
Popular categories
Looking for a yarn?


|
|||||||||||||
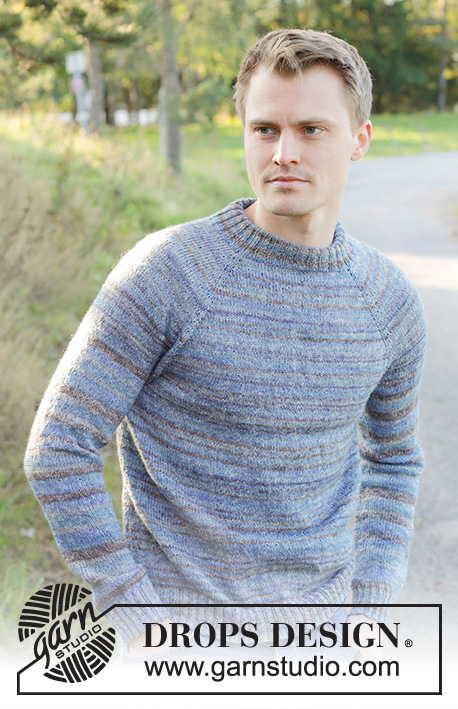
City Ranger |
|||||||||||||
 |
 |
||||||||||||
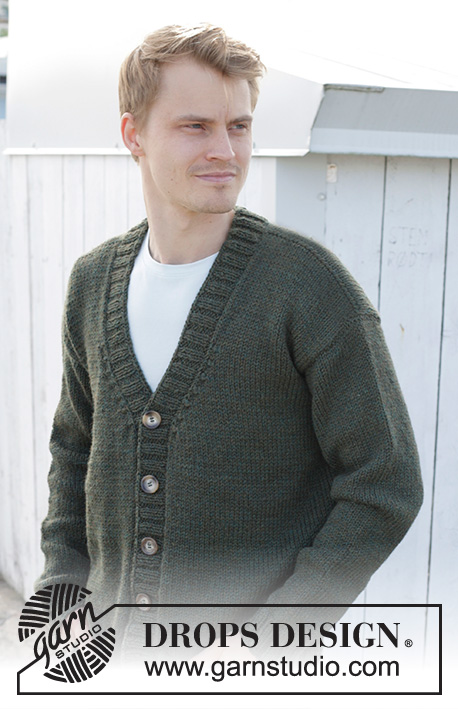
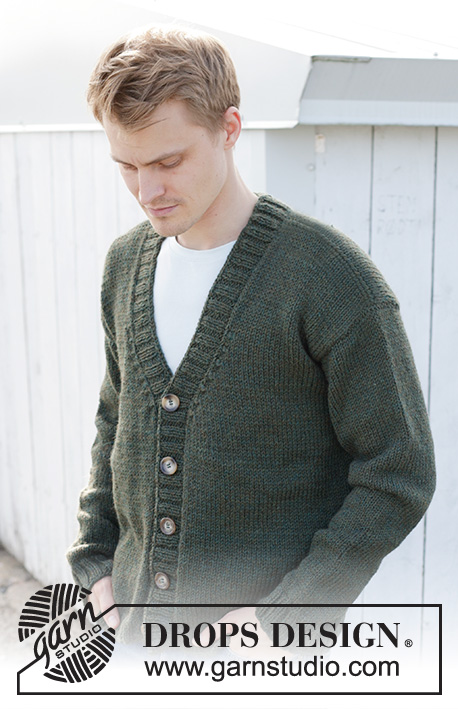
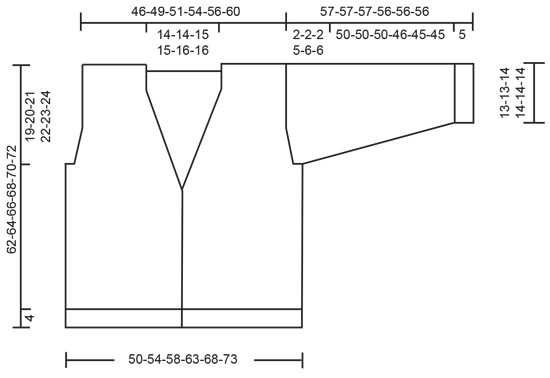
Knitted jacket for men in DROPS Nepal. The piece is worked bottom up with V-neck. Sizes S - XXXL.
DROPS 246-7 |
|||||||||||||
|
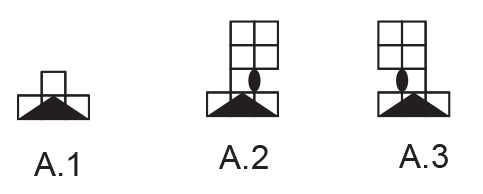
------------------------------------------------------- EXPLANATIONS FOR THE PATTERN: ------------------------------------------------------- GARTER STITCH (worked back and forth): Knit all rows. 1 ridge = knit 2 rows. PATTERN: See diagrams A.1 to A.3. The diagrams show all rows in the pattern from the right side. DECREASE TIP (for V-neck and armholes): All decreases are worked from the right side! DECREASE 2 STITCHES AT BEGINNING OF ROW: Work 1 edge stitch in garter stitch, knit 1, work A.1 over the next 3 stitches. DECREASE 2 STITCHES AT END OF ROW: Work until there are 5 stitches left on the row, work A.1 over the next 3 stitches, knit 1 and 1 edge stitch in garter stitch. DECREASE 1 STITCH AT BEGINNING OF ROW: Work 1 edge stitch in garter stitch, knit 1, A.2 over the next 3 stitches. DECREASE 1 STITCH AT END OF ROW: Work until there are 5 stitches left on the row, work A.3 over the next 3 stitches, knit 1 and 1 edge stitch in garter stitch. INCREASE TIP (for sleeves): Knit to 1 stitch past the marker-thread, make 1 yarn over, knit to 1 stitch before the marker-thread, make 1 yarn over. On the next round knit the yarn overs twisted, then work the new stitches in stocking stitch. BUTTONHOLES: Work 5 buttonholes on the right band. 1 buttonhole = knit 2 together and make 1 yarn over – NOTE: It is neatest, when working the buttonholes, to purl 2 together in each purled section (seen from the right side). Knit the yarn over on the next row to leave a hole. The bottom buttonhole is worked 5 cm from the bottom edge and the top buttonhole 25-27-29-30-31-32 cm below the shoulder. The other 3 buttonholes are worked evenly between these two. ------------------------------------------------------- START THE PIECE HERE: ------------------------------------------------------- JACKET – SHORT OVERVIEW OF THE PIECE: The body is worked back and forth with circular needle, bottom up as far as the armholes, divided and then the front and back pieces are finished separately back and forth with circular needle. The sleeves are worked in the round with double pointed needles/short circular needle, bottom up as far as the sleeve cap, which is then finished back and forth with circular needle. The neck/bands are worked to finish. BODY: Cast on 192-208-224-240-264-280 stitches with circular needle size 4 mm and DROPS Nepal. Purl 1 row from the wrong side. Then work as follows from the right side: 1 GARTER STITCH – read description above, * purl 2, knit 2 *, work from *-* until there are 3 stitches left, purl 2 and 1 garter stitch. Continue this rib back and forth for 4 cm. Knit 1 row from the right side and decrease 30-34-38-38-46-46 stitches evenly spread = 162-174-186-202-218-234 stitches. Change to circular needle size 5.5 mm. Insert 1 marker-thread 41-44-47-51-55-59 stitches in from each side (= 80-86-92-100-108-116 stitches on the back piece between the markers). Allow the threads to follow your work onwards; they mark the sides and are used when working the armholes. Work stocking stitch with 1 garter stitch on each side. REMEMBER THE KNITTING TENSION! OVERVIEW OF THE NEXT SECTION: When the piece measures 38-38-38-39-40-41 cm, start to decrease for the V-neck. AT THE SAME TIME, cast off for the armholes and finish each section separately. Read V-NECK and ARMHOLES before continuing. V-NECK: When the piece measures 38-38-38-39-40-41 cm, decrease for the neck on the next row from the right side – read DECREASE TIP. Decrease 2 stitches on each side every 4th row 4 times in all sizes. Then decrease 1 stitch on each side every 4th row 3-3-4-4-5-5 times. ARMHOLES: AT THE SAME TIME, when the piece measures 43-44-45-46-47-48 cm, cast off for the armholes on the next row from the right side as follows: Work until there are 2-3-4-4-4-5 stitches left before the first marker-thread, cast off 4-6-8-8-8-10 stitches, work until there are 2-3-4-4-4-5 stitches left before the second marker-thread, cast off 4-6-8-8-8-10 stitches and work to end of row. Finish the front and back pieces separately. LEFT FRONT PIECE: Start from the wrong side and work stocking stitch, with 1 garter stitch on each side, and continue to decrease for the V-neck. In addition, work the armhole as follows: ARMHOLES: At the beginning of the next row from the right side decrease 1-1-1-2-2-2 stitches, then decrease 1 stitch every 4th row 0-0-0-1-3-3 times – remember DECREASE TIP. After all the decreases for the neck and armhole there are 27-29-30-32-33-36 stitches on the shoulder. Continue with stocking stitch and 1 garter stitch on each side until the piece measures 62-64-66-68-70-72 cm. Cast off. RIGHT FRONT PIECE: Start from the wrong side and work stocking stitch, with 1 garter stitch on each side, and continue to decrease for the V-neck. In addition, work the armhole as follows: ARMHOLE: At the end of the next row from the right side decrease 1-1-1-2-2-2 stitches, then decrease 1 stitch every 4th row 0-0-0-1-3-3 times – remember DECREASE TIP. After all the decreases for the neck and armhole there are 27-29-30-32-33-36 stitches on the shoulder. Continue with stocking stitch and 1 garter stitch on each side until the piece measures 62-64-66-68-70-72 cm. Cast off. BACK PIECE: = 76-80-84-92-100-106 stitches. Start from the wrong side and work stocking stitch, with 1 garter stitch on each side, and work the armholes as follows: On the next row from the right side, decrease 1-1-1-2-2-2 stitch on each side, then 1 stitch on each side every 4th row, 0-0-0-1-3-3 times – remember DECREASE TIP = 74-78-82-86-90-96 stitches. When the piece measures 59-61-63-65-67-69 cm, cast off the middle 18-18-20-20-22-22 stitches for the neckline (28-30-31-33-34-37 stitches on each shoulder). Finish each shoulder separately. On the next row from the neck cast off 1 stitch by the neck = 27-29-30-32-33-36 stitches. Cast off when the piece measures 62-64-66-68-70-72 cm. Work the other shoulder in the same way. SLEEVES: Cast on 48-48-52-52-56-56 stitches with double pointed needles size 4 mm and DROPS Nepal. Knit 1 round. Then work rib in the round (knit 2, purl 2) for 5 cm. Knit 1 round and decrease 8-6-8-8-10-10 stitches evenly spaced = 40-42-44-44-46-46 stitches. Insert 1 marker-thread at the beginning of the round (mid-under sleeve). Allow the thread to follow your work onwards – it is used when increasing under the sleeve. Change to double pointed needles size 5.5 mm and work stocking stitch. When the sleeve measures 12-12-9-11-9-12 cm, increase 1 stitch on each side of the marker-thread – read INCREASE TIP. Increase like this every 4½-4-4-3-3-2½ cm a total of 10-11-12-13-14-15 times = 60-64-68-70-74-76 stitches. When the sleeve measures 55-55-55-51-50-50 cm, work as follows: Start 2-3-4-4-4-5 stitches before the marker-thread, cast off 4-6-8-8-8-10 stitches and work to the end of the round = 56-58-60-62-66-66 stitches. Start from the wrong side and work the sleeve cap back and forth. Cast off stitches at the beginning of each row as follows: Cast off 9-9-10-5-4-4 stitches 2-2-2-5-6-6 times on each side = 20-22-20-12-18-18 stitches. Cast off. The sleeve measures approx.57-57-57-56-56-56 cm. Work the other sleeve in the same way. ASSEMBLY: Sew the shoulder seams inside the cast-off edge. Sew in the sleeves inside the 1 edge stitch on the armholes. BANDS/NECK: Insert 1 marker, in the middle of the back piece. The bands/neck are knitted up inside 1 edge stitch. Start from the right side at the bottom of the right front piece and knit up 131-135-139-143-149-153 stitches up the front piece to the marker mid-back, with circular needle size 4 mm – leave the marker in place. Knit up 131-135-139-143-149-153 stitches down the left front pieces = a total of 262-270-278-286-298-306 stitches (should be divisible by 4 + 2. It is important that the bands are neither too tight nor too loose. Work as follows from the wrong side: 2 garter stitches, * purl 2, knit 2 *, work from *-* until there are 4 stitches left, purl 2 and 2 garter stitches. Continue this rib for 2 cm. Now work the BUTTONHOLES on the right band – read description above. Continue working until the rib measures 4 cm. Cast off a little loosely. Sew the buttons onto the left band. |
|||||||||||||
Diagram explanations |
|||||||||||||
|
|||||||||||||
|
|||||||||||||
|
|||||||||||||
|
|||||||||||||
|
Have you made this or any other of our designs? Tag your pictures in social media with #dropsdesign so we can see them! Do you need help with this pattern?You'll find tutorial videos, a Comments/Questions area and more by visiting the pattern on garnstudio.com. © 1982-2024 DROPS Design A/S. We reserve all rights. This document, including all its sub-sections, has copyrights. Read more about what you can do with our patterns at the bottom of each pattern on our site. |
|||||||||||||


With over 40 years in knitting and crochet design, DROPS Design offers one of the most extensive collections of free patterns on the internet - translated to 17 languages. As of today we count 304 catalogues and 11422 patterns - 11422 of which are translated into English (UK/cm).
We work hard to bring you the best knitting and crochet have to offer, inspiration and advice as well as great quality yarns at incredible prices! Would you like to use our patterns for other than personal use? You can read what you are allowed to do in the Copyright text at the bottom of all our patterns. Happy crafting!
Comments / Questions (6)
Guten Tag, ich habe eine Frage zum Stricken der Blende des V-Ausschnitt es. Wie bekomme ich eine schöne Rundung hin am Knick von den geraden Stücken (Knopflöcher und Knöpfe) der Vorderteile zum Beginn des V-Ausschnittes? Bei mir gibt es immer eine *Delle". Vielen Dank für Ihre Hilfe!!! Und herzliche Grüße vom Bodensee Elke
11.02.2024 - 22:16DROPS Design answered:
Liebe Elke, meinen Sie, dass sich die Blende am Übergang zum V-Ausschnitt etwas wellt? Dann sind an dieser Stelle möglicherweise zu viele Maschen vorhanden, vielleicht versuchen Sie, an diesem "Knick" etwas weniger Maschen aufzufassen. Sollte sich das Problem dadurch verschlimmern, müssen Sie mehr Maschen auffassen - vielleicht liegt die "Delle" auch daran, dass es zu wenige Maschen sind - das lässt sich leider per "Ferndiagnose" schlecht sagen... Gutes Gelingen weiterhin!
12.02.2024 - 19:20é corrett CORPO: ... Continuare queste coste in piano per 4 cm. Lavorare 1 ferro diritto dal diritto del lavoro e diminuire 30 ?
09.01.2024 - 11:52DROPS Design answered:
Buonasera Mirna, si, il numero di maglie da diminuire è corretto. Buon lavoro!
09.01.2024 - 16:20Buongiorno dopo aver lavorato la costa del cardigan viene indicato nelle spiegazioni di chiudere 30 punti (per la taglia S) e non capisco come mai? in pratica dopo la costa si riduce da 192 a 162 punti mi sembra strano ! grazie per il vostro aiuto complimenti per i vostri magnifici modelli un caro saluto Mina Bello Mina
09.01.2024 - 11:50DROPS Design answered:
Buongiorno Mirna, il bordo a coste tende a "tirare" il lavoro, per cui si avvia un numero di maglie maggiore per non aver un bordo contratto, e poi vengono diminuite alla fine del bordo. Buon lavoro!
09.01.2024 - 16:19I’m struggling to understand instruction for decrease at front edge. A1 is purl 3 together making 2 stitches less , then pattern says decrease 1 stitch by using A2 at beginning of row and A3 at end of row but this shows make a stitch in between 2 stitches which surly increases by one stitch at the begging and end of row not decrease. I’m confused
08.01.2024 - 19:16DROPS Design answered:
Dear Maureen, you first decrease 3 sts as shown in A.1, but then you will decrease only 1 stitch working 3 sts together as in A.1 but on the next row, make 1 yarn over to compensate one of the decreases, so that you decrease only 1 stitch but continue same pattern all the way. Happy knitting!
09.01.2024 - 07:36Dette er en herrejakke. Knapperne sidder til højre og knaphuller skal derfor laves i venstre forkant.
01.11.2023 - 12:23Mitkä ovat esim. miesten XL koon cm-mitat?
30.10.2023 - 19:18DROPS Design answered:
Löydät kaikki mitat ohjeen tekstin alapuolella olevasta mittapiirroksesta.
31.10.2023 - 16:49