DROPS Air
DROPS Air
65% Alpaca, 28% Polyamide, 7% Wool
from 4.80 £ /50g
DROPS Kid-Silk
DROPS Kid-Silk
75% Mohair, 25% Silk
from 4.60 £ /25g
Get the yarn to make this pattern from 65.60£.

The yarn cost is calculated from the pattern’s smallest size and the yarn’s cheapest product type. Looking for an even better price? You might find it on the DROPS Deals!

DROPS SS24

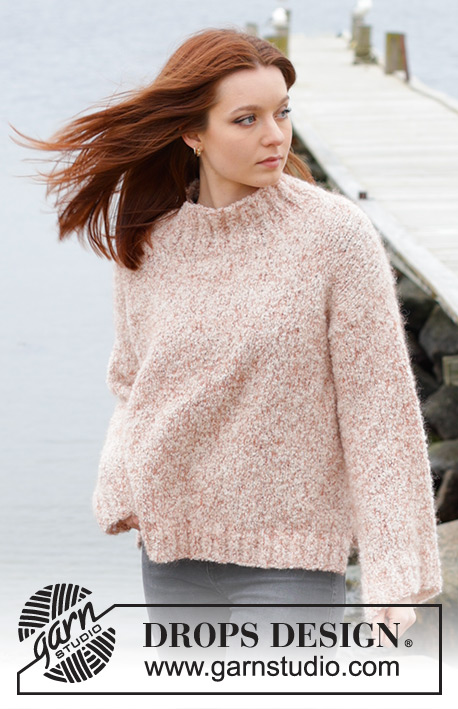
Dandelion Wish Sweater

Knitted oversized jumper in 1 strand DROPS Air and 2 strands DROPS Kid-Silk. The piece is worked bottom up, with moss stitch and high neck. Sizes XS - XXL.

DROPS 243-16
DROPS Design: Pattern ai-460
Yarn group C + A + A or E
-------------------------------------------------------

SIZES:
XS - S - M - L - XL - XXL

YARN:
DROPS AIR from Garnstudio (belongs to yarn group C)
300-300-350-400-400-450 g colour 33, pink sand
And use:
DROPS KID-SILK from Garnstudio (belongs to yarn group A)
200-225-250-275-300-325 g colour 40, pink pearl

NEEDLES:
DROPS CIRCULAR NEEDLE SIZE 8 MM: Length 40 cm and 80 cm.
DROPS CIRCULAR NEEDLE SIZE 6 MM: Length 40 cm and 80 cm.

KNITTING TENSION:
11 stitches in width and 19 rows in height with moss stitch (A.1), 1 strand DROPS Air and 2 strands DROPS Kid-Silk = 10 x 10 cm.
NOTE: Needle size is only a guide. If you get too many stitches on 10 cm, change to a larger needle size. If you get too few stitches on 10 cm, change to a smaller needle size.

-------------------------------------------------------

Alternative Yarn – See how to change yarns here
Yarn Groups A to F – Use the same pattern and change the yarn here
Yarn usage using an alternative yarn – Use our yarn converter here

-------------------------------------------------------

DROPS Air
DROPS Air
65% Alpaca, 28% Polyamide, 7% Wool
from 4.80 £ /50g
DROPS Kid-Silk
DROPS Kid-Silk
75% Mohair, 25% Silk
from 4.60 £ /25g
Get the yarn to make this pattern from 65.60£.

The yarn cost is calculated from the pattern’s smallest size and the yarn’s cheapest product type. Looking for an even better price? You might find it on the DROPS Deals!

Pattern instructions

NOTE: This pattern is written in British English. All measurements in charts are in cm. For conversion from cm to inches - click here. There are different terms for crocheting in British and American English. If this pattern includes crochet, click for "crochet terms" here. For this pattern in American English, please click here.
-------------------------------------------------------

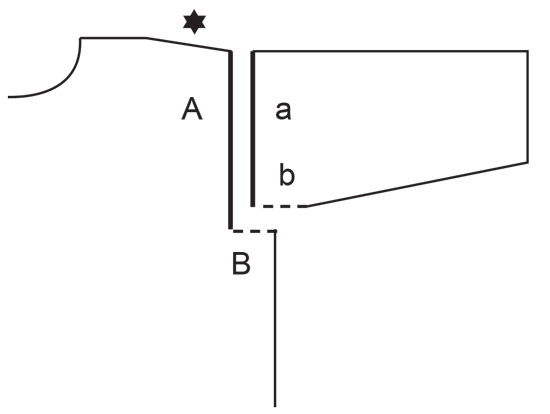
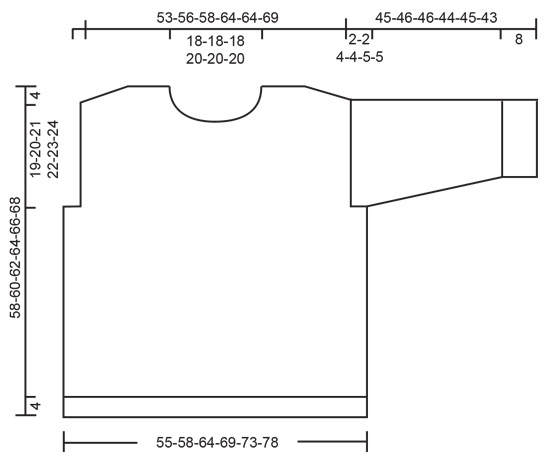
EXPLANATIONS FOR THE PATTERN:
-------------------------------------------------------

EDGE STITCHES:
1 edge stitch on each side of the piece, which is knitted both from the right and wrong side (garter stitch).

PATTERN:
See diagram A.1. The diagram shows all rows in the pattern from the right side.

INCREASE TIP:
Increase inside the 1 edge stitch in garter stitch by making 1 yarn over which is then worked twisted on the next row to avoid a hole. The new stitches are worked into A.1.

-------------------------------------------------------

START THE PIECE HERE:

-------------------------------------------------------

JUMPER - SHORT OVERVIEW OF THE PIECE:
The piece is worked in sections, back and forth with circular needle, and sewn together. The neck is worked in the round to finish.

BACK PIECE:
Cast on 74-78-86-92-96-104 stitches with circular needle size 6 mm, 1 strand DROPS Air and 2 strands DROPS Kid-Silk (3 strands). Purl 1 row from the wrong side.
Work the next row as follows from the right side: 1 EDGE STITCH – read description above, * knit 1, purl 1 *, work from *-* until there is 1 stitch left, work 1 edge stitch. Continue this rib back and forth for 4 cm. Knit 1 row from the right side and decrease 12-12-14-14-14-16 stitches evenly spaced = 62-66-72-78-82-88 stitches.
Change to circular needle size 8 mm.
Work as follows from the wrong side: 1 edge stitch, work A.1 until there is 1 stitch left, 1 edge stitch. Continue this pattern. REMEMBER THE KNITTING TENSION!
When the piece measures 35-36-37-38-39-40 cm, cast off 2-2-4-4-6-6 stitches at the beginning of the next 2 rows for the armholes = 58-62-64-70-70-76 stitches. Continue the pattern with 1 edge stitch on each side until the piece measures 54-56-58-60-62-64 cm. Insert 1 marker in the middle of the row.

OVERVIEW OF THE NEXT SECTION:
Now you cast off for the neckline at the same time as stitches are placed on threads for the diagonal shoulders. Read the next 2 paragraphs before continuing.

NECKLINE:
Cast off the middle 16-16-16-18-18-18 stitches (8-8-8-9-9-9 stitches on each side of the marker) and finish each shoulder separately.
Continue A.1. Cast off 2 stitches on the next row from the neck and place stitches on a thread as described below.

DIAGONAL SHOULDER:
Place stitches on a thread at the beginning of each row from the side (to avoid having to cut the strand, work the stitches first): Place 6-6-6-7-7-8 stitches 2 times, then 7-9-10-10-10-11 stitches 1 time = 19-21-22-24-24-27 stitches on the thread
Place the stitches back on circular needle size 8 mm and work 1 row in stocking stitch (to avoid holes in the transitions between the stitches, pick up the loop before the next stitch, place it twisted on the left needle and knit it together with the next stitch) then cast off
Work the other shoulder in the same way. The piece measures approx. 58-60-62-64-66-68 cm, measured from the top of the shoulder by the neck.

FRONT PIECE:
Cast on and work in the same way as the back piece until the front measures 50-52-54-55-57-59 cm.
Now the neckline is worked and stitches are placed on threads for the diagonal shoulders. Read the next 2 paragraphs before continuing.

NECKLINE:
Place the middle 8-8-8-10-10-10 stitches on a thread and finish each shoulder separately.
Continue A.1 and cast off at the beginning of each row from the neck as follows: 2 stitches 1 time and 1 stitch 4 times.

AT THE SAME TIME when the piece measures 54-56-58-60-62-64 cm, place stitches on a thread for the shoulder in the same way as on the back piece = 19-21-22-24-24-27 stitches on the thread. Work 1 row in stocking stitch in the same way as on the back piece then cast off. Work the other shoulder in the same way. The piece measures approx. 58-60-62-64-66-68 cm, measured from the top of the shoulder by the neck.

SLEEVES:
Cast on 46-46-48-50-52-52 stitches with circular needle size 6 mm and 1 strand DROPS Air and 2 strands DROPS Kid-Silk (3 strands). Purl 1 row from the wrong side.
Work the next row as follows from the right side: 1 edge stitch, * knit 1, purl 1 *, work from *-* until there is 1 stitch left, 1 edge stitch.
Continue this rib back and forth for 8 cm. Knit 1 row from the right side and decrease 10-10-10-12-12-12 stitches evenly spaced = 36-36-38-38-40-40 stitches.
Change to circular needle size 8 mm.
Work as follows from the wrong side: 1 edge stitch, work A.1 until there is 1 stitch left, 1 edge stitch. Continue this pattern. When the sleeve measures 10 cm, increase 1 stitch on each side – read INCREASE TIP. Increase like this every 10-8-7-5½-5½-4 cm a total of 4-5-5-6-6-7 times on each side = 44-46-48-50-52-54 stitches.
When the sleeve measures 43-44-42-40-40-38 cm, insert 1 marker in each side.
Work until the sleeve measures 45-46-46-44-45-43 cm. Cast off.
Work the other sleeve in the same way.

ASSEMBLY:
Sew the shoulder seams inside the cast-off edge.
Sew the side seams inside the 1 edge stitch.
Sew the sleeve seams inside the 1 edge stitch – start at the bottom and work as far as the markers = a split of 2-2-4-4-5-5 cm at the top.
Sew the sleeve cap to the armhole inside 1 edge stitch. Sew the split to the bottom of the armhole – see sketch.

HIGH NECK:
Start on one shoulder seam and knit up 68 to 80 stitches around the neck (including the stitches on the thread in front) with short circular needle size 6 mm, 1 strand DROPS Air and 2 strands DROPS Kid-Silk (3 strands).
Work rib in the round (knit 1, purl 2) – adjusting the rib to get purl over knit and knit over purl over the stitches on mid-front.
When the neck measures 11-11-12-12-13-13 cm, cast off a little loosely with rib or Italian cast off.
If you want a double neck, fold the neck to the inside and fasten with a couple of stitches on each shoulder.

Diagram

symbols = knit from right side, purl from wrong side
symbols = purl from right side, knit from wrong side
symbols = Sew A to a and b to B
diagram
diagram
diagram

Each of our patterns has specific tutorial videos to help you.

Do you have a question? See a list of frequently asked questions (FAQ)

Knitting tension is what determines the final measurements of your work, and is usually measured per 10 x 10 cm. It is provided like so: number of stitches in width x number of rows in height - eg: 19 stitches x 26 rows = 10 x 10 cm.

The knitting tension is very individual; some people knit/crochet loosely while others work tightly. You adjust the knitting tension with the needle size, which is why the suggested needle size is only meant as a guide! You need to adjust this (up or down) to ensure that YOUR knitting tension matches the knitting tension provided in the pattern. If you work with a different knitting tension than provided you will have a different yarn consumption, and your work will have different measurements than what the pattern suggests.

The knitting tension also determines which yarns can replace each other. As long as you achieve the same knitting tension you can replace one yarn with another.

See DROPS lesson: How to measure your tension/gauge

See DROPS video: How to make a gauge tension swatch

The required amount of yarn is provided in grams, eg: 450 g. To calculate how many balls you’ll need you first need to know how many grams are in 1 ball (25g, 50g or 100g). This information is available if you click on the individual yarn quality on our pages. Divide the amount required with the amount of each ball. For example, if each ball is 50g (the most common amount), the calculation will be as follows: 450 / 50 = 9 balls.

The important thing when changing from one yarn to another is that the knitting/crochet tension remains the same. This is so that the measurements of the finished piece will be the same as on the sketch provided. It is easier to achieve the same knitting tension using yarns from the same yarn group. It is also possible to work with multiple strands of a thinner yarn to achieve the knitting tension of a thicker one. Please try our yarn converter. We recommend you to always work a test swatch.

Please NOTE: when changing yarn the garment might have a different look and feel to the garment in the photo, due to individual properties and qualities of each yarn.

See DROPS lesson: Can I use a different yarn than the one mentioned in the pattern?

All our yarns are categorised into yarn groups (from A to F) according to thickness and knitting tension – group A contains the thinnest yarns and group F the thickest. This makes it easier for you to find alternative yarns to our patterns, should you wish to switch yarn. All yarns within the same group have a similar knitting tension and can easily replace each other. However, different yarn qualities have different structures and properties which will give the finished work a unique look and feel.

Click here for an overview of the yarns in each yarn group

At the top of all our patterns you’ll find a link to our yarn calculator, which is a helpful tool should you wish to use a different yarn than suggested. By filling in the yarn quality you wish to replace, the amount (in your size) and number of strands, the calculator will present good alternative yarns with the same knitting tension. Additionally it will tell you how much you’ll require in the new qualities and whether you’ll need to work with multiple strands. Most skeins are 50g (some are 25g or 100g).

If the pattern is worked with multiple colours, every colour will have to be calculated separately. Similarly, if the pattern is worked with several strands of different yarns (for example 1 strand Alpaca and 1 strand Kid-Silk) you will have to find alternatives for each, individually.

Click here to see our yarn calculator

Since different yarns have different qualities and textures we have chosen to keep the original yarn in our patterns. However, you can easily find options among our available qualities by using our yarn calculator, or simply pick a yarn from the same yarn group.

It is possible that some retailers still have discontinued yarns in stock, or that someone has a few skeins at home that they would like to find patterns for.

The yarn calculator will provide both alternative yarn as well as required amount in the new quality.

If you think it's hard to decide what size to make, it can be a good idea to measure a garment you own already and like the size of. Then you can pick the size by comparing those measures with the ones available in the pattern's size chart.

You'll find the size chart at the bottom of the pattern.

See DROPS lesson: How to read size chart

The needle size provided in the pattern serves only as a guide, the important thing is to follow the knitting tension. And since knitting tension is very individual, you will have to adjust the needle size to ensure that YOUR tension is the same as in the pattern – maybe you’ll have to adjust 1, or even 2 needle sizes, up or down to achieve the correct tension. For this, we recommend that you work test swatches.

Should you work with a different knitting tension than the one provided, the measurements of the finished garment might deviate from the measurement sketch.

See DROPS lesson: How to measure your tension/gauge

See DROPS video: How to make a tension/gauge swatch

Working a garment top-down provides more flexibility and room for personal adjustment. For example it is easier to try the garment on while working, as well as making adjustments to length of yoke and shoulder caps.

The instructions are carefully explaining every step, in the correct order. Diagrams are adjusted to the knitting direction and are worked as usual.

The diagram depicts all rows/rounds, and every stitch seen from the right side. It is read from bottom to top, from right to left. 1 square = 1 stitch.

When working back and forth, every other row is worked from the right side and every other row is worked from the wrong side. When working from the wrong side, the diagram will have to be worked reversed: from left to right, knit stitches are purled, purl stitches are knit etc.

When working in the round every round is worked from the right side and the diagram are worked from right to left on all rounds.

See DROPS lesson: How to read knitting diagrams

The diagram depicts all rows/rounds, and every stitch seen from the right side. It is worked from bottom to top, from right to left.

When working back and forth every other row is worked from the right side: from right to left and every other row is worked from the wrong side: from left to right.

When working in the round, every row in the diagram are worked from the right side, from right to left.

When working a circular diagram you start in the middle and work your way outwards, counter clockwise, row by row.

The rows usually start with a given number of chain stitches (equivalent to the height of the following stitch), this will either be depicted in the diagram or explained in the pattern.

See DROPS lesson: How to read crochet diagrams

Instructions for working several diagrams after each other on the same row/round, will often be written like so: “work A.1, A.2, A.3 a total of 0-0-2-3-4 times". This means you work A.1 once, then A.2 is worked once, and A.3 is repeated (in width) the number of times provided for your size – in this case like so: S = 0 times, M = 0 times, L=2 times, XL= 3 times and XXL = 4 times.

The diagrams are worked as usual: begin with the first row in A.1, then work the first row in A.2 etc.

See DROPS lesson: How to read knitting diagrams

See DROPS lesson: How to read crochet diagrams

The total width of the garment (from wrist-to-wrist) will be larger in the larger sizes, despite the actual sleeves being shorter. The larger sizes have longer sleeve caps and wider shoulders, so there will be a good fit in all sizes.

The measurement sketch/schematic drawing provides information regarding the full length of the garment. If it’s a jumper or a jacket the length is measured from the highest point on the shoulder closest to the neckline, and straight down to the bottom of the garment. It is NOT measured from the tip of shoulder. Similarly, the length of yoke is measured from the highest point on the shoulder and down to where yoke is split into body and sleeves.

On a jacket measures are never taken along bands, unless specifically stated. Always measure inside band stitches when measuring the length.

See DROPS lesson: How to read a schematic drawing

Diagrams are often repeated on the round or in height. 1 repeat is the diagram the way it appears in the pattern. If it says to work 5 repeats of A.1 in the round, then you work A.1 a total of 5 times after/next to each other in the round. If it says to work 2 repeats of A.1 vertically/in height you work the entire diagram once, then begin again at the start and work the entire diagram one more time.

Chain stitches are slightly narrower than other stitches and to avoid working the cast-on edge too tight, we simply chain more stitches to begin with. The stitch count will be adjusted on the following row to fit the pattern and measurement sketch.

The rib edge is more elastic and will contract slightly compared to, for example, stocking stitch. By increasing before the rib edge, you avoid a visible difference in width between the rib edge and the rest of the body.

It’s very easy to cast off too tightly, and by making yarn overs while casting off (and simultaneously casting these off) you avoid a too tight cast off edge.

See DROPS video: How to bind off with yarn overs (yo)

To achieve an even increase (or decrease) you can increase on, for example: every 3rd and 4th row alternately, like so: work 2 rows and increase on the 3rd row, work 3 rows and increase on the 4th. Repeat this until the increase is complete.

See DROPS lesson: Increase or decrease 1 st on every 3rd and 4th row alternately

Should you prefer to work in the round instead of back and forth, you may of course adjust the pattern. You’ll need to add steeks mid-front (usually 5 stitches), and follow the instructions. When you would normally turn and work from the wrong side, simply work across the steek and continue in the round. At the end you’ll cut the piece open, pick up stitches to work bands, and cover the cut edges.

See DROPS video: How to knit steeks and cut open

Should you prefer to work back and forth instead of in the round, you may of course adjust the pattern so you work the pieces separately and then assemble them at the end. Divide the stitches for the body in 2, add 1 edge stitch in each side (for sewing) and work the front and back pieces separately.

See DROPS lesson: Can I adapt a pattern for circular needles into straight needles?

Pattern repeats can vary slightly in the different sizes, in order to get the correct proportions. If you’re not working the exact same size as the garment in the photo, yours might deviate slightly. This has been carefully developed and adjusted so that the complete impression of the garment is the same in all sizes.

Make sure to follow instructions and diagrams for your size!

If you have found a pattern you like which is available in women’s size it’s not very difficult to convert it to men’s size. The biggest difference will be the length of sleeves and body. Start working on the women size that you think would fit across the chest. The additional length will be worked right before you cast off for the armhole/sleeve cap. If the pattern is worked top-down you can add the length right after the armhole or before the first decrease on sleeve.

Regarding additional yarn amount, this will depend on how much length you add, but it is better with a skein too many than too few.

All yarns will have excess fibres (from production) that might come off as lint or shedding. Brushed yarns (ie hairier yarns) have more of these loose, excess fibres, causing more shedding.

Shedding also depends on what is worn under or over the garment, and whether this pulls at the yarn fibres. It’s therefore not possible to guarantee that there will be no shedding

Below are some tips on how to get the best result when working with hairier yarns:

1. When the garment is finished (before you wash it) shake it vigorously so the looser hairs come off. NOTE: do NOT use a lint roller, brush or any method that pulls at the yarn.

2. Place the garment in a plastic bag and put it in your freezer - the temperature will cause the fibres to become less attached to each other, and excess fibres will come off easier.

3. Leave in the freezer for a few hours before taking it out and shaking it again.

4. Wash the garment according to the instructions on the yarn label.

Pilling is a natural process that happens to even the most exclusive of fibers. It's a natural sign of wear and tear that is hard to avoid, and that is most visible in high friction areas of your garment like a sweater's arms and cuffs.

You can make your garment look as new by removing the pilling, using a fabric comb or a pill/lint remover.

Still can't find the answer you need? Then scroll down and leave your question so one of our experts can try to help you. This will be done normally within 5 to 10 working days.
In the meantime, you can read the questions and answers that others have left to this pattern or join the DROPS Workshop on Facebook to get help from fellow knitters/crocheters!

You might also like...

Post a comment to pattern DROPS 243-16

We would love to hear what you have to say about this pattern!

If you want to leave a question, please make sure you select the correct category in the form below, to speed up the answering process. Required fields are marked *.

Comments / Questions (13)

country flag Lene Knudsen wrote:

Venligst oplys størrelsesmål i centimeter, da jeres størrelsesangivelse i XS-XXL er meget upræcis. På forhånd tak.

14.04.2024 - 13:32

DROPS Design answered:

Hei Lena. Men om du ser på hele oppskriften og da spesielt på målskissen (nederst på oppskriften) vil du finne alle cm mål i alle størrelser plagget er skrevet i. mvh DROPS Design

15.04.2024 - 14:20

country flag Stefanie Raase wrote:

Wie ist das mit dem Halsausschnitt und der Schulterschrägung gemeint: Ich lege zuerst 6 Maschen still, stricke dann normal weiter bis ich zum Halsauschnitt gekommen bin. Kette den Halsauschnitt ab, stricke wieder normal bis zum Ende weiter. Wende die Arbeit, lege wieder 6 Maschen für die andere Schulterseite still und dann wieder wenden und die nächsten 6 Maschen stilllegen?

20.03.2024 - 15:19

DROPS Design answered:

Liebe Frau Raase, ja genau, die Maschen am Anfang der Reihe vom Armauschnitt werden zuerst gestrickt, dann stillgelegt, Reihe wird bis zur Ende gestrickt, nach Wenden wird die nächste Reihe wie zuvor gestrickt, und diese 2 Reihen bis alle Maschen stillgelegt sind. Viel Spaß beim STricken!

20.03.2024 - 15:39

country flag Philippa Miller wrote:

I really like the dandelion wish jumper but would prefer using one strand of wool. Which wools would you recommend? With thanks Philippa

01.02.2024 - 10:43

DROPS Design answered:

Dear Mrs Miller, you can then use 1 strand yarn group E, read more here. Happy knitting!

01.02.2024 - 15:44

country flag Steffi wrote:

Beim Ärmel steht: Bei einer Länge von 10 cm je 1 Masche beidseitig zunehmend. Bezieht sich die 10 cm aus der gestrickten Gesamtlänge (also mit Bündchen Rippenmustee) oder auf das Perlmuster A1? Was bedeutet beidseitig? Hinrunde und Rückrunde zunehmen oder je eine linke Masche und eine rechte Masche?

25.01.2024 - 00:19

DROPS Design answered:

Liebe Steffi, messen Sie diese 10 cm ab der Anschlagskante, dh mit Bündchen. Beidseitig zunehmen bedeutet: 1 Masche am Anfang + 1 Masche am Ende der Reihe zunehmen (2 Zunahmen bei jeder Zunahmenreihe) - siehe ZUNAHMETIPP: am Anfang der Anleitung. Viel Spaß beim stricken!

25.01.2024 - 09:21

country flag Eliane wrote:

Pourquoi je ne peux plus accéder à mes favoris il me dise adressé mail invalide

07.11.2023 - 14:44

DROPS Design answered:

Bonjour Eliane, avez-vous vérifié qu'il n'y avait pas de faute de frappe dans l'adresse mail tapée? Ou bien peut-être que vous n'aviez pas utilisé cette adresse depuis longtemps?

08.11.2023 - 08:06

country flag FIEYRE Sylvette wrote:

Sujet : quantité de laine nécessaire pour le modèle DROP 243-16 en changeant 1 laine. Pour ce modèle, il est conseillé 450gr DROPS AIR (XXL) + 325 gr KID SILK . Si je préfère utiliser FLORA à la place de AIR, la quantité de laine requise sera un peu moins importante ? Merci de me confirmer la quantité de FLORA nécessaire. Merci d'avance!

05.10.2023 - 12:00

DROPS Design answered:

Bonjour Mme Fieyre, vous pouvez utiliser 2 fils Flora pour remplacer 1 fil DROPS Air, utilisez notre convertisseur pour avoir la quantité requise correspondant à votre taille et tricotez ainsi avec 2 fils Flora + 2 fils Kid-Silk. Bon tricot!

06.10.2023 - 08:41

country flag Barbara wrote:

Buongiorno. Io non uso i ferri circolari ma quelli lineari. È possibile seguire le vostre istruzioni per i maglioni con i ferri lineari? Grazie.

14.09.2023 - 16:34

DROPS Design answered:

Buonasera Barbara, alcuni modelli sono lavorati in piano con i ferri circolari, per cui può usare anche i ferri normali. Questo modello ad esempio è lavorato in parti separate in piano fino al collo, che viene lavorato in tondo. Buon lavoro!

14.09.2023 - 20:08

country flag Claudia wrote:

Hallo So wie ich lese kann man diesen Pullover auch mit Wolle der Garngruppe E stricken..Beispiel Andes oder Snow Liebe Grüße Claudia

12.09.2023 - 09:58

DROPS Design answered:

Liebe Claudia, benutzen Sie den Garnumrechner, und wählen Sie "Air", dann das Gewicht z.B. 300 g und "2 Fäden" (da 1 Faden C = 2 Fäden A), so bekommen Sie die neue Garnmenge mit 1 Faden der Garngruppe E (und andere Alternative). Viel Spaß beim stricken!

13.09.2023 - 08:18

country flag Iris wrote:

Sieht sehr gemütlich aus

06.08.2023 - 14:14

country flag Blumstein wrote:

Serait il possible d'avoir les explications de ce modèle svp merci

06.08.2023 - 10:47