
Popular categories
Looking for a yarn?


|
||||||||||||||||||||||||||||||||||
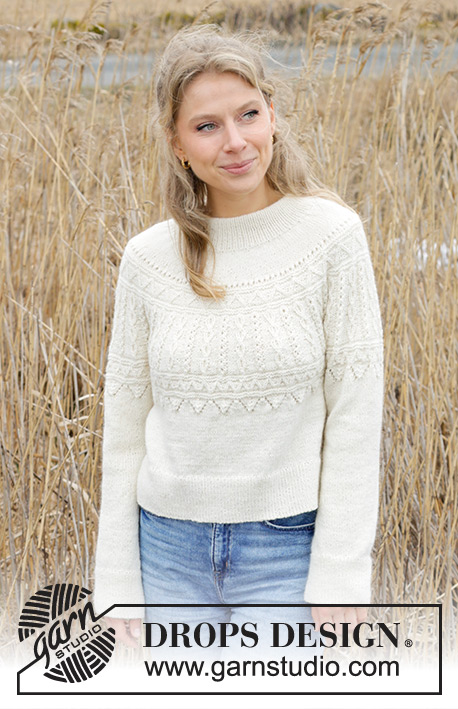
Avalanche Sweater |
||||||||||||||||||||||||||||||||||
 |
 |
|||||||||||||||||||||||||||||||||
Knitted jumper in DROPS Nord. The piece is worked top down with double neck, round yoke, relief-pattern and split in sides. Sizes S - XXXL.
DROPS 243-8 |
||||||||||||||||||||||||||||||||||
|
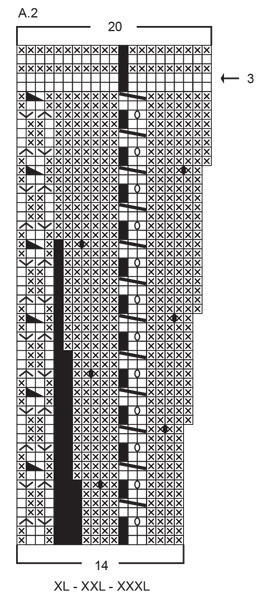
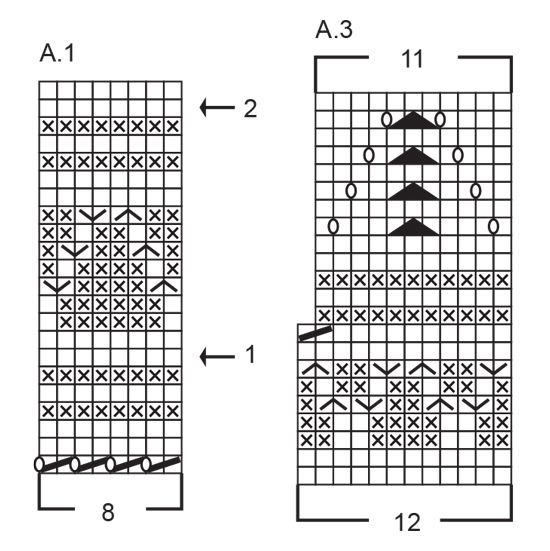
------------------------------------------------------- EXPLANATIONS FOR THE PATTERN: ------------------------------------------------------- EDGE STITCHES (for rib at bottom): 3 edge stitches are worked on each side of the piece. They are knitted from both the right and wrong side (garter stitch). ELEVATION: To make the jumper a little higher at the back you can work the following elevation. Skip this section if you do not want an elevation. Insert 1 marker at the beginning of the round (mid-back). Start from the right side and knit 16-17-18-19-20-21 stitches past the marker, turn, tighten the strand and purl 32-34-36-38-40-42 back. Turn, tighten the strand and knit 48-51-54-57-60-63, turn, tighten the strand and purl 64-68-72-76-80-84 back. Turn, tighten the strand and knit 80-85-90-95-100-105, turn, tighten the strand and purl 96-102-108-114-120-126 back. Turn, tighten the strand and knit to mid-back. PATTERN: See diagrams A.1 to A.3. Choose diagram for your size (applies to A.2). INCREASE TIP (evenly spaced): Increase 1 stitch by making 1 yarn over which is worked twisted on the next round to avoid a hole. DECREASE TIP (for sleeves): Decrease 1 stitch on each side of the marker-thread as follows: Work until there are 3 stitches left before the marker-thread, knit 2 together, knit 2 (marker-thread sits between these 2 stitches), slip 1 stitch knit-wise, knit 1 and pass the slipped stitch over the knitted stitch. ------------------------------------------------------- START THE PIECE HERE: ------------------------------------------------------- JUMPER – SHORT OVERVIEW OF THE PIECE: The neck and yoke are worked in the round with circular needle, from mid back and top down. You can work an elevation at the back if you wish. The yoke is divided for body and sleeves and the body is continued in the round with circular needle as far as the split in each side, then each piece is finished separately back and forth with circular needle. The sleeves are worked in the round with circular needle/double pointed needles. DOUBLE NECK: Cast on 136-140-146-150-156-166 stitches with DROPS Nord, using short circular needles size 2.5 and 3 mm held together. Remove the needle size 3 mm (this gives you an elastic cast-on edge). Work rib in the round (knit 1, purl 1) for 9-9-9-11-11-11 cm. Fold the neck double to the inside and work 1 more round of rib, working every 4th stitch together with its corresponding stitch on the cast-on edge. You now have a double neck. YOKE: Change to circular needle size 3 mm. Knit 1 round and increase 34-36-36-38-40-42 stitches evenly spaced – read INCREASE TIP = 170-176-182-188-196-208 stitches. Insert 1 marker in the middle of the round (mid-front) – this is used to measure the yoke. You can now work an ELEVATION at the back – read description above. If you do not want an elevation, go straight to the next section. Work stocking stitch. REMEMBER THE KNITTING TENSION! When the yoke measures 3-4-6-2-3-4 cm from the marker, increase 38-40-42-40-40-42 stitches evenly spaced = 208-216-224-228-236-250 stitches. The increases for the relief-pattern are now finished in sizes S, M and L. SIZES XL, XXL and XXXL: When the yoke measures 4-6-8 cm from the marker, increase 36-36-38 stitches evenly spaced = 264-272-288 stitches. ALL SIZES: = 208-216-224-264-272-288 stitches. Continue with stocking stitch until the yoke measures 4-5-7-5-7-9 cm from the marker. Work A.1 26-27-28-33-34-36 times on the round. Continue this pattern and AT THE SAME TIME increase stitches evenly spaced on each round marked with an arrow in A.1 as follows: Arrow-1: Increase 40-48-56-48-56-56 stitches evenly spaced = 248-264-280-312-328-344 stitches. Arrow-2: Increase 40-48-56-38-50-48 stitches evenly spaced = 288-312-336-350-378-392 stitches. When A.1 is finished the yoke measures approx. 10-11-13-11-13-15 cm from the marker on mid front. Now work A.2, 24-26-28-25-27-28 times on the round. Continue this pattern and increase as shown in the diagram. When you have worked as far as the round marked with arrow-3 in the diagram, there are 384-416-448-500-540-560 stitches. Continue the pattern and increase 12-4-6-0-6-18 stitches evenly on the round marked with arrow-3 = 396-420-454-500-546-578 stitches. When A.2 is finished the yoke measures approx. 21-22-24-26-28-30 cm from the marker. Now divide for the body and sleeves as follows: Work the first round in A.3 over the first 59-65-69-75-82-90 stitches and increase 6-6-7-7-8-9 stitches evenly over these (= 65-71-76-82-90-99 stitches on half back piece), place the next 80-80-89-100-109-109 stitches on 1 thread for the sleeve, cast on 8-8-10-10-12-12 stitches (in side under sleeve), work the first round in A.3 over the next 118-130-138-150-164-180 stitches and increase 12-12-14-14-16-18 stitches evenly over these (= 130-142-152-164-180-198 stitches on front piece), place the next 80-80-89-100-109-109 stitches on 1 thread for the sleeve, cast on 8-8-10-10-12-12 stitches (in side under sleeve), work the first round in A.3 over the last 59-65-69-75-82-90 stitches and increase 6-6-7-7-8-9 stitches evenly over these (= 65-71-76-82-90-99 stitches on half back piece). Cut the strand. The body and sleeves are finished separately! The piece is now measured from here. BODY: = 276-300-324-348-384-420 stitches. Insert 1 marker in the middle of the 8-8-10-10-12-12 stitches cast on under 1 sleeve. Start at the marker and work A.3, 23-25-27-29-32-35 times on the round. When A.3 is finished, you have decreased 1 stitch in each repeat (23-25-27-29-32-35 decreased stitches) = 253-275-297-319-352-385 stitches. Continue with stocking stitch and adjust the stitch count to 254-276-296-318-354-384 on the first round. When the piece measures 14-15-15-15-15-15 cm from the division, divide for the split in each side. Place the first 127-138-148-159-177-192 stitches on circular needle size 2.5 mm (front piece). Leave the other 127-138-148-159-177-192 stitches on the needle size 3 mm. FRONT PIECE: Knit 1 row from the right side and increase 46-49-53-58-64-71 stitches evenly spaced = 173-187-201-217-241-263 stitches. From the wrong side: Work 3 EDGE STITCHES – read description above, * purl 1, knit 1 *, work from *-* until there are 4 stitches left, purl 1 and 3 edge stitches. Work this rib back and forth for 8 cm. Cast off – you can use Italian cast off. The jumper measures approx. 48-50-52-54-56-58 cm from the shoulder. BACK PIECE: Place the 127-138-148-159-177-192 stitches on circular needle size 2.5 mm and work in the same way as the front piece. SLEEVES: Start mid-under one sleeve, knit up 1 stitch in each of 4-4-5-5-6-6 cast-on stitches, place the 80-80-89-100-109-109 stitches from the thread on short circular needle size 3 mm. Work the first round in A.3 over these stitches and increase 8-8-9-10-11-11 stitches evenly spaced, then knit up 1 stitch in each of the remaining 4-4-5-5-6-6 cast-on stitches under the sleeve = 96-96-108-120-132-132 stitches. Insert a marker-thread in the middle of the 8-8-10-10-12-12 stitches under the sleeve; allow it to follow your work onwards – it is used when decreasing under the sleeve. Work A.3, 8-8-9-10-11-11 times on the round. When A.3 is finished you have decreased 1 stitch in each repeat (8-8-9-10-11-11 decreased stitches). Continue with stocking stitch. AT THE SAME TIME, when the sleeve measures 2 cm, decrease 1 stitch on each side of the marker-thread – read DECREASE TIP. Decrease like this every 2nd round a total of 2-0-3-7-10-10 times, then every 4th round 6-6-8-8-8-8 times = 72-76-77-80-85-85 stitches. Continue working until the sleeve measures 36-35-34-32-31-29 cm from the division (try the jumper on, there is approx. 8 cm left before the rib). Change to double pointed needles size 2.5 mm. Knit 1 round and increase 26-26-29-30-31-31 stitches evenly spaced = 98-102-106-110-116-116 stitches. Work rib (knit 1, purl 1) for 8 cm. Cast off in the same way as on the body. Work the other sleeve in the same way. |
||||||||||||||||||||||||||||||||||
Diagram explanations |
||||||||||||||||||||||||||||||||||
|
||||||||||||||||||||||||||||||||||

|
||||||||||||||||||||||||||||||||||
|
||||||||||||||||||||||||||||||||||
|
||||||||||||||||||||||||||||||||||

|
||||||||||||||||||||||||||||||||||
|
Have you made this or any other of our designs? Tag your pictures in social media with #dropsdesign so we can see them! Do you need help with this pattern?You'll find tutorial videos, a Comments/Questions area and more by visiting the pattern on garnstudio.com. © 1982-2024 DROPS Design A/S. We reserve all rights. This document, including all its sub-sections, has copyrights. Read more about what you can do with our patterns at the bottom of each pattern on our site. |
||||||||||||||||||||||||||||||||||


With over 40 years in knitting and crochet design, DROPS Design offers one of the most extensive collections of free patterns on the internet - translated to 17 languages. As of today we count 304 catalogues and 11422 patterns - 11422 of which are translated into English (UK/cm).
We work hard to bring you the best knitting and crochet have to offer, inspiration and advice as well as great quality yarns at incredible prices! Would you like to use our patterns for other than personal use? You can read what you are allowed to do in the Copyright text at the bottom of all our patterns. Happy crafting!
Comments / Questions (35)
Hut menar ni att man ska sticka diagrammet A2 och B2 när man stickar fram o tillbaka. Börjar med 388 m och ska sticka 26 rapporter a 14 m + 14 kantmaskor = 378 m Ska jag sticka först A2 och fortsätta med B2 (rapport 10 m) och hur stickar jag de aviga varven ? Tacksam för snabbt och lätt förstående svar
28.01.2024 - 22:45DROPS Design answered:
Hei Seidy. Vi skal hjelpe deg så godt vi kan, men hvilken str. strikker du og hva mener du med "+ 14 kantmaskor". I oppskriften ser jeg kun 3 kantmasker. Skriv gjerne nøyaktig hvor du er i oppskriften. mvh DROPS Design
05.02.2024 - 12:46Bonjour, pensez-vous que je puisse tricoter le sweater avalanche avec le fil alpaca au lieu de nord. Merci pour votre aide
26.12.2023 - 21:01DROPS Design answered:
Bonjour Mme Sabine, tout à fait, utilisez notre convertisseur pour connaître la nouvelle quantité correspondante. Bon tricot!
02.01.2024 - 08:35Enligt mönstret stickas 15 cm + 8 från delning, dvs där ärmen börjar det blir 23 cm för hela bålen, kort. På bilden ser det ut som 15 cm + 8 från där mönstret slutar, kan det vara så det ska vara?
13.10.2023 - 09:16DROPS Design answered:
Hej Camilla, Hvilken størrelse strikker du? Du finder målene i de forskellige størrelser i måleskitsen nederst i opskriften :)
18.10.2023 - 10:31Jag kan inte hitta diagram A2?
26.09.2023 - 22:21DROPS Design answered:
Hej Camilla, diagrammet ligger under diagramtexten nederst i mönstret :)
27.09.2023 - 07:48Complimenti, il modello è molto bello. È possibile lavorarlo con il vs. filato alpaca ? Forse con tale filato può perdere definizione e compattezza? Grazie Saluti
16.09.2023 - 23:11DROPS Design answered:
Buonasera Maria Cristina, il filato Nord contiene una parte di merino e una parte di poliammide che gli permettono di mantenere la struttura del capo. Buon lavoro!
17.09.2023 - 22:42Beautiful design with little lace work, looking elegant and stylish.
07.08.2023 - 02:46Stars from heaven
06.08.2023 - 20:19Frost sweater
06.08.2023 - 09:58Christmas morning
06.08.2023 - 09:27FestiveArt sweater
05.08.2023 - 19:39