DROPS Karisma
DROPS Karisma
100% Wool
from 2.30 £ /50g
Get the yarn to make this pattern from 11.50£.

The yarn cost is calculated from the pattern’s smallest size and the yarn’s cheapest product type. Looking for an even better price? You might find it on the DROPS Deals!

DROPS SS24

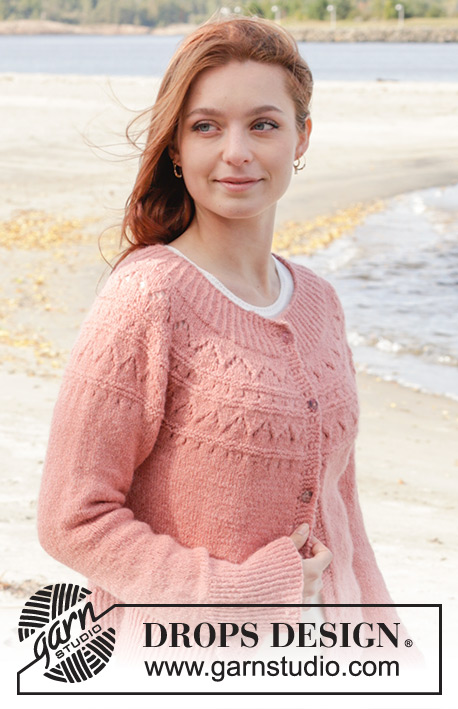
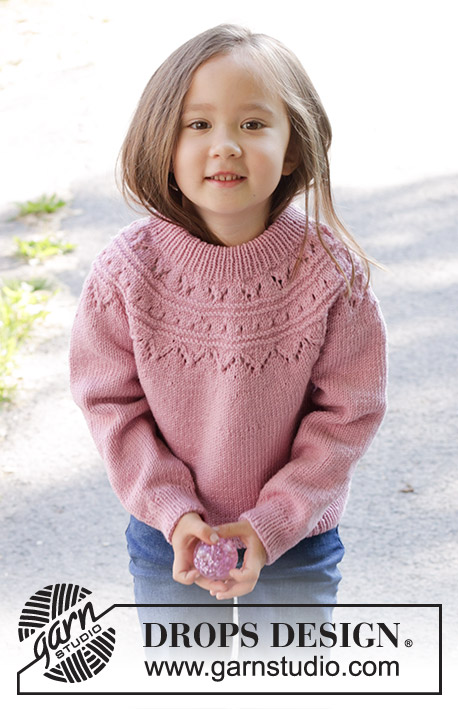
Running Circles Cardigan

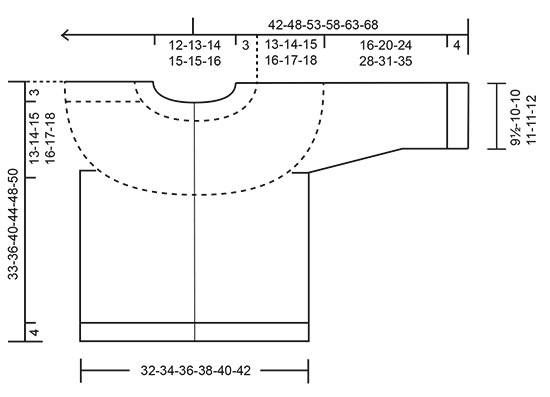
Knitted jacket for children in DROPS Karisma. The piece is worked top down with round yoke, lace pattern and double neck. Sizes 2 - 12 years.

DROPS Children 47-7
DROPS Design: Pattern u-108-bn
Yarn group B
-------------------------------------------------------

SIZES:
2 - 3/4 - 5/6 - 7/8 - 9/10 - 11/12 years
Child’s height in cm:
92 - 98/104 - 110/116 - 122/128 - 134/140 - 146/152

YARN:
DROPS KARISMA from Garnstudio (belongs to yarn group B)
250-300-300-350-400-450 g colour 68, light sky blue

NEEDLES:
DROPS CIRCULAR NEEDLES SIZE 4 MM: Length 40 cm and 60 cm.
DROPS CIRCULAR NEEDLES SIZE 3 MM: Length 40 cm and 60 cm.
DROPS DOUBLE POINTED NEEDLES SIZE 4 MM.
DROPS DOUBLE POINTED NEEDLES SIZE 3 MM.
The technique MAGIC LOOP can be used – you then only need 80 cm circular needle in each size.

BUTTONS:
DROPS BUTTONS NO 627: 5-5-6-6-6-6 items.

KNITTING TENSION:
21 stitches in width and 28 rows in height with stocking stitch = 10 x 10 cm.
NOTE: Needle size is only a guide. If you get too many stitches on 10 cm, change to a larger needle size. If you get too few stitches on 10 cm, change to a smaller needle size.

-------------------------------------------------------

Alternative Yarn – See how to change yarns here
Yarn Groups A to F – Use the same pattern and change the yarn here
Yarn usage using an alternative yarn – Use our yarn converter here

-------------------------------------------------------

DROPS Karisma
DROPS Karisma
100% Wool
from 2.30 £ /50g
Get the yarn to make this pattern from 11.50£.

The yarn cost is calculated from the pattern’s smallest size and the yarn’s cheapest product type. Looking for an even better price? You might find it on the DROPS Deals!

Pattern instructions

NOTE: This pattern is written in British English. All measurements in charts are in cm. For conversion from cm to inches - click here. There are different terms for crocheting in British and American English. If this pattern includes crochet, click for "crochet terms" here. For this pattern in American English, please click here.
-------------------------------------------------------

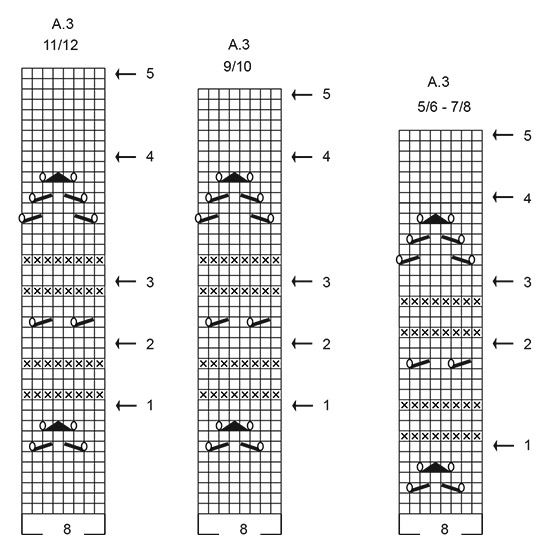
EXPLANATIONS FOR THE PATTERN:
-------------------------------------------------------

GARTER STITCH (worked back and forth):
Knit all rows.
1 ridge = knit 2 rows.

PATTERN:
See diagrams A.1 to A.3. Choose diagram for your size (applies to A.3). The diagrams show all rows in the pattern from the right side. When working A.3, the last stitch before the band is worked as the first stitch in A.3 so the pattern is symmetrical.

INCREASE TIP:
Increase 1 stitch by making 1 yarn over which is then worked twisted on the next row to avoid a hole.

DECREASE TIP (for sleeves):
Decrease 1 stitch on each side of the marker-thread as follows: Work until there are 3 stitches left before the marker-thread, knit 2 together, knit 2 (marker-thread sits between these 2 stitches), slip 1 stitch knit-wise, knit 1 and pass the slipped stitch over the knitted stitch.

-------------------------------------------------------

START THE PIECE HERE:

-------------------------------------------------------

JACKET – SHORT OVERVIEW OF THE PIECE.
The neck and yoke are worked back and forth with circular needle, from mid front and top down as far as the armholes, then the body and sleeves are finished separately. The body is finished back and forth with circular needle. The sleeves are worked in the round with double pointed needles.
Buttonholes are not worked, as the buttons are buttoned in the lace pattern on the band.

DOUBLE NECK:
Cast on 75-79-85-87-89-93 stitches with circular needle size 4 mm and DROPS Karisma.
Change to circular needle size 3 mm. Purl 1 row from the wrong side.
Work rib (knit 1, purl 1) until there is 1 stitch left, knit 1. Work this rib back and forth for 3 cm. At the end of the next 2 rows cast on 7 stitches in garter stitch for the bands = 89-93-99-101-103-107 stitches.
On the next row from the right side work as follows: A.1 over the 7 band stitches, continue the rib as before until there are 7 stitches left, A.2 over the 7 band stitches. Continue this pattern until the rib measures 6½ cm from the cast-on edge and the next row is from the right side.

YOKE:
Work the 7 band stitches as before, knit until there are 7 stitches left, increasing 14-18-20-18-24-20 stitches evenly over these stitches - read INCREASE TIP, work the 7 band stitches as before = 103-111-119-119-127-127 stitches. Insert a marker; the yoke is measured from here.
Change to circular needle size 4 mm. Purl 1 row from the wrong side (bands worked as before).
Now work A.3 - read PATTERN in explanations above, and at the same time increase on each row marked with an arrow in A.3 as follows (bands worked as before):
ARROW 1: Increase 24 stitches evenly spaced = 127-135-143-143-151-151 stitches.
REMEMBER THE KNITTING TENSION!
ARROW 2: Increase 24-24-28-28-32-32 stitches evenly spaced = 151-159-171-171-183-183 stitches.
ARROW 3: Increase 24-24-28-28-32-32 stitches evenly spaced =175-183-199-199-215-215 stitches.
ARROW 4: Increase 24-24-26-32-28-36 stitches evenly spaced = 199-207-225-231-243-251 stitches.
ARROW 5: Increase 26-30-26-32-32-36 stitches evenly spaced = 225-237-251-263-275-287 stitches

Continue with stocking stitch (bands worked as before) until the yoke measures 13-14-15-16-17-18 cm from the marker. Now divide for the body and sleeves as follows from the right side: Work the first 37-39-42-44-46-48 stitches as before (left front piece), place the next 44-46-48-50-52-54 stitches on a thread, without working them (sleeve), cast on 6 stitches under the sleeve, knit 63-67-71-75-79-83 (back piece), place the next 44-46-48-50-52-54 stitches on a thread, without working them(sleeve), cast on 6 stitches under the sleeve, work the last 37-39-42-44-46-48 stitches as before (right front piece). The piece is now measured from here!

BODY:
= 149-157-167-175-183-191 stitches. Continue back and forth as before for a further 13-15-18-21-24-25 cm, with the next row from the right side (approx. 4 cm left; try the jacket on and work to desired length).
Work the bands in GARTER STITCH – see explanation above, and stocking stitch over the other stitches, increasing 28-30-30-32-33-36 stitches evenly over the stocking stitches = 177-187-197-207-216-227 stitches. Purl back from the wrong side (bands in garter stitch). Change to circular needle size 3 mm and work rib as follows from the right side: 7 band stitches in garter stitch, rib (knit 1, purl 1) until there are 8 stitches left, knit 1, worked 7 band stitches in garter stitch. Continue this rib for 4 cm. Cast off a little loosely with knit over knit and purl over purl. The jacket measures approx. 33-36-40-44-48-50 cm from the shoulder.

SLEEVES:
Place the 44-46-48-50-52-54 stitches from the thread on the one side of the piece on double pointed needles size 4 mm and knit up 1 stitch in each of the 6 stitches cast on under the sleeve = 50-52-54-56-58-60 stitches. Insert a marker-thread in the middle of the new stitches under the sleeve and allow it to follow your work onwards.
Work stocking stitch in the round.
When the sleeve measures 4 cm, decrease 1 stitch on each side of the marker-thread – read DECREASE TIP. Decrease like this every 2½-3½-4½-5-6-7 cm a total of 5 times = 40-42-44-46-48-50 stitches. Work until the sleeve measures 16-20-24-28-31-35 cm from the division (or to desired length. There is approx. 4 cm left). Knit 1 round and increase 4 stitches evenly spaced = 44-46-48-50-52-54 stitches. Change to double pointed needles size 3 mm and work rib (knit 1, purl 1) for 4 cm. Cast off with knit over knit and purl over purl. Work the other sleeve in the same way.

ASSEMBLY:
Fold the neck double to the inside and sew down. To avoid the neck being tight and rolling outwards, it is important that the seam is elastic. Sew the openings together mid-front with small stitches. Sew the buttons onto the left band; the top button is positioned so it can be buttoned through the first row of the lace pattern on the band and the other buttons positioned evenly down the band.

Diagram

symbols = knit from right side, purl from wrong side
symbols = purl from right side, knit from wrong side
symbols = between 2 stitches make 1 yarn over which is purled on the next row to leave a hole
symbols = between 2 stitches make 1 yarn over which is knitted on the next row to leave a hole
symbols = knit 2 together
symbols = slip 1 stitch knit-wise, knit 1 and pass the slipped stitch over the knitted stitch
symbols = slip 2 stitches as if to knit together, knit 1 and pass the slipped stitches over the knitted stitch
symbols = increase – explained in text
diagram
diagram
diagram

Each of our patterns has specific tutorial videos to help you.

Do you have a question? See a list of frequently asked questions (FAQ)

Knitting tension is what determines the final measurements of your work, and is usually measured per 10 x 10 cm. It is provided like so: number of stitches in width x number of rows in height - eg: 19 stitches x 26 rows = 10 x 10 cm.

The knitting tension is very individual; some people knit/crochet loosely while others work tightly. You adjust the knitting tension with the needle size, which is why the suggested needle size is only meant as a guide! You need to adjust this (up or down) to ensure that YOUR knitting tension matches the knitting tension provided in the pattern. If you work with a different knitting tension than provided you will have a different yarn consumption, and your work will have different measurements than what the pattern suggests.

The knitting tension also determines which yarns can replace each other. As long as you achieve the same knitting tension you can replace one yarn with another.

See DROPS lesson: How to measure your tension/gauge

See DROPS video: How to make a gauge tension swatch

The required amount of yarn is provided in grams, eg: 450 g. To calculate how many balls you’ll need you first need to know how many grams are in 1 ball (25g, 50g or 100g). This information is available if you click on the individual yarn quality on our pages. Divide the amount required with the amount of each ball. For example, if each ball is 50g (the most common amount), the calculation will be as follows: 450 / 50 = 9 balls.

The important thing when changing from one yarn to another is that the knitting/crochet tension remains the same. This is so that the measurements of the finished piece will be the same as on the sketch provided. It is easier to achieve the same knitting tension using yarns from the same yarn group. It is also possible to work with multiple strands of a thinner yarn to achieve the knitting tension of a thicker one. Please try our yarn converter. We recommend you to always work a test swatch.

Please NOTE: when changing yarn the garment might have a different look and feel to the garment in the photo, due to individual properties and qualities of each yarn.

See DROPS lesson: Can I use a different yarn than the one mentioned in the pattern?

All our yarns are categorised into yarn groups (from A to F) according to thickness and knitting tension – group A contains the thinnest yarns and group F the thickest. This makes it easier for you to find alternative yarns to our patterns, should you wish to switch yarn. All yarns within the same group have a similar knitting tension and can easily replace each other. However, different yarn qualities have different structures and properties which will give the finished work a unique look and feel.

Click here for an overview of the yarns in each yarn group

At the top of all our patterns you’ll find a link to our yarn calculator, which is a helpful tool should you wish to use a different yarn than suggested. By filling in the yarn quality you wish to replace, the amount (in your size) and number of strands, the calculator will present good alternative yarns with the same knitting tension. Additionally it will tell you how much you’ll require in the new qualities and whether you’ll need to work with multiple strands. Most skeins are 50g (some are 25g or 100g).

If the pattern is worked with multiple colours, every colour will have to be calculated separately. Similarly, if the pattern is worked with several strands of different yarns (for example 1 strand Alpaca and 1 strand Kid-Silk) you will have to find alternatives for each, individually.

Click here to see our yarn calculator

Since different yarns have different qualities and textures we have chosen to keep the original yarn in our patterns. However, you can easily find options among our available qualities by using our yarn calculator, or simply pick a yarn from the same yarn group.

It is possible that some retailers still have discontinued yarns in stock, or that someone has a few skeins at home that they would like to find patterns for.

The yarn calculator will provide both alternative yarn as well as required amount in the new quality.

If you think it's hard to decide what size to make, it can be a good idea to measure a garment you own already and like the size of. Then you can pick the size by comparing those measures with the ones available in the pattern's size chart.

You'll find the size chart at the bottom of the pattern.

See DROPS lesson: How to read size chart

The needle size provided in the pattern serves only as a guide, the important thing is to follow the knitting tension. And since knitting tension is very individual, you will have to adjust the needle size to ensure that YOUR tension is the same as in the pattern – maybe you’ll have to adjust 1, or even 2 needle sizes, up or down to achieve the correct tension. For this, we recommend that you work test swatches.

Should you work with a different knitting tension than the one provided, the measurements of the finished garment might deviate from the measurement sketch.

See DROPS lesson: How to measure your tension/gauge

See DROPS video: How to make a tension/gauge swatch

Working a garment top-down provides more flexibility and room for personal adjustment. For example it is easier to try the garment on while working, as well as making adjustments to length of yoke and shoulder caps.

The instructions are carefully explaining every step, in the correct order. Diagrams are adjusted to the knitting direction and are worked as usual.

The diagram depicts all rows/rounds, and every stitch seen from the right side. It is read from bottom to top, from right to left. 1 square = 1 stitch.

When working back and forth, every other row is worked from the right side and every other row is worked from the wrong side. When working from the wrong side, the diagram will have to be worked reversed: from left to right, knit stitches are purled, purl stitches are knit etc.

When working in the round every round is worked from the right side and the diagram are worked from right to left on all rounds.

See DROPS lesson: How to read knitting diagrams

The diagram depicts all rows/rounds, and every stitch seen from the right side. It is worked from bottom to top, from right to left.

When working back and forth every other row is worked from the right side: from right to left and every other row is worked from the wrong side: from left to right.

When working in the round, every row in the diagram are worked from the right side, from right to left.

When working a circular diagram you start in the middle and work your way outwards, counter clockwise, row by row.

The rows usually start with a given number of chain stitches (equivalent to the height of the following stitch), this will either be depicted in the diagram or explained in the pattern.

See DROPS lesson: How to read crochet diagrams

Instructions for working several diagrams after each other on the same row/round, will often be written like so: “work A.1, A.2, A.3 a total of 0-0-2-3-4 times". This means you work A.1 once, then A.2 is worked once, and A.3 is repeated (in width) the number of times provided for your size – in this case like so: S = 0 times, M = 0 times, L=2 times, XL= 3 times and XXL = 4 times.

The diagrams are worked as usual: begin with the first row in A.1, then work the first row in A.2 etc.

See DROPS lesson: How to read knitting diagrams

See DROPS lesson: How to read crochet diagrams

The total width of the garment (from wrist-to-wrist) will be larger in the larger sizes, despite the actual sleeves being shorter. The larger sizes have longer sleeve caps and wider shoulders, so there will be a good fit in all sizes.

The measurement sketch/schematic drawing provides information regarding the full length of the garment. If it’s a jumper or a jacket the length is measured from the highest point on the shoulder closest to the neckline, and straight down to the bottom of the garment. It is NOT measured from the tip of shoulder. Similarly, the length of yoke is measured from the highest point on the shoulder and down to where yoke is split into body and sleeves.

On a jacket measures are never taken along bands, unless specifically stated. Always measure inside band stitches when measuring the length.

See DROPS lesson: How to read a schematic drawing

Diagrams are often repeated on the round or in height. 1 repeat is the diagram the way it appears in the pattern. If it says to work 5 repeats of A.1 in the round, then you work A.1 a total of 5 times after/next to each other in the round. If it says to work 2 repeats of A.1 vertically/in height you work the entire diagram once, then begin again at the start and work the entire diagram one more time.

Chain stitches are slightly narrower than other stitches and to avoid working the cast-on edge too tight, we simply chain more stitches to begin with. The stitch count will be adjusted on the following row to fit the pattern and measurement sketch.

The rib edge is more elastic and will contract slightly compared to, for example, stocking stitch. By increasing before the rib edge, you avoid a visible difference in width between the rib edge and the rest of the body.

It’s very easy to cast off too tightly, and by making yarn overs while casting off (and simultaneously casting these off) you avoid a too tight cast off edge.

See DROPS video: How to bind off with yarn overs (yo)

To achieve an even increase (or decrease) you can increase on, for example: every 3rd and 4th row alternately, like so: work 2 rows and increase on the 3rd row, work 3 rows and increase on the 4th. Repeat this until the increase is complete.

See DROPS lesson: Increase or decrease 1 st on every 3rd and 4th row alternately

Should you prefer to work in the round instead of back and forth, you may of course adjust the pattern. You’ll need to add steeks mid-front (usually 5 stitches), and follow the instructions. When you would normally turn and work from the wrong side, simply work across the steek and continue in the round. At the end you’ll cut the piece open, pick up stitches to work bands, and cover the cut edges.

See DROPS video: How to knit steeks and cut open

Should you prefer to work back and forth instead of in the round, you may of course adjust the pattern so you work the pieces separately and then assemble them at the end. Divide the stitches for the body in 2, add 1 edge stitch in each side (for sewing) and work the front and back pieces separately.

See DROPS lesson: Can I adapt a pattern for circular needles into straight needles?

Pattern repeats can vary slightly in the different sizes, in order to get the correct proportions. If you’re not working the exact same size as the garment in the photo, yours might deviate slightly. This has been carefully developed and adjusted so that the complete impression of the garment is the same in all sizes.

Make sure to follow instructions and diagrams for your size!

If you have found a pattern you like which is available in women’s size it’s not very difficult to convert it to men’s size. The biggest difference will be the length of sleeves and body. Start working on the women size that you think would fit across the chest. The additional length will be worked right before you cast off for the armhole/sleeve cap. If the pattern is worked top-down you can add the length right after the armhole or before the first decrease on sleeve.

Regarding additional yarn amount, this will depend on how much length you add, but it is better with a skein too many than too few.

All yarns will have excess fibres (from production) that might come off as lint or shedding. Brushed yarns (ie hairier yarns) have more of these loose, excess fibres, causing more shedding.

Shedding also depends on what is worn under or over the garment, and whether this pulls at the yarn fibres. It’s therefore not possible to guarantee that there will be no shedding

Below are some tips on how to get the best result when working with hairier yarns:

1. When the garment is finished (before you wash it) shake it vigorously so the looser hairs come off. NOTE: do NOT use a lint roller, brush or any method that pulls at the yarn.

2. Place the garment in a plastic bag and put it in your freezer - the temperature will cause the fibres to become less attached to each other, and excess fibres will come off easier.

3. Leave in the freezer for a few hours before taking it out and shaking it again.

4. Wash the garment according to the instructions on the yarn label.

Pilling is a natural process that happens to even the most exclusive of fibers. It's a natural sign of wear and tear that is hard to avoid, and that is most visible in high friction areas of your garment like a sweater's arms and cuffs.

You can make your garment look as new by removing the pilling, using a fabric comb or a pill/lint remover.

Still can't find the answer you need? Then scroll down and leave your question so one of our experts can try to help you. This will be done normally within 5 to 10 working days.
In the meantime, you can read the questions and answers that others have left to this pattern or join the DROPS Workshop on Facebook to get help from fellow knitters/crocheters!

You might also like...

Post a comment to pattern DROPS Children 47-7

We would love to hear what you have to say about this pattern!

If you want to leave a question, please make sure you select the correct category in the form below, to speed up the answering process. Required fields are marked *.

Comments / Questions (23)

country flag Annie Shortall wrote:

Could you please explain what the line symbol on A1 and A2 are I can not figure out where buttonholes go

29.03.2024 - 21:45

DROPS Design answered:

Dear Annie, if you mean the 8th row of the A.1 pattern, that is P1, (YO, K2TOG)x3 times. (the 4th and 5th symbol in the explanations.) I hope that helps. Happy Knitting!

30.03.2024 - 01:02

country flag Suzanne PANSERRIEU LAPERRIÈRE wrote:

Que veut dire le rang 8 des diagrammes A1 et A2? Merci beaucoup pour votre réponse. Suzanne Panserrieu Laperrière

26.03.2024 - 12:19

DROPS Design answered:

Bonjour Mme Panserrieu Laperrière, lisez le rang 8 de gauche à droite (sur l'envers) et tricotez ainsi: A.2 (1 m end, (1 jeté,2 m ens à l'end)x3) et A.1 ((2 m ens à l'end, 1 jeté)x 3, 1 m end). Bon tricot!

02.04.2024 - 10:21

country flag Kathy Doak wrote:

Are the rows for the pattern diagrams worked from the bottom? The arrows are numbered from the bottom up which is why I ask. Is the pattern worked over 8 stitches and repeated? Thanks

24.03.2024 - 05:38

DROPS Design answered:

Dear Kathy, yes, the pattern is knitted from the bottom row, and go upwards. However, since you knit this cardigan from the top down, row no.1. will be the one that is closest to the neckline. Thus the row with the arrow numbered 1. will be the first one (closest to the neckline) as well. happy Knitting!

24.03.2024 - 09:43

country flag Mira wrote:

Okay! Thanks for your reply!

21.03.2024 - 09:57

country flag Mira wrote:

Is it really true that you need to increase 33 stitches at the bottom of the body, just above the rib, for size 140??? Or should this be done at the bottom of the insert of the sleeve?

20.03.2024 - 22:44

DROPS Design answered:

Dear Mira, yes that's correct, to avoid the ribbing to tighten piece together at the bottom of the jacket, you will have to increase stitches as you need more stitches for ribbing edge with smaller needles as for stocking stitch with larger needles. Happy knitting!

21.03.2024 - 08:49

country flag Mira wrote:

Klopt het dat je pas onderaan het lijf, vlak boven de boordsteek, voor maat 140 33 steken moet meerderen??? Of moet dit ter hoogte van onderkant mouwaanzet gebeuren?

19.03.2024 - 14:08

country flag Jane wrote:

Werden alle Diagramme von oben gearbeitet?

17.03.2024 - 20:07

DROPS Design answered:

Liebe Jane, die Diagramme lesen Sie von unten nach oben (auch wenn die Jacken von oben nach unten gestrickt wird), Hin-Reihen lesen Sie rechts nach links und Rückreihen lesen Sie links nach rechts. Viel Spaß beim Stricken!

18.03.2024 - 09:34

country flag Bky wrote:

How do I cast on the 6 stitches under the sleeves.

19.02.2024 - 20:23

DROPS Design answered:

Hi Bky, The stitches are cast on after the first front piece has been worked, casting on from the last stitch on the front piece, then you continue over the back piece (the sleeve stitches are on a thread so not worked). Do the same at the end of the back piece and finally work the second front piece. Hope this helps and happy knitting!

20.02.2024 - 07:00

country flag Anna Harbourne wrote:

I wish that instead of saying "inc / dec number of stitches evenly across the row" you would give detailed instructions. This would be particularly useful in this pattern where having to exclude the button bands makes the calculation more complicated and involves more stitches counting.

14.02.2024 - 00:51

country flag Bly wrote:

When we increase evenly do we include the 7 st band. When should I start the first increase if I am knitting the 3rd size

12.02.2024 - 15:39

DROPS Design answered:

Hi Bly, No, the increases are not worked on the bands as these stay the same throughout the garment. So you can start the increases straight after the first band and work them evenly throughout the row, as far as the second band (increase after approx. every 4th stitch). Happy knitting

13.02.2024 - 06:51