
Popular categories
Looking for a yarn?


|
|
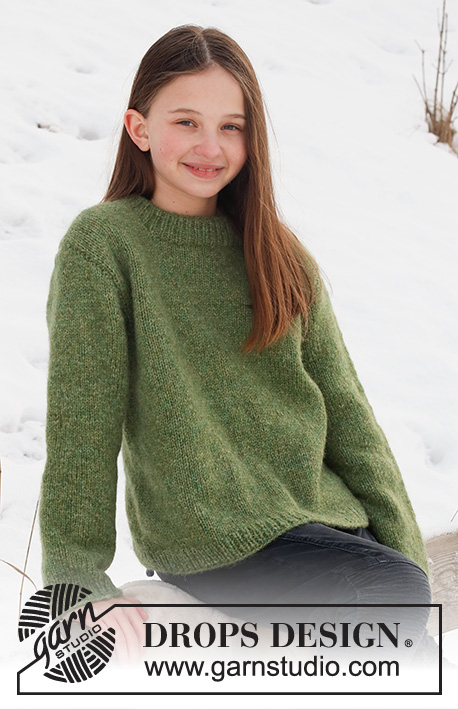
Fresh Lime Jacket |
|
 |
 |
Knitted jacket in DROPS Air. The piece is worked with double neck. Sizes 2 – 12 years.
DROPS Children 41-11 |
|
|
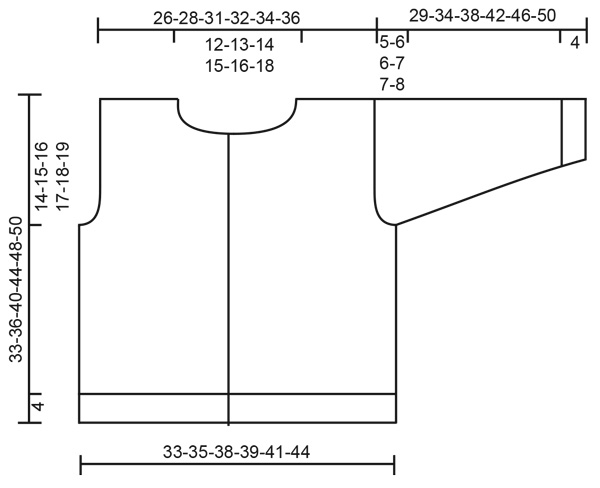
------------------------------------------------------- EXPLANATIONS FOR THE PATTERN: ------------------------------------------------------- RIDGE/GARTER STITCH (worked back and forth): Knit all rows. 1 ridge = knit 2 rows. INCREASE TIP: Work until there are 2 stitches left before the marker thread, make 1 yarn over, knit 4 (marker thread sits in the middle of these 4 stitches), 1 yarn over. On the next round knit the yarn overs twisted to avoid holes (= 2 stitches increased). BUTTONHOLES: Work the buttonholes on the right band. 1 BUTTONHOLE = Knit together the 3rd and 4th stitch from the edge and make 1 yarn over. On the next row knit the yarn over to leave a hole. Work the buttonholes when the piece measures: 2 years: 4, 10, 16, 22 and 28 cm 3/4 years: 4, 11, 18, 24 and 30 cm 5/6 years: 4, 12, 20, 27 and 34 cm 7/8 years: 5, 13, 21, 29 and 37 cm 9/10 years: 5, 14, 23, 32 and 41 cm 11/12 years: 5, 15, 24, 33 and 42 cm CASTING-OFF TIP: To avoid the cast-off edge being tight you can cast off with a larger size needle. If the edge is still tight, make 1 yarn over after approx. each 4th stitch at the same time as casting off; the yarn overs are cast off as normal stitches. ------------------------------------------------------- START THE PIECE HERE: ------------------------------------------------------- JACKET – SHORT OVERVIEW OF THE PIECE: The piece is worked back and forth with circular needle, bottom up as far as the armholes, then divided and the front and back pieces are finished separately. The sleeves are worked in the round with double pointed needles, bottom up as far as the sleeve cap, then back and forth. The neck is worked to finish. BODY: Cast on 123-131-139-143-151-159 stitches (including 5 band stitches on each side) with circular needle size 4 mm and DROPS Air. Purl 1 row from the wrong side. Then work rib from the right side as follows: 5 band stitches in GARTER STITCH – read description above, * knit 1, purl 1 *, work from *-* until there are 6 stitches left, knit 1 and 5 band stitches in garter stitch. Continue this rib for 4 cm, change to circular needle size 5 mm. Continue with stocking stitch and garter stitch, decreasing 1 stitch on the first row (avoid decreasing on the bands) = 122-130-138-142-150-158 stitches. Remember the BUTTONHOLES on the right band – read description above. REMEMBER THE KNITTING TENSION! When the piece measures 19-21-24-27-30-31 cm, cast off for the armholes on the next row as follows: Work 30-32-34-35-37-39 stitches, cast off 6 stitches, work 50-54-58-60-64-68 stitches, cast off 6 stitches and work the last 30-32-34-35-37-39 stitches. The front and back pieces are finished separately. Place the first and last 30-32-34-35-37-39 stitches on a thread and work the 50-54-58-60-64-68 stitches on the back piece. BACK PIECE: Continue with stocking stitch, AT THE SAME TIME cast off for the armholes at the beginning of each row: 2 stitches 1 time and 1 stitch 1 time on each side = 44-48-52-54-58-62 stitches. When the piece measures 31-34-38-42-46-48 cm, cast off the middle 18-20-22-24-26-28 stitches for the neck and finish each shoulder separately (= 13-14-15-15-16-17 stitches on each shoulder). Cast off 1 stitch on the next row from the neck = 12-13-14-14-15-16 stitches. Continue with stocking stitch until the piece measures 33-36-40-44-48-50 cm (= 14-15-16-17-18-19 cm from the bottom of the armhole), cast off. Work the other shoulder in the same way. RIGHT FRONT PIECE: Place the first 30-32-34-35-37-39 stitches back on circular needle size 5 mm and continue with stocking stitch and 5 band stitches in garter stitch towards mid-front. Cast off for the armhole at the beginning of each row from the side: 2 stitches 1 time and 1 stitch 1 time = 27-29-31-32-34-36 stitches. When the piece measures 29-31-35-38-42-43 cm, place the 12-13-14-14-15-16 stitches towards mid-front on a thread for the neck. Then cast off stitches for the neck as follows: 2 stitches 1 time and 1 stitch 1-1-1-2-2-2 times = 12-13-14-14-15-16 stitches on the shoulder. Continue with stocking stitch until the piece measures 33-36-40-44-48-50 cm (= 14-15-16-17-18-19 cm from the bottom of the armhole), cast off. LEFT FRONT PIECE: Place the last 30-32-34-35-37-39 stitches back on circular needle size 5 mm and continue with stocking stitch and 5 band stitches in garter stitch towards mid-front. Cast off for the armhole at the beginning of each row from the side: 2 stitches 1 time and 1 stitch 1 time = 27-29-31-32-34-36 stitches. When the piece measures 29-31-35-38-42-43 cm, place the 12-13-14-14-15-16 stitches towards mid-front on a thread for the neck. Then cast off stitches for the neck as follows: 2 stitches 1 time and 1 stitch 1-1-1-2-2-2 times = 12-13-14-14-15-16 stitches on the shoulder. Continue with stocking stitch until the piece measures 33-36-40-44-48-50 cm (= 14-15-16-17-18-19 cm from the bottom of the armhole), cast off. SLEEVES: Cast on 32-34-36-38-40-42 stitches with double pointed needles size 4 mm and DROPS Air. Knit 1 round then work rib (knit 1, purl 1) for 4 cm. Change to double pointed needles size 5 mm and work stocking stitch. Insert a marker thread at the beginning of the round = mid-under the sleeve. When the sleeve measures 8 cm, increase 1 stitch on each side of the marker thread – read INCREASE TIP. Increase like this every 2-3-3½-4-4-4½ cm a total of 7-7-7-7-8-8 times = 46-48-50-52-56-58 stitches. When the sleeve measures 24-28-32-35-39-42 cm, cast off 3 stitches on each side of the marker thread and work the sleeve cap back and forth. Cast off at the beginning of each row as follows: 2 stitches 2 times and 1 stitch 1-1-2-2-2-2 times on each side. Then cast off 2 stitches on each side until the sleeve measures 28-33-37-41-45-49 cm, 3 stitches 1 time on each side, then cast off the remaining stitches. The sleeve measures approx. 29-34-38-42-46-50 cm. Work the other sleeve in the same way. ASSEMBLY: Sew the shoulder seams. Sew in the sleeves. Sew the buttons onto the left band. NECK: Start mid-front from the right side and knit up 57 to 83 stitches (including the stitches on the threads and stitch-number divisible by 2 + 1) around the neck, with circular needle size 4 mm. Work rib from the wrong side as follows: 5 band stitches in garter stitch, rib (purl 1, knit 1) until there are 6 stitches left, purl 1 and 5 band stitches in garter stitch. Work this rib for 8 cm. Cast off with knit over knit and purl over purl – read CASTING-OFF TIP. ASSEMBLY: Fold the neck double to the inside and sew down. To avoid the neck being tight and rolling outwards, it is important that the seam is elastic. Sew together the openings on each side with small stitches. |
|
|
|
|
Have you made this or any other of our designs? Tag your pictures in social media with #dropsdesign so we can see them! Do you need help with this pattern?You'll find tutorial videos, a Comments/Questions area and more by visiting the pattern on garnstudio.com. © 1982-2024 DROPS Design A/S. We reserve all rights. This document, including all its sub-sections, has copyrights. Read more about what you can do with our patterns at the bottom of each pattern on our site. |
|


With over 40 years in knitting and crochet design, DROPS Design offers one of the most extensive collections of free patterns on the internet - translated to 17 languages. As of today we count 304 catalogues and 11422 patterns - 11422 of which are translated into English (UK/cm).
We work hard to bring you the best knitting and crochet have to offer, inspiration and advice as well as great quality yarns at incredible prices! Would you like to use our patterns for other than personal use? You can read what you are allowed to do in the Copyright text at the bottom of all our patterns. Happy crafting!
Comments / Questions (16)
Après plusieurs tentatives j’ai réussi à monter la manche contrairement à mon précédent message mais l’ajustement pourtour emmanchure du corps avec la tête de manche est délicat car la première est plus « longue » que le pourtour de la tête de manches
25.04.2024 - 14:35Pb au montage des manches : j’ai bien suivi les indications de diminutions des têtes de manche et du corps de l’ouvrage Je monte les manches à partir de l’épaule , mais quand la manche arrive au niveau des 6 mailles (diminuées à 31 cm de hauteur ) elle ne les couvre pas La largeur de la manche 34 cm soit 58 mailles ne permet qu’elle soit cousue sur ces 6 mailles diminuées Que faire ? Merci
25.04.2024 - 12:33DROPS Design answered:
Bonjour Mme Bernardi, la largeur totale de la manche (soit les 58 mailles dans votre taille) tricotée sur la longueur de la tête de manche (8 cm dans la dernière taille) va être cousue tout le long de l'emmanchure en commençant par les 6 premières mailles rabattues sous la manche contre les 6 mailles rabattues pour les emmanchures, puis tout le long de l'emmanchure. Ces 58 mailles feront donc plus que 34 cm car vous avez des rangs supplémentaires (ces 8 cm). vous pouvez épingler la manche tout autour de l'emmanchure pour vous aider si besoin. Bon aasemblage!
25.04.2024 - 16:07A propos des têtes de manche : elles sont trop courtes avec 8 cm de haut pour une emmanchure de 19 cm « a 49 cm » rabattre 1x3 de chaque côté puis rabattre les mailles restantes ? Combien ? Ou combien de cm ? Ça serait intéressant d’avoir les mesures de la manche à côté des mesures du corps comme souvent dans les patrons .. Merci
17.04.2024 - 17:58DROPS Design answered:
aBonjour Mme Bernardi, le nombre de mailles restant va dépendre de votre nombre de rangs en hauteur pour 10 cm, indépendamment de ce nombre de mailles, c'est ici la hauteur (les 8 cm en taille 12 ans) qui comptent, autrement dit, rabattez d'abord 3 m de chaque côté, puis 2 x 2 m puis 2 x 1 m puis rabattez 2 m de chaque côté jusqu'à c que la manche mesure 49 cm (le nombre de fois va dépendre de votre tension, veillez juste à avoir rabattu le même nombre de mailles de chaque côté), rabattez ensuite 1 x 3 m de chaque côté et rabattez les mailles restantes; le haut de la manche doit mesurer 8 cm environ. Bon tricot!
18.04.2024 - 08:00Merci de cette réponse rapide J’ai suivi le modèle : la tête de manche à partir de 42 cm jusqu’à 50 : ces 8cm me permettent pas de la coudre sur une emmanchure de 19cm de haut
15.04.2024 - 13:42DROPS Design answered:
Bonjour Mme Bernardi, c'est la largeur totale du haut de la manche, soit tout la largeur du haut de la tête de la manche qui va être cousu le long de l'emmanchure, on a les 58 mailles de la fin de la manche rabattues sur 8 cm, cela doit correspondre à la hauteur de l'emmanchure, épinglez avant de coudre la manche, cela peut aider. Bon tricot!
15.04.2024 - 16:04La taille des manches n’est pas correcte pour la taille 12 ans \r\nPas assez large 34 cm au lieu de 38 au plus large \r\nHauteur insuffisante de la tête de manche \r\nToute la manche à refaire ? ….
13.04.2024 - 14:09DROPS Design answered:
Bonjour Mme Bernardi, en fait, c'est bien ainsi que les manches se tricotent en 12 ans; vous allez mesurer tout le long des diminutions du haut de la manche. Bon tricot!
15.04.2024 - 13:21I don’t understand the instructions for picking up stitches for the neck. What does knit up 57 to 83 stitches mean? What does the bracketed phrase ( including stitches on the threads and stitch number divisible by 2+1) mean?
01.04.2024 - 23:14DROPS Design answered:
Hi Gillian, Depending on the size you are working and how tight a neck you would like, you knit up the number of stitches you choose, between 57 and 83 stitches. This number includes the stitches on the threads in front. The number you end up with must be divisible by 2 + 1 (in other words, an odd number) so that the ribbing in the neck is symmetrical. Happy knitting!
02.04.2024 - 06:43”Fortsätt med slätstickning, SAMTIDIGT maskas det av till ärmhål i början av varje varv i varje sida: 2 maskor 1 gång och 1 maska 1 gång = 44-48-52-54-58-62 maskor.” Jag förstår inte riktigt vad man ska göra här. Om jag börjar sticka räta sidan - ska jag då börja med att maska av två första varvet och 1 andra varvet och göra så på varje sida? Det blir ju då att man maskar av 2 och 3 maskan. Mvh
19.03.2024 - 17:51DROPS Design answered:
Hej Marcus. Ja du maskar först av 2 maskor på varje sida och sedan 1 maska på varje sida på bakstycket, så totalt 3 maskor på varje sida. Mvh DROPS Design
20.03.2024 - 07:42The pattern I have chosen:- Pattern no ai-043-bn specifies Drops Mother of Pearl buttons Arched NR521 These do not appear to be available on the website - can you tell me what size these buttons are so I can choose an equivalent?
11.11.2023 - 11:58DROPS Design answered:
Dear Gillian, the buttons are: Arched (white) No. 521, size 15mm; you will find them more easily using the number. You can contact your usual Drops store to see if they are available or if they can order them for you. You can also choose other 15mm buttons for your work. Happy knitting!
12.11.2023 - 19:47Ja dankjewel voor het antwoord, maar ik begrijp het niet.. welke steken moet ik op de hulpdraad zetten? Die aan de kant van het armsgat of richting hals? Want het is een vrij rechte mouwinzet en vlgs de foto van het vestje is er maar aan één kant aannde haks verminderd. 🤔
05.11.2023 - 20:55DROPS Design answered:
Dag Ingrid,
Je kant aan de kant van de hals af, dus gelijk naast de steken die je daar voor op een hulpdraad hebt gezet.
15.11.2023 - 14:26Hallo...ik heb een vraag gesled zie 3 nov ... Kan ik hier antwoord op krijgen svp??
05.11.2023 - 16:24DROPS Design answered:
Dag Ingrid,
Je vraag is, als het goed is, inmiddels beantwoord.
05.11.2023 - 19:04