Clicking the ORDER button will redirect you to Wool Warehouse Direct Ltd website
The yarn cost is calculated from the pattern’s smallest size and the yarn’s cheapest product type. Looking for an even better price? You might find it on the DROPS Deals!
-------------------------------------------------------
Alternative Yarn – See how to change yarns here
Yarn Groups A to F – Use the same pattern and change the yarn here
Yarn usage using an alternative yarn – Use our yarn converter here
-------------------------------------------------------
Clicking the ORDER button will redirect you to Wool Warehouse Direct Ltd website
The yarn cost is calculated from the pattern’s smallest size and the yarn’s cheapest product type. Looking for an even better price? You might find it on the DROPS Deals!
= knit from right side, purl from wrong side | |
= purl from right side, knit from wrong side | |
= between 2 stitches make 1 yarn over which is purled twisted on next row to avoid a hole |
Each of our patterns has specific tutorial videos to help you.
These step-by-step tutorials might also help you:
Why is the knitting/crochet tension so important?
Knitting tension is what determines the final measurements of your work, and is usually measured per 10 x 10 cm. It is provided like so: number of stitches in width x number of rows in height - eg: 19 stitches x 26 rows = 10 x 10 cm.
The knitting tension is very individual; some people knit/crochet loosely while others work tightly. You adjust the knitting tension with the needle size, which is why the suggested needle size is only meant as a guide! You need to adjust this (up or down) to ensure that YOUR knitting tension matches the knitting tension provided in the pattern. If you work with a different knitting tension than provided you will have a different yarn consumption, and your work will have different measurements than what the pattern suggests.
The knitting tension also determines which yarns can replace each other. As long as you achieve the same knitting tension you can replace one yarn with another.
See DROPS lesson: How to measure your tension/gauge
See DROPS video: How to make a gauge tension swatch
How do I know how many balls of yarn I need?
The required amount of yarn is provided in grams, eg: 450 g. To calculate how many balls you’ll need you first need to know how many grams are in 1 ball (25g, 50g or 100g). This information is available if you click on the individual yarn quality on our pages. Divide the amount required with the amount of each ball. For example, if each ball is 50g (the most common amount), the calculation will be as follows: 450 / 50 = 9 balls.
Can I use a different yarn than what the pattern suggests?
The important thing when changing from one yarn to another is that the knitting/crochet tension remains the same. This is so that the measurements of the finished piece will be the same as on the sketch provided. It is easier to achieve the same knitting tension using yarns from the same yarn group. It is also possible to work with multiple strands of a thinner yarn to achieve the knitting tension of a thicker one. Please try our yarn converter. We recommend you to always work a test swatch.
Please NOTE: when changing yarn the garment might have a different look and feel to the garment in the photo, due to individual properties and qualities of each yarn.
See DROPS lesson: Can I use a different yarn than the one mentioned in the pattern?
What are the yarn groups?
All our yarns are categorised into yarn groups (from A to F) according to thickness and knitting tension – group A contains the thinnest yarns and group F the thickest. This makes it easier for you to find alternative yarns to our patterns, should you wish to switch yarn. All yarns within the same group have a similar knitting tension and can easily replace each other. However, different yarn qualities have different structures and properties which will give the finished work a unique look and feel.
How do I use the yarn calculator?
At the top of all our patterns you’ll find a link to our yarn calculator, which is a helpful tool should you wish to use a different yarn than suggested. By filling in the yarn quality you wish to replace, the amount (in your size) and number of strands, the calculator will present good alternative yarns with the same knitting tension. Additionally it will tell you how much you’ll require in the new qualities and whether you’ll need to work with multiple strands. Most skeins are 50g (some are 25g or 100g).
If the pattern is worked with multiple colours, every colour will have to be calculated separately. Similarly, if the pattern is worked with several strands of different yarns (for example 1 strand Alpaca and 1 strand Kid-Silk) you will have to find alternatives for each, individually.
Why do you show discontinued yarns in the patterns?
Since different yarns have different qualities and textures we have chosen to keep the original yarn in our patterns. However, you can easily find options among our available qualities by using our yarn calculator, or simply pick a yarn from the same yarn group.
It is possible that some retailers still have discontinued yarns in stock, or that someone has a few skeins at home that they would like to find patterns for.
The yarn calculator will provide both alternative yarn as well as required amount in the new quality.
What size should I knit?
If you think it's hard to decide what size to make, it can be a good idea to measure a garment you own already and like the size of. Then you can pick the size by comparing those measures with the ones available in the pattern's size chart.
You'll find the size chart at the bottom of the pattern.
See DROPS lesson: How to read size chart
Why do I get the wrong knitting tension with the suggested needle size?
The needle size provided in the pattern serves only as a guide, the important thing is to follow the knitting tension. And since knitting tension is very individual, you will have to adjust the needle size to ensure that YOUR tension is the same as in the pattern – maybe you’ll have to adjust 1, or even 2 needle sizes, up or down to achieve the correct tension. For this, we recommend that you work test swatches.
Should you work with a different knitting tension than the one provided, the measurements of the finished garment might deviate from the measurement sketch.
See DROPS lesson: How to measure your tension/gauge
See DROPS video: How to make a tension/gauge swatch
Why is the pattern worked top-down?
Working a garment top-down provides more flexibility and room for personal adjustment. For example it is easier to try the garment on while working, as well as making adjustments to length of yoke and shoulder caps.
The instructions are carefully explaining every step, in the correct order. Diagrams are adjusted to the knitting direction and are worked as usual.
How do I work according to a knitting diagram?
The diagram depicts all rows/rounds, and every stitch seen from the right side. It is read from bottom to top, from right to left. 1 square = 1 stitch.
When working back and forth, every other row is worked from the right side and every other row is worked from the wrong side. When working from the wrong side, the diagram will have to be worked reversed: from left to right, knit stitches are purled, purl stitches are knit etc.
When working in the round every round is worked from the right side and the diagram are worked from right to left on all rounds.
See DROPS lesson: How to read knitting diagrams
How do I work according to a crochet diagram?
The diagram depicts all rows/rounds, and every stitch seen from the right side. It is worked from bottom to top, from right to left.
When working back and forth every other row is worked from the right side: from right to left and every other row is worked from the wrong side: from left to right.
When working in the round, every row in the diagram are worked from the right side, from right to left.
When working a circular diagram you start in the middle and work your way outwards, counter clockwise, row by row.
The rows usually start with a given number of chain stitches (equivalent to the height of the following stitch), this will either be depicted in the diagram or explained in the pattern.
See DROPS lesson: How to read crochet diagrams
How do I work several diagrams simultaneously on the same row/round?
Instructions for working several diagrams after each other on the same row/round, will often be written like so: “work A.1, A.2, A.3 a total of 0-0-2-3-4 times". This means you work A.1 once, then A.2 is worked once, and A.3 is repeated (in width) the number of times provided for your size – in this case like so: S = 0 times, M = 0 times, L=2 times, XL= 3 times and XXL = 4 times.
The diagrams are worked as usual: begin with the first row in A.1, then work the first row in A.2 etc.
See DROPS lesson: How to read knitting diagrams
See DROPS lesson: How to read crochet diagrams
Why are the sleeves shorter in larger sizes?
The total width of the garment (from wrist-to-wrist) will be larger in the larger sizes, despite the actual sleeves being shorter. The larger sizes have longer sleeve caps and wider shoulders, so there will be a good fit in all sizes.
Where on the garment is the length measured?
The measurement sketch/schematic drawing provides information regarding the full length of the garment. If it’s a jumper or a jacket the length is measured from the highest point on the shoulder closest to the neckline, and straight down to the bottom of the garment. It is NOT measured from the tip of shoulder. Similarly, the length of yoke is measured from the highest point on the shoulder and down to where yoke is split into body and sleeves.
On a jacket measures are never taken along bands, unless specifically stated. Always measure inside band stitches when measuring the length.
See DROPS lesson: How to read a schematic drawing
What is a repeat?
Diagrams are often repeated on the round or in height. 1 repeat is the diagram the way it appears in the pattern. If it says to work 5 repeats of A.1 in the round, then you work A.1 a total of 5 times after/next to each other in the round. If it says to work 2 repeats of A.1 vertically/in height you work the entire diagram once, then begin again at the start and work the entire diagram one more time.
Why does the piece start with more chain stitches than it’s worked with?
Chain stitches are slightly narrower than other stitches and to avoid working the cast-on edge too tight, we simply chain more stitches to begin with. The stitch count will be adjusted on the following row to fit the pattern and measurement sketch.
Why increase before the rib edge when the piece is worked top-down?
The rib edge is more elastic and will contract slightly compared to, for example, stocking stitch. By increasing before the rib edge, you avoid a visible difference in width between the rib edge and the rest of the body.
Why increase in the cast-off edge?
It’s very easy to cast off too tightly, and by making yarn overs while casting off (and simultaneously casting these off) you avoid a too tight cast off edge.
See DROPS video: How to bind off with yarn overs (yo)
How do I increase/decrease on every 3rd and 4th row/round alternately?
To achieve an even increase (or decrease) you can increase on, for example: every 3rd and 4th row alternately, like so: work 2 rows and increase on the 3rd row, work 3 rows and increase on the 4th. Repeat this until the increase is complete.
See DROPS lesson: Increase or decrease 1 st on every 3rd and 4th row alternately
How can I work a jacket in the round instead of back and forth?
Should you prefer to work in the round instead of back and forth, you may of course adjust the pattern. You’ll need to add steeks mid-front (usually 5 stitches), and follow the instructions. When you would normally turn and work from the wrong side, simply work across the steek and continue in the round. At the end you’ll cut the piece open, pick up stitches to work bands, and cover the cut edges.
See DROPS video: How to knit steeks and cut open
Can I work a jumper back and forth instead of in the round?
Should you prefer to work back and forth instead of in the round, you may of course adjust the pattern so you work the pieces separately and then assemble them at the end. Divide the stitches for the body in 2, add 1 edge stitch in each side (for sewing) and work the front and back pieces separately.
See DROPS lesson: Can I adapt a pattern for circular needles into straight needles?
Why is the pattern slightly different than what I see in the photo?
Pattern repeats can vary slightly in the different sizes, in order to get the correct proportions. If you’re not working the exact same size as the garment in the photo, yours might deviate slightly. This has been carefully developed and adjusted so that the complete impression of the garment is the same in all sizes.
Make sure to follow instructions and diagrams for your size!
How do I make a women’s size garment into a men’s size one?
If you have found a pattern you like which is available in women’s size it’s not very difficult to convert it to men’s size. The biggest difference will be the length of sleeves and body. Start working on the women size that you think would fit across the chest. The additional length will be worked right before you cast off for the armhole/sleeve cap. If the pattern is worked top-down you can add the length right after the armhole or before the first decrease on sleeve.
Regarding additional yarn amount, this will depend on how much length you add, but it is better with a skein too many than too few.
How do I prevent a hairy garment from shedding?
All yarns will have excess fibres (from production) that might come off as lint or shedding. Brushed yarns (ie hairier yarns) have more of these loose, excess fibres, causing more shedding.
Shedding also depends on what is worn under or over the garment, and whether this pulls at the yarn fibres. It’s therefore not possible to guarantee that there will be no shedding
Below are some tips on how to get the best result when working with hairier yarns:
1. When the garment is finished (before you wash it) shake it vigorously so the looser hairs come off. NOTE: do NOT use a lint roller, brush or any method that pulls at the yarn.
2. Place the garment in a plastic bag and put it in your freezer - the temperature will cause the fibres to become less attached to each other, and excess fibres will come off easier.
3. Leave in the freezer for a few hours before taking it out and shaking it again.
4. Wash the garment according to the instructions on the yarn label.
Why does my garment pill?
Pilling is a natural process that happens to even the most exclusive of fibers. It's a natural sign of wear and tear that is hard to avoid, and that is most visible in high friction areas of your garment like a sweater's arms and cuffs.
You can make your garment look as new by removing the pilling, using a fabric comb or a pill/lint remover.
Ginger Dream |
||||||||||
|
|
|||||||||
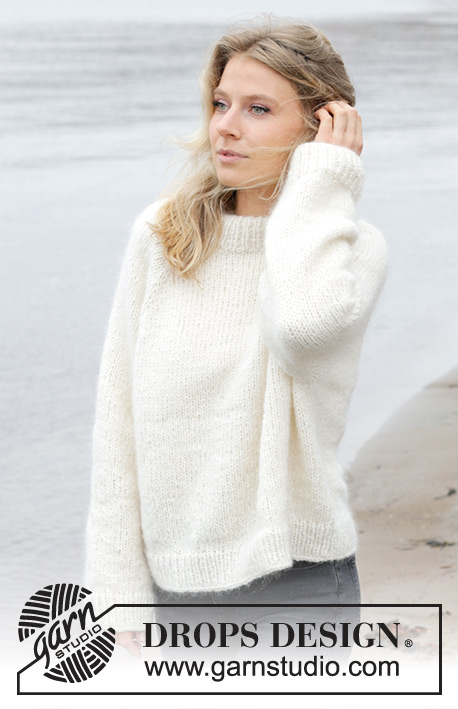
Knitted jumper in DROPS Alaska. The piece is worked top down in stocking stitch with raglan and high neck. Sizes S - XXXL.
DROPS 244-22 |
||||||||||
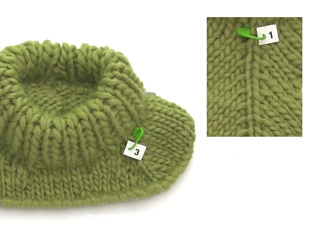
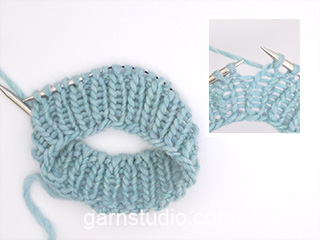
------------------------------------------------------- EXPLANATIONS FOR THE PATTERN: ------------------------------------------------------- PATTERN: See diagrams A.1 and A.2. The diagrams show all rows in the pattern from the right side. INCREASE TIP (evenly spaced): Increase 1 stitch by making 1 yarn over which is worked twisted on the next round to avoid a hole. RAGLAN: Increase 1 stitch before/after A.2. Increase 1 stitch by making 1 yarn over which is worked twisted on the next row/round to avoid a hole. The new stitches are worked in stocking stitch. DECREASE TIP (for sleeves): Decrease 1 stitch on each side of the marker-thread as follows: Work until there are 3 stitches left before the marker-thread, knit 2 together, knit 2 (marker-thread sits between these 2 stitches), slip 1 stitch knit-wise, knit 1 and pass the slipped stitch over the knitted stitch. ------------------------------------------------------- START THE PIECE HERE: ------------------------------------------------------- JUMPER – SHORT OVERVIEW OF THE PIECE: The neck is started in the round with circular needle, working from mid back and top down, followed by the neckline worked back and forth with circular needle with short rows. The yoke is continued in the round with circular needle from mid back, then divided for the body and sleeves and the body is continued in the round with circular needle. The sleeves are worked in the round with short circular needle/double pointed needles. HIGH NECK: Cast on 96-100-104-112-116-124 stitches with short circular needle size 4 mm and DROPS Alaska. Knit 1 round, then work rib (knit 1, purl 1) for 9-9-10-10-11-11 cm. NOTE: If you want a double neck, it can be folded double later and sewn down with a couple of stitches on each side. When the rib is finished, work as follows: Knit 11-13-13-15-17-19 and decrease 2-2-3-3-3-4 stitches evenly spaced over these stitches (half back piece), work A.1 (A.1 should match the purl 1, knit 1, purl 1 from the rib – insert marker-1 in the knitted stitch), knit 19 and decrease 4 stitches evenly spaced over these stitches (sleeve), work A.1 (insert marker-2 in the knitted stitch), knit 23-25-27-31-33-37 and decrease 4-4-6-6-6-8 stitches evenly spaced over these stitches (front piece), work A.1 (insert marker-3 in the knitted stitch), knit 19 and decrease 4 stitches evenly spaced over these stitches (sleeve), work A.1 (insert marker-4 in the knitted stitch), knit 12-12-14-16-16-18 and decrease 2-2-3-3-3-4 stitches evenly spaced over these stitches (half back piece) = 88-92-92-100-104-108 stitches (23-25-25-29-31-33 stitches between the marker-stitches on the front and back pieces and 19 stitches between the marker-stitches on each sleeve). A.1 is worked in each transition between the body and sleeves, with the marker-stitches on each raglan-line. Cut the strand. NECKLINE: Change to circular needle size 5.5 mm. Insert 1 marker at the beginning of the round (mid-back). This marker should be a different colour from the raglan-markers to mark mid-back. Now work short rows for a neckline and increase for raglan as follows: REMEMBER THE KNITTING TENSION. ROW 1 (right side): Start 2 stitches before A.1 with marker-3 (left front side of neck when the garment is worn). Knit and work the last row in A.1; increase for RAGLAN on each side of A.1 in each transition between the body and sleeves – read description above, and until you have worked 2 stitches past marker-stitch 2 (right front of neck = 8 increased stitches for raglan). Turn, tighten the strand. ROW 2 (wrong side): Purl and work A.2 over A.1 (remember to work the yarn overs twisted) and increase for raglan before/after each A.2 only on the front and back pieces and until you have worked 2 stitches past where the short rows started by marker-3 (do not increase on the sleeves = 4 increased stitches). Turn, tighten the strand. ROW 3 (right side): Knit and work A.2; increase for raglan on each side of every A.2, on both the body and sleeves, until you have worked 2 stitches past the previous turn by marker-2 (8 increased stitches). Turn, tighten the strand. ROW 4 (wrong side): Work as before and increase for raglan before/after each A.2 only on the front and back pieces and until you have worked 2 stitches past where you last turned by marker-3 (= 4 increased stitches). Turn, tighten the strand. ROW 5 (right side): Work as before and increase for raglan before/after each A.2 on both the body and sleeves and until you have worked 2 stitches past the previous turn by marker-2 (8 increased stitches). Turn, tighten the strand. ROW 6 (wrong side): Work as before and increase for raglan before/after each A.2 only on the front and back pieces and until you have worked 2 stitches past the previous turn by marker-3. Cut the strand. The short rows are finished and you have increased 6 times for raglan on the body and 3 times on the sleeves = 124-128-128-136-140-144 stitches. YOKE: Start mid-back again and continue in the round with stocking stitch and A.2; continue to increase for raglan as follows: SIZES S, M and L: Increase for raglan on each side of A.2 on the body and sleeves, every 2nd round, 5-5-9 times = 164-168-200 stitches. Then continue to increase for raglan every 2nd round but every 2nd increase is only on the body, i.e., increase on the body every 2nd round and on the sleeves every 4th round (alternately 4 and 8 increased stitches). Increase like this 12-14-12 times on the body and 6-7-6 times on the sleeves = 236-252-272 stitches. The sleeve increases are now finished. Increase on the body one more time = 240-256-276 stitches. All increases are now finished. SIZES XL, XXL and XXXL: Increase for raglan on each side of A.2 every round but every 2nd increase is only on the body, i.e., increase on the body every round and on the sleeves every 2nd round (alternately 4 and 8 increased stitches). Increase like this 2-4-8 times on the body and 1-2-4 times on the sleeves = 148-164-192 stitches. Increase for raglan on each side of every A.2 every 2nd round, 13-9-7 times = 252-236-248 stitches. Continue to increase for raglan every 2nd round but every 2nd increase is only on the body, i.e., increase on the body every 2nd round and on the sleeves every 4th round (alternately 4 and 8 increased stitches). Increase like this 9-13-15 times on the body and 4-6-7 times on the sleeves = 304-312-336 stitches. The increases on the body are finished. Continue to increase on the sleeves on every 4th round 0-1-1 more time = 304-316-340 stitches. The sleeve increases are now finished. ALL SIZES: = 240-256-276-304-316-340 stitches. Work stocking stitch and A.2 without further increases until the yoke measures 22-24-25-26-28-30 cm, after the neck mid-back. Divide for the body and sleeves as follows: Knit 36-40-41-45-49-54 (half back piece), place the next 47-49-55-61-61-63 stitches on 1 thread for the sleeve, cast on 8-8-10-10-12-14 stitches (in side under sleeve), knit 73-79-83-91-97-107 (front piece), place the next 47-49-55-61-61-63 stitches on 1 thread for the sleeve, cast on 8-8-10-10-12-14 stitches (in side under sleeve), knit 37-39-42-46-48-53 (half back piece). The body and sleeves are finished separately. The piece is now measured from here! BODY: = 162-174-186-202-218-242 stitches. Insert 1 marker-thread in the middle of the new stitches under 1 sleeve. Work to the marker-thread. The round starts here. Work stocking stitch in the round for a further 28-28-29-30-30-30 cm. Knit 1 round and increase 32-32-34-38-40-46 stitches evenly spaced – read INCREASE TIP = 194-206-220-240-258-288 stitches. Change to circular needle size 4 mm. Work rib (knit 1, purl 1) for 4 cm. Cast off a little loosely. The jumper measures approx. 60-62-64-66-68-70 cm from the shoulder. SLEEVES: Place the 47-49-55-61-61-63 stitches from the thread on the one side of the piece on short circular needle/double pointed needles size 5.5 mm and knit up 1 stitch in each of the new stitches cast on under the sleeve = 55-57-65-71-73-77 stitches. Insert a marker-thread in the middle of the new stitches under the sleeve; allow it to follow your work onwards. Start at the marker-thread and work stocking stitch in the round. When the sleeve measures 4-4-4-4-3-3 cm, decrease 2 stitches mid under sleeve – read DECREASE TIP. Decrease like this every 8-7½-4½-3-3-2½ cm a total of 5-5-8-11-11-12 times = 45-47-49-49-51-53 stitches. Continue working until the sleeve measures 41-39-39-38-37-35 cm from the division. Knit 1 round and increase 9 stitches evenly spaced – remember INCREASE TIP = 54-56-58-58-60-62 stitches. Change to double pointed needles size 4 mm and work rib (knit 1, purl 1) for 4 cm. Cast off a little loosely. The sleeve measures approx. 45-43-43-42-41-39 cm from the division. Work the other sleeve in the same way. |
||||||||||
Diagram explanations |
||||||||||
|
||||||||||
Have you made this or any other of our designs? Tag your pictures in social media with #dropsdesign so we can see them! Do you need help with this pattern?You'll find tutorial videos, a Comments/Questions area and more by visiting the pattern on garnstudio.com. © 1982-2024 DROPS Design A/S. We reserve all rights. This document, including all its sub-sections, has copyrights. Read more about what you can do with our patterns at the bottom of each pattern on our site. |
With over 40 years in knitting and crochet design, DROPS Design offers one of the most extensive collections of free patterns on the internet - translated to 17 languages. As of today we count 304 catalogues and 11422 patterns - 11422 of which are translated into English (UK/cm).
We work hard to bring you the best knitting and crochet have to offer, inspiration and advice as well as great quality yarns at incredible prices! Would you like to use our patterns for other than personal use? You can read what you are allowed to do in the Copyright text at the bottom of all our patterns. Happy crafting!
Comments / Questions (12)
Greta Cava wrote:
Dere må legge inn Raglan økning, kastene skal vries i riktig retning, f.eks slik: kastene strikkes vridd mot høyre på h side og mot venstre på v side...
22.01.2024 - 18:11Graziella wrote:
Bonjour, Les raglans ne semblent pas se joindre sous la manche des deux côtés. Est-ce normal?
06.11.2023 - 22:50DROPS Design answered:
Bonjour Graziella, effectivement, en fonction de la taille, la division se fera à un endroit différent de A.2, mais quoi qu'il arrive, on tricote ensuite tout en jersey, on ne continue pas les mailles envers de A.2. Bon tricot!
07.11.2023 - 08:58Aman Nath wrote:
Hi, i am fairly new at knitting so please help me understand the pattern. i have finished the neck ribbing and stuck. the pattern asks for dec but the total remaining St count doesn't add up... if your neckline is 96, how do you end up with 88 after total dec of 16 + 4 A1.
27.09.2023 - 03:08DROPS Design answered:
Hi Aman, You decrease stitches over each part of the round where you work stocking stitch; first decrease 2 stitches over the first section, then work A.1, then decrease 4 stitches over the next section and so on. You decrease in total 2+4+4+4+4+2=20 decreases. However, in each A.1 you make 2 yarn overs (increase 2 stitches), which gives you 8 increased stitches. So the final stitch number is 96-20+8=84 (not 88) in size S. Happy knitting!
27.09.2023 - 06:53Sylvia wrote:
Wieso ist der Beginn der Runde nach Stillegung der Ärmelmaschen nicht mehr in der hinteren Mitte sondern in der Mitte der neu angeschlagenen Maschen unter einem Ärmel?
18.09.2023 - 10:15DROPS Design answered:
Liebe Sylvia, so wird das Ende der Runde am Ende in der Seite, wo mehr unauffällig wird. Viel Spaß beim stricken!
18.09.2023 - 16:08Ana wrote:
En el aumento ranglán, ¿cómo distingo la parte de las mangas de la parte del delantero y espalda para hacer los aumentos solamente en alguno de ellos? Si hay que hacer 8 aumentos y luego 4, entiendo que los primeros aumentos serían en todas las partes y los 4 en sólo dos de ellas. ¿Cómo podría diferenciarlo? Gracias.
17.09.2023 - 19:25DROPS Design answered:
Hola Ana, en el cuello alto has insertado marcapuntos en cada sección: el 1 en la transición entre la espalda y la manga izquierda, el 2 entre la manga izquierda y el delantero, el 3 entre el delantero y la manga derecha y el 4 entre la manga derecha y la espalda. El inicio de la vuelta está en el centro de la espalda y se marca con otro marcapuntos. Los aumentos para el raglán se trabajan antes y después de A.1 (en la FILA 1) / A.2 (el resto de las filas). Cuando solo se trabajan los aumentos del cuerpo aumentar: antes del marcapuntos-1, después del marcapuntos-2, antes del marcapuntos-3 y después del marcapuntos-4.
17.09.2023 - 23:40Astrid wrote:
Je begint de hals met Teltekening A1 tijdens de verdeling van de Panden vervolgens brei je 1 e naald verkorte rijen en pas bij de tweede rij zou je de omslagen breien maar als ik tel tekening 1 volg brei ik de omslagen al in de 1e naald Bij tel tekening a2 wordt niet gemeerderd?
17.09.2023 - 17:42DROPS Design answered:
Dag Astrid,
Klopt, je breit de omslagen van de eerste naald van A.1 gelijk al bij de paragraaf 'HOGE HALS'. (Deze omslagen brei je op de volgende naald gedraaid, om gaatjes te voorkomen.) Bij het breien van de halslijn maak je tegelijkertijd meerderingen voor de raglan aan elke kant van A.1
18.09.2023 - 20:26Efira wrote:
Ik ben er al uit. Ik weet niet hoe ik mijn bericht kan verwijderen
12.09.2023 - 08:27Efira wrote:
Ik heb hulp nodig bij het verminderen deel bij de Hogen Hals. Ik blijk niet goed te snappen hoe ik 2x verdeelt verminder op 13 steken, en/of 4x verdeeld verminderen op 19 steken enz. Ik heb het al eens geprobeerd maar kwam de laaste 12 steken tekort!? Ook heb ik het voorbeeld pagina al 3x door gelezen lol. Ik werk maat M op het moment. Alvast bedankt.
11.09.2023 - 16:52Marina wrote:
Almendra
06.08.2023 - 12:09Vanilla wrote:
Caramel leaf
04.08.2023 - 17:30