
Popular categories
Looking for a yarn?


Comments / Questions (49)
![]() Catherine Difftot wrote:
Catherine Difftot wrote:
S’il vous plaît, où pourrais-je trouver le patron du modèle de moufles 173-42? Merci
18.02.2026 - 16:02DROPS Design answered:
Bonjour Mme Diffot, vous trouverez les explications des moufles en français, ici. Bon tricot!
19.02.2026 - 08:37
![]() Jette wrote:
Jette wrote:
Hallo, ich möchte gerne Socken in der Toe-Up-Technik stricken, angelehnt an diese Anleitung, aber nicht unbedingt bunt gestrickt. Für Socken, die man von der Spitze aus hoch strickt, fehlt mir leider spätestens bei der Ferse die Vorstellungskraft. Es wäre wunderbar, wenn sie für die Toe-Up-Fersentechniken mit Zwickel auch so kleine Videos machen könnten, so dass man lernt, das Prinzip zu verstehen. Danke für alles!
07.11.2025 - 18:40DROPS Design answered:
Liebe Jette, wir haben Ihren Wunsch gut aufgenommen, gerne könnne Sie auch mal dazwischen Ihre Fragen stellen, oder Ihr Wollladen nach Hilfe - auch per E-Mail oder Telefon- bitten. Viel Spaß beim Stricken!
18.11.2025 - 11:39
![]() Linnea Elvira wrote:
Linnea Elvira wrote:
Summan av kardemumman är att instruktionen som säger att man ska sticka både första och andra raden av A.2 vid samma tillfälle är inkorrekt (andra raden stickas först på nästa varv för att vara möjligt och stämma med mönstret i A.1). I DROPS egna instruktionsvideo om lettisk fläta visar de exakt dessa vantar och sockar och man kan se tydligare hur tummen ska se ut!
01.10.2025 - 19:49
![]() Linnea Elvira wrote:
Linnea Elvira wrote:
Sista delen av min kommentar :) : Jag stickade största delen av vanten ut och in för att undvika att trådarna skulle dra, det gjorde stor skillnad i mönstret att hela tiden placera den gula tråden närmast arbetet.
01.10.2025 - 19:42
![]() Linnea Elvira wrote:
Linnea Elvira wrote:
Sticka färdigt varvet enligt A.1 (62m (52-3+13) på varvet). Fortsätt enligt A1, samt A2 "under" den svarta rutan i diagrammet, när de 14 raderna av svart ruta är klara har du återigen 52 m på varvet. Övriga tips Lägg extra tid på början av vanten, jag gjorde om den 5 ggr för att få den bra. Tricket för mig var att göra maskorna på den magiska cirkeln mycket tighta för att få det snyggt.
01.10.2025 - 19:41
![]() Linnea Elvira wrote:
Linnea Elvira wrote:
TUMÖPPNING: När du kommer till den svarta rutan i A.1 avmaska tre maskor (jag maskade av i den färg som du skulle fortsatt med i mönstret). Fortsätt sedan som vanligt varvet ut enligt A.1 (49 m (52 minus 3) på varvet). TUMKIL: När du kommer till de 3 avmaskade m (den svarta rutan) på nästa varv lägger du upp 13 nya maskor på höger sticka, lägg upp enligt första raden i A.2 (sök på \"ögleuppläggning\" för instruktioner).
01.10.2025 - 19:39
![]() Linnea Elvira wrote:
Linnea Elvira wrote:
Gör ett försök att förklara hur jag löste tummen och jag tycker det ser rätt ut, kanske kan hjälpa någon! När arbetet mäter 12 cm eller den längd som passar handen ska det stickas en TUMM-ÖPPNING och en TUMM-KIL på delen för handflatan, själva tummen stickas först när A.1 är färdig. Tumm-kilen kommer stickas där den svarta rutan ligger i diagram A.1.
01.10.2025 - 19:36
![]() Jensen wrote:
Jensen wrote:
Ups, så fandt jeg ud af hvad der var galt, havde ikke lige læst 1. line i opskriften - start fra fingerspids :-) En vigtig detalje ,,,,
03.02.2025 - 08:51
![]() Jensen wrote:
Jensen wrote:
Altså jeg strikker jo fra håndled og op, ved jo ikke hvornår vanten måler 12 cm fra spidsen ? Er I sikre på at pilen er placeret korrekt ? Der jo 14 omgange med 3 sorte felter inden jeg kommer til pilen ?
25.01.2025 - 17:20DROPS Design answered:
Hei Jensen. Oppskriften er skrevet fra fingertupp til håndledd, slik at da skal det stemme slik det står i oppskriften. mvh DROPS Design
27.01.2025 - 11:04
![]() Jensen wrote:
Jensen wrote:
Mange tak - Men jeg forstår ikke hvad jeg skal med de 3 masker inden jeg når til pilen ? Hvor de lukkes af, Ialt 14 omg ? Der står hop over ?
20.01.2025 - 17:39DROPS Design answered:
Hej Jensen, de 3 masker strikkes på samme måde som alle de andre masker til du bliver lukket af. På pinden efter at de er lukket af, slår du 13 nye masker op, disse masker skal strikkes ifølge A.2 og alle de andre strikkes videre ifølge A.1 som tidligere (men de 3 masker er jo lukket af, så derfor er de markeret som sort i diagrammet) :)
23.01.2025 - 14:14
|
|||||||||||||||||||||||||||||||||||||||||||
Hokey Pokey#hokeypokeyset |
|||||||||||||||||||||||||||||||||||||||||||
 |
 |
||||||||||||||||||||||||||||||||||||||||||
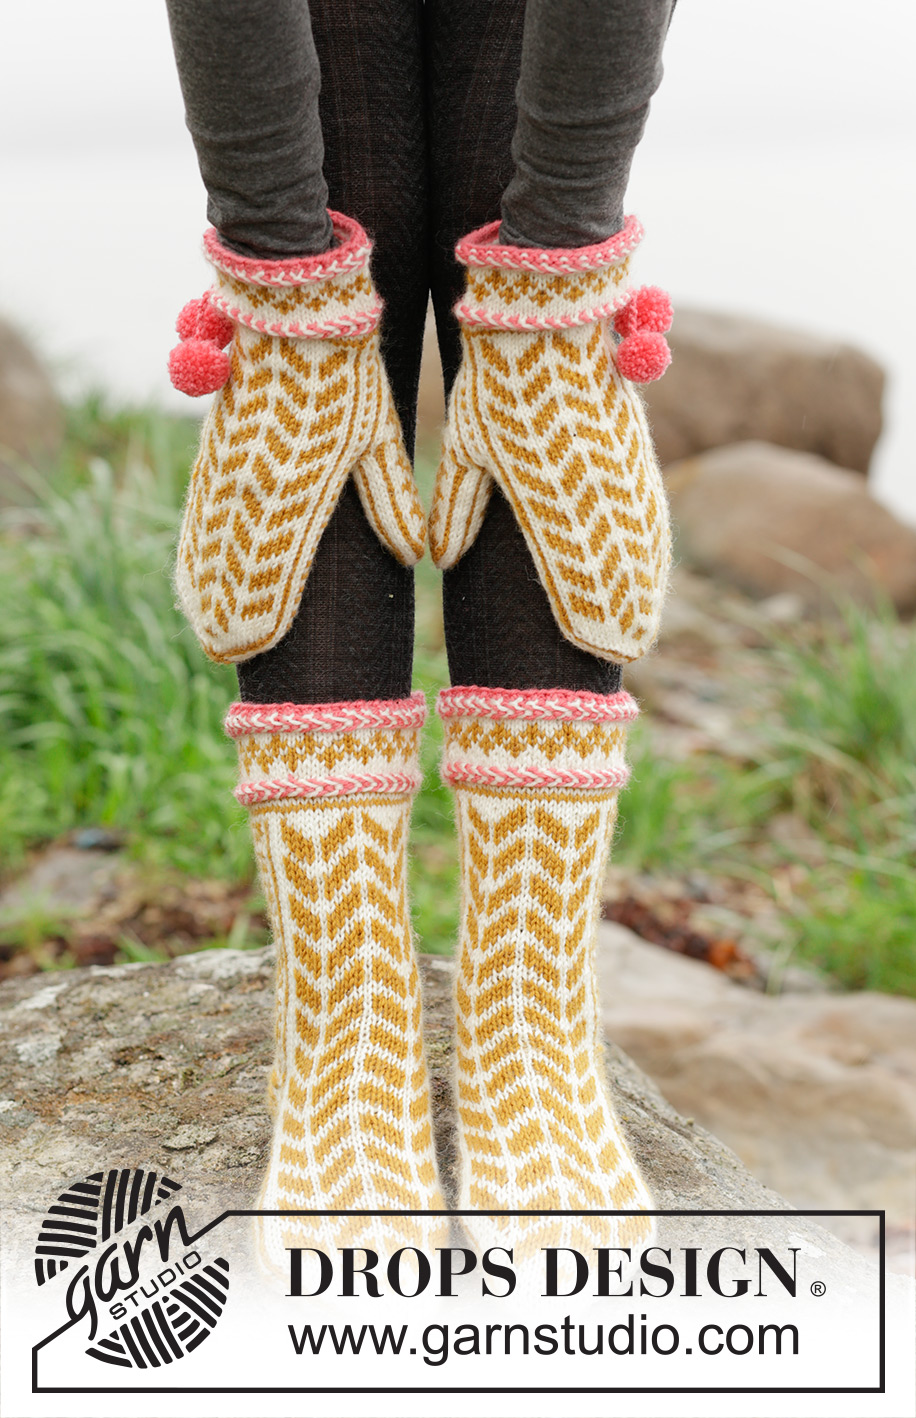
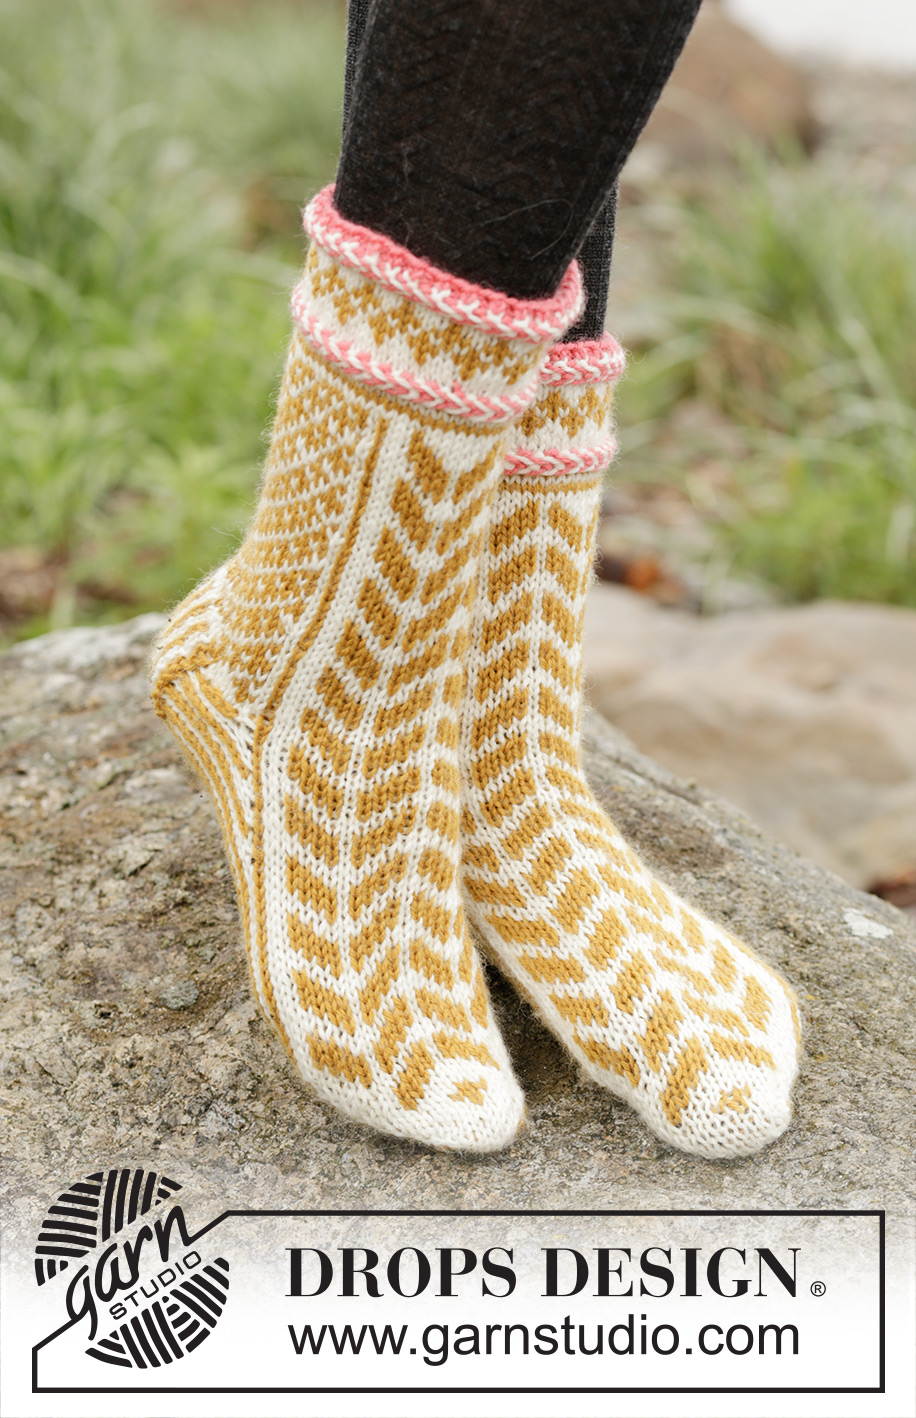
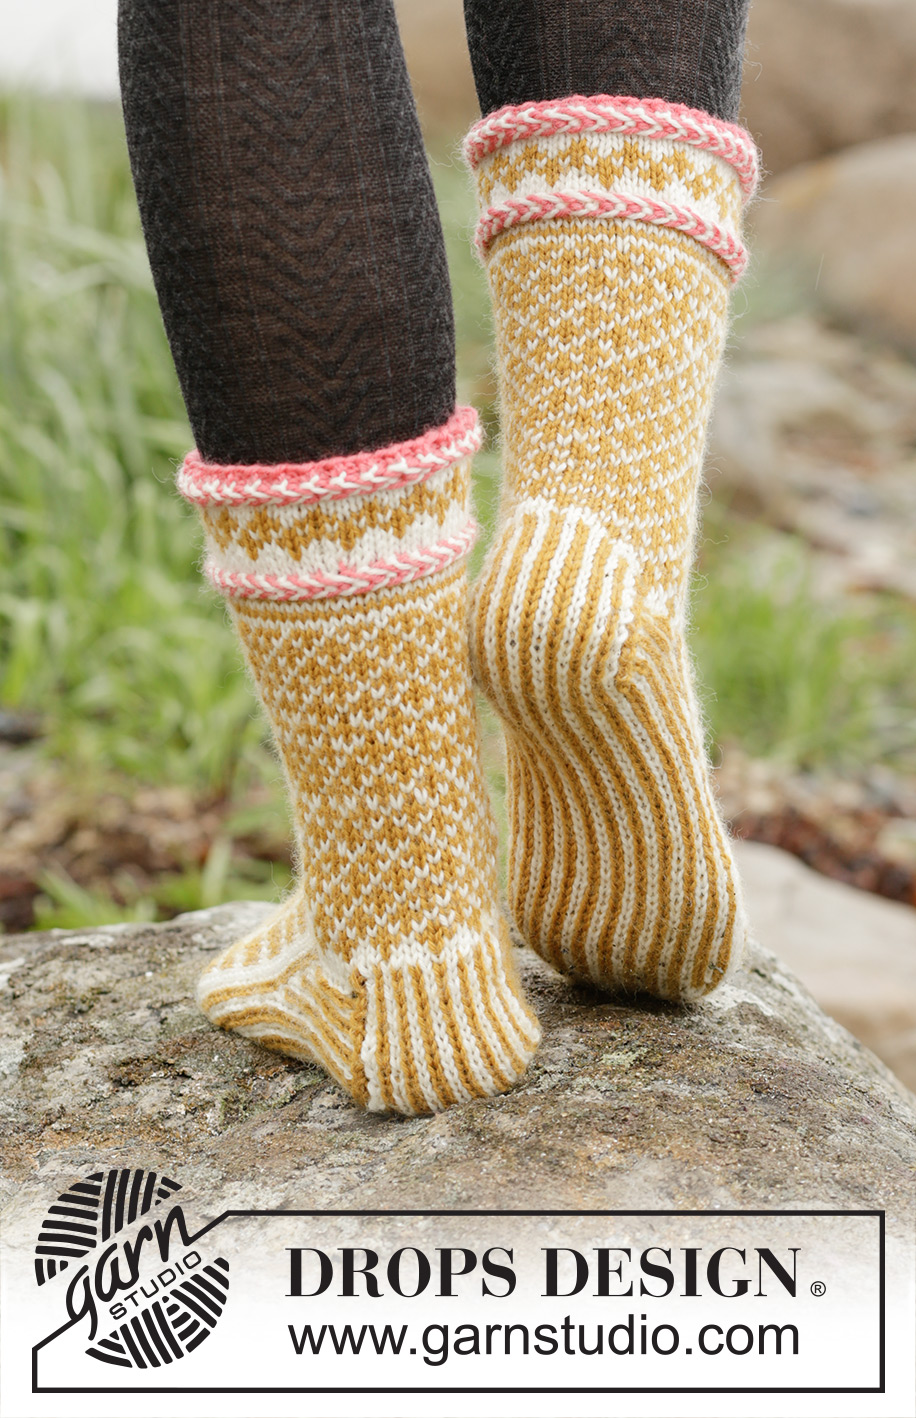
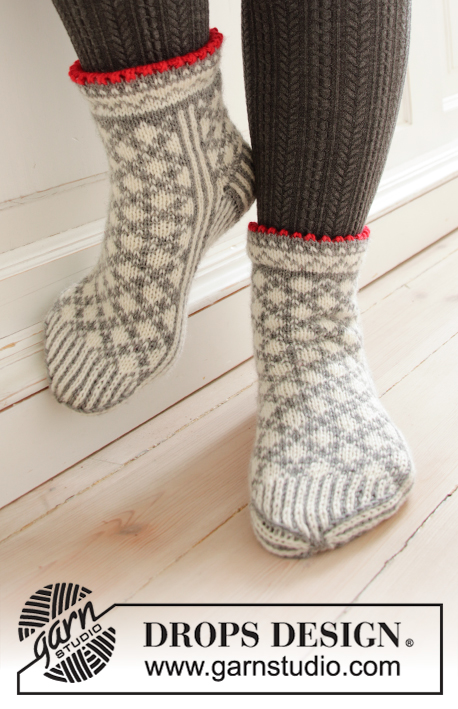
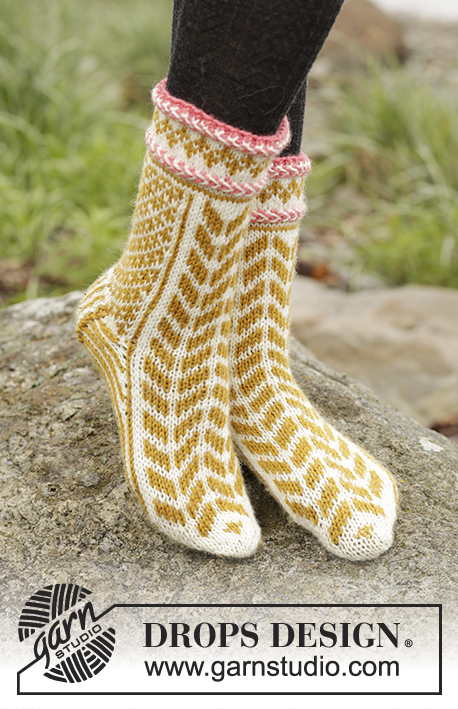
Set consists of: Knitted DROPS mittens and toe-up socks with Nordic pattern, Latvian braid and pompoms in ”Karisma”.
DROPS 173-42 |
|||||||||||||||||||||||||||||||||||||||||||
|
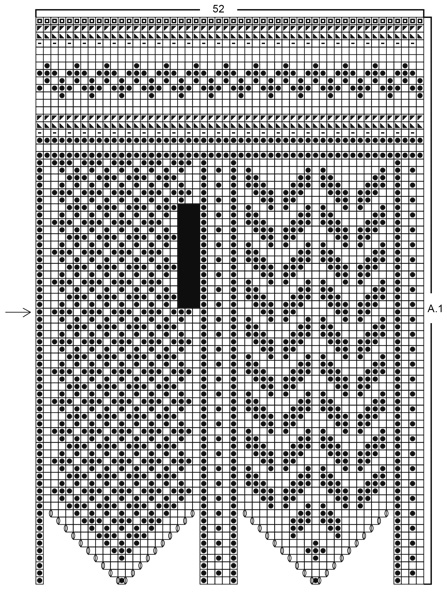
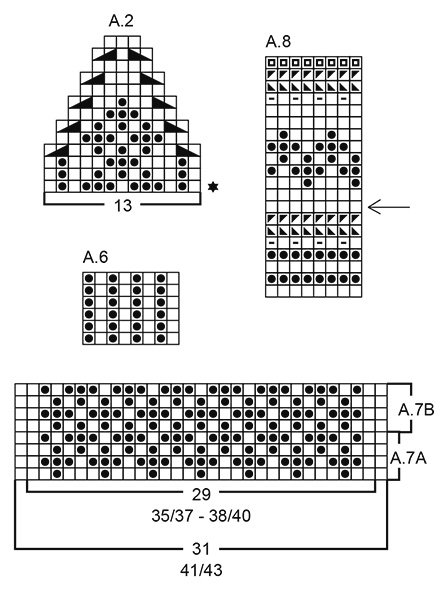
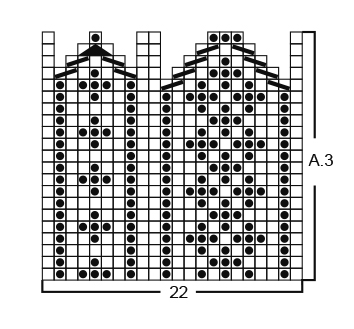
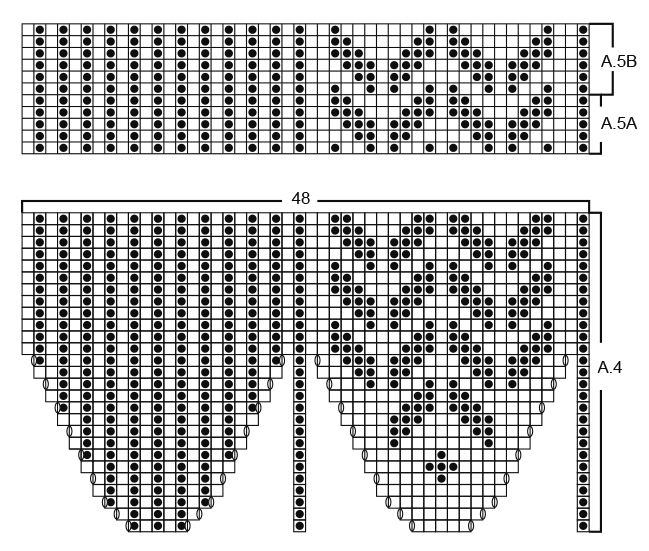
MITTENS: MAGIC CIRCLE: To avoid hole in the middle beg with this technique: Hold yarn end in the left hand and make a loop around left index finger (from left to right). Hold the loop with left thumb and index finger. Insert needle through loop, get yarn from ball (i.e. place yarn 1 time over needle from you), pull yarn back through loop, 1 YO (now place yarn from the back and towards you) and pull YO through sts on needle, * insert needle through loop, 1 YO (place yarn from the back and towards you), pull YO through loop, 1 YO (from the back and towards you) and pull YO through outermost st on right needle (i.e. the last st made) *, repeat from *-* until there are 12 sts on needle. Distribute sts on 4 double pointed needles size 3 mm / US 2.5 as explained in pattern. Then work as explained in pattern – AT THE SAME TIME pull yarn end so that loop is tighten tog and the hole disappears. PATTERN: See diagrams A.1 to A.3. Work entire pattern in stockinette st. LATVIAN BRAID: Braid consists of 3 rounds - all rounds are shown in diagram and worked as follows: ROUND 1: * K 1 with off white, K 1 with coral *, repeat from *-* the entire round. ROUND 2: Place both strands in the front of piece (towards you). Then move the off white strand to the back, P 1 and move the strand to the front again. Pull the coral strand underneath the off white strand and then move the coral to the back, P 1 and move the strand to the front again. Continue like this with P alternately with off white and coral but always place the strand underneath the strand from the last st worked. ROUND 3: Work as 2nd round but now place strand always OVER strand from the last st worked. ---------------------------------------------------------- LEFT MITTEN: Worked in the round on double pointed needles and work from fingertip to wrist. Start with mustard and MAGIC CIRCLE - see explanation above = 12 sts distributed on 4 double pointed needles 3 mm - NOTE: If you do not want to start with a magic circle cast on 12 sts with mustard distributed over 4 double pointed needles size 3 mm / US 2.5 (when mitten is done baste a yarn up and down through sts around hole at the top and tighten tog). Then work pattern in the round according to diagram A.1 and inc as shown in diagram = 52 sts on needle. REMEMBER THE KNITTING GAUGE When piece measures 12 cm / 4¾" from the tip (i.e. after round marked with arrow in diagram), bind off 3 sts over the 3 black squares in diagram for thumb opening (try the mitten and work to desired length). On next round: cast on 13 new sts over these = 62 sts on needle. NOTE: cast on as if working first row of diagram A.2, ie: cast on with 2 colors. See black star in diagram. Continue A.2 over these 13 sts, and A.1 as over the remaining sts. . When A.2 has been worked, there are 52 sts on needle and continue A.1 in the round over all sts again. When A.1 has been worked, loosely bind off with coral. The entire mitten measures approx. 24 cm / 9½". THUMB: Pick up 1 st in each of the 13 sts cast on for thumb opening and pick in addition up 9 sts around thumb opening = 22 sts. Distribute sts on double pointed needles size 3 mm / US 2.5 and work pattern in the round according to diagram A.3. Dec as shown in diagram. When A.3 has been worked, 8 sts remain on needle. Cut the yarns and pull them through the remaining sts, tighten tog and fasten. POMPOM: Make 1 small pompom with coral with an approx. diameter of 3 cm / 1". When tying the yarn around the pompom leave approx. 20 cm / 8" of yarn at the end. Now use the yarn ends and make knots after each other in a row until this tie is approx. 3 cm / 1". Then fasten tie with pompom in the side on mitten (see picture). There should be 2 pompom with ties in the side on mitten. RIGHT MITTEN: Cast on and work as left mitten but reversed, i.e. the 3 black squares for thumb are worked in 2nd, 3rd and 4th st from the left in the diagram. ---------------------------------------------------------- SOCKS: PATTERN: See diagrams A.4 to A.8 – choose diagram for correct size. INCREASE TIP: Inc 1 st by making 1 YO, on next round work YO twisted to avoid holes. HEEL: ROW 1 (= RS): Work until 10-10-11 sts remain, slip 1 st as if to K, K 1, psso, turn piece. ROW 2 (= WS): Work until 10-10-11 sts remain, slip 1 st as if to P, P 1, psso, turn piece. ROW 3 (= RS): Work until 9-9-10 sts remain, slip 1 st as if to K, K 1, psso, turn piece. ROW 4 (= WS): Work until 9-9-10 sts remain, slip 1 st as if to P, P 1, psso, turn piece. Continue dec like this with 1 less st before each dec until there are 17-17-19 sts on needle. LATVIAN BRAID: Braid consists of 3 rounds - all rounds are shown in diagram and worked as follows: ROUND 1: * K 1 with off white, K 1 with coral *, repeat from *-* the entire round. ROUND 2: Place both strands in the front of piece (towards you). Then move the off white strand to the back, P 1 and move the strand to the front again. Pull the coral strand underneath the off white strand and then move the coral to the back, P 1 and move the strand to the front again. Continue like this with P alternately with off white and coral but always place the strand underneath the strand from the last st worked. ROUND 3: Work as 2nd round but now place strand always OVER strand from the last st worked. ---------------------------------------------------------- SOCK: Worked in the round on double pointed needles and work from the toes and up. Cast on 12 sts on double pointed needles size 3.5 mm / US 4 with off white. Work pattern in the round according to diagram A.4 and inc as shown in diagram = 48 sts on needle. REMEMBER THE KNITTING GAUGE When A.4 is done, continue pattern in the round according to diagram A.5A. When piece measures 15-17-18 cm / 6"-6¾-7" from toe (approx. 7-7-9 cm / 2¾"-2¾"-3½" remain until full foot length – try the sock and work to desired length) insert 1 marker in 1st st on round and 1 marker in 25th st on round (both markers are in a mustard st on sock). Now inc 1 st before first marker and 1 st after 2nd marker - READ INCREASE TIP (= 2 sts inc). Inc like this every other round a total of 6-6-8 times = 60-60-64 sts on needle –NOTE: Work the inc sts in stripes under foot. After last inc keep the first 25 sts on needle and continue with stripes back and forth according to diagram A.6 over the remaining 35-35-39 sts for 3½-3½-4 cm / 1¼"-1¼"-1½" (sock measures 22-24-27 cm / 8¾"-9½"-10½" from the toe). Then work HEEL - see explanation above, over the 35-35-39 sts (continue stripes in A.6 as before). After heel work next round as follows: Work with off white over the 17-17-19 sts on heel, pick up 8-8-9 sts (with off white) along edge on the 3½-3½-4 cm / 1¼"-1¼"-1½" worked back and forth, continue A.5A over the next 25 sts and pick up 8-8-9 sts along edge on the 3½-3½-4 cm / 1¼"-1¼"-1½" in the other side = 58-58-62 sts on needle. Insert 1 marker, NOW MEASURE PIECE FROM HERE! Work next round as follows: Work pattern according to diagram A.7A over the first 33-33-37 sts (= behind sock) and dec AT THE SAME TIME 4-4-6 sts evenly over these sts on first round, so that pattern continues over 29-29-31 sts, continue A.5A as before over the next 25 sts (= at the front of sock) = 54-54-56 sts on needle. When A.7A has been worked one time vertically, repeat A.7B over these 29-29-31 sts (continue A.5A as before at the front of sock). AT THE SAME TIME when piece measures 4 cm / 1½", inc 1 st inside outermost st in each side of A.7B - READ INCREASE TIP (= 2 sts inc). Inc like this every 4 cm / 1½" a total of 3 times = 60-60-62 sts - NOTE: Work the inc sts in A.7B but the outermost 1-1-2 sts in each side should always be in off white. When piece measures approx. 13-14-15 cm / 5"-5½"-6" from marker – adjust after one whole repetition in A.5A and finish as shown on last round in A.5B K 1 round over all sts with off white. Then continue pattern in the round according to diagram A.8. AT THE SAME TIME on round marked with arrow inc 4-4-6 sts evenly = 64-64-68 sts. When A.8 has been worked, loosely bind off with coral. Sock measures approx. 19-20-21 cm / 7½-8"-8¼" from marker. ASSEMBLY: Sew opening at the front of toe tog with grafting/kitchener sts in mustard. Knit another sock the same way. |
|||||||||||||||||||||||||||||||||||||||||||
Diagram explanations |
|||||||||||||||||||||||||||||||||||||||||||
|
|||||||||||||||||||||||||||||||||||||||||||
 |
|||||||||||||||||||||||||||||||||||||||||||
 |
|||||||||||||||||||||||||||||||||||||||||||
 |
|||||||||||||||||||||||||||||||||||||||||||
 |
|||||||||||||||||||||||||||||||||||||||||||
Have you finished this pattern?Tag your pictures with #dropspattern #hokeypokeyset or submit them to the #dropsfan gallery. Do you need help with this pattern?You'll find 19 tutorial videos, a Comments/Questions area and more by visiting the pattern on garnstudio.com. © 1982-2026 DROPS Design A/S. We reserve all rights. This document, including all its sub-sections, has copyrights. Read more about what you can do with our patterns at the bottom of each pattern on our site. |
|||||||||||||||||||||||||||||||||||||||||||


With over 40 years in knitting and crochet design, DROPS Design offers one of the most extensive collections of free patterns on the internet - translated to 17 languages. As of today we count 325 catalogs and 12298 patterns - 12288 of which are translated into English (US/in).
We work hard to bring you the best knitting and crochet have to offer, inspiration and advice as well as great quality yarns at incredible prices! Would you like to use our patterns for other than personal use? You can read what you are allowed to do in the Copyright text at the bottom of all our patterns. Happy crafting!
Post a comment to pattern DROPS 173-42
We would love to hear what you have to say about this pattern!
If you want to leave a question, please make sure you select the correct category in the form below, to speed up the answering process. Required fields are marked *.