Comments / Questions (4)
![]() Ruth Härtlein wrote:
Ruth Härtlein wrote:
I also have a problem with the increase after 10 cm on the back, that you discussed with Mrs Haugen. My questions are: will there be 3 edge stitches, in garter stitch after the increase? Or 1 or 2? - So does A1 start with stitch 2,3 or 4? And why does it look on the drawing of the pattern like a DEcrease rather than an INcrease? Thanks you very much!
20.03.2021 - 10:31DROPS Design answered:
Dear Mrs Härtlein, after you have cast on 1 new stitch on each side; these stitches will be worked in garter stitch as edge stitches and when working A.1 work: 1 edge st in garter st, repeat A.1 (= 2 sts) and finish with 1 edge st in garter stitch. These stitches are cast on for seam allowance. Happy knitting!
22.03.2021 - 07:34
![]() Rosi Campbell wrote:
Rosi Campbell wrote:
Hi. Question re sleeve instructions. The instruction is to start decrease for sleeve when garment measures 3cm. Please advise on the correct length. Also cast off lengths on sleeve get smaller as the size of the garment increases. Should these be reversed? Thanks for advice.
22.04.2018 - 14:28DROPS Design answered:
Dear Mrs Campbell, sleeves are worked top down and dec start after 3 cm have been worked after picking up sts. The measurements are smaller in larger sizes since the shoulders are wider. Feel free to adjust measurement to your own - comparing finished measurements shown in chart. Happy knitting!
23.04.2018 - 10:21
![]() Barbara Haugen wrote:
Barbara Haugen wrote:
Back instructions: "2 sts in garter st in each side of piece" Doesn't that make these "edge stitches"? I don't understand the following instructions: "When piece measures 10 cm / 4'', cast on 1 new st in each side of piece at the end of the next 2 rows" - If I add one new st each side, then are there 3 "edge" sts on each side? And I don't understand what this means: "(= edge st) = 78-82-86-94-102-110 sts."
20.08.2015 - 01:34DROPS Design answered:
Dear Mrs Haugen, you start first working 2 sts in garter st in each side, then inc 1 st in each side and continue with A.1 inside 1 st in garter st in each side. Happy knitting!
20.08.2015 - 13:49
![]() Barbara Haugen wrote:
Barbara Haugen wrote:
It seems that if you "cast on 1 new st in each side of piece at the end of the next 2 rows" the total number of stitches will increase by 4, but in the directions below you have indicated only an increase of 2. Is this an error, or am I not understanding? Cast on 76-80-84-92-100-108 sts on circular needle size 6 mm / US 10 with Paris... When piece measures 10 cm / 4'', cast on 1 new st in each side of piece at the end of the next 2 rows (= edge st) = 78-82-86-94-102-110 sts
20.08.2015 - 01:22DROPS Design answered:
Dear Mrs Haugen, you first inc 1 st at the end of 1st row (= 1 st inc), then turn and work next row inc 1 st at the end of this row (= 1 st inc), you have now increased 2 sts = 1 st at the end of both last rows. Happy knitting!
20.08.2015 - 13:47
Mediterranean Breeze |
|||||||||||||
|
|
|||||||||||||
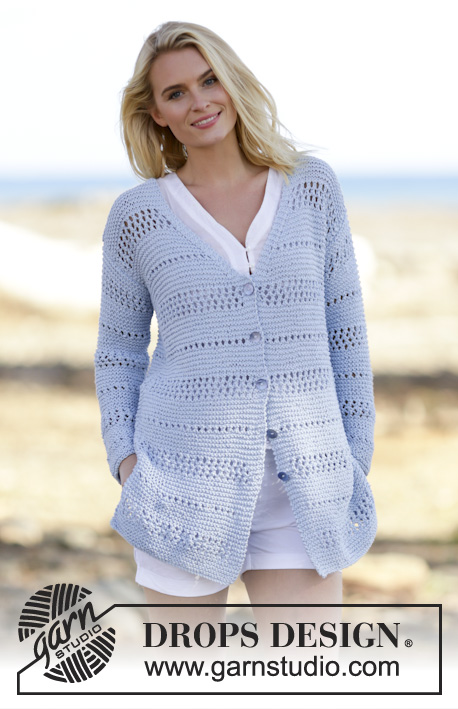
Knitted DROPS jacket in garter st with lace pattern in ”Paris”. Size: S - XXXL.
DROPS Extra 0-1125 |
|||||||||||||
|
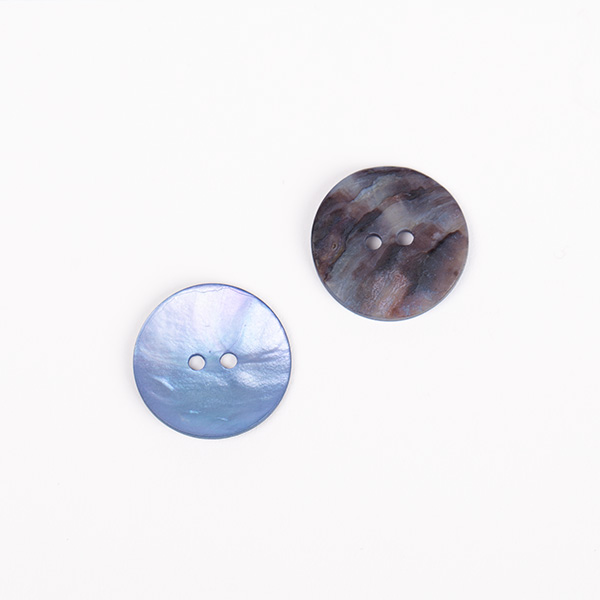
GARTER ST (back and forth): K all rows. 1 ridge = K2 rows. PATTERN: See diagram A.1. Diagrams show all rows seen from RS. DECREASE TIP (applies to neck dec): Dec inside 3 sts in garter st. All dec are done from RS! Dec before 3 sts as follows: K 2 tog. Dec as follows after 3 sts: Slip 1 st as if to K, K 1, psso. DECREASE TIP (applies to sleeve): All dec are done from RS. Dec 1 st by K 2 tog inside 1 edge st in each side of piece. BUTTONHOLES: Dec from RS for 5-5-5-6-6-6 buttonholes on right front band. 1 BUTTONHOLE = work 3 sts from mid front, make 1 YO, K the next 2 tog. On next row K the YO. Dec for buttonholes when piece measures approx: SIZE S: 19, 26, 33, 40 and 48 cm. SIZE M: 18, 26, 34, 42 and 50 cm. SIZE L: 19, 27, 35, 43 and 51 cm. SIZE XL: 18, 25, 32, 39, 46 and 53 cm. SIZE XXL: 19, 26, 33, 40, 47 and 54 cm. SIZE XXXL: 18, 25, 32, 40, 48 and 56 cm. ---------------------------------------------------------- BACK PIECE: Worked back and forth on circular needle. Cast on 76-80-84-92-100-108 sts on circular needle size 6 mm / US 10 with Paris. Work 5 ridges in GARTER ST - see explanation above. Then work A.1 with 2 sts in garter st in each side of piece. When piece measures 10 cm / 4", cast on 1 new st in each side of piece at the end of the next 2 rows (= edge st) = 78-82-86-94-102-110 sts. Work edge sts in garter st until finished measurements. REMEMBER THE KNITTING GAUGE Dec for BUTTONHOLES - see explanation above. When piece measures approx. 52-53-54-55-56-57 cm / 20½"-21"-21¼"-21⅝"-22"-22½", bind off for armholes in each side of piece at beg of the 2 next rows as follows: bind off 4-4-4-6-8-8 sts 1 time = 70-74-78-82-86-94 sts. Continue with pattern with 1 edge st in garter st in each side until piece measures 65-67-69-71-73-75 cm / 25½"-26⅜"-27⅛"-28"-28¾"-29½" - adjust after 2 ridges. Bind off the middle 26-26-26-28-28-28 sts (= 22-24-26-27-29-33 sts on each side) and finish each shoulder separately. Now continue piece in garter st. On next row from the neck, dec 1 st inside 3 sts = 21-23-25-26-28-32 sts. Bind off when piece measures 68-70-72-74-76-78 cm / 26¾"-27½"-28⅜"-29⅛"-30"-30¾". Work the other shoulder the same way. RIGHT FRONT PIECE: Worked back and forth on circular needle. Cast on 43-45-47-51-55-59 sts (includes 5 band st in garter st) on circular needle size 6 mm / US 10 with Paris. Work 5 ridges. Then work as follows from RS: 5 band st in garter st, A.1 until 2 st remains, finish with 2 sts in garter st. Continue band sts in garter st and A.1 until finished measurements. When piece measures 10 cm / 4", cast on 1 new st at the end of next row from RS (= edge st) = 44-46-48-52-56-60 sts. Work edge sts in garter st until finished measurements. READ ALL OF THE FOLLOWING SECTION BEFORE CONTINUING! Dec for neck and armhole as follows: NECK DEC: When piece measures 50-52-53-55-56-58 cm / 19 ¾"-20½"-21"-21½"-22"-22 ¾", beg dec for neck as follows: On next row from RS bind off the first 2 band sts. Continue the 3 band sts towards the neck in garter st. On next row from RS, dec 1 st inside 3 band sts - SEE DECREASE TIP! Repeat dec every 4th row 2 times and then every row from RS 14-14-14-15-15-15 times in total. ARMHOLE: When piece measures 52-53-54-55-56-57 cm / 20½"-21"-21¼"-21⅝"-22"-22½" (adjust pattern according to back piece), bind off for armholes at the beg of next row from WS as follows: bind off 4-4-4-6-8-8 sts 1 time. Continue with 1 edge st in garter st towards the sleeve. When all dec are done, 21-23-25-26-28-32 sts remain for shoulder. Continue with pattern and in garter st until piece measures 68-70-72-74-76-78 cm / 26¾"-27½"-28⅜"-29⅛"-30"-30¾", adjust to finish with 2 ridges. Bind off. LEFT FRONT PIECE: Work as right front piece but reversed. Bind off for armhole at beg of row from RS. Do not dec for buttonholes. SLEEVE: Worked back and forth on circular needle, top down. Cast on 50-52-56-58-62-66 sts (includes 1 edge st in each side) on circular needle size 6 mm / US 10 with Paris. Work 5 ridges. Then work A.1 with 1 edge st in garter st in each side of piece. When piece measures 3 cm / 1", dec 1 st in each side inside 1 edge st - READ DECREASE TIP. Repeat dec every 6-5½-4½-4-4-3 cm / 2½"-2¼"-1 ¾"-1½"-1½"-1" 6-7-8-8-9-11 more times = 36-36-38-40-42-42 sts. Then work piece in garter st. Bind off when piece measures 49-49-48-47-46-44 cm / 19¼"-19¼"-19"-18½"-18"-17¼". Make another sleeve. ASSEMBLY: Sew shoulder seams in outer loops of edge sts, sew in sleeves, sew underarm and side seams in one down to where edge sts were cast on (= approx. 10 cm / 4" vent). Sew the buttons on to the left band. |
|||||||||||||
Diagram explanations |
|||||||||||||
|
|||||||||||||
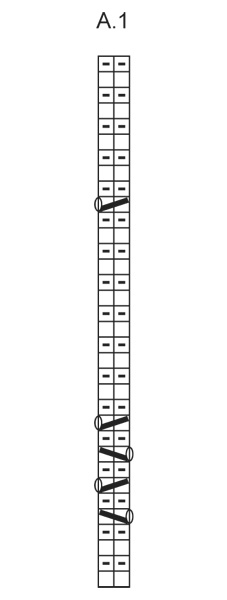 |
|||||||||||||
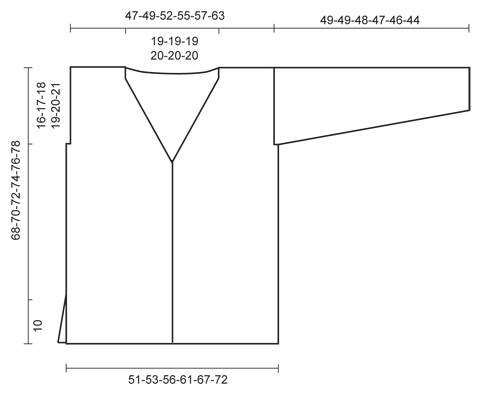 |
|||||||||||||
Have you finished this pattern?Tag your pictures with #dropspattern or submit them to the #dropsfan gallery. Do you need help with this pattern?You'll find 15 tutorial videos, a Comments/Questions area and more by visiting the pattern on garnstudio.com. © 1982-2025 DROPS Design A/S. We reserve all rights. This document, including all its sub-sections, has copyrights. Read more about what you can do with our patterns at the bottom of each pattern on our site. |
|||||||||||||






Post a comment to pattern DROPS Extra 0-1125
We would love to hear what you have to say about this pattern!
If you want to leave a question, please make sure you select the correct category in the form below, to speed up the answering process. Required fields are marked *.