
Popular categories
Looking for a yarn?


Comments / Questions (60)
![]() ΡΟΖΙΝΑ wrote:
ΡΟΖΙΝΑ wrote:
Realy nice patern!
01.04.2025 - 10:39
![]() Marion wrote:
Marion wrote:
Bonjour, pour le col châle, il est écrit : "*2 rangs sur toutes les mailles, 2 rangs sur les..." est-ce en mousse ou en jersey? De plus, pour l'assemblage il me semble qu'il manque un mot après" jusqu'aux" : "Coudre les côtés dans le brin le plus à l'extérieur des mailles jusqu'aux et y compris les 4 m montées... " Je vous remercie pour votre aide. Marion
30.11.2023 - 08:51DROPS Design answered:
Bonjour Marion, tricotez les mailles du col comme avant, en rangs raccourcis pour que l'extérieur du col soit plus haut que le côté intérieur qui sera cousu le long de l'encolure dos. Il ne manque pas de mot, vous devez coudre jusqu'aux 4 mailles montées et ces 4 mailles doivent être aussi assemblées. Bon tricot!
30.11.2023 - 10:24
![]() Lorraine Smith wrote:
Lorraine Smith wrote:
I am reading the first row of A.1 as follows: K1, YO, K6, Slip 1st as if to K, K1, PSSO, K2TOG, K6, YO. When doing so, I end up with 17 sts per pattern instead of 16. What am I doing wrong?
18.02.2021 - 16:43DROPS Design answered:
Dear Mrs Smith, the decrease in the middle is 3rd symbol; slip 1, K2 tog, psso, so that you work over 16 sts: K1, YO, K6, slip 1, K2 tog, psso, K6, YO = 16 sts. Happy knitting!
19.02.2021 - 07:24
![]() Johanna Rehbein wrote:
Johanna Rehbein wrote:
4. Wann beginnt man mit dem Zählen von Muster1? Unter der Anleitung Rückenteil steht, dass man die Umschläge von A3/A6 fortlaufend in Muster1 einarbeiten soll. Beginne ich mit der ersten Reihe von Muster1 also erst, wenn A3/A6 anfängt oder bereits ab der Einarbeitung von A2/A5?
21.01.2020 - 10:31DROPS Design answered:
Liebe Frau Rehbein, die Umschläge von A.3/A.6 werden in Muster-1 gestrickt, die Zunahmen beidseitig werden auch in Muster-1 gestrickt. Viel Spaß beim stricken!
21.01.2020 - 10:40
![]() Johanna Rehbein wrote:
Johanna Rehbein wrote:
Korrektur zur ersten Frage: Die krause Masche würde auf der linken Seite NICHT mehr gestrickt (wenn man eine Masche von A1 weglässt), auf der rechten Seite aber schon.
21.01.2020 - 09:39
![]() Johanna Rehbein wrote:
Johanna Rehbein wrote:
2. A1 geht in der Maschenanzahl doch schon nicht mehr auf, sobald ich mit A2/A5 beginne. Halte ich mich nun an die Beschreibung unter Rückenteil und stricke einfach immer eine Masche weniger von A1? Oder muss ich schon hier A9/A10 einbauen? 3. Was bedeutet "(= 3 Rapporte von A1)" in dem Teil, wo A9/A10 eingearbeitet werden soll?
21.01.2020 - 09:37DROPS Design answered:
Liebe Frau Rehbein, die Maschenanzahl wird zunehmen erst wenn Sie beidseitig zunehmen - siehe ZUNAHMEN, die Zunahmen beginnen wenn A.1 1 x in der Höhe gestrickt wird. Dann wird es abgenommen, also wie in der Anleitung weiter stricken. Den Absatz DIAGRAM A.1 erklärt wie das Diagram über die ganze Arbeit gestrickt wird. Viel Spaß beim stricken!
21.01.2020 - 10:36
![]() Johanna Rehbein wrote:
Johanna Rehbein wrote:
Ich komme mit der Anleitung leider schon ab Einarbeiten von A2/A5 nicht so richtig klar. 1. In der Anleitung zum Rückenteil steht, dass durch das Verschieben von A2/A5 immer eine Mache weniger von A1 gestrickt wird. Das würde bedeuten, dass ich auf der rechten Seite (von vorn betrachtet) weiterhin eine krause Masche stricken würde (denn dort gehört sie nicht zum Diagramm von A1), auf der linken Seite hingegen würde die krause Masche als Bestandteil von A1 weiterhin gestrickt?
21.01.2020 - 09:33DROPS Design answered:
Liebe Frau Rehbein, zuerst stricken Sie A.2 und A.5 (= noch keine neue Maschen rechts und links jetzt), dann stricken Sie A.3 und A.6, und die neuen Maschen rechts und links (= die Umschläge) stricken Sie in Muster-1. Wenn dann nicht genügend Maschen in A.1 bleiben, stricken Sie A.10. Viel Spaß beim stricken!
21.01.2020 - 10:32
![]() Ruth wrote:
Ruth wrote:
I LOVE this design and would love to make it. Although, I consider myself a fairly experienced knitter I have had so much difficulty following the instructions that I finally gave up. I know how to read a pattern chart and had no problems with that however I am completely stuck on the first section "READ ALL OF THE FOLLOWING SECTION BEFORE CONTINUING-WORK PATTERN AND INC AT THE SAME TIME" is totally confusing me.
09.10.2019 - 19:18DROPS Design answered:
Dear Ruth, you will now work following the diagrams as explained, but increase at the same time as described. When the increases are done, cast on 4 sts on each side and continue in pattern as before. Then you will have to work other diagrams and decrease as explained under next section. Happy knitting!
10.10.2019 - 09:45
![]() Tirzah wrote:
Tirzah wrote:
When you start the displacement between A.6 and A.1, are there supposed to be 2 stitches between the last yarn over/decrease stitch of A.5 and the first yarn over of A.1, or 3 stitch. EX: A.6 (yarn over, decrease times 3), then 2 stitched into A.1, then yarnover OR A.6, then 3 stitches into A.1, then yarnover. Thanks!
19.08.2019 - 10:20DROPS Design answered:
Dear Tirzah, you start A.5 on row 3 in A.1, you will start A.6 on row 11 in A.1 and work: A.6 (= YO, K2 tog)x 3, then work A.1 = dec 2, K1, YO, etc... Happy knitting!
19.08.2019 - 11:44
![]() Sylvie Roy wrote:
Sylvie Roy wrote:
Bonjour je suis du canada avez vous un magasin drops au canada et moi jai demander la grosseur du fils svp merci
07.08.2019 - 15:30DROPS Design answered:
Bonjour Mme Roy, vous trouverez ici la liste des magasins DROPS au Canada/expédiant au Canada. Vous trouverez toutes les informations utiles sur nos fils dans leur nuancier. Bon tricot!
08.08.2019 - 09:14
|
||||||||||||||||||||||
Ripple Tide#rippletidecardigan |
||||||||||||||||||||||
 |
 |
|||||||||||||||||||||
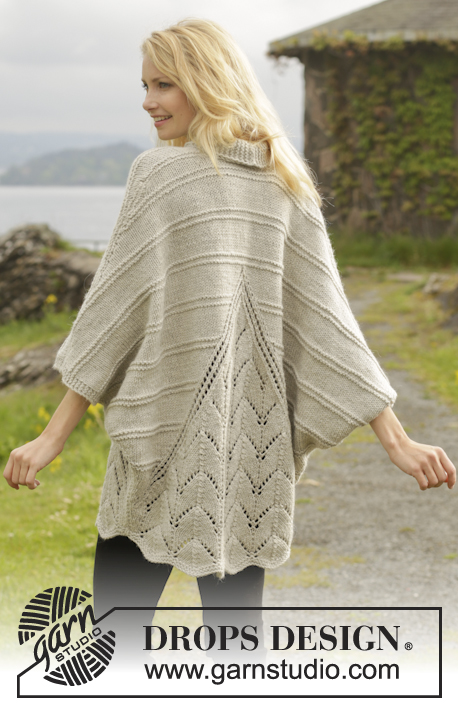
Knitted DROPS jacket in garter st with lace pattern and shawl collar in ”Nepal”. Size: S - XXXL.
DROPS 157-40 |
||||||||||||||||||||||
|
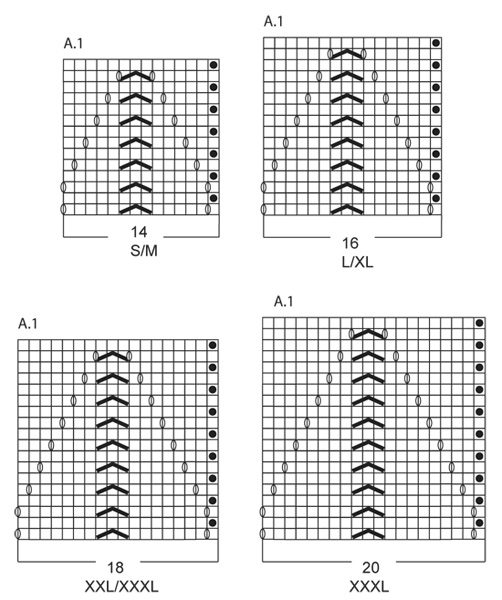
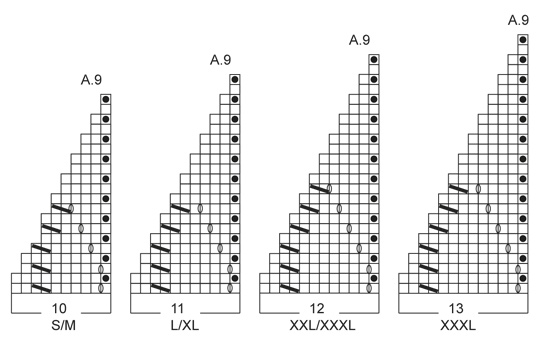
GARTER ST (back and forth on needle): K all rows. 1 ridge = K2 rows. PATTERN: See diagrams A.1-A.10. See diagrams for correct size. The diagrams show all rows in pattern seen from RS. Diagrams A.3 and A.6 do not fit vertically when repeated but eyelet rows are continued diagonally upwards as before. DIAGRAM A.1. A.1 is repeated differently vertically. When there are 2 sts between first YO (towards A.3/A.6) in A.1 and A.3/A.6, stop repetition of A.1 vertically. I.e. seen from RS A.1 is repeated towards mid front and mid back 6 times in total vertically. Middle A.1 is repeated 4 times in total vertically. A.1 towards the side is repeated 2 times in total vertically. Then work as follows: When A.1 does not fit no of sts, i.e. after repetitions explained above, work A.9 over A.1 on right front piece and right side of back piece (= 3 repetitions of A.1) and A.10 over A.1 on left front piece and left side of back piece (= 3 repetitions of A.1). PATTERN 1: Row 1: K from RS. Row 2: P from WS. Repeat 1st and 2nd row 4 more times (= 10 rows). Row 11: K from RS. Row 12: K from WS. Row 13: K from RS. Row 14: P from WS. Row 15: P from RS. Row 16: P from WS. Repeat row 1 to 16. BUTTONHOLES: Dec from RS for 6 buttonholes on right band. 1 BUTTONHOLE = work 3 sts from mid front, make 1 YO, K the next 2 tog. On next row K the YO. Dec for buttonholes when piece measures: SIZE S/M: 10, 18, 30, 38, 50 and 58 cm / 4",7",11 3/4",15",19 3/4",22 3/4" SIZE L/XL: 12, 20, 32, 40, 52 and 60 cm / 4 3/4",8",12½",15 3/4",20½",23½" SIZE XXL: 14, 22, 35, 43, 56 and 64 cm / 5½",8 3/4",13 3/4",17",22",25 1/4". SIZE XXXL: 13, 22, 35, 44, 57 and 66 cm / 5",8 3/4",13 3/4",17 1/4",22½",26. ---------------------------------------------------------- BACK PIECE: Worked back and forth on circular needle. Cast on 91-103-115-127 sts on circular needle size 5.5 mm / US 9 with Nepal. Work 2 ridges in GARTER ST - see explanation above. Then work as follows from RS: 3 sts in stockinette st, A.1 (= 14-16-18-20 sts) 6 times in total – READ PATTERN, 1 st in garter st, 3 sts in stockinette st. Continue the pattern like this. REMEMBER THE GAUGE! When piece measures 3 cm / 1'', inc 1 st in each side of piece inside 3 sts in stockinette st. Repeat inc every 4th-4th-6th-6th row 2 more times = 97-109-121-133 sts. Work inc sts in stockinette st. READ ALL OF THE FOLLOWING SECTION BEFORE CONTINUING – WORK PATTERN AND INC AT THE SAME TIME. PATTERN: When A.1 has been worked 1 time vertically, work the first 2 rows of A.1, then work as follows from RS: 3 sts in stockinette st, A.5, K 1 and A.1 as before until 7 sts remain, 1 st in garter st, K 1, A.2, 3 sts in stockinette st. Diagrams A.2/A.5 are displaced 1 st towards mid back on every row from RS, i.e. work 1 st less of A.1 on every other row - see DIAGRAM A.1. When A.2 and A.5 have been worked 1 time vertically, continue displacement with A.3 and A.6. Work the twisted YOs in A.3/A.6 in to PATTERN 1 – see explanation above. INCREASE: All inc are done from RS. Inc 1 st in each side of piece inside 3 sts in stockinette st as follows: Inc 1 st every 4th row 6-9-13-16 times, then 1 st every other row 19-13-6-0 times = 147-153-159-165 sts. Work the inc sts in to pattern 1. When all inc are done, cast on 4 new sts in each side of piece for sleeve at end of the next 2 rows = 155-161-167-173 sts. Piece measures approx. 39-40-42-43 cm / 15 1/4"-15 3/4"-16½"-17". Work the new sts in garter st. Continue with pattern as before. READ ALL OF THE FOLLOWING SECTION BEFORE CONTINUING – WORK PATTERN AND DEC AT THE SAME TIME. PATTERN: When 1 st remains between lace rows A.3 and A.6, work A.8 over A.3, A.6 and the 1 st between them. When A.8 has been worked 1 time vertically, piece measures approx. 57-64-70-77 cm / 22½"-25 1/4"-27½"-30½". Now continue piece in pattern 1. DECREASE: When piece measures 61-63-67-69 cm / 24"-24 3/4"-26½"-27", work the 4 sts in garter st, then slip them on 1 stitch holder, work the rest of row, repeat on next row = 147-153-159-165 sts. Then slip sts on 1 stitch holder for diagonal shoulder as follows: Work the first 4 sts, then slip them on 1 stitch holder, work the rest of row. Repeat in each side of piece on every row 6-5-4-4 more times, then work the first 2 sts, then slip them on a stitch holder, work the rest of row. Repeat in each side of piece on every row 7-9-12-13 more times = 48-48-50-52 sts on the thread for each shoulder and 59-65-67-69 sts on needle. AT THE SAME TIME when piece measures 74-77-83-85 cm / 29"-30½"-32 3/4"-33½", bind off the middle 17-17-19-19 sts and finish each shoulder separately. On next row from neck bind off 1 st for neck. When all bind offs are done, 20-23-23-24 sts remain on needle for each shoulder. Piece measures approx. 76-79-85-88 cm / 30"-31"-33½"-34½". Cut the yarn. SHOULDER/SLEEVE: Slip all sts from stitch holder back on needle = 68-71-73-76 sts. Now inc to avoid a tight shoulder, from RS as follows: K 20-23-25-28, * 1 YO, K 6 *, repeat from *-* the rest of row = 76-79-81-84 sts. K 1 row from WS, K YOs twisted. Work 1 ridge. Loosely bind off. Work the other shoulder the same way but reversed. RIGHT FRONT PIECE: Worked back and forth on circular needle. Cast on 52-58-64-70 sts (includes 6 band sts) on circular needle size 5.5 mm / US 9 with Nepal. Work 2 ridges. Then work as follows from RS: 6 band sts in garter st, A.1 3 times in total, 1 st in garter st, 3 sts in stockinette st. Work band sts in garter st until finished measurements. Continue the pattern like this. When piece measures 3 cm / 1'', inc 1 st in the side of piece at the end of row from RS inside 3 sts in stockinette st. Repeat inc every 4th-4th-6th-6th row 2 more times = 55-61-67-73 sts. Work inc sts in stockinette st. READ ALL OF THE FOLLOWING SECTION BEFORE CONTINUING – WORK PATTERN AND INC AT THE SAME TIME. PATTERN: When A.1 has been worked 1 time vertically, work the first 2 rows of A.1, then work as follows from RS: 6 band sts in garter st, A.1 as before until 7 sts remain, 1 st in garter st, K 1, A.2, 3 sts in stockinette st. Diagram A.2 is displaced 1 st towards mid front on every row from RS, i.e. work 1 st less of A.1 on every other row - see DIAGRAM A.1. When A.2 has been worked 1 time vertically, continue displacement with A.3. Work the twisted YOs in A.3 in to pattern 1. Remember BUTTONHOLES - see explanation above. INCREASE: All inc are done from RS. Inc 1 st in the side of piece inside 3 sts in stockinette st as follows: Inc 1 st every 4th row 6-9-13-16 times, then 1 st every other row 19-13-6-0 times = 80-83-86-89 sts. Work the inc sts in to pattern 1. When all inc are done, cast on 4 new sts in the side for sleeve at the end of next row from RS = 84-87-90-93 sts. Piece measures approx. 39-40-42-43 cm / 15 1/4"-15 3/4"-16½"-17". Work the new sts in garter st. Continue with pattern as before. READ ALL OF THE FOLLOWING SECTION BEFORE CONTINUING – WORK PATTERN AND DEC AT THE SAME TIME. PATTERN: When A.3 meets band sts, work A.4 over A.3. When A.4 has been worked 1 time vertically, piece measures approx. 57-64-70-77 cm / 22½"-25 1/4"-27½"-30½". Now continue piece in pattern 1 and garter st. DECREASE: When piece measures 61-63-67-69 cm / 24"-24 3/4"-26½"-27", adjust so that next row is from WS and work as follows: Work the first 4 sts in garter st in the side, then slip them on a stitch holder, work the rest of row = 80-83-86-89 sts. On next row from WS, slip sts on 1 stitch holder for diagonal shoulder as follows: Work the first 4 sts, then slip them on 1 stitch holder, work the rest of row. Repeat on every row from WS 6-5-4-4 more times, then work the first 2 sts, then slip them on a stitch holder, work the rest of row. Repeat on every row from WS 7-9-12-13 more times = 48-48-50-52 sts on stitch holder and 36-39-40-41 sts on needle. Cut the yarn. SHOULDER/SLEEVE: Slip all sts from stitch holder back on needle = 84-87-90-93 sts. Now inc to avoid a tight shoulder, from RS as follows: K 36-39-42-45, * 1 YO, K 6 *, repeat from *-* the rest of row. K 1 row from WS, K YOs twisted = 92-95-98-101 sts. Work 1 ridge. Then loosely cast off 76-79-81-84 sts towards the side = 16-16-17-17 sts remain for shawl collar. SHAWL COLLAR: Work from mid front: * 2 rows over all sts, work 2 rows over the first 12-12-13-13 sts *, repeat from *-* until piece measures 8-8-9-9 cm / 3"-3"-3½"-3½" measured closest to the shoulder. Bind off. LEFT FRONT PIECE: Work as right front piece but reversed. Work A.5-A.7 instead of A.2-A.4. Do not dec for buttonholes. When all inc are done, cast on 4 new sts in the side for sleeve at the end of row from WS. Work shoulder/sleeve from RS as follows: * K 6, 1 YO *, repeat from *-* until 36-39-42-45 sts remain, finish with K 36-39-42-45. ASSEMBLY: Sew side seams in outer loops of edge sts up to and including the 4 inc sts in garter st. Sew shoulder seams in outer loops of edge sts from and with the 4 inc sts in garter st up to shawl collar. Sew shawl collar tog mid back and sew it to the neckline. Sew the buttons on to the left band. |
||||||||||||||||||||||
Diagram explanations |
||||||||||||||||||||||
|
||||||||||||||||||||||
|
||||||||||||||||||||||
|
||||||||||||||||||||||

|
||||||||||||||||||||||

|
||||||||||||||||||||||

|
||||||||||||||||||||||
Have you finished this pattern?Tag your pictures with #dropspattern #rippletidecardigan or submit them to the #dropsfan gallery. Do you need help with this pattern?You'll find 29 tutorial videos, a Comments/Questions area and more by visiting the pattern on garnstudio.com. © 1982-2025 DROPS Design A/S. We reserve all rights. This document, including all its sub-sections, has copyrights. Read more about what you can do with our patterns at the bottom of each pattern on our site. |
||||||||||||||||||||||


With over 40 years in knitting and crochet design, DROPS Design offers one of the most extensive collections of free patterns on the internet - translated to 17 languages. As of today we count 314 catalogs and 11824 patterns - 11814 of which are translated into English (US/in).
We work hard to bring you the best knitting and crochet have to offer, inspiration and advice as well as great quality yarns at incredible prices! Would you like to use our patterns for other than personal use? You can read what you are allowed to do in the Copyright text at the bottom of all our patterns. Happy crafting!
Post a comment to pattern DROPS 157-40
We would love to hear what you have to say about this pattern!
If you want to leave a question, please make sure you select the correct category in the form below, to speed up the answering process. Required fields are marked *.