
Popular categories
Looking for a yarn?


Comments / Questions (11)
![]() Anja wrote:
Anja wrote:
Ich verstehe das nicht bitte beschreiben Danke Mit M.1 und 1 Randm. auf jeder Seite weiterfahren. Wenn die Arb. 20 cm misst, 1 M auf jeder Seite alle 14. cm total 3 Mal abketten = 71-77-83-95-101 M. Was genau bedeutet total abketten? Ist das die Beschreibung 14 M vor oder nach?? abketten??
21.12.2025 - 15:38DROPS Design answered:
Liebe Anja, "total" bedeutet einfach nur "insgesamt". Das Wort "abketten" ist hier nicht ganz richtig, denn Sie nehmen an beiden Seiten je 1 Masche neben der Rand-Masche ab, also nach der Rand-Masche am Anfang der Reihe und vor der Rand-Masche am Ende der Reihe. Dann stricken Sie 14 cm ab dieser Abnahmereihe und nehmen wieder an beiden Seiten je 1 M ab, dann wieder 14 cm stricken und wieder abnehmen. Dann haben Sie insgesamt (total) 3 x je 1 M abgenommen. Viel Spaß beim Stricken!
24.02.2026 - 21:58
![]() Vesna Martinac Eguíluz wrote:
Vesna Martinac Eguíluz wrote:
Hola, cúal es el patrón 1 y cúal es el patrón 2? y no hablan donde va el punto elástico? Muchas gracias
29.05.2025 - 03:44DROPS Design answered:
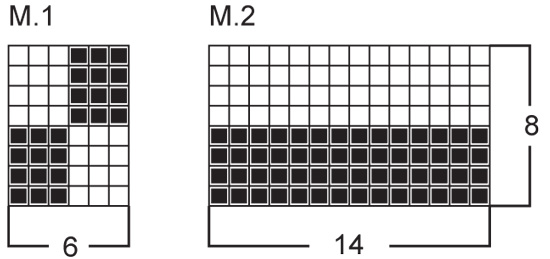
Hola Vesna, el patrón 1 es el diagrama M.1. El patrón 2 se explica al inicio de la labor: 4 filas en pt jersey revés, 4 filas en pt jersey; también está representado como el diagrama M.2. Los diagramas se encuentran debajo de las instrucciones escritas del patrón. El elástico explicado en texto se usa para el inicio de la manga, mientras que la imitación de elástico en el cuello se trata del diagrama M.2.
31.05.2025 - 23:21
![]() Cynthia Hagen wrote:
Cynthia Hagen wrote:
Model 84-16, word middenvoor met verkorte toeren gebreid, of worden de hele naald uit gebreid.
01.02.2019 - 12:11DROPS Design answered:
Dag Cyntia,
Er worden inderdaad geen verkorte toeren gebreid op de voorpanden of voorbiezen; je breit alle naalden helemaal uit.
03.02.2019 - 11:24
![]() Cynthia Hagen wrote:
Cynthia Hagen wrote:
Ik ben begonnen met vest 84-16 en kan niet ontdekken hoe ik het voorpand aan midden voor kan meerderen, volgens de beschrijving 1 st. afh. en 3 st.r daarna 5 av. breien. Teruggaande naald 5 av. en3r. maar hoort de 1ste afgehaalde st bij de 3r.gebreide steken. En worden deze naalde in iedere naald gebreid of alleen in de av.naalden.
01.02.2019 - 11:53DROPS Design answered:
Dag Cynthia,
Je hoeft niet te meerderen op het voorpand voorpand; je breit gewoon beide patronen (het blokjes patroon en het patroon voor de bies.). Er zit geen ronding o.i.d. onderaan de voorpanden (Zie ook de maattekening onderaan het patroon.)
03.02.2019 - 11:30
![]() Myriam wrote:
Myriam wrote:
Bonjour, je souhaiterais réaliser ce modèle sans fentes, merci de bien vouloir m'expliquer comment je dois procéder.
26.01.2019 - 17:48DROPS Design answered:
Bonjour Myriam, il vous suffit de monter les mailles lisières dès le début (et non à 15 cm), soit 2 m en plus pour le dos et 1 m en plus pour les devants, et sans les mailles de bordures de fentes au point mousse (= M1 sur toutes les mailles avec 1 m lis de chaque côté). Bon tricot!
28.01.2019 - 10:41
![]() Irmi wrote:
Irmi wrote:
Vielen Dank, jetzt ist es mir klar!!! :)
28.03.2013 - 09:49
![]() Irmi wrote:
Irmi wrote:
Vielen Dank, klingt schon besser, aber muss ich jetzt nach 56cm Gesamtlänge die neuen Maschen aufnehmen oder erst nach 56cm noch einmal 8 R in M2 stricken und dann aufnehmen? ich verstehe die 8R nicht!
27.03.2013 - 19:11DROPS Design answered:
Liebe Irmi, nach 56 cm schauen Sie in welcher Reihe im Muster Sie sind. Wenn es direkt nach einer 8. Reihe ist, machen Sie gleich die Aufnahme. Wenn Sie z.B. erst in Reihe 2 des Musters sind, stricken Sie weiter bis Reihe 8. Es kommt auf 1 cm nicht an, hingegen ist es wichtig, dass das Muster stimmt.
28.03.2013 - 08:17
![]() Irmi wrote:
Irmi wrote:
Wie soll man das denn verstehen? : "Kragen: Gleichzeitig, wenn die Arb. ca 60-60-60-56-56 cm misst- nach der 8.Ndl von M.2 anpassen – 22 neue M gegen die Mitte vorne anschlagen. Weiter M.2 über die äussersten 36 M gegen die Mitte vorne stricken (die übrigen M wie zuvor stricken)."
26.03.2013 - 20:59DROPS Design answered:
Liebe Irmi, ich versehe Ihre Schwierigkeiten, hier handelt es sich um eine ältere Übersetzung, die noch etwas schwer verständlich ist. Ich habe diesen Satz nun neu übersetzt und hoffe, dass es jetzt verständlicher ist. Wenn unser Übersetzerteam etwas Zeit hat, werden die alten Übersetzungen überarbeitet.
27.03.2013 - 17:29
![]() Cindy wrote:
Cindy wrote:
Hej. Jag har tänkt att försöka sticka denna kofta i Big Delight. Men upptäckte nu att jag bara har beställt 700g garn. Men om man räknar ut längden så är det mer än i beskrivningen. Kommer det att räcka?? Kan man räkna på längden på garnet för att veta om det räcker?? Eller blir det annorlunda eftersom det är ett annat garn, men samma garngrupp?
15.05.2012 - 13:37DROPS Design answered:
Hej, du måste gå på originalgarnets löpläng när du skall beräkna garnmängd.
18.05.2012 - 08:22
![]() DROPS Design wrote:
DROPS Design wrote:
The translations for the Diagrams for all Garnstudio patterns are included within the text of the Pattern itself. If you look you will find lines starting with an = sign. These are the translations, and they are given in the same vertical order as the chart symbols within the diagram.
16.07.2008 - 19:33
|
|||||||
DROPS 84-16 |
|||||||
|
|
|||||||
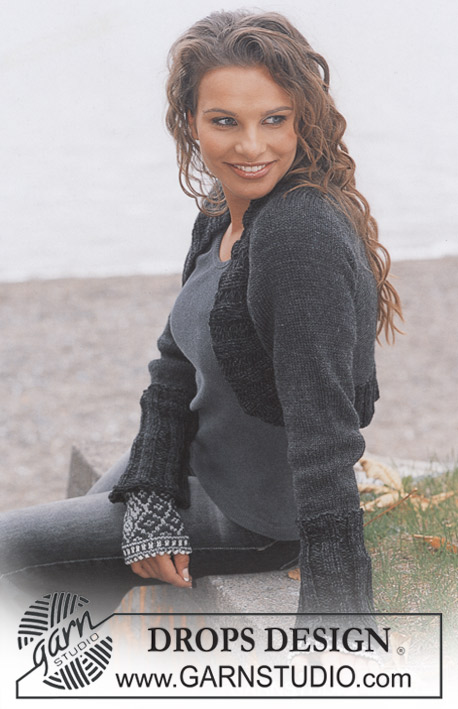
DROPS Cardigan in Alaska
DROPS 84-16 |
|||||||
|
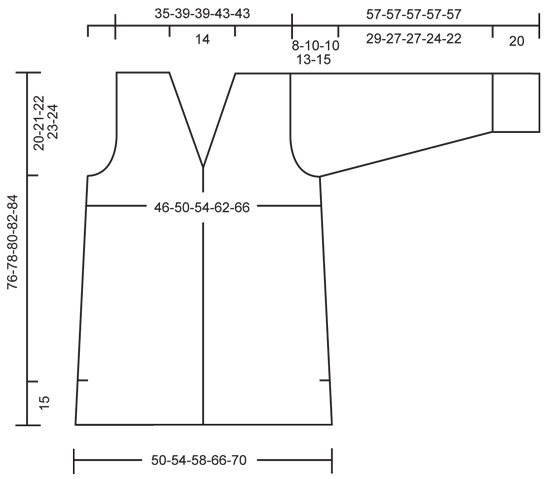
Gauge: 15 sts x 19 rows in Pattern 1 = 10 x 10 cm. Pattern: See charts. The pattern is seen from the right side. Pattern 2: 4 rows reverse stockinette st, 4 rows stockinette st. Rib: Row 1: * K 3, P 5 *, repeat * - *. Row 2: * P 3, K 5 *, repeat * - *. Knitting tips (for neckband): Dec inside 14 buttonband sts knit as explained in pattern. All decs are made on right side rows. Dec 1 K st as follows: After 14 sts: Slip 1 st as if to knit, K 1, psso. Before 14 sts: K 2 tog. Dec 1 P st as follows: After 14 sts: P 2 tog, twisting sts. If this is too difficult, slip 2, return to left needle 1 by 1, twisting sts, then P 2 tog. Before 14 sts: P 2 tog. Back: Cast on 83-89-95-107-113 sts and knit 4 rows garter st, decreasing 8 sts evenly distributed on the last row = 75-81-87-99-105 sts. Knit Pattern 1 keeping 3 sts in garter st at each side (for edge of side split). When the piece measures approx. 15 cm – adjust to end after a complete square – end split and cast on 1 new st at each side for seam = 77-83-89-101-107 sts. Continue Pattern 1 keeping 1 edge st at each side in garter st. When the piece measures 20 cm dec 1 st at each side every 14 cm a total of 3 times = 71-77-83-95-101 sts. When the piece measures 56-57-58-59-60 cm bind off for armhole at each side every other row: 3 sts 1-1-1-2-2 times, 2 sts 2-2-3-3-4 times and 1 st 2-2-3-3-4 times = 53-59-59-65-65 sts. Continue Pattern 1 keeping 1 edge st at each side. When the piece measures 74-76-78-80-82 cm bind off the center 19 sts for the neck. On the next row dec 1 st at each neck edge = 16-19-19-22-22 sts remain on each shoulder. When the piece measures approx. 76-78-80-82-84 cm – adjust to end after a complete square – bind off all sts. Right front: Cast on 51-54-57-63-66 sts and knit 4 rows garter st, decreasing 4 sts evenly distributed on the last row = 47-50-53-59-62 sts. NB! In order to have a firm edge at center front, slip the first st in the beg of every row starting at center front edge, and K the last st at every row ending at center front edge. Knit the next row as follows from center front: Pattern 2 (= 14 sts), Pattern 1 over the following 30-33-36-42-45 sts (start Pattern 1 with K 3 for sizes S + L + XL and with P 3 for sizes M + XXL) and 3 sts in garter st for edge of side split. Continue in pattern as established. When the piece measures approx. 15 cm (match back) end side split and cast on 1 new st at the side for seam = 48-51-54-60-63 sts. Continue with Pattern 2 on button bands, Pattern 1 on remaining sts and 1 edge st at the side. When the piece measures 20 cm bind off at the side as on back = 45-48-51-57-60 sts. Read the entire section before knitting: Neckband: When the piece measures 53-54-55-56-57 cm dec 1 st for the neck inside the 14 buttonband sts every other row 20 times – see knitting tips above. Armhole: When the piece measures 56-57-58-59-60 cm bind off for armhole at the side as on back. Collar: When the piece measures approx. 60-60-60-56-56 cm – adjust to end after 8 rows of Pattern 2 – cast on 22 new sts at the center front. Then knit Pattern 2 over the outermost 36 sts at the center front (knit the remaining sts the same as before). After all shaping is complete 38-41-41-44-44 sts remain. When the piece measures approx. 76-78-80-82-84 cm – adjust to end after a complete square – bind off the 16-19-19-22-22 sts on shoulder = 22 collar sts remain on st. Collar: Continue with Pattern 2 until the collar measures approx. 7 cm from shoulder – adjust to end after 2 knit rows or 2 purl rows so that Pattern 2 follows when the collar is sewn together at center back. Put sts on a st holder. Left front: Cast on and knit the same as the right, reversing shaping. Sleeve: Loosely cast on 50-50-58-58-58 sts and knit rib keeping 1 edge st in garter st at each side. When the rib measures 4 cm dec all P 5 to P 4 = 44-44-51-51-51 sts. When the piece measures 12 cm dec all P 4 to P 3 = 38-38-44-44-44 sts. When the piece measures 18 cm – adjust so that the next row is a right side row – knit 3 rows garter st. Then continue with Pattern 1, keeping 1 edge st at each side – see that the pattern follows the rib. When the piece measures 20 cm inc 1 st at each side every 3-3-3-2-1.5 cm a total of 9-9-9-12-12 times = 56-56-62-68-68 sts – knit the increased sts in Pattern 1 as you go along. When sleeve measures 49-47-47-44-42 cm bind off for sleeve cap at each side every other row: 3 sts 1 time, 2 sts 2 times and 1 st 2-4-4-6-8 times, then 2 sts at each side until the piece measures 56 cm, then bind off 3 sts at each side 1 time. Bind off remaining sts, the piece measures approx. 57 cm. Assembly: Sew shoulder seams. Weave the collar together at center back. Sew the collar to back neckband – the seam should be on the right side so it will not show when collar is folded down. Sew in sleeves using edge sts as seam allowance. Sew sleeve and side seams using edge sts as a seam allowance, down to side split. Fringe: Fasten 5 fringe tufts at each front edge of the collar. 1 fringe tuft = cut 4 strands of yarn 20 cm long and fold in half. Pull loop through edge st on the collar and pull ends through loop. Belt: Cast on 11 sts and knit 4 rows garter st, and then knit Pattern 1, keeping 1 edge st at each side. Slip the edge st at the beginning of every row, K the edge st at the end of every row. When belt measures approx. 120-150 cm – adjust to end after a complete square – knit 4 rows garter st, and then bind off all sts. |
|||||||
Diagram explanations |
|||||||
|
|||||||
 |
|||||||
 |
|||||||
Have you finished this pattern?Tag your pictures with #dropspattern or submit them to the #dropsfan gallery. Do you need help with this pattern?You'll find 23 tutorial videos, a Comments/Questions area and more by visiting the pattern on garnstudio.com. © 1982-2026 DROPS Design A/S. We reserve all rights. This document, including all its sub-sections, has copyrights. Read more about what you can do with our patterns at the bottom of each pattern on our site. |
|||||||


With over 40 years in knitting and crochet design, DROPS Design offers one of the most extensive collections of free patterns on the internet - translated to 17 languages. As of today we count 324 catalogs and 12290 patterns - 12280 of which are translated into English (US/in).
We work hard to bring you the best knitting and crochet have to offer, inspiration and advice as well as great quality yarns at incredible prices! Would you like to use our patterns for other than personal use? You can read what you are allowed to do in the Copyright text at the bottom of all our patterns. Happy crafting!
Post a comment to pattern DROPS 84-16
We would love to hear what you have to say about this pattern!
If you want to leave a question, please make sure you select the correct category in the form below, to speed up the answering process. Required fields are marked *.