
Popular categories
Looking for a yarn?


Comments / Questions (17)
![]() Ariane wrote:
Ariane wrote:
Bonjour, Pour le raglan vous indiquer les mailles pour les rangs endroits et également envers. Je ne comprends pas comment procéder vu que c'est un tricot circulaire et non en aller retour. Aurais je mal compris le sens ? Comment dois je procéder pour faire le raglan ? Merci d'avance pour votre aide et tous vos tutos et modèles.
25.07.2024 - 19:52DROPS Design answered:
Bonjour Ariane, apres avoir mis en attente les 6-6-9-10-14 m centrales sur un arrêt de mailles pour l’encolure, la suite de votre pull sera tricotee en aller retour. A ce moment-la les diminutions pour les reglans ne seront pas encore terminees. Bon tricot!
26.07.2024 - 10:55
![]() Danielle wrote:
Danielle wrote:
I don’t really understand the neckband instructions. It says to put the center # stitches on a holder, but it doesn’t say the center of what (I assume it’s not across from the start of row marker as that would be at a shoulder seam). After that, am I supposed to continue knitting in the round but without those stick stitches or knit all other stitches flat or something else. Thanks
12.01.2023 - 21:27DROPS Design answered:
Hi Danielle, The middle stitches on the round are placed on the thread(mid-front). So you want equal numbers of stitches at the beginning and end of the round, with the stitches on the thread between them. After placing the stitches on the thread you continue back and forth, decreasing as described for the neck . Hope this helps and happy knitting!
13.01.2023 - 07:45
![]() Cobi wrote:
Cobi wrote:
Bij het breien van de panden staat 4 cm in boordsteek, breien, wisselen naar pen 7 en verder in tricotsteek. Meerder bij een hoogte van 10 cm 1 steek....... Is die 10 cm inclusief de boord, of exclusief.
18.11.2022 - 08:31DROPS Design answered:
Dag Cobi,
Dit is vanaf de opzet.
20.11.2022 - 17:21
![]() Elisabeth wrote:
Elisabeth wrote:
Porque todos los modelos están explicados solo con aguja circular? Hay modelos explicados con 2 agujas sin tener que hacer conversiones? Para buscar modelos se puede filtrar por modelos a 2 agujas?
07.11.2020 - 12:36DROPS Design answered:
Hola Elisabeth, la mayoría están escritos para una aguja circular para trabajar la prenda sin costuras. Además, hay ciertas prendas que, por su elevado número de puntos, no se pueden trabajar con agujas rectas. Algunos patrones se pueden adaptar a agujas rectas, puedes ver la explicación en el siguiente enlace: https://www.garnstudio.com/lesson.php?id=13&cid=23
19.11.2020 - 21:04
![]() Arnot McDonald wrote:
Arnot McDonald wrote:
I see that I added 4 stitches to 66 and it should have been 2 stitches. Sorry 😐
02.12.2019 - 16:55DROPS Design answered:
Hi again, if you have any questions do not hesitate to contact us. Best regards!
02.12.2019 - 17:47
![]() Arnot McDonald wrote:
Arnot McDonald wrote:
In pattern for Katrine for the body I have to increase each row by 4 stitches 5 times which for size class gives me 172 stitches but the pattern says I should have 152! Can you help?
02.12.2019 - 16:38DROPS Design answered:
Hello Mrs McDonald. At the beginning you have 132 stitches. Then you increase 4 stitches 5 times (20 stitches increased), so a total is 152 stitches. Happy knitting!
02.12.2019 - 17:46
![]() Bente Vedal wrote:
Bente Vedal wrote:
34 cm til armfelling på bolen i str XXL, blir ikke det beldig kort?
06.01.2019 - 14:38DROPS Design answered:
Hei Bente. Denne modellen er kort, du kan se på bildet at genseren går nesten kant-i-kant med bukselinningen. Så den skal altså være sånn. Det er selvfølgelig ikke noe i veien for at du strikker bolen lenger om du ønsker det, men vær da obs på at dette kan påvirke garnforbruket. God fornøyelse
09.01.2019 - 08:39
![]() SYLVIE MAREAU wrote:
SYLVIE MAREAU wrote:
Bonjour Ce modèle est tricoté en 1 ou 2 fils Merci par avance
07.11.2018 - 06:31DROPS Design answered:
Bonjour Mme Mareau, on tricote ici avec 1 fil Symphony (ou toute autre alternative - essayez notre convertisseur) - et on termine par une bordure au crochet en Vivaldi. Bon tricot!
07.11.2018 - 08:38
![]() Louise wrote:
Louise wrote:
Bonjour se chandail se tricote de bas en haut.merci
02.05.2018 - 01:15DROPS Design answered:
Bonjour Louise, tout à fait. Bon tricot!
02.05.2018 - 11:00
![]() Veronique31 wrote:
Veronique31 wrote:
Bonjour, J'aimerais réaliser ce pull mais au point d’alvéole... Pour l'échantillon le nbre de mailles est bon mais , normal, le nbr de rands double pour le raglan , au lieu de "Diminuer ainsi 17 fois tous les 2 rangs , si je diminue tous les 4 rangs, ça ira? Merci pour vos modèles et votre professionnalisme
20.07.2016 - 16:00DROPS Design answered:
Bonjour Véronique, si votre nbe de rangs est plus grand en hauteur il vous faudra effectivement ajouter des rangs entre ceux des diminutions, vérifiez régulièrement les mesures de votre empiècement pour ajuster les dernières diminutions du raglan si nécessaire. Bon tricot!
21.07.2016 - 08:45
|
|
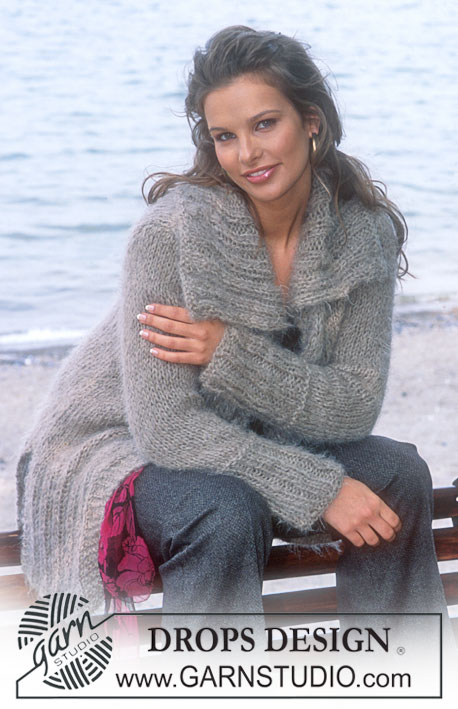
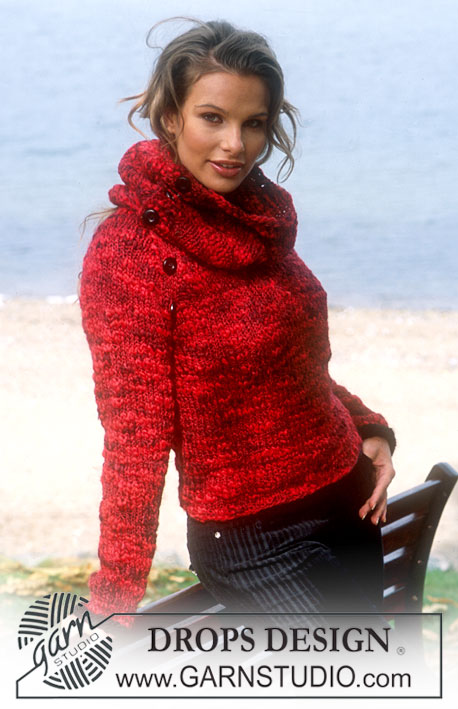
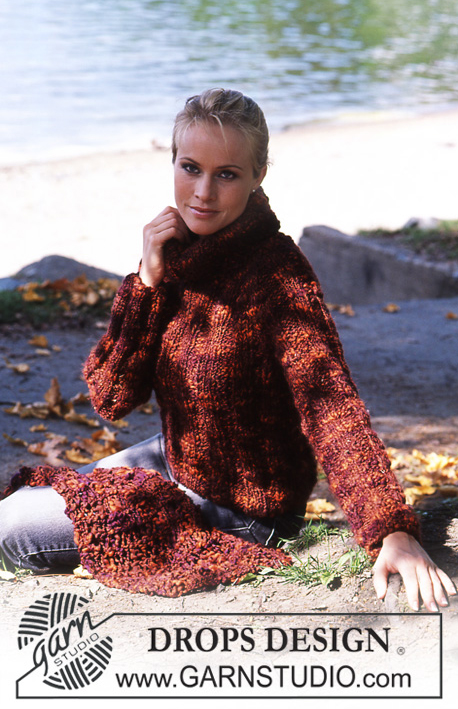
Katrine Sweater#katrinesweater |
|
|
|
|
DROPS Pullover in Symphony
DROPS 84-10 |
|
|
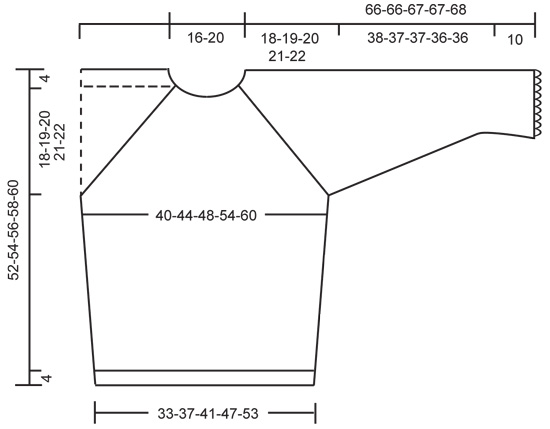
Gauge: 14 sts x 20 rows on larger needles in stockinette st = 10 x 10 cm. Rib: * K 4, P 4 *, repeat * - *. Decreasing tips (for raglan): Dec in the transitions between the sleeves and body as follows: From right side: (start 3 sts before the marker): K 2 tog, K 2 (the marker sits between these 2 sts), slip 1 st as if to knit, K 1, psso. From wrong side: (start 3 sts before the marker): P 2 tog, twisting sts (if this is too difficult, slip 2 sts, return to left needle one by one, twisting each, then P 2 tog), P 2 (the marker sits between these 2 sts), P 2 tog. Body: Cast on 96-104-112-136-152 sts on smaller circular needles; join and place a marker at the join. Knit rib – see instructions above. When the piece measures 4 cm change to larger circular needles and stockinette st, adjusting (inc/dec) to 92-104-114-132-148 sts evenly distributed on the first row. Place a marker for the other side = 46-52-57-66-74 sts between markers. When the piece measures 10 cm inc 1 st at each side of both markers every 4 cm a total of 5 times = 112-124-134-152-168 sts. When the piece measures 30-31-32-33-34 cm bind off 6 sts at each side for armhole (3 sts at each side of each marker) = 50-56-61-70-78 sts remain on Body. Lay piece aside and knit the sleeve. Sleeve: Cast on 39-41-41-43-45 sts on smaller double-pointed needles; join and place a marker at the join. Knit 4 rows garter st. Change to larger double pointed needles and stockinette st, decreasing 8 sts evenly distributed on the first row = 31-33-33-35-37 sts. When the piece measures 10-10-10-9-12 cm inc 1 st each side of marker every 3.5-3.5-3-2.5-2 cm a total of 11-11-12-15-16 times = 53-55-57-65-69 sts. When sleeve measures 48-47-47-46-46 cm bind off 3 sts each side of marker = 47-49-51-59-63 sts. Lay piece aside and knit a second sleeve. Yoke: Put the sleeves in on the same circular needles as Body where you bound off for armholes = 194-210-224-258-282 sts. Put a marker in each transition between front, back and the sleeves = 4 markers. Knit 3-1-1-0-0 rows before beginning raglan shaping. Raglan: Dec 1 st at each side of each marker = 8 decs per row. Dec as follows – see decreasing tips above – every other row: 17-19-20-19-19 times and then every row: 0-0-0-5-7 times. Neckband: When the piece measures 46-48-49-51-53 cm put the center 6-6-9-10-14 sts on a st holder for the neck, then dec 1 st at each neck edge every other row: 2-2-3-3-3 times. After all raglan and neck shaping is complete 48-48-49-50-54 sts remain. Collar: Pick up approx. 10-20 sts (incl. sts from st holder) along front neck and put all sts on larger double-pointed needles = 58-74 sts. Join and P 1 right side row, then continue in stockinette st, adjusting (inc/dec) to 56-60-64-66-68 sts on the first row. When the collar measures 5 cm change to reverse stockinette st. When the collar measures 10 cm inc 20 sts evenly distributed on the row. Repeat inc when the piece measures 20 cm. Continue to inc 10 sts evenly distributed every 4 rows 3 times = 126-130-134-136-138 sts. Bind off when the collar measures approx. 26 cm. Assembly: Sew under the sleeve. Crocheted edge: Crochet a row of loops with Vivaldi around the collar and lower edge of the sleeves as follows: 1 sc in 1st st, * ch 6, skip over 2 sts, 1 sc in the next st *, repeat * - * and finish with ch 6 and 1 sl st in the 1st st at start of row. |
|
 |
|
Have you finished this pattern?Tag your pictures with #dropspattern #katrinesweater or submit them to the #dropsfan gallery. Do you need help with this pattern?You'll find 26 tutorial videos, a Comments/Questions area and more by visiting the pattern on garnstudio.com. © 1982-2026 DROPS Design A/S. We reserve all rights. This document, including all its sub-sections, has copyrights. Read more about what you can do with our patterns at the bottom of each pattern on our site. |


With over 40 years in knitting and crochet design, DROPS Design offers one of the most extensive collections of free patterns on the internet - translated to 17 languages. As of today we count 325 catalogs and 12298 patterns - 12288 of which are translated into English (US/in).
We work hard to bring you the best knitting and crochet have to offer, inspiration and advice as well as great quality yarns at incredible prices! Would you like to use our patterns for other than personal use? You can read what you are allowed to do in the Copyright text at the bottom of all our patterns. Happy crafting!
Post a comment to pattern DROPS 84-10
We would love to hear what you have to say about this pattern!
If you want to leave a question, please make sure you select the correct category in the form below, to speed up the answering process. Required fields are marked *.