
Popular categories
Looking for a yarn?


Comments / Questions (16)
![]() Iris wrote:
Iris wrote:
Hi ich stricke gerade die Jacke drops 60-7 und verstehe einen Satz der Anleitung nicht. Es geht um folgenden teil: Körper: 6 M Perlmuster auf beiden Seiten der Markierungsfäden ubd 8 M auf beiden Seiten gegen vorne, die restlichen M werden glatt rechts gestrickt. Was bedeutet bitte : und 8 M auf beiden Seiten gegen vorne??? Viele Grüße Iris Noll
17.11.2025 - 19:33DROPS Design answered:
Liebe Iris, die 4 letzten Maschen vom rechten Vorderteil + die 4 ersten Maschen vom Rückenteil = 8 Maschen auf einer Seite sowie die 4 letzten Maschen vom Rückenteil + die 4 ersten Maschen vom linken Vorderteil = 8 Maschen auf der andere Seite, diese 8 Maschen x 2 stricken Sie auch im Perlmuster (nur 6 Reihen, dann sind diese Maschen glattrechts gestrickt). Viel Spaß beim Stricken!
18.11.2025 - 16:54
![]() Agneta wrote:
Agneta wrote:
Jag undrar om det finns bild på koftan bak. Det brukar finnas flera bilder på modellen men inte på den här.
05.08.2025 - 08:50DROPS Design answered:
Hej Agneta. Nej det finns det dessvärre inte. Mvh DROPS Design
26.08.2025 - 14:22
![]() Isa wrote:
Isa wrote:
A 16cm, je dois rabattre les 8 m du dessous de la manche. A combien de mailles du bord dois-je diminuer ? cela ne va pas faire un trou ? Merci par avance de vos éclairages.
16.05.2025 - 09:56DROPS Design answered:
Bonjour Isa, vous rabattez les 8 premières mailles en début de rang sur l'endroit (les 8 mailles point de riz) et vous continuez en rond en tricotant désormais toutes les mailles en jersey, vous avez effectivement un trou, qui sera fermé en cousant la bordure du dessus au-dessus de l'autre et en cousant les boutons dans les 2 épaisseurs. Les 8 mailles du début des rangs sur l'endroit sur les 16 premiers cm seront placées au-dessus des 8 mailles point de rie de la fin des rangs pour la petite bordure point de riz. Bon tricot!
16.05.2025 - 17:27
![]() Clara wrote:
Clara wrote:
Ik heb een vraag over het minderen en meerderen in het voorpand. Voor de kraag elke 4e en 6e naald één steek meerder. Betekent dit dat je een steek meerdere in de 4e naald en vervolgens twee naalden nog één steek(6e naald) of eerst in de vierde naald één steek, vervolgens 6 naalden breien en in de 6e naald één steek meerderen? Dezelfde vraag voort de 6e en 8e naald van de minderingen in het voorpand..
05.01.2025 - 16:24
![]() Cornelie Schilling wrote:
Cornelie Schilling wrote:
Die Beschreibung zum Kragen verstehe ich nicht. Ist er teilweise gleich angestrickt und teilweise erst später angenäht? Für mich ist die Anleitung nicht lang genug, ebenso bei 50-5. Dagegen bestens bei 227-37. Danke und Grüße!
12.08.2022 - 16:19DROPS Design answered:
Liebe Frau Schilling, Sie werden hier für den Kragen innerhalb die 1./letzte Masche glatt rechts nach der Blende so zugenommen : bei jeder 6. R.: 1 M. x 12, und bei jeder 8. R.: 1 M. x 2 = 14 Zunahmen + 8 Blende-Maschen = 22 M. für den Kragen - es wird auch gleizeitig für den V-Hals abgenommen - dann ketten Sie die Maschen für den Schulter ab und stricken noch den Kragen bis zur Ende (siehe dieses Video für die letzten cm vom Kragen. Viel Spaß beim stricken!
15.08.2022 - 07:43
![]() Marije wrote:
Marije wrote:
Dit vest wordt gebreid met DROPS Bomull-Lin. Volgens de Garencategorie is de steenverhouding 17 x 22 voor 10 x 10 cm. Het patroon gaat uit van stekenverhouding 21 x 28 voor 10 x 10 cm. Kan deze breigaren dan toch gebruikt worden? Moet het patroon dan aangepast worden? Of kan er beter breiwol gebruikt worden uit de garencategorie B?
25.07.2021 - 11:52DROPS Design answered:
Dag Marije,
Ja hoor, soms wijkt de stekenverhouding in het patroon af van de standaard stekenverhouding van het gebruikte garen. Dit is vaak omdat de ontwerper dit zo bedacht heeft om het werkstuk bijvoorbeeld bewust compacter of losser te maken. Houd dus altijd de stekenverhouding van het patroon aan en maak ook altijd een proeflapje.
19.08.2021 - 14:16
![]() Marijke wrote:
Marijke wrote:
Met de stekenverhouding kom ik uit op 11 cm breed. Kan ik ipv maat L maat M aanhouden?
06.06.2021 - 09:14DROPS Design answered:
Dag Marijke,
Er komt dan 1 cm per 10 cm in de breedte bij, dus in plaats van 52 cm breed wordt je pand, ruim 57. Dat komt inderdaad aardig in de buurt van maat L. Let er op dat je wel de hoogtematen aan moet houden van maat L.
11.06.2021 - 12:37
![]() Linda W wrote:
Linda W wrote:
Why no XL?
18.04.2020 - 19:19DROPS Design answered:
Dear Linda, this is one of our older patterns, and back then pattern were made in a smaller range size wise. It would probably suit those sizes the best. You can get our newer patterns in a much wider scale size-wise. We hope you would understand.
19.04.2020 - 20:56
![]() Pascale wrote:
Pascale wrote:
Matière compliquée à tricoter pour moi, souffrant d'asthénie. Ca devrait s'arranger en utilisant une aiguille numéro 3 pour l'envers, et une de 3, 5.
30.05.2019 - 16:16
![]() Ellis wrote:
Ellis wrote:
Ik zit nu op 33cm en moet gaan minderen in het voorpand. Volgens de beschrijving moet ik zowel meerderen als minderen in de gerstekorrelbies maar dan kom ik toch nooit aan 22steken? Moet het niet zo zijn dat het minderen steeds net vóór de bies wordt gedaan? Volgens de foto wordt de kraag ook steeds breder zodat je hem om kunt slaan en anders lijkt het mij dat hij niet echt breder wordt. Bij voorbaat dank
27.07.2017 - 20:52DROPS Design answered:
Hoi Ellis, Ja dat klopt, het minderen doe je steeds tussen de bies en de panden. Door het minderen worden de panden smaller en krijg je een v-vorm in de hals. Door het meerderen bij de bies, wordt de kraag in gerstekorrel breder. Dus je mindert tussen de bies in gerstekorrel en het pand in tricotsteek.
02.11.2017 - 18:11
|
|
DROPS 60-7 |
|
|
|
|
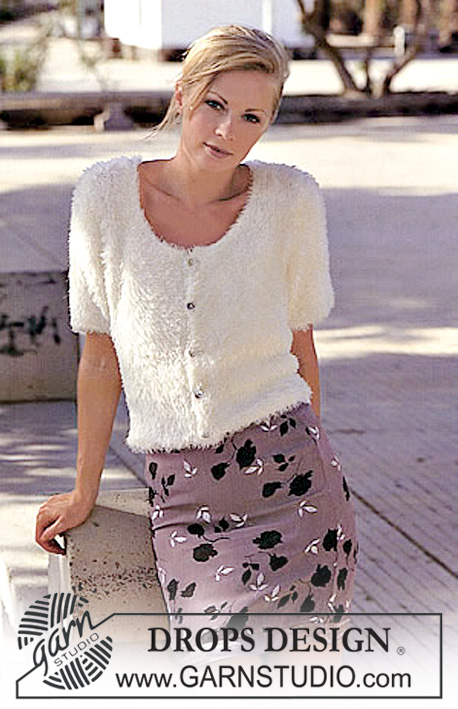
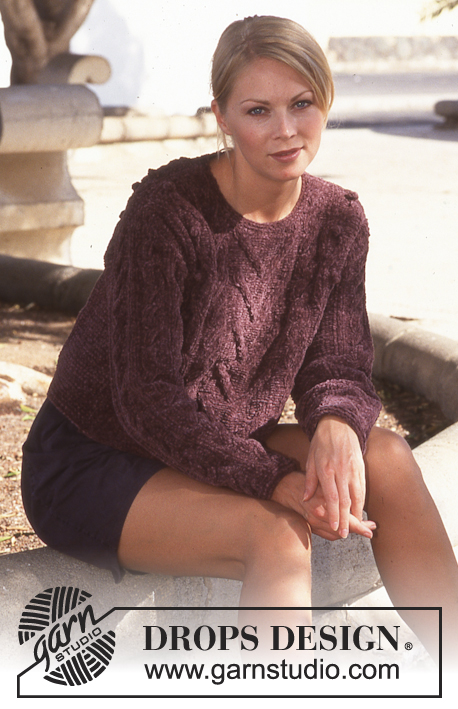
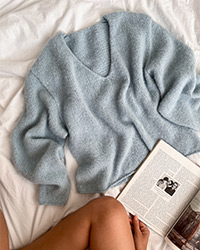
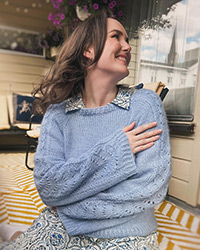
DROPS Cardigan in Bomull-Lin with shawl collar
DROPS 60-7 |
|
|
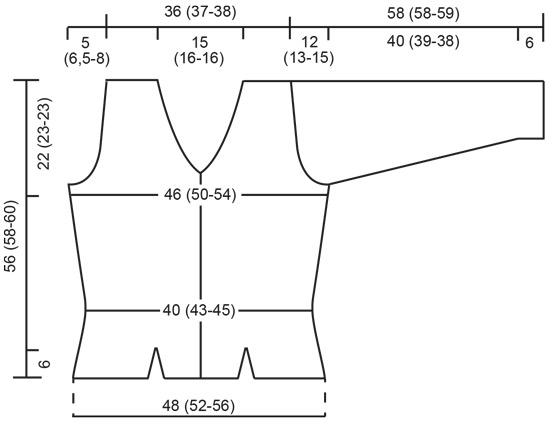
Gauge: 21 sts x 28 rows in stockinette stitch = 10 x 10 cm [4" x 4"]. Buttonholes: When the work measures: 8 cm, 14.5 (15.5-16) cm, 21.5 (22.5-24) cm and 28 (30-32) cm [3⅛", 5.75" (5⅞" - 6.25"), 8.5" (8⅞" - 9.5"), and 11" (11.75" - 12⅝")], make buttonholes on the right front as follows: bind off the 4th and 5th sts and cast on 2 new sts over the bound-off sts on the next row. Make the top buttonhole in the neckband in line with the others. Seed stitch (on an even number of sts): Row 1: * K 1, P 1 * Row 2: * P 1, K 1 * Seed stitch (on an odd number of sts): All rows: K 1, *P 1, K 1* Seed stitch (worked in the round): Row 1: * knit 1, purl 1 * Row 2: * knit the purl sts from the previous row and purl the knit sts from the previous row * Back: Cast on 50 (52-54) sts and knit 9 rows seed st. Change to stockinette stitch, keeping the outer 6 sts at each side in seed st throughout. When the work measures 7 cm [2.75"] put the work aside. Left Side piece: Cast on 54 (62-68) sts and knit 9 rows seed st. Change to stockinette stitch, keeping the outer 6 sts at each side in seed st throughout. When the work measures 7 cm [2.75"] put the work aside. Right Side piece: Cast on and knit as for the left side piece. Left Front piece: Cast on 29 (30-31) sts and knit 9 rows seed st. Change to stockinette stitch, keeping the outer 6 sts at the left side and the outer 8 sts at the center front (for the button band) in seed st throughout. When the work measures 7 cm [2.75"] put the work aside. Right Front: Cast on and knit as for the left front, but reverse pattern (6 sts seed st at the right side, 8 sts seed st at the center front). Body: Put all five parts on the same needles as follows: right front, right side piece, back, left side piece, left front - there will be 2 splits in the back and 2 in the front = 216 (236-252) sts on the needles. Place markers at each join. Knit the next 6 rows as follows: Keep 6 sts on each side of each marker and the 8 sts at each center front (button bands) in seed st; knit the remaining sts in stockinette stitch. Then knit stockinette stitch over all sts, but continue to work the 8 button band sts on each side in seed st throughout. Make buttonholes on the right front - see instructions above. When the work measures 10 cm [4"] dec 1 st at each side of each marker 4 (5-6) times (see instructions below): Sizes S+M: every 4th row Size L: alternately every 3rd and 4th row Make decreases as follows on the right side: Before the marker: K 2 tog. After the marker: slip 1, K 1, pass the slipped st over (psso). Make decreases as follows on the wrong side: Before the marker: P 2 tog into the back of the st. After the marker: P 2 tog. = 184 (196-204) sts on the needles. When the work measures 17 (18-19) cm [6.75" (7" - 7.5")] inc 1 st each side of each marker (make increases 1 st in from marker) 3 (4-5) times every 5th (4th-3rd) row = 208 (228-244) sts. Remove the markers when you are finished with the increases. Attach new markers, one at each side: fronts = 56 (61-65) sts each, back = 96 (106-114) sts. When the work measures 27 (29-31) cm [10⅝" (11⅜" - 12.25")] increase for the collar at the center front edge 1 st in from the edge - measure the collar from here. Inc 1 st each side every 6th row 12 times, then every 8th row 2 times = 22 sts each collar. Knit the increased sts into seed st as you go along. At the same time, when the work measures 29 (31-33) cm [11" (12.25" - 13")], decrease for the neck and continue to increase for the collar as instructed above. Make the decreases in the last stitch of stockinette st next to the seed stitch border. Dec 1 st every 6th row 4 times, then every 4th row 12 (13-13) times. Make decreases as follows on the right side: Before the seed st border: K 2 tog. After the seed st border: slip 1, K 1, pass the slipped st over (psso). Make decreases as follows on the wrong side: Before the seed st border: P 2 tog into the back of the st. After the seed st border: P 2 tog. When the work measures 34 (35-37) cm [13⅜" (13.75" - 14.5")], bind off 2 sts on each side of each marker for armholes and knit the rest of each part separately. Front: Bind off for armholes every other row: 3 sts 1 (2-2) times, 2 sts 1 (2-3) times, 1 st 3 (2-3) times. When the collar measures 25 cm [9⅞"], dec 1 st at each center front (make decrease 1 st in from the edge), then every 3 cm [1.25"] 2 times = 19 sts collar. When the work measures 56 (58-60) cm [22" (22⅞" - 23⅝")] bind off 22 (22-23) sts for the shoulder. Now only the collar sts remain on the needles. Continue in seed st, but every other row knit a short row on the collar follows: Knit 1 row only over the outer 12 sts at the center front, turn the work and knit back to edge. Knit the next row over all sts. When the collar measures 7.5 (7.5-8) cm [3" (3" - 3⅛")] put all sts on a stitch holder. Back: = 92 (102-110) sts. Bind off for armholes as on the front = 76 (78-80) sts. When the work measures 54 (56-58) cm [21.25" (22" - 22⅞")] bind off the center 28 (30-30) sts for the neck. Bind off 2 sts at each neck edge on the next row. Bind off when the work measures 56 (58-60) cm [22" (22⅞" - 23⅝")]. Right sleeve: Knit the sleeves back and forth on the needles for the first 16 (18-18) cm [6.25" (7" - 7")]. Cast on 62 (62-64) sts and knit 9 rows seed st. Change to stockinette stitch, but keep the outer 8 sts at each side in seed st and place a marker as follows: 40 (40-41) sts for the upper sleeve, attach a marker (underarm), 22 (22-23) sts for the lower sleeve. When the work measures 6 cm [2⅜"], inc 1 st at each side of the marker 16 (18-17) times: Size S: alternately every 6th and 7th row Sizes M+L: alternately every 5th and 6th row. When the work measures 16 (18-18) cm [6.25" (7" - 7")], bind off the outer 8 sts on the lower sleeve. Put all sts on double pointed needles and join. Knit all sts in stockinette stitch. Continue to increase at the underarm marker until there are 86 (90-90) sts on the needles. When the work measures 46 (45-44) cm [18⅛" (17.75" - 17.25")], bind off 2 sts each side of underarm marker and knit the rest of the work back and forth on the needles. Bind off for sleeve caps at each side every other row: 3 sts 2 times, 2 sts 2 (3-2) times, 1 st 7 (7-12) times, 2 sts 3 times, 3 sts 3 (3-2) times, bind off. The work measures approximately 58 (58-59) cm [22⅞" (22⅞" - 23.25")]. Left sleeve: Knit like the right, but reverse shaping. Assembly: Sew shoulder seams. Weave the collar together at the center back. Sew the collar to the neck opening on the back with the seam toward the wrong side. Lay the lower sleeve button band under the upper sleeve button band and sew. Sew on the sleeves and the buttons. The buttons on the sleeves should be sewed through both bands. |
|
 |
|
Have you finished this pattern?Tag your pictures with #dropspattern or submit them to the #dropsfan gallery. Do you need help with this pattern?You'll find 20 tutorial videos, a Comments/Questions area and more by visiting the pattern on garnstudio.com. © 1982-2026 DROPS Design A/S. We reserve all rights. This document, including all its sub-sections, has copyrights. Read more about what you can do with our patterns at the bottom of each pattern on our site. |

With over 40 years in knitting and crochet design, DROPS Design offers one of the most extensive collections of free patterns on the internet - translated to 17 languages. As of today we count 320 catalogs and 12110 patterns - 12100 of which are translated into English (US/in).
We work hard to bring you the best knitting and crochet have to offer, inspiration and advice as well as great quality yarns at incredible prices! Would you like to use our patterns for other than personal use? You can read what you are allowed to do in the Copyright text at the bottom of all our patterns. Happy crafting!
Post a comment to pattern DROPS 60-7
We would love to hear what you have to say about this pattern!
If you want to leave a question, please make sure you select the correct category in the form below, to speed up the answering process. Required fields are marked *.