
Popular categories
Looking for a yarn?


Comments / Questions (61)
![]() Renate Thienel wrote:
Renate Thienel wrote:
Habe das Garn Drops Safran , wie in der Anleitung für dieses Top, bestellt. Die Anleitung für Größe S schlägt für dieses Rückenteil 110 Maschen vor. Das ist viel zu groß. Es müssten viel weniger Maschen sein. Für eine Antwort wäre ich dankbar. VG
22.01.2026 - 13:11DROPS Design answered:
Liebe Renate, haben Sie die Maschenprobe eingehalten? Achten Sie auch auf die Maße in der Maßskizze. Die Maschenzahl passt auf jeden Fall zu der angegebenen Breite.
27.01.2026 - 10:26
![]() Renate Rauch wrote:
Renate Rauch wrote:
Bis jetzt hat alles super geklappt. Drops Safran ist ein tolles Garn und die Videos haben mir sehr geholfen. Ich bin nun schon fast fertig. Nun meine Frage: wird auf der Knopflochreihe unten an der Blumenkante auch eine Reihe feste Maschen gehäkelt? Vielen Dank und viele Grüße, Renate Rauch
05.08.2025 - 19:51DROPS Design answered:
Liebe Frau Rauch, die Knopflöcher sind nicht bei der Blumenkante, nur bei dem Strickteil vom Top. Viel Spaß beim Stricken!
06.08.2025 - 07:47
![]() Frances wrote:
Frances wrote:
I don't understand these instructions. "At the same time after 1 cm, inc at markers in each side: 2 sts 5 times every 7th-8th-10th row - inc 2 sts next to each other and work them in pattern so that pattern still fits = 240-264-292 sts." We start with 244 stitches and ends with 264 so an increase of 20 2 stitches on each side would be 4 and it says to do this 5 times which makes 20. So far so good. But why does it say every 7th-8th-10th row?
16.07.2025 - 18:36DROPS Design answered:
Hi Frances, that is the frequency of increasing sts. You increase 4 stitches per row, every 7h-8th-10th row. Happy knitting!
17.07.2025 - 10:09
![]() Suzanne wrote:
Suzanne wrote:
Bonjour, je ne comprends pas comment faire les augmentations dans ce point fantaisie. Dans la vidéo, on nous montre une augmentation dans un point jersey. Merci
10.07.2025 - 22:16DROPS Design answered:
Bonjour Suzanne, utilisez cette technique ICI, mais augmentez l'une à côté de l'autre. Sur l'envers vous tricotez a l'envers avec 2 mailles au point mousse de chaque cote. Le rang suivant est tricote comme avant (rang 1 du point fantaisie). Bon tricot!
14.07.2025 - 09:16
![]() Anna wrote:
Anna wrote:
Buongiorno, per cortesía Ho un dubbio sulla modalita\' delle diminuzioni prima e dopo Il vivagno. Da come sono descritte mi chiedo se non dovrebbe essere Il contrario ovvero dopo Il vivagno tre m insieme e prima una passata due insieme e accavallare. Grazie
18.06.2025 - 11:57DROPS Design answered:
Buongiorno Anna, le diminizioni si lavorano come indicato, dopo il vivagno iniziale e prima di quello finale. Buon lavoro!
18.06.2025 - 16:24
![]() RETAIL wrote:
RETAIL wrote:
Dans le modèle il est noté que les diminutions doivent se faire uniquement sur l'endroit mais pour les emmanchures il est noté 5 fois tous les deux rangs et 5 fois tous les rangs ??? Dans ce cas je comprends rang ou un aller-retour
17.06.2025 - 14:56DROPS Design answered:
Bonjour Mme Retail, les diminutions des emmanchures doivent bien se faire tous les 2 rangs = tous les rangs sur l'endroit; Diminuez d'abord 2 mailles puis 1 maille en début de rang à partir de l'emmanchure (dos/devant gauche) et/ou en fin de rang côté emmanchure (dos/devant droit) comme indiqué sous Diminutions au début des explications. Bon tricot!
18.06.2025 - 07:19
![]() Odile Cazade wrote:
Odile Cazade wrote:
J'ai crocheté le carré fleur avec un crochet n°3 et ma fleur mesure 11 cm. Je suis loin des 9,5 cm demandés dans les explications. Que dois-je faire ? Merci pour votre réponse
15.04.2025 - 18:09DROPS Design answered:
Bonjour Mme Cazade, essayez avec un crochet plus petit, et/ou bien essayez de tirer un peu moins sur vos mailles en hauteur pour bien avoir les bonnes mesures. Bon crochet!
22.04.2025 - 09:44
![]() Demange wrote:
Demange wrote:
Bonjour, j'ai fait 8 fleurs au crochet mais malgré un crochet de 2,5 au lieu de 3,5, j'atteins la bonne mesure pour la taille S avec seulement 7 fleurs. De ce fait, je ne peux pas relever 220 mailles, je n'ai pas assez de place. Comment puis-je modifier toutes les mesures (nombre de mailles, marqueurs, nombre d'augmentations, diminutions etc.) ? Je pense que je vais également devoir prendre des aiguilles plus petites car mon échantillon fait presque un centimètre de plus.
15.07.2024 - 14:20DROPS Design answered:
Bonjour Mme Demange, 1 carré doit mesurer 9,5 x 9,5 cm; si vous avez le bon échantillon tricot en jersey et point fantaisie (ajustez la taille des aiguilles si besoin), mais pas au crochet, vous pouvez probablement juste relever vos mailles le long des carrés en augmentant en même temps (dès que vous relevez les mailles) le nombre de mailles nécessaire à intervalles réguliers pour avoir le bon échantillon; il serait naturellement plus facile pour vous d'avoir les bonnes dimensions pour les carrés, essayez de tirer vos mailles un peu moins en hauteur pour vous éviter des calculs et les ajustements nécessaires. Bon tricot!
29.07.2024 - 10:08
![]() Nettan wrote:
Nettan wrote:
Hej! Jag undrar lite om hur man ska göra ökningsmaskorna i detta mönster? Står bara hur man avmaskar!! En film på hur man ökar i just detta mönster vore superbra!
03.07.2024 - 22:18DROPS Design answered:
Hej Nettan, du kan tage ud ved at strikke 2 masker i maskerne på hver side af mærketråden :)
04.07.2024 - 07:43
![]() Chloe wrote:
Chloe wrote:
When I knit into the passed over slip stitch, do I knit into the front or back of the stitch? Knitting into the front twists the stitch which is what I’m assuming is the correct way?
02.07.2024 - 15:25DROPS Design answered:
Dear Chole, in this video we show how to work the pattern, it might help you understanding how to do. Happy knitting!
02.07.2024 - 16:02
|
|
Beachside Garden#beachsidegardentop |
|
 |
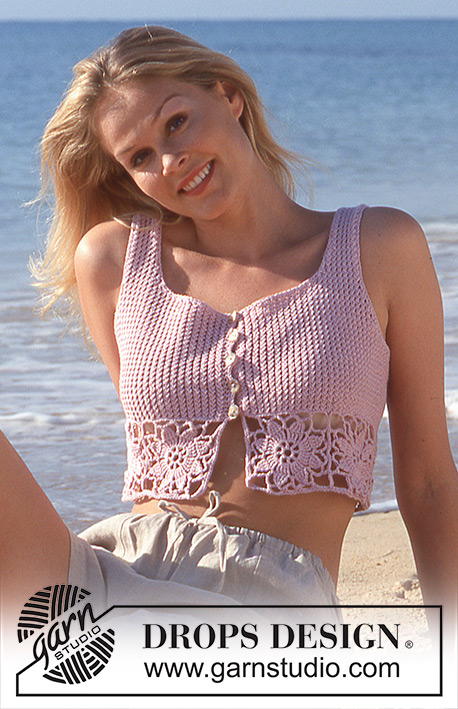 |
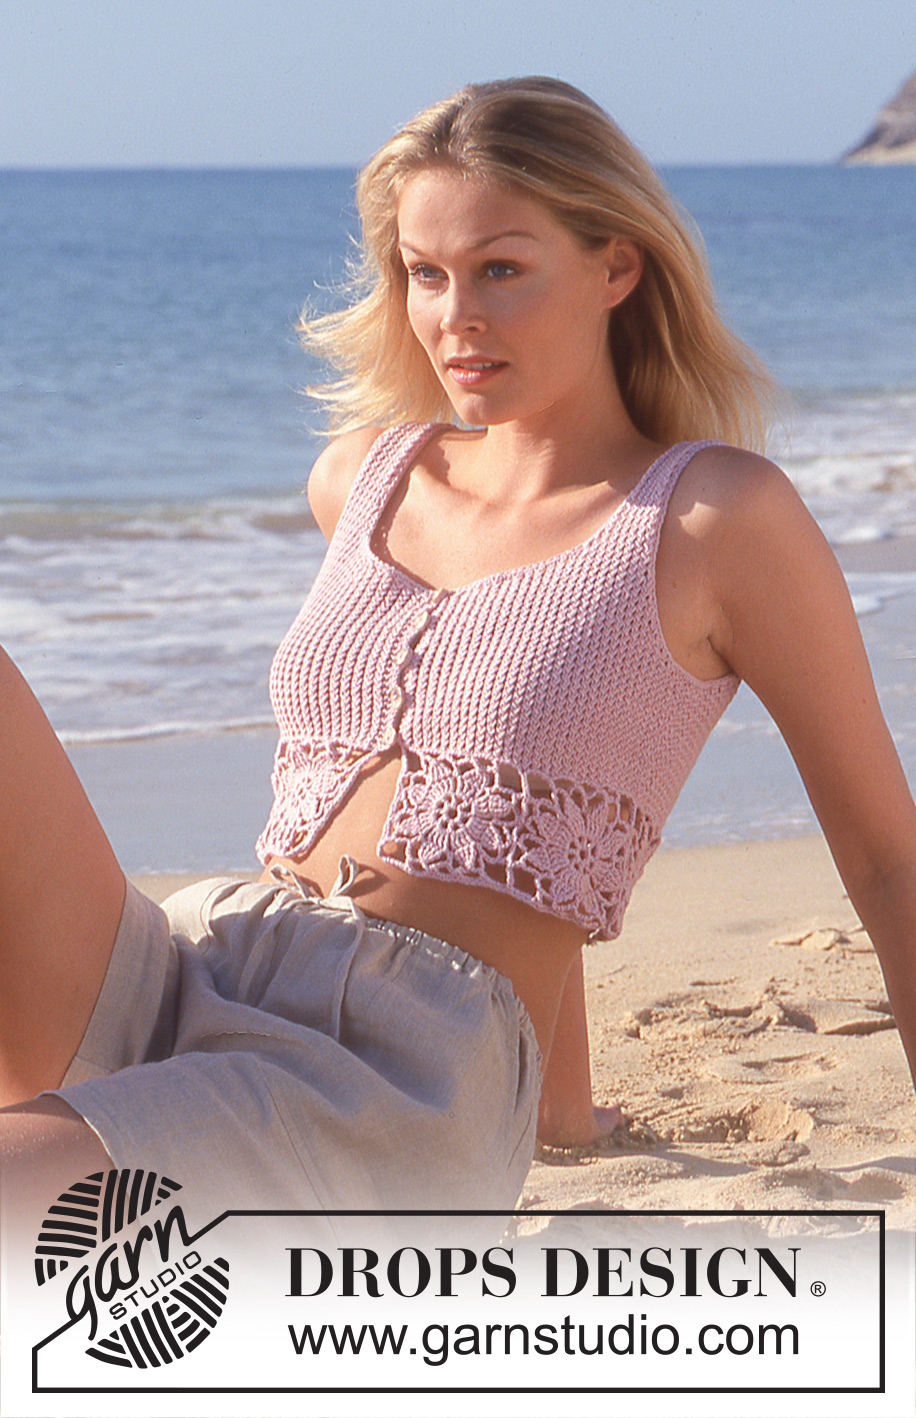
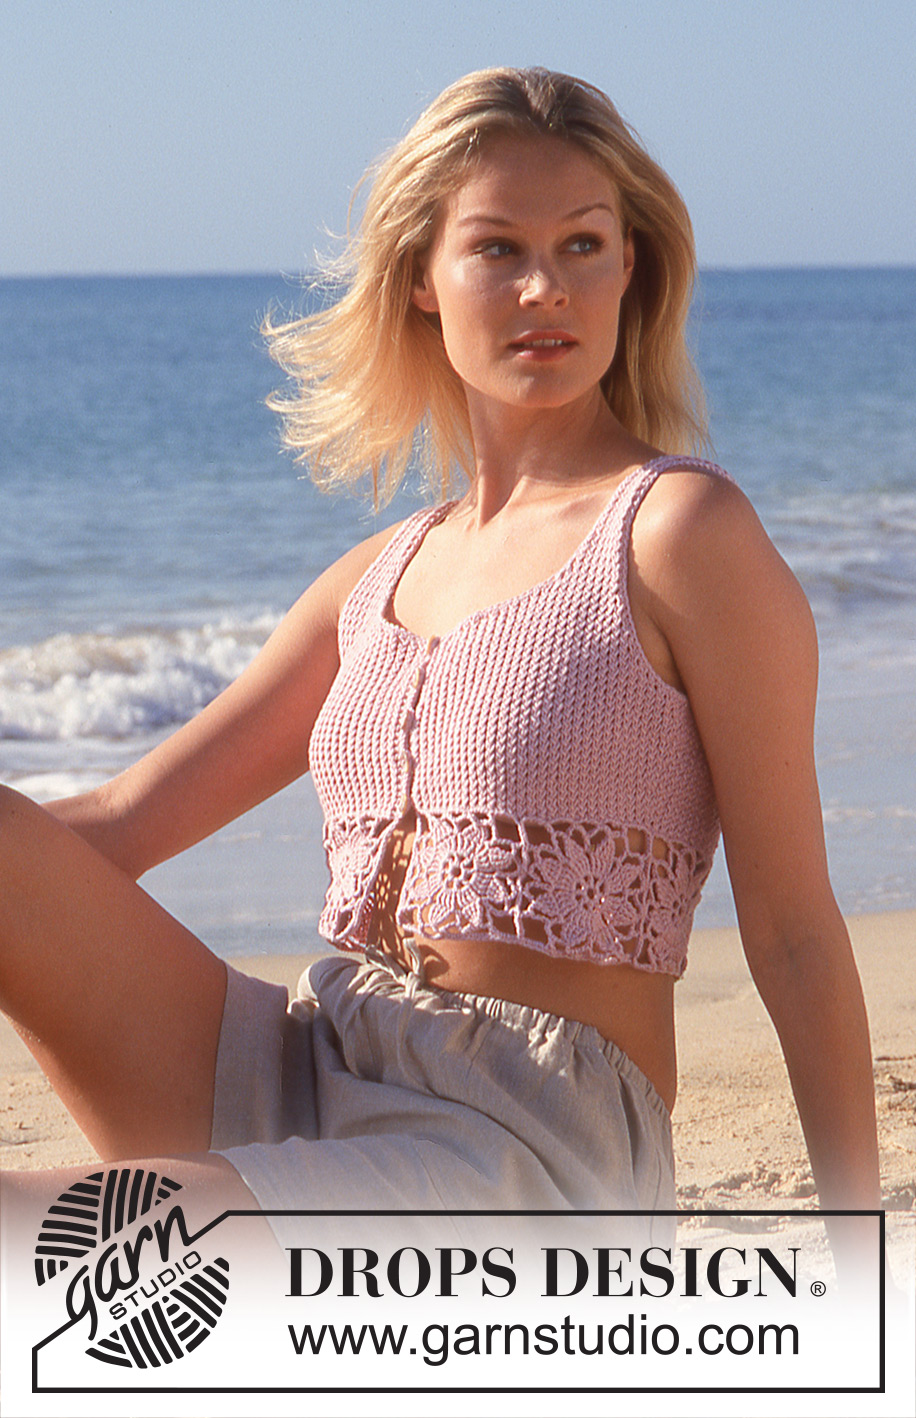
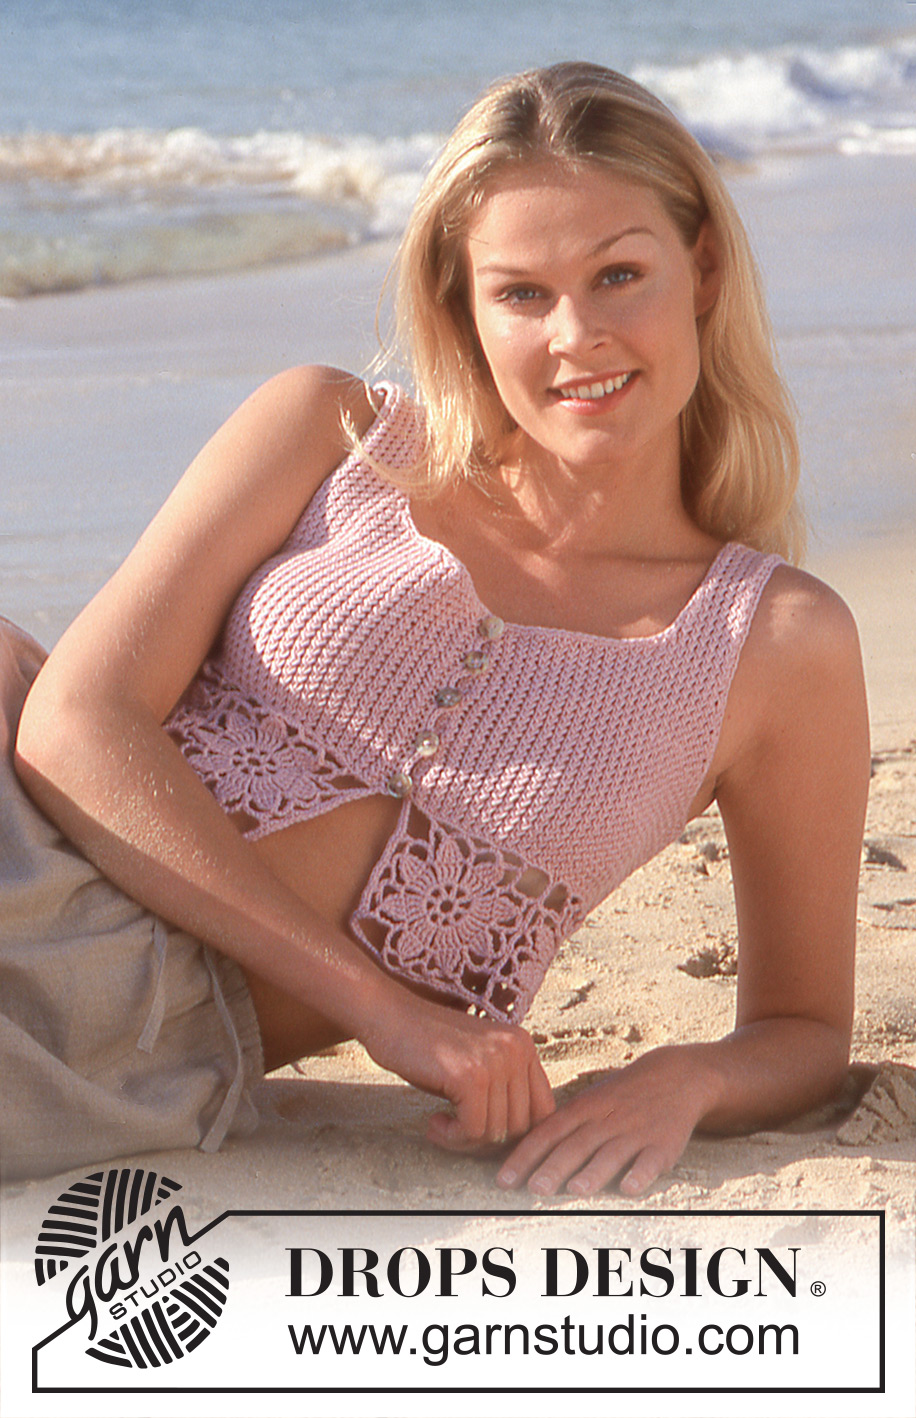
DROPS Short top in Safran with crocheted flower squares.
DROPS 64-8 |
|
|
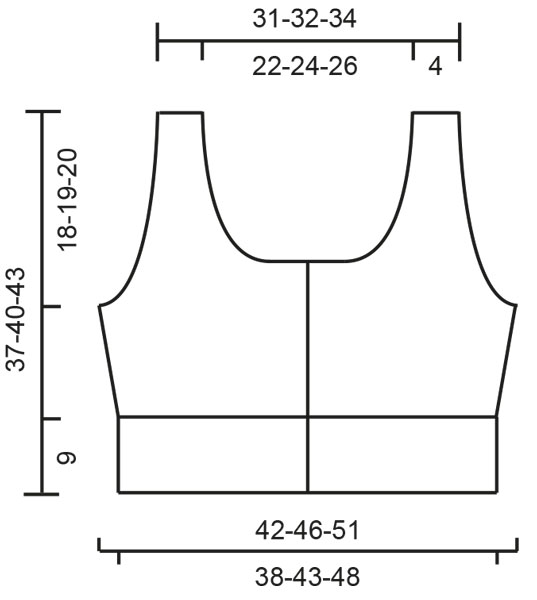
KNITTING GAUGE: 26 stitches in width and 34 rows in height in stocking stitch = 10 x 10 cm [4" x 4"] 28 stitches in width x 36 rows in height in pattern = 10 x 10 cm. [4" x 4"] NOTE: Needle size is only a guide. If you get too many stitches on 10 cm [4"], change to a larger needle size. If you get too few stitches on 10 cm [4"], change to a smaller needle size. Crochet gauge: One flower square measures approx. 9.5 x 9.5 cm [3.75" x 3.75"] PATTERN: Pattern is divisible by 2. Row 1: * slip one st as if to K, K 1, pass the slipped st over 1 K and leave the slipped st on left needle, K the slipped st *, repeat from *-*. Row 2: K2, purl all stitches and finish with K2. Repeat 1st and 2nd row Garter st, when knitting flat: Knit all sts, all rows. Knitting tip: All decs are made on right side rows, inside 1 edge st which is knit in garter st throughout. Dec 2 sts as follows: After 1 edge st: Slip 1, K 2 tog, pass the slipped st over (psso). Before 1 edge st: K 3 tog. Dec 1 st as follows: After 1 edge st: Slip 1, K 1, psso. Before 1 edge st: K 2 tog. Crocheted flower square: Chain 8 and join them into a ring with 1 slip st. Row 1: * 1 double crochet (dc) (the first dc is replaced by ch 3), ch 2 *, repeat from * - * 8 times, join with a slip st into the first dc. Row 2: * 4 trebles (the first treble is replaced by ch 4 around the ch st bow, ch 2 *, repeat from * - * 8 times, join with a slip st in the first treble. Row 3: * 4 trebles in the 4 trebles from the previous row (the first treble is replaced by ch 4) -- but keep the last loop of each on the hook until all trebles have been crocheted, then pull the yarn through all sts on the crochet hook (4 sts become 1), ch 6, 1 treble around the ch 2 from the preceding row, ch 6 *, repeat from * - * 8 times, join with a slip st in the first treble group. Row 4: Slip st to the center of the ch st bow, ch 1, 1 single crochet (sc) around the ch st bow, * ch 5, 1 sc around the next ch st bow, ch 5, 1 dc around the next ch st bow, ch 10, 1 dc around the next ch st bow (= corner), ch 5, 1 sc around the next ch st bow *, repeat from * - * a total of 3 times, then ch 5, 1 sc around the next ch st bow, ch 5, 1 dc around the next ch st bow, ch 10, 1 dc around the next ch st bow (= corner), ch 5, join with a slip st in the first sc. Top: Crochet 8-9-10 flower squares - see instructions above. Join together into a long strip - sew in the edge sts. Pick up and knit 220-244-272 sts in the upper ch st round on the crocheted strip. Attach 1 marker in the work after 55-61-68 sts and 1 marker after 165-183-204 sts. Knit Pattern - see instructions above, but keep the 2 edge sts at each side (center front) in garter st throughout. After 1 cm [⅜"], inc 2 sts at each marker 5 times every 7-8-10 rows - inc 2 sts beside each other and knit them into the pattern = 240-264-292 sts. When the work measures 19-21-23 cm [7.5"-8.25"-9"], knit the next row as follows: 57-62-68 sts for the front, bind off 8-10-12 sts for armhole, 110-120-132 sts for the back, bind off 8-10-12 sts for armhole, 57-62-68 sts for the front. Knit the rest of each part separately. Right Front: = 57-62-68 sts. Keeping the armhole edge st in garter st, dec for armholes every other row - see Knitting tip - 2 sts 3-5-6 times, 1 st 6-5-6 times = 45-47-50 sts. When the work measures 23-24-26 cm [9"-9.5"-10.25"], bind off 24-26-29 sts at the center front for neck opening. Keeping the center front edge st in garter st, dec at the neck edge every other row - see Knitting tip - 2 sts 3 times, 1 st 3 times = 12-12-12 sts remain on each shoulder. Continue by knitting Pattern, but keep 1 st at each side in garter st. Bind off when the work measures 37-40-43 cm [14.5"-15.75"-16⅞"]. Left Front: Knit like the right front, but reverse all shaping. Back: 110-120-132 sts. Keeping the armhole edge st in garter st, dec at each side for armholes as on the front = 86-90-96 sts. When the work measures 23-24-26 cm [9"-9.5"-10.25"], bind off the center 44-48-54 sts for neck opening. Keeping each neck edge st in garter st, dec at each neck edge every other row - see Knitting tip: 2 sts 3 times, 1 st 3 times = 12-12-12 sts remain on each shoulder. Continue knitting Pattern, but keep 1 st at each side in garter st throughout. Bind off when the work measures 37-40-43 cm [14.5"-15.75"-16⅞"]. Assembly: Sew the loops on the shoulders together. Crochet around the armhole: 1 row of single crochet (sc) inside 1 edge st. Make 5 buttonholes evenly distributed along the right front edge - the top buttonhole at the very top, the lowest just before the flower squares begin. Crochet inside the 2 edge sts -- begin at the very top as follows: Row 1: ch 5, skip over 1 cm [⅜"] (= 1 buttonhole), sc until the next buttonhole. Row 2: 4 sc around the ch st loop (buttonhole) and slip st between the buttonholes. After row 2: Continue to work sc around the neck opening, down along the left front and around the entire crocheted flower border. Sew on the buttons. |
|
 |
|
Have you finished this pattern?Tag your pictures with #dropspattern #beachsidegardentop or submit them to the #dropsfan gallery. Do you need help with this pattern?You'll find 27 tutorial videos, a Comments/Questions area and more by visiting the pattern on garnstudio.com. © 1982-2026 DROPS Design A/S. We reserve all rights. This document, including all its sub-sections, has copyrights. Read more about what you can do with our patterns at the bottom of each pattern on our site. |
|


With over 40 years in knitting and crochet design, DROPS Design offers one of the most extensive collections of free patterns on the internet - translated to 17 languages. As of today we count 325 catalogs and 12298 patterns - 12288 of which are translated into English (US/in).
We work hard to bring you the best knitting and crochet have to offer, inspiration and advice as well as great quality yarns at incredible prices! Would you like to use our patterns for other than personal use? You can read what you are allowed to do in the Copyright text at the bottom of all our patterns. Happy crafting!
Post a comment to pattern DROPS 64-8
We would love to hear what you have to say about this pattern!
If you want to leave a question, please make sure you select the correct category in the form below, to speed up the answering process. Required fields are marked *.