
Popular categories
Looking for a yarn?


Comments / Questions (34)
![]() Monica wrote:
Monica wrote:
Riporto in calce precedente risposta, aggiungendo: 5 maglie a grana di riso all'inizio del ferro e 5 maglie alla fine fanno 10 maglie, che sottratte alle 227 previste per taglia M, danno 217, che non è un numero divisibile per 12, chiedo di nuovo: come suddivido lo schema composto da nr. di maglie divisibile per 12? Grazie DROPS Design ha risposto: Buonasera Monica, deve lavorare 5 maglie di vivagno a ogni lato come indicato. Buon lavoro!
15.03.2026 - 15:32DROPS Design answered:
Buonasera Monica, può lavorare la prima maglia del motivo. Buon lavoro!
15.03.2026 - 19:07
![]() Monica wrote:
Monica wrote:
Lo schema prevede un numero di Maglie divisibile per 12, Come mai il numero di maglie da avviare è dispari? Come mi regolo? Grazie
14.03.2026 - 08:43DROPS Design answered:
Buonasera Monica, deve lavorare 5 maglie di vivagno a ogni lato come indicato. Buon lavoro!
14.03.2026 - 11:10
![]() Jeanne wrote:
Jeanne wrote:
Bonjour après les 2 rangs au point de riz, on est sur l envers et sur le diagramme on nous dit de faire des mailles endroit. Donc chaque fois qu on est sur l envers on doit faire un rang endroit . ?
10.03.2026 - 23:03DROPS Design answered:
Bonjour Jeanne, dans ce modèle, le 1er rang des diagrammes se tricote sur l'envers, ainsi vous avez 2 rangs point de riz, puis 1 rang envers sur l'envers et vous commencez le point ajouré au rang suivant sur l'endroit. Bon tricot!
11.03.2026 - 08:03
![]() Vickie wrote:
Vickie wrote:
I don’t understand the sleeve, how many cm do you knit after the 6 bind off before you start the sleeve cap bind offs?
28.08.2025 - 16:56DROPS Design answered:
Dear Vickie, the sleeve bind off marks the start of the sleeve cap; you start working back and forth. You continue straight into the sleeve cap bind offs, not working extra cm in between them. Happy knitting!
31.08.2025 - 22:29
![]() Marie-Louise Van Ingelgem wrote:
Marie-Louise Van Ingelgem wrote:
Patroon
22.02.2025 - 18:58
![]() GAZEL Fabienne wrote:
GAZEL Fabienne wrote:
Puis-je avoir le texte en français s’il vous plaît ?
09.08.2024 - 10:12DROPS Design answered:
Bonjour Mme Gazel, cliquez sur le menu déroulant juste à côté de l'icône de l'imprimante pour chacun de nos modèles pour basculer les explications en français, par ex. ici pour celui-ci. Bon tricot!
09.08.2024 - 15:17
![]() Thuy wrote:
Thuy wrote:
Thanks for sharring. It's so beautiful
18.06.2024 - 10:41
![]() Trudi wrote:
Trudi wrote:
Heeft u dit patroon ook in XXL?
04.05.2024 - 17:10DROPS Design answered:
Dag Trudi,
Nee, helaas zijn de oudere patronen alleen in deze maten beschikbaar. Hopelijk kun je een vestje vinden in jouw maat bij de meer nieuwere patronen.
05.05.2024 - 11:24
![]() Patricia Colichet wrote:
Patricia Colichet wrote:
Je vous signale juste que pour les manches il faut un nombre impair de mailles donc 73- 73 - 85. Sinon c'est compliqué de faire le premier diagramme.
01.04.2024 - 23:30DROPS Design answered:
Bonjour Mme Colichet, les manches se tricotent en rond ainsi: montez 72-72-84 mailles et tricotez 6-6-7 fois les 12 mailles du diagramme (6-6-7 x 12 = 72-72-84 m). Bon tricot!
03.04.2024 - 13:35
![]() Susanne wrote:
Susanne wrote:
Der Maschenanschlag passt nicht mit dem Muster überein. M1 geht über 12 Maschen, wiederhole ich es 17x sind das 204 Maschen. Dazu an jeder Seite 5 Maschen im Perlmuster = 214 und nicht 215. Wo ist mein Denkfehler?
16.04.2023 - 12:35DROPS Design answered:
Liebe Susanne, am Ende der Reihe, vor den 5 Blenden-Maschen stricken Sie die 1. Masche M.1, so wird das Muster symmetrisch sein, dh so: 5 Blenden-Maschen, die 12 M in M.1 insgesamt 17 Mal wiederholen, die erste Masche M.1 stricken und mit 5 Blenden-Maschen enden; Viel Spaß beim stricken!
17.04.2023 - 09:35
|
|||||||||||||
Always There |
|||||||||||||
|
|
|||||||||||||
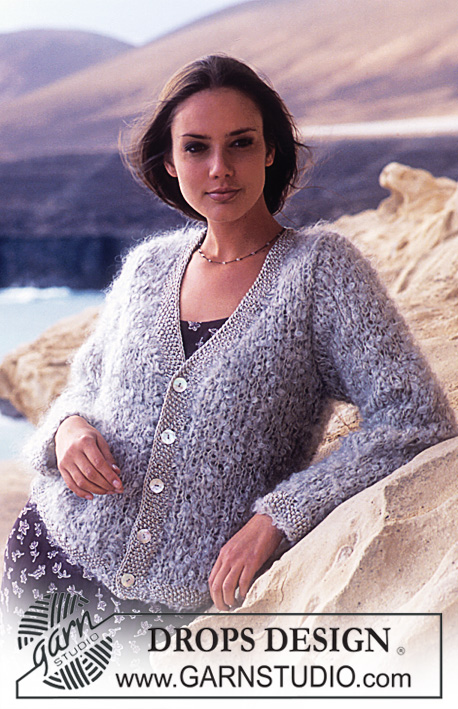
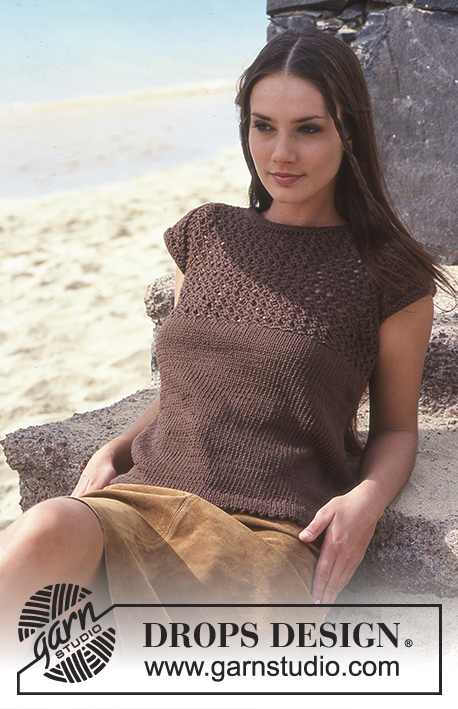
DROPS Cardigan with hole pattern in Cotton Viscose.
DROPS 65-18 |
|||||||||||||
|
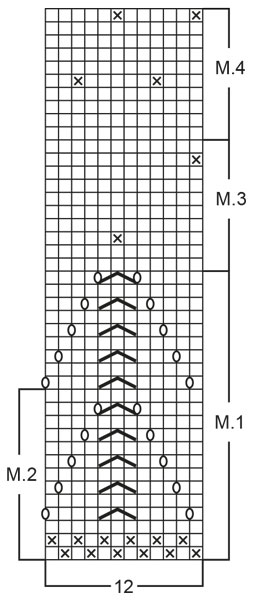
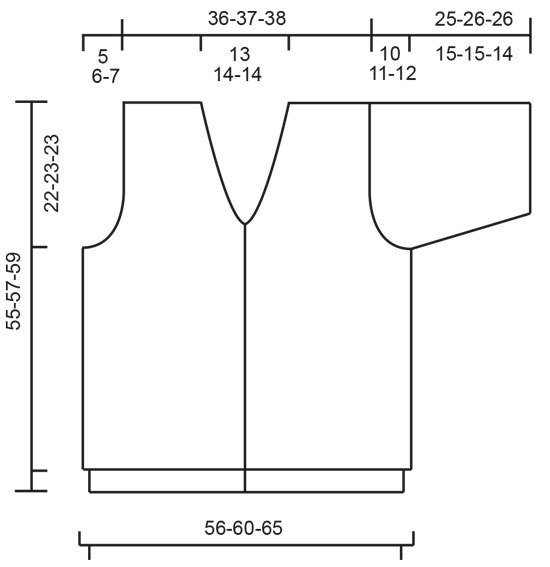
Gauge: 24 sts x 32 rows on needles size 3 and stockinette st = 10 x 10 cm [4" x 4"]. Seed stitch (on an even number of sts): Row 1: * K 1, P 1 * Row 2: * P 1, K 1 * repeat these two rows. Seed stitch (on an odd number of sts): All rows: K 1, *P 1, K 1* Pattern: See chart, one chart = 1 repeat. The pattern is shown from the right side. Buttonholes: 1 buttonhole = bind off the 3rd and 4th edge sts from the center front, cast on 2 new sts over the bound-off sts on the next row. Bind off for buttonholes when the work measures: 3-4-5 cm, 9-10-11 cm, 15-16-17 cm, 21-22-23 cm, 27-28-29 cm and 33-34-35 cm. Tip for binding off: All binding off for the neck takes place from the right side. Bind off as follows before 5 edge sts: K 2 tog, Bind off as follows after 5 edge sts: lift 1 st off the needles, K 1, pull the lifted st over. BODY Knit the cardigan back and forth on circular needles from the center front. Cast on 215-227-251 sts (including 5 edge sts at each side at the center front) on circular needles size 4 with beige. Knit Pattern 1 - with 5 sts of moss-st at each side at the center front = front edge. Knit buttonholes along the right front edge - see above. After Pattern 1, switch to circular needles size 3 and at the same time inc 12-12-12 sts evenly distributed on the 1st row = 227-239-263 sts. Knit Pattern 3, and then knit the rest with Pattern 4. When the work measures 29-30-31 cm, knit the next row as follows: 55-58-64 sts front, bind off 6 sts for armhole, 105-111-123 sts back, bind off 6 sts for armhole, 55-58-64 sts front. Knit the rest of each part separately. Right Front: = 55-58-64 sts. Now bind off for armholes every other row: 2 sts 3-4-5 times, 1 st 3-3-5 times = 46-47-49 sts. At the same time, when the work measures 33-34-35 cm, bind off for the neck inside 5 edge sts every other row - see Tip for binding off: 1 st 19-20-20 times = 27-27-29 sts remain on the shoulder. Bind off when the work measures 48-50-52 cm. Left Front: Knit like the right but reversed - see Tip for binding off at the neck edge! Back: = 105-111-123 sts. Bind off for armholes as on the front = 87-89-93 sts. When the work measures 45-47-49 cm, knit 5 rows of moss-st over the center 41-43-43 sts (the remaining sts are knitted into the pattern). On the next row, bind off the center 31-33-33 sts for the neck - knit the remaining outermost 5 sts at the neck in moss-st. Then bind off 1 st on the next row for the neck inside these 5 edge sts - see Tip for binding off! = 27-27-29 sts remain on each shoulder. Bind off when the work measures 48-50-52 cm. SLEEVE Cast on 72-72-84 sts on double pointed needles size 4 with beige. Switch to double pointed needles size 3 and knit Pattern 2, Pattern 3, and then knit the rest with Pattern 4. At the same time, after Pattern 2, inc 2 sts directly under the sleeve 4-6-3 times every 9th-6th-11th row = 80-84-90 sts. When the work measures 15-15-14 cm, bind off 6-6-6 sts directly under the sleeve and knit the rest back and forth on the needles. Then bind off at each side for sleeve cap every other row: 3 sts 1-1-1 time, 2 sts 3-3-3 times, 1 st 8-10-11 times, 2 sts 3-3-3 times, 3 sts 1-1-1 time. Bind off; the work now measures approx. 25-26-26 cm. ASSEMBLY Sew the shoulder seams. Sew in the sleeves. Sew on the buttons. |
|||||||||||||
Diagram explanations |
|||||||||||||
|
|||||||||||||
 |
|||||||||||||
 |
|||||||||||||
Have you finished this pattern?Tag your pictures with #dropspattern or submit them to the #dropsfan gallery. Do you need help with this pattern?You'll find 21 tutorial videos, a Comments/Questions area and more by visiting the pattern on garnstudio.com. © 1982-2026 DROPS Design A/S. We reserve all rights. This document, including all its sub-sections, has copyrights. Read more about what you can do with our patterns at the bottom of each pattern on our site. |
|||||||||||||


With over 40 years in knitting and crochet design, DROPS Design offers one of the most extensive collections of free patterns on the internet - translated to 17 languages. As of today we count 324 catalogs and 12284 patterns - 12274 of which are translated into English (US/in).
We work hard to bring you the best knitting and crochet have to offer, inspiration and advice as well as great quality yarns at incredible prices! Would you like to use our patterns for other than personal use? You can read what you are allowed to do in the Copyright text at the bottom of all our patterns. Happy crafting!
Post a comment to pattern DROPS 65-18
We would love to hear what you have to say about this pattern!
If you want to leave a question, please make sure you select the correct category in the form below, to speed up the answering process. Required fields are marked *.