
Popular categories
Looking for a yarn?


Comments / Questions (11)
![]() Martina wrote:
Martina wrote:
Man soll eine bestimmte Zahl an Maschen anschlagen und später 16 Maschen abnehmen. Laut Maschenzahl nach dem Abnehmen würde man aber 16 Maschen mehr haben
16.10.2025 - 13:58DROPS Design answered:
Liebe Martina, das war ein Fehler und er wurde nun korrigiert. Vielen Dank für Ihren Hinweis! Viel Spaß beim Weiterstricken!
24.10.2025 - 00:36
![]() Anne De Keersmaeker wrote:
Anne De Keersmaeker wrote:
Bonjour, J'arrive au moment où je fais l'empiècement. Il est indiqué de rabattre 4 mailles (2 x 2) et je voudrais être sûre que ce sera suffisant comme ouverture pour passer les bras dans les manches. Merci. Anne
20.11.2024 - 14:53DROPS Design answered:
Bonjour Mme De Keersmaeker, les 4 mailles des emmanchures dos/devant seront ensuite cousues aux mailles rabattues sur les manches, avant de les mettre en attente (2 x 3 m - les 2 m lisières des coutures) - les manches seront ensuite placées au niveau des mailles rabattues pour les emmanchures comme on le montre dans cette vidéo; et on fera les diminutions du raglan à la transition entre les manches/les devants & le dos. Bon tricot!
20.11.2024 - 16:33
![]() Anne De Keersmaeker wrote:
Anne De Keersmaeker wrote:
Bonjour, Je ne comprends pas bien comment répartir les mailles de l'empiècement. Lorsqu'on termine le dos/devant, il est noté de mettre en attente 2 x 2 mailles en attente aux marqueurs. Ne faut-il pas plutôt les arrêter ? Merci. Anne
05.11.2024 - 13:17DROPS Design answered:
Bonjour Anne, dans ce modèle, les 4 mailles des emmanchures sont effectivement mises en attente puis cousues aux mailles rabattues des manches; mais vous pouvez effectivement les rabattre au moment de la division pour les emmanchures. Bon tricot!
05.11.2024 - 16:27
![]() Jane Furnival wrote:
Jane Furnival wrote:
How do I finish the 4 sts at each side on a stitch holder for armhole?
05.01.2024 - 15:40DROPS Design answered:
Dear Jane, you can bind them off but you don't need to; you simply pick up the stitches when sewing and sew these together with the stitches bound-off on the sleeve. This is to avoid a chunky seam. Happy knitting!
07.01.2024 - 23:18
![]() Christine wrote:
Christine wrote:
Dos/Devant, dans la première étape : où est le deuxième marqueur ? On dirait qu'il manque des M1 ou autres : je compte 116 m pour la taille M alors qu'il devrait y en avoir 162. Et puis on ne voit à quoi ressemble le col sur la photo, vous n'en avez pas une autre ? Merci
04.12.2022 - 20:05DROPS Design answered:
Bonjour Christine, il manquait effectivement une partie des mailles sur ce rang, correction faite, merci. Le col est un long col boutonné (cf emplacement des boutonnières) - nous n'avons pas d'autres photos. Bon tricot!
06.12.2022 - 11:41
![]() Dorthe Flammild wrote:
Dorthe Flammild wrote:
Jeg vil gerne have anbefalet garn og mængde til denne opskrift - men enkelttrådet garn. I har tidligere hjulpet mig med hvordan jeg skulle finde andet garn ved hjælp af omregner, men jeg vil gerne nøjes med ET garn. På forhånd tak - Dorthe
20.04.2022 - 18:29DROPS Design answered:
Hej Dorthe, du kan strikke den i en tråd DROPS Snow, da skal du bruge ca 23 nøgler i Small og vil få nogenlunde samme udtryk. Du kan også strikke den i en tråd DROPS Wish som er lettere (udtrykket vil blive lettere) og da skal du bruge ca 16 nøgler i Small. God fornøjelse!
21.04.2022 - 15:43
![]() Dorthe Flammild wrote:
Dorthe Flammild wrote:
Begge Garner til nævnte opskrift (66-10) er udgået, så jeg vil gerne høre hvilket garn I så vil anbefale. Evt bare 1 garn, og hvor meget der skal påregnes at skulle bruges. Jeg synes at det er svært at bruge omregneren, når der i opskriften bruges 2 Garner. På forhånd mange tak for hjælpen - mange hilsner Dorthe Flammild
03.04.2022 - 09:14DROPS Design answered:
Hei Dorthe. I denne oppskriften brukes det 2 kvaliteter. Når du skal bruke omregneren, regner du om 1 kvalitet av gangen. F.eks om du fyller inn garnmengden i str. S og DROPS Vienna 600 gram 1 tråd, så får du opp DROPS Melody (1 tråd) og 408 gram. Deretter fyller du inn neste garn DROPS Ull-Tweed 550 g, da får du opp mange alternativer, f.eks Soft Tweed 466 ,gram (1 tråd). Så i str. S kan du bruke 450 gram DROPS Melody og 500 gram DROPS Soft-Tweed. mvh DROPS Design
04.04.2022 - 15:52
![]() Michelle wrote:
Michelle wrote:
Hi, can i use wish yarn for this pattern? If so, can you help with the amount of yarn that's needed and the corresponding needle sizes?
18.11.2021 - 16:19DROPS Design answered:
Dear Michelle, yes, you should be able to use DROPS wish, as long as you maintain the gauge of the pattern, with needles size US 11 (as in this pattern). You will need the same yardage as Karisma, so you will need more than 1 kg, even for the smallest size. Happy knitting!
21.11.2021 - 19:28
![]() Erzsebet Kho-Brouwer wrote:
Erzsebet Kho-Brouwer wrote:
Hallo, ik snap iets niet aan de mouwen. Waar laat ik de 4 steken van de hulpnaald? Dat is mij niet duidelijk
15.09.2018 - 22:35DROPS Design answered:
Dag Erzsebet Kho-Brouwer, Het is inderdaad niet duidelijk aangegeven wat je daarmee moet doen. Je kunt ze gewoon op de hulpdraad laten staan tot het werk klaar is en bij de afwerking, wanneer je de opening onder de mouwen dichtnaait (dus, zeg maar de oksel) de steken vast naaien. (In de nieuwe patronen kant je de steken af in plaats van op een hulpdraad te zetten.)
17.09.2018 - 12:36
![]() Kerstin Wiens wrote:
Kerstin Wiens wrote:
Ich möchte gerne diesen Mantel nachstricken. Leider sind die Garne nicht mehr erhältlich. Auch bei den von Ihnen angegebenen Alternativen sieht es schlecht aus. Haben Sie noch andere Garnalternativen?
18.08.2015 - 10:35DROPS Design answered:
Vienna (Garngruppe D) können Sie durch 3 Fäden der Garngruppe A ersetzen, hier würde sich für den Flauschcharakter Kid-Silk anbieten. Anstelle von Ull-Tweed können Sie eine der drei Wollgarne aus Gruppe B verwenden (Lima, Karisma oder Merino Extra Fine). Sie müssen anhand der Originalgarne die gesamte Lauflänge für Ihre Größe errechnen (Vienna 50 g = 95 m und Ull-Tweed 50 g = 110 m). Wenn Sie Kid-Silk (25 g = 200 m, d.h. 50 g = 400 m) 3-fach verwenden, müssen Sie die Lauflänge mit 3 multiplizieren. Beachten Sie, dass es wichtig ist, die Maschenprobe einzuhalten.
01.09.2015 - 23:17
|
|||||||||||||
Never Cold Again |
|||||||||||||
 |
 |
||||||||||||
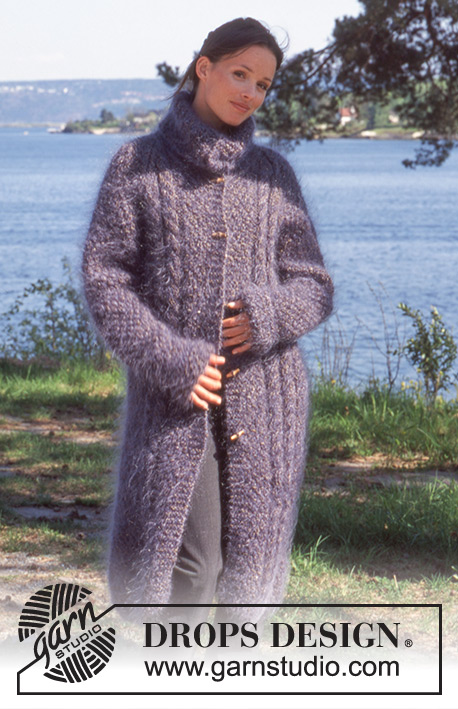
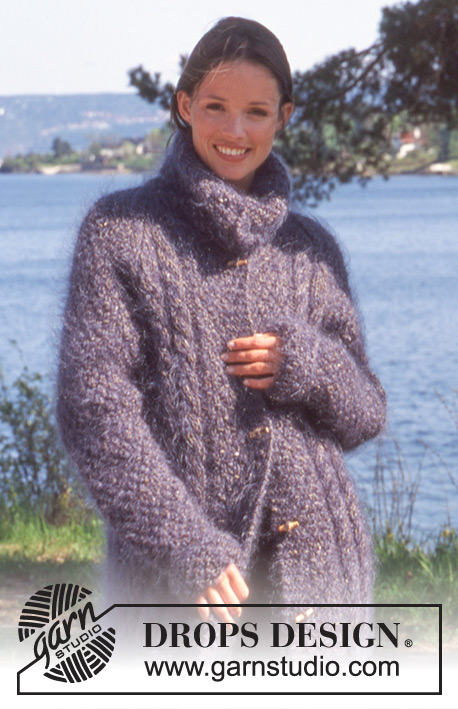
DROPS Coat in Vienna and Ull-Tweed
DROPS 66-10 |
|||||||||||||
|
Gauge: 10 sts x 14 rows with 1 strand Vienna and 1 strand Ull-Tweed in stockinette st = 10 x 10 cm [4" x 4"]. Pattern: See charts. The pattern is seen from the right side. Garter st, when knitting flat: Knit all sts, all rows. Buttonhole: for buttonhole, bind off the third st from center front, cast on 1 new st over the bound off st on the next row. Make buttonholes when the piece measures 40-45-50 cm [15.75"-17.75"-19.75"], 53-58-63 cm [20⅞"-22⅞"-24.75"], 65-70-75 cm [25⅝"-27⅝"-29.5"], 78-83-88 cm [30.75"-32⅝"-34⅝"], 90-95-100 cm [35⅜"-37⅜"-39⅜"], 103-108-113 cm [40.5"-42.5"-44.5"] and 115-120-125 cm [45.25"-47.25"-49.25"]. Knitting tip: The measurements on the schematic refer to the measurements in the written pattern, measured when piece is lying flat. Because of the weight of the garment, it will stretch approx. 15 cm [5⅞"] longer when worn or hanging. Body: Cast on 138-146-154 sts (including 5 edge st at each side for button bands) with 1 strand Vienna and 1 strand Ull-Tweed. Knit 2 rows garter st, increasing 16 sts evenly distributed across the second row = 154-162-170 sts. On the next row, establish pattern as follows: 5 sts garter st (button band), 7-8-9 sts Pattern 1, 14-14-14 sts Pattern 2, 15-16-17 sts Pattern 1, put in 1 marker (the side), 15-16-17 sts Pattern 1, 14-14-14 sts Pattern 3, 14-16-18 sts Pattern 1, 14-14-14 sts Pattern 2, 15-16-17 sts Pattern 1, put in 1 marker (the side), 15-16-17 sts Pattern 1, 14-14-14 sts Pattern 3, 7-8-9 sts Pattern 1, 5 sts garter st (button band). Work in pattern as established. When the piece measures 20-20-20 cm [7⅞"] dec 1 st at each side of each marker (dec 4 sts total) = 150-158-166 sts. Repeat decreases every 10-11-12 cm [4"-4⅜"-4.75"] a total of 5-5-5 times = 134-142-150 sts. When the piece measures 72-76-81 cm [28.25"-29⅞"-31⅞"] put 4 sts at each side on a stitch holder for armhole (2 sts each side of the marker) = 34-36-38 sts on each front and 58-62-66 sts on back. Put aside and knit the sleeves. Sleeve (knit flat): The bottom 10 cm [4"] on sleeves folds back for a cuff. Cast on 30-32-34 sts and knit 2 rows garter st. Knit Pattern 1 over all sts. When the piece measures 20-20-20 cm [7⅞"] inc 1 st at each side 8-8-8 times every 4-4-4 cm [1.5"] = 46-48-50 sts. When the piece measures 54-54-55 cm [21.25"-21.25"-21⅝"] bind off 3 sts at each side = 40-42-44 sts. Yoke: Put the sleeves in on the same circular needles as the body, above the sts on a st holder for armhole = 206-218-230 sts on needles. Put 1 marker at each transition between the sleeve and body = 4 markers. Continue with pattern over all sts and shape raglan. Raglan shaping: Read this entire section before knitting. There are 8 decs per row. Dec 1 st each side of each markers 13-13-12 times every other row, then 6-7-9 times every row. A total of 152-160-168 sts are decreased. Dec as follows on right side: before the marker: K 2 tog. After the marker: slip 1, K 1, psso. Dec as follows on wrong side: before the marker: P 2 tog. After the marker: slip 2 sts off needle, put them back onto left needle twisted (one by one), then P 2 tog into the back of the sts. At the same time: When the piece measures 89-94-99 cm [35"-37"-39"] put the 5 button band sts at each side (center front) on a st holder for the neck (the remaining buttonholes are made on the collar). Continue decreasing for the neck every other row: 2 sts 2-2-2 times, 1 st 2-2-2 times. After all raglan and neck shaping is complete there are 32-36-40 sts on needles. Collar: Pick up 54-62 sts around the neck (including sts from st holders and sts remaining on needles) on circular needles with 1 strand Vienna and 1 strand Ull-Tweed. Knit Pattern 1, but the keep the 5 button band sts at each side in garter st. Remember to make the remaining buttonholes. When the collar measures 10 cm [4"] knit 2 rows garter st, increasing 6-6-6 sts evenly distributed on the second row (don’t increase over button bands). Continue in Pattern 1 until collar measures 15 cm [5⅞"] - measured from garter st, then bind off all sts. Assembly: Sew sleeve seams and sew the opening under the sleeve. |
|||||||||||||
Diagram explanations |
|||||||||||||
|
|||||||||||||
 |
|||||||||||||
 |
|||||||||||||
Have you finished this pattern?Tag your pictures with #dropspattern or submit them to the #dropsfan gallery. Do you need help with this pattern?You'll find 27 tutorial videos, a Comments/Questions area and more by visiting the pattern on garnstudio.com. © 1982-2026 DROPS Design A/S. We reserve all rights. This document, including all its sub-sections, has copyrights. Read more about what you can do with our patterns at the bottom of each pattern on our site. |
|||||||||||||


With over 40 years in knitting and crochet design, DROPS Design offers one of the most extensive collections of free patterns on the internet - translated to 17 languages. As of today we count 324 catalogs and 12290 patterns - 12280 of which are translated into English (US/in).
We work hard to bring you the best knitting and crochet have to offer, inspiration and advice as well as great quality yarns at incredible prices! Would you like to use our patterns for other than personal use? You can read what you are allowed to do in the Copyright text at the bottom of all our patterns. Happy crafting!
Post a comment to pattern DROPS 66-10
We would love to hear what you have to say about this pattern!
If you want to leave a question, please make sure you select the correct category in the form below, to speed up the answering process. Required fields are marked *.