
Popular categories
Looking for a yarn?


Comments / Questions (21)
![]() Inger Bengtsson wrote:
Inger Bengtsson wrote:
Hej! Jag undrar om mönstret till Starry Night, koftan . Diagram A2. Ska jag börja sticka från toppen på mönstret eller längst ner? Tack för svar Hälsningar Inger
14.05.2026 - 17:09
![]() Inger wrote:
Inger wrote:
Hej! Ska mönstret A2 stickas uppifrån eller nerifrån?
14.05.2026 - 12:00
![]() Monica Newborg wrote:
Monica Newborg wrote:
Hur stickar man dessa prickar i mönstret A3 som börjar på rätsidan och stickas från höger till vänster. Sedan avig/rät/ avig och sedan prick med början på höger sida och då befinner sig den grå tråden på vä sida. Krångligt när ärmdelarna ska sättas på tråd och sticka 8 nya maskor. Fick läsa på jumpermönstret för att se att det skulle vara UNDER ärmhålet.
30.01.2025 - 12:32DROPS Design answered:
Hei Monica. Litt usikker på hva du mener, men når 5. pinne i diagram A.3 skal strikkes må man klippe tråden ((lys perlegrå) der den slutten på 1. rad. Men det er kun denne gangen. Prickar i diagram A.3 strikkes med koksgrå farge. Du vil allerede ha strikket en del av A.3 før du skal sette maskene på en tråd til ermene. mvh DROPS Design
03.02.2025 - 13:06
![]() Monica Newborg wrote:
Monica Newborg wrote:
Försöker sticka detta mönster. Bland det värsta jag gjort. Hur många maskor ska det vara på överdelen , när man ska sticka "hjulen"? Det ska vara 18 rapporter a 8 maskor, men de här rundlarna är 12 maskor.
19.01.2025 - 23:21DROPS Design answered:
Hei Monica. Om du følger diagrammet ser du at det skal økes masker på hver rapport. I alle str. økes det masker på pinne 5 og 9 (2 masker i hver rapport), så når du skal strikke "hjulet" består diagrammet av 12 masker. mvh DROPS Design
20.01.2025 - 14:16
![]() Monica Newborg wrote:
Monica Newborg wrote:
Detta mönster är för rundstickning. Nu får jag klippa av garnet för att börja i andra änden av stickan. Rad 4 på A2.
19.01.2025 - 14:39
![]() Christel Newborg wrote:
Christel Newborg wrote:
Hej! Hur ska man ta ut maskorna till oket när man är på sticka mönster A1? Jag finner inte diagrammet som beskrivningen hänvisar till.
18.01.2025 - 15:13DROPS Design answered:
Hei Christel. Diagram A.1 finner du under ermet på målskissen og på pinne 4 i diagrammet økes det 1 maske hver gang A.1 strikkes. mvh DROPS Design
20.01.2025 - 11:10
![]() Berit Skogmo wrote:
Berit Skogmo wrote:
Sitter och letar mönster. Vill hitta en nordisk cardigan som stickas runt og klippas upp. Finns några sånna? Och en annan fråga. Går det inte att söka på instruktionsfilmena? (surfar på mobilen) På förhand tack 😊
02.12.2019 - 10:36DROPS Design answered:
Hei Berit! Ja, vi har flere slike koftemodeller, f.eks: DROPS 39-19 , DROPS 50-12 , DROPS 52-6 og DROPS 50-8 . Det er mulig å søke på instruksjonsvideoer, dette er dessverre ikke mulig fra mobil, men det går an å filtrere videoene for å få et mest mulig nøyaktig resultat. Lykke til!
02.12.2019 - 12:13
![]() Hanne Gunnertoft wrote:
Hanne Gunnertoft wrote:
Tusind tak for svar. Jeg mente forkanter, kanter på forstykkerne, og ikke firkanter 😊
30.12.2016 - 19:34
![]() Hanne Gunnertoft wrote:
Hanne Gunnertoft wrote:
Hej. Jrgvhar opgivet at strikke mønster på vrangpinde. Er istedet startet på jumperen, og tænker att jeg kan sy på maskine og klippe den op foran, og så strikke firkanter på. Er der noget jeg skal være opmærksom på?
27.12.2016 - 17:33DROPS Design answered:
Hej Hanne. Ja, det forstaar jeg godt ;) Du kan sagtens klippe op (saet 3-5 m ekstra op til dette og strik rundt). Jeg ville saa tage maskerne til stolperne op bagefter og strikke dem naar der er klippet op og daekke kanten fra klippemaskerne med et paent baand paa indersiden. Jeg forstaar ikke hvad du mner med at strikke firkanter paa?
30.12.2016 - 12:33Rian wrote:
Ben net begonnen aan de pas: tel patroon A2. De 2e regel is parelgrijs, de 3e regel antraciet, de 4e gemengd parelgrijs en antraciet. Maar hoe doe je dat, want je wol parelgrijs zit aan de andere kant van het breiwerk. Moet je steeds dan een nieuwe bol wol aanspreken? Verderop in het A2 patroon kom je soortgelijk situaties tegen. Hopelijk kunnen jullie me helpen.
21.10.2016 - 19:28DROPS Design answered:
Hoi Rian. Je kan inderdaad met een nieuwe bol beginnen - of je kan de draad knippen en verder gaan met de bol.
24.10.2016 - 11:07
|
|||||||||||||||||||
Starry Night#starrynightcardigan |
|||||||||||||||||||
 |
 |
||||||||||||||||||
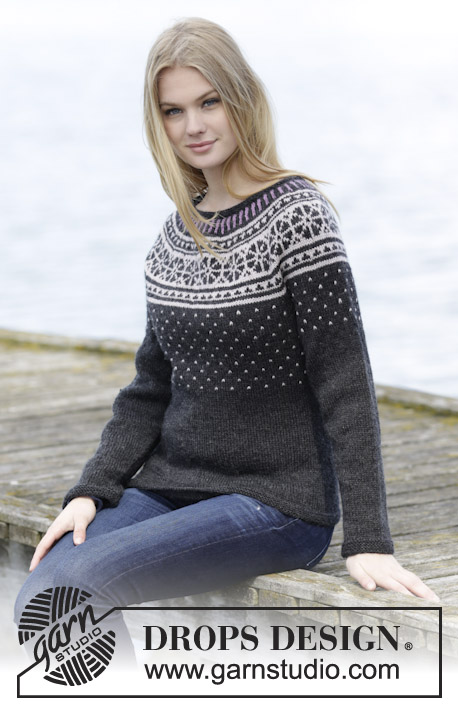
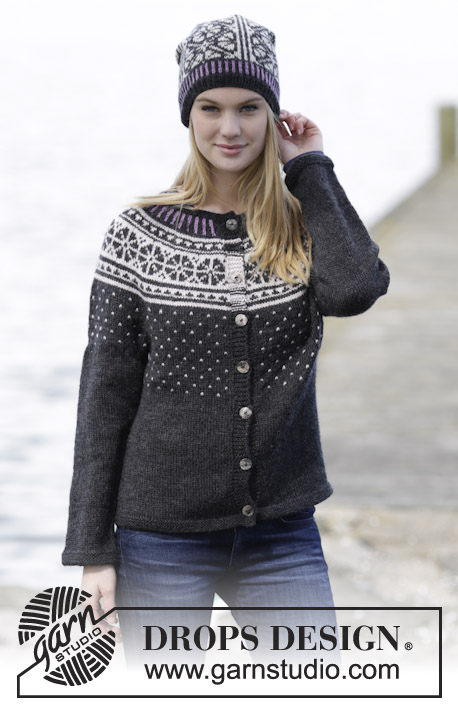
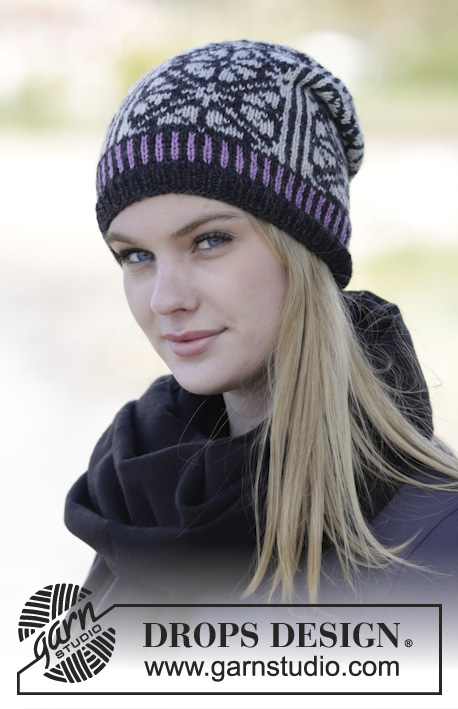
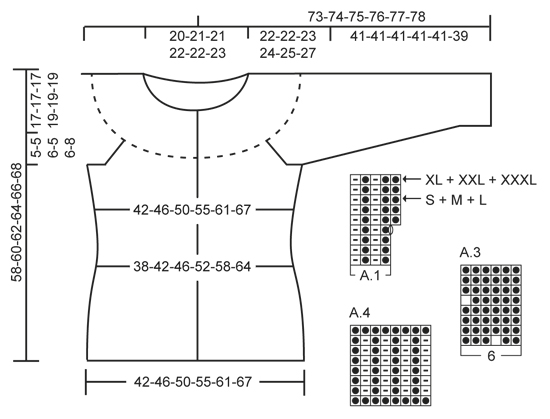
Set consists of: Knitted DROPS jacket with round yoke and Nordic pattern, worked top down and hat with Nordic pattern in ”Karisma”. Size: S - XXXL.
DROPS 166-24 |
|||||||||||||||||||
|
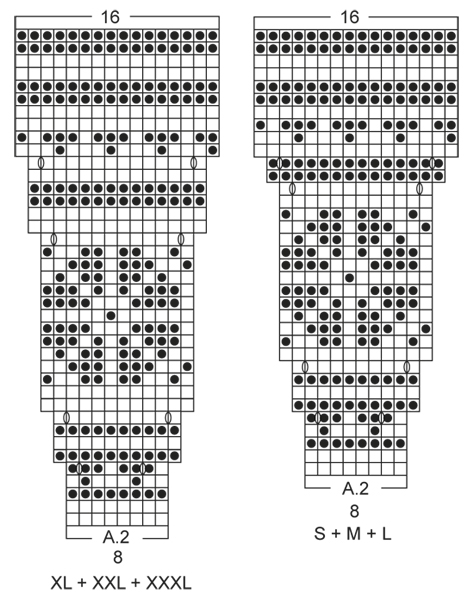
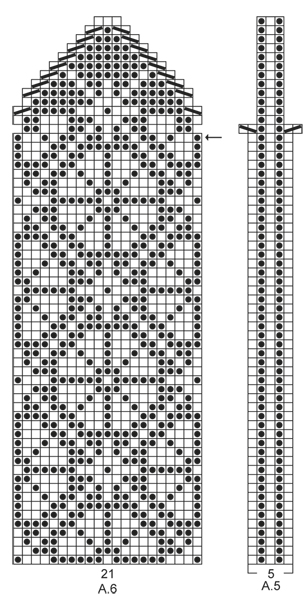
JACKET: GARTER ST (back and forth): K all rows. 1 ridge = K2 rows. GARTER ST (worked in the round): * K 1 round and P 1 round *, repeat from *-*. 1 ridge = 2 rounds. PATTERN: See diagrams A.1 to A.3. The diagrams show all rows in pattern seen from RS. Work entire pattern in stockinette st. KNITTING TIP: To avoid the knitting gauge to tighten when working pattern on yoke, it is important not to tighten the strands on back side of piece. Switch to a higher needle no when working pattern if the pattern is somewhat tight. INCREASE TIP-1: All inc are done from RS. Inc 1 st by making 1 YO. On next round P YO twisted to avoid holes. INCREASE TIP-2 (applies to sides of body): Inc on each side of marker: All inc are done from RS as follows: Work until 2 sts remain before marker: Make 1 YO, K 4 (marker is in the middle of these 4 sts), make 1 YO (= 2 sts inc). On next row P YO twisted to avoid holes. RAGLAN: Inc for raglan on each side of marker in every transition between sleeves and body. All inc are done from RS as follows: Work until 1 sts remain before marker: Make 1 YO, K 2 sts (marker is in the middle of these 2 sts), make 1 YO (= 2 sts inc). On next round P YOs twisted to avoid holes. DECREASE TIP (applies to sides on body and mid under sleeve): Dec on each side of marker. All dec are done from RS as follows: Beg 4 sts before marker and K 2 tog, K 4 (marker is between these 4 sts), slip 1 st as if to K, K 1, psso (= 2 sts dec). BUTTONHOLES: Dec for buttonholes on right band. 1 buttonhole = work until 4 sts remain on needle (seen from RS), make 1 YO, K 2 tog and finish with K 2. Dec for buttonholes when piece measures (measured from cast-on edge): SIZE S: 2, 10, 18, 27, 36, 45 and 54 cm / 3/4",4",7",10½",14¼",17¾",21¼". SIZE M: 2, 11, 20, 29, 38, 47 and 56 cm / 3/4",4½",8",11½",15",18½",22" SIZE L: 2, 11, 20, 29, 38, 48 and 58 cm / 3/4",4½",8",11½",15",19",22¾". SIZE XL: 2, 10, 18, 26, 34, 42, 51 and 60 cm / 3/4",4",7",10¼",13½",16½",20",23½". SIZE XXL: 2, 10, 18, 26, 34, 42, 51 and 60 cm / 3/4",4",7",10¼",13½",16½",20",23½". SIZE XXXL: 2, 10, 18, 26, 35, 49, 53 and 62 cm / 3/4",4",7",10¼",13¾",19¼",21",24½". ---------------------------------------------------------- JACKET: Work back and forth on circular needle from mid front, work top down. YOKE: Cast on 110-116-116-118-122-124 sts (includes 6 band sts each side towards mid front) on circular needle size 3 mm / US 2.5 with anthracite. Work 2 ridges in GARTER ST - see explanation above. K 1 row from RS with anthracite while inc 3-9-9-19-23-33 sts evenly - READ INCREASE TIP-1 (do not inc over band sts) = 113-125-125-137-145-157 sts. Switch to circular needle size 4 mm / US 6 and work as follows from WS: 6 band sts in garter st, work A.1 until 7 sts remain, work first st in A.1 and finish with 6 band sts in garter st. Continue pattern and inc on 4th row as shown in diagram (inc also before last st before band so that pattern beg and ends the same inside band in each side) = 26-29-29-32-34-37 sts inc and 139-154-154-169-179-194 sts on needle – REMEMBER KNITTING GAUGE and remember BUTTONHOLES on right band – see explanation above. When A.1 has been worked (finish after a row marked with arrow for correct size), K 1 row from RS with anthracite while inc 2-3-3-4-2-3 sts evenly (do not inc over bands) = 141-157-157-173-181-197 sts. P 1 row from WS with anthracite (work band in garter st). Work next row as follows from RS: 6 band sts in garter st, work pattern according to diagram A.2 until 7 sts remain on row (choose diagram for correct size 16-18-18-20-21-23 repetitions of 8 sts), work first st in A.2 (so that pattern beg and ends the same way inside band in each) and finish with 6 band sts in garter st. Continue pattern like this and inc as shown in diagram. REMEMBER THE KNITTING GAUGE When diagram A.2 has been worked, there are 269-301-301-333-349-381 sts on needle and piece measures approx. 17-17-17-19-19-19 cm / 6¾"-6¾"-6¾"-7½"-7½"-7"½ from cast-on edge. P1 row from WS, and K 1 row from RS while inc 6-4-4-8-10-2 sts evenly (do not inc over bands) = 275-305-305-341-359-383 sts. Work next row as follows from WS with anthracite: Work the first 43-47-49-55-60-65 sts (= right front piece), insert a marker, work the next 57-64-60-66-65-67 sts (= sleeve), insert a marker, work the next 75-83-87-99-109-119 sts (= back piece), insert a marker, work the next 57-64-60-66-65-67 sts (= sleeve), insert a marker, work the remaining 43-47-49-55-60-65 sts (= left front piece). READ ALL OF THE FOLLOWING SECTION BEFORE CONTINUING! Work next row as follows from RS: 6 band sts in garter st, work pattern according to diagram A.3 until 11 sts remain on row, work the first 5 sts in A.3 (so that pattern beg and ends the same inside band in each side) and finish with 6 band sts in garter st. Continue pattern like this. AT THE SAME TIME on next row from RS inc for RAGLAN – see explanation above. Repeat inc for raglan every 4th row (i.e. every other row from RS) 3-3-4-3-4-5 times in total – NOTE: Work the inc sts in pattern but always work 1 st on each side of each marker with anthracite. After inc for raglan there are 299-329-337-365-391-423 sts on row and piece measures approx. 22-22-23-24-25-27 cm / 8¾"-8¾"-9"-9½"-9¾"-10½" from shoulder. Now work next row from WS as follows (continue pattern as before): Work the first 46-50-53-58-64-70 sts (= right front piece), slip the next 63-70-68-72-73-77 sts on a stitch holder (= sleeve), cast on 8-8-10-10-12-12 new sts on needle (= in the side of body), work the next 81-89-95-105-117-129 sts (= back piece), cast on 8-8-10-10-12-12 new sts on needle (= in the side on body), slip the next 63-70-68-72-73-77 sts on a stitch holder (= sleeve) and work the remaining 46-50-53-58-64-70 sts as before (= left front piece). BODY: = 189-205-221-241-269-293 sts. Insert 1 marker, NOW MEASURE PIECE FROM HERE! Insert 1 marker 50-54-58-63-70-76 sts in from each side (= 89-97-105-115-129-141 sts between markers on back piece). Continue back and forth as before with pattern according to diagram A.3 and 6 band sts in garter st in each side towards mid front - NOTE: Continue pattern on yoke - work the sts that do not fit the pattern in the sides of body in anthracite. AT THE SAME TIME when piece measures 4-4-4-5-5-5 cm / 1½"-1½"-1½"-2"-2"-2", dec on each side of marker in the sides of body - READ DECREASE TIP (= 4 sts dec). Repeat dec in each side every 3-3-3-5-6-6 cm / 1"-1"-1"-2"-2½"-2½" a total of 4-4-4-3-3-3 times = 173-189-205-229-257-281 sts - NOTE: Work sts that do not fit the pattern when dec in anthracite. AT THE SAME TIME when piece measures 8-9-10-11-12-13 cm / 3⅛"-3½"-4"-4⅜"-4¾"-5⅛", finish A.3 and work with anthracite until finished measurements. AT THE SAME TIME when piece measures 18-18-19-21-23-23 cm / 7"-7"-7½"-8¼"-9"-9" (piece measures approx. 40-40-42-45-48-50 cm / 15¾"-15¾"-16½"-17¾"-19"-19¾" from shoulder), inc on each side of markers in the sides of body - READ INCREASE TIP-2 (= 4 sts inc). Repeat inc every 4-4-4-5-5-5 cm / 1½"-1½"-1½"-2"-2"-2" a total of 4-4-4-3-3-3 times = 189-205-221-241-269-293 sts. When piece measures 34-36-37-38-39-39 cm / 13½"-14¼"-14½"-15"-15¼"-15¼" (piece measures approx. 56-58-60-62-64-66 cm / 22"-22¾"-23⅝"-24⅜"-25¼"-26" from shoulder), switch to circular needle size 3 mm / US 2.5. Work 4 ridges and LOOSELY bind off. Jacket measures approx. 58-60-62-64-66-68 cm / 22¾"-23⅝"-24⅜"-25¼"-26"-26¾" from shoulder. SLEEVE: Worked in the round on double pointed needles. Slip sts from stitch holder in one side of piece on double pointed needles size 4 mm / US 6. Continue pattern in the round as before and cast on 8-8-10-10-12-12 new sts at the end of first round = 71-78-78-82-85-89 sts. Insert 1 marker in the middle of the 8-8-10-10-12-12 new sts (= mid under sleeve) – NOW MEASURE PIECE FROM HERE. NOTE: Continue pattern on yoke - work the sts that do not fit the pattern mid under sleeve in anthracite. When piece measures 2-3-3-3-3-4 cm / ¾"-1"-1"-1"-1"-1½", dec on each side of marker – REMEMBER DECREASE TIP (= 2 sts dec). Repeat dec every 3-2-2-2-2-1½ cm / 1"-¾"-¾"-¾"-¾"-½" a total of 11-14-14-15-16-17 times = 49-50-50-52-53-55 sts. AT THE SAME TIME when piece measures 4-4-4-6-6-6 cm / 1½"-1½"-1½"-2⅜"-2⅜"-2⅜", finish A.3 and work with anthracite until finished measurements. Work until piece measures 39-39-39-39-39-37 cm / 15¼"-15¼"-15¼"-15¼"-15¼"-14½" (2 cm / ¾" remain before finished measurements, try the jacket and work to desired length). Switch to double pointed needles size 3 mm / US 2.5. Work 4 ridges in GARTER ST - see explanation above, LOOSELY bind off. Sleeve measures approx. 41-41-41-41-41-39 cm / 16"-16"-16"-16"-16"-15¼" (shorter measurements in the larger sizes because of wider shoulders). Work the other sleeve the same way. ASSEMBLY: Sew the openings under the sleeves. Sew the buttons on to the left band. ---------------------------------------------------------- HAT: PATTERN: See diagrams A.4 to A.6. Work entire pattern in stockinette st. KNITTING TIP: If you want a shorter hat than measurements in pattern work until 4 cm / 1½" remain before desired length and dec as explained in pattern. DECREASE TIP: Dec 1 st on each side of the middle 3 sts in A.5 as shown in diagram. Beg 1 st before A.5, K 2 tog with light pearl gray, work 1 st anthracite, 1 st light pearl gray, 1 st anthracite (= the 3 middle sts in A.5), slip 1 st as if to K, K 1 with light pearl gray, psso (= 2 sts dec). -------------------------------------------------------- HAT: Worked in the round on circular needle, switch to double pointed needles when needed. Cast on 104 sts on circular needle size 3 mm / US 2.5 with anthracite. K 1 round, then work rib = K 1/P 1 for 6 rounds. Switch to circular needle size 3.5 mm / US 4 and work pattern in the round according to diagram A.4. When A.4 has been worked, piece measures approx. 4½ cm / 1¾". Then work pattern in the round as follows: * Work A.5 (= 5 sts), A.6 (= 21 sts) *, repeat from *-* 4 times in total. Continue pattern like this. REMEMBER KNITTING GAUGE AND READ KNITTING TIP. When round marked with arrow in diagram A.6 has been worked, beg dec at the top of hat. Dec 1 st on each side of the middle 3 sts in A.5 - READ DECREASE TIP and see diagram (= 8 sts dec). Repeat dec every other round a total of 3 times and then every round 7 times in total = 24 sts remain on needle. K 1 round with anthracite while K all sts tog 2 by 2 = 12 sts. Cut the yarn and pull it through the remaining sts, tighten tog and fasten. Hat measures approx. 24 cm / 9½". |
|||||||||||||||||||
Diagram explanations |
|||||||||||||||||||
|
|||||||||||||||||||
 |
|||||||||||||||||||
 |
|||||||||||||||||||
 |
|||||||||||||||||||
Have you finished this pattern?Tag your pictures with #dropspattern #starrynightcardigan or submit them to the #dropsfan gallery. Do you need help with this pattern?You'll find 29 tutorial videos, a Comments/Questions area and more by visiting the pattern on garnstudio.com. © 1982-2026 DROPS Design A/S. We reserve all rights. This document, including all its sub-sections, has copyrights. Read more about what you can do with our patterns at the bottom of each pattern on our site. |
|||||||||||||||||||


With over 40 years in knitting and crochet design, DROPS Design offers one of the most extensive collections of free patterns on the internet - translated to 17 languages. As of today we count 325 catalogs and 12298 patterns - 12288 of which are translated into English (US/in).
We work hard to bring you the best knitting and crochet have to offer, inspiration and advice as well as great quality yarns at incredible prices! Would you like to use our patterns for other than personal use? You can read what you are allowed to do in the Copyright text at the bottom of all our patterns. Happy crafting!
Post a comment to pattern DROPS 166-24
We would love to hear what you have to say about this pattern!
If you want to leave a question, please make sure you select the correct category in the form below, to speed up the answering process. Required fields are marked *.