
Looking for a yarn?


Comments / Questions (21)
![]() Tita wrote:
Tita wrote:
Graag de moeilijkheidsgraad van dit patroon. Dank u.
08.06.2024 - 11:10DROPS Design answered:
Dag Tita,
We hebben geen moeilijkheidsgraden toegevoegd omdat het van persoon tot persoon heel verschillend kan zijn wat je moeilijk vindt, afhankelijk van welke technieken je ervaring mee hebt. Bij alle patronen hebben we video's en instructies toegevoegd. Verder kun je ook altijd een vraag achterlaten mocht je er niet uit komen.
09.06.2024 - 16:56
![]() Maren wrote:
Maren wrote:
Einen schönen guten Tag, ich bekomme es leider nicht hin, während des Krausmusters die 10 Maschen zuzunehmen OHNE das Löcher entstehen oder die Reihen schief werden . Ich habe Zunahmen aus dem Querfaden gestrickt und versucht eine Masche direkt zu verdoppeln. Wie muss ich die Maschen denn zunehmen, dass das ordentlich aussieht? Dankeschön und viele Grüße Maren Nowak
30.06.2022 - 10:05DROPS Design answered:
Liebe Maren, für diese Zunahmen können Sie Ihre gewöhnliche Technik benutzen, beim waschen sind meistens die Maschen regelmäßiger und solche kleine Löcher verschwinden meistens auch. Viel Spaß beim stricken!
30.06.2022 - 14:16
![]() Brenda Cornell wrote:
Brenda Cornell wrote:
Could this pattern be translated to a seamless top to bottom pattern?
15.06.2022 - 03:06DROPS Design answered:
Dear Mrs Cornell, probably but we are unfortunately not able to adjust every pattern to every single request. Please feel free to contact your yarn store or a knitting forum for any further individual assistance. Thanks for your comprehension. Happy knitting!
15.06.2022 - 09:21
![]() Kathy Lee wrote:
Kathy Lee wrote:
How do i finish the back of the neck after assembly ?? it should be a continuation of the front edges thanks
10.05.2022 - 01:10DROPS Design answered:
Hi Kathy, The back of the neck is the cast-off edge on the back piece. Happy knitting!
10.05.2022 - 06:50
![]() Kathy Ruth Lee wrote:
Kathy Ruth Lee wrote:
How do i finish the back of the neck after assembly ??? thanks
10.05.2022 - 01:08DROPS Design answered:
Dear Mrs Lee, you just have to sew shoulders, there is no extra edge along neck on back piece, just the cast off stitches for neck. But you can work a crochet edge along the whole opening of the jacket if you like. Happy knitting!
10.05.2022 - 08:45
![]() Mussillon wrote:
Mussillon wrote:
Impossible mettre explications, gilet, col v rose, en français ! Merci pour votre réponse.
24.03.2022 - 21:53DROPS Design answered:
Bonjour Mme Mussillon, pour changer la langue, cliquez sur le menu déroulant sous la photo, vous retrouverez ainsi les explications de ce modèle en français ici. Bon tricot!
25.03.2022 - 08:09
![]() Mussillon wrote:
Mussillon wrote:
Je n’arrive pas à mettre les explications du tricot rose, cotes perlées, en français!
24.03.2022 - 21:50
![]() Doreen Roeske wrote:
Doreen Roeske wrote:
Was heisst 2.Ndl und 4.Ndl bei der abnahme beim Halsausschnitt ?
09.08.2021 - 16:09
![]() Doreen Roeske wrote:
Doreen Roeske wrote:
Was heisst 2.Ndl und 4.Ndl bei der abnahme beim Halsausschnitt ?
09.08.2021 - 15:37DROPS Design answered:
Liebe Frau Roeske, es heisst: alle 2. bzw 4. Reihe. Viel Spaß beim stricken!
09.08.2021 - 15:41
![]() Heike wrote:
Heike wrote:
Ich stricke gerade die kurze Jacke in Muskat.Leider finde ich keine Anleitung für die Abnahmen der Vorderteile. Wo kann ich sie finden, oder wie werden die Abnahmen im Ausschnitt gestrickt? Danke
23.06.2021 - 19:30DROPS Design answered:
Liebe Heike, die finden Sie am Anfang der schriftlichen Anleitung, utner Tipp für das Abketten (gilt für den Hals), dh nach 4 Maschen (Rechtes Vorderteil): 2 Maschen rechts zusammen und vor 4 Maschen (Linkes Vorderteil): 1 Masche abheben, 1 Masche rechts stricken, die abgehobene Masche über die gestrickte Masche ziehen. Viel Spaß beim stricken!
24.06.2021 - 08:27
|
|||||||
DROPS 69-9 |
|||||||
|
|
|||||||
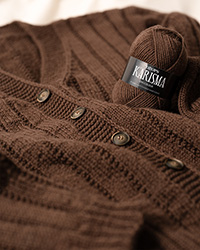
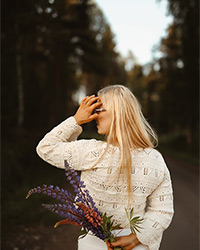
DROPS Short wide cardigan in Muskat.
DROPS 69-9 |
|||||||
|
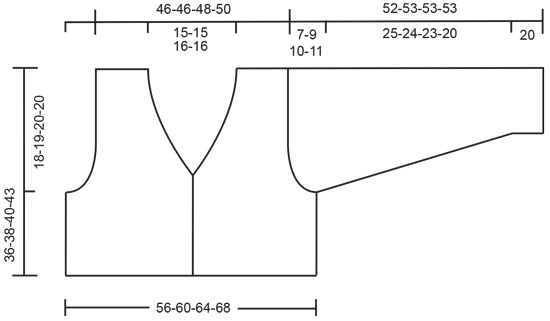
Gauge: 20 sts x 39 rows = 10 x 10 cm [4" x 4"] on larger needles in garter st. Garter st, when knitting flat: Knit all sts, all rows. Pattern: See chart. The pattern is seen from the right side. (In words, the pattern is: K 1 row, * P 3 rows, K 3 rows *, repeat * - * a total of 3 times, K 1 row, P 1 row, K 4 rows.) Knitting tips (for neck): All decs are made from right side inside 4 edge sts = 3 sts in garter st + P 1 (seen from the right side). Dec 1 st as follows; After 4 edge sts: K 2 tog. Before 4 edge sts: sl 1, K 1, psso. Back: Cast on 104-112-120-128 sts on smaller needles. Knit garter st, after 3 cm [1.25"] inc (right side row) 10 sts evenly distributed on the row = 114-122-130-138 sts. Continue in garter st until the piece measures 5 cm [2"]. Change to larger needles and knit Pattern 1 time, then knit garter st to finished dimensions. When the piece measures 18-19-20-23 cm [7"-7.5"-7⅞"-9"] bind off for armhole at each side every other row: 3 sts 1-1-1-1 time, 2 sts 1-3-4-4 times and 1 st 6-6-6-8 times = 92-92-96-100 sts. When the piece measures 34-36-38-41 cm [13⅜"-14⅛"-14⅞"-16⅛"] bind off the center 26-26-28-28 sts for the neck. Then dec 1 st at each neck edge every other row 2-2-2-2 times - see knitting tips. Bind off the remaining 31-31-32-34 sts on each shoulder when the piece measures 36-38-40-43 cm [14⅛"-14⅞"-15.75"-16⅞"]. Right front: Cast on 57-61-65-69 sts on smaller needles. Knit garter st, but knit the 4 button band sts as follows from center front edge (right side row): K 3, P 1 (seen from the right side – on wrong side rows you will K 4). When the piece measures 5 cm [2"] change to larger needles and knit Pattern 1 one time - button bands knit as explained above to finished dimensions. After Pattern 1 knit garter st. Read the entire next section before knitting Armholes: When the piece measures 18-19-20-23 cm [7"-7.5"-7⅞"-9"] bind off for armhole at the side as on back = 46-46-48-50 sts. Neck shaping: When the piece measures 19-20-21-24 cm [7.5"-7⅞"-8.25"-9.5"] dec 1 st for the neck - see knitting tips: 10-10-11-11 times every other row, then 5-5-5-5 times every 4 rows. Bind off the remaining 31-31-32-34 sts on shoulder when the piece measures 36-38-40-43 cm [14⅛"-14⅞"-15.75"-16⅞"]. Left front: Cast on and knit the same as the right, reversing all shaping. Sleeve: Cast on 60-62-64-66 sts on smaller needles. Knit 6 rows garter st, change to larger needles and knit Pattern 1 one time. Then knit garter st. When the piece measures 20 cm [7⅞"] inc 1 st at each side 5-6-7-6 times every 5-4-3-3 cm [2"-1.5"-1.25"-1.25"] = 70-74-78-78 sts. When sleeve measures 45-44-43-40 cm [17.75"-17.25"-16⅞"-15.75"] bind off for sleeve cap at each side every other row: 3 sts 1-1-1-1 time, 2 sts 2-1-1-1 time, 1 st 8-14-16-17 times, then bind off 2 sts at each side until the piece measures 52-53-53-53 cm [20.5"-20⅞"-20⅞"-20⅞"]. Bind off the remaining sts. Assembly: Sew in sleeves. Sew sleeve and side seams using edge sts as a seam allowance. Crochet three buttonhole loops along right button band as follows: start at the top with 1 sc, ch 3, fasten with 1 sc 1 cm [⅜"] lower, turn and crochet 3 sc in ch-loop, tie off. Make 2 more buttonhole loops with 5 cm [2"] between each. Sew on buttons. |
|||||||
Diagram explanations |
|||||||
|
|||||||
 |
|||||||
 |
|||||||
Have you finished this pattern?Tag your pictures with #dropspattern or submit them to the #dropsfan gallery. Do you need help with this pattern?You'll find 17 tutorial videos, a Comments/Questions area and more by visiting the pattern on garnstudio.com. © 1982-2025 DROPS Design A/S. We reserve all rights. This document, including all its sub-sections, has copyrights. Read more about what you can do with our patterns at the bottom of each pattern on our site. |
|||||||

With over 40 years in knitting and crochet design, DROPS Design offers one of the most extensive collections of free patterns on the internet - translated to 17 languages. As of today we count 320 catalogs and 12106 patterns - 12096 of which are translated into English (US/in).
We work hard to bring you the best knitting and crochet have to offer, inspiration and advice as well as great quality yarns at incredible prices! Would you like to use our patterns for other than personal use? You can read what you are allowed to do in the Copyright text at the bottom of all our patterns. Happy crafting!
Post a comment to pattern DROPS 69-9
We would love to hear what you have to say about this pattern!
If you want to leave a question, please make sure you select the correct category in the form below, to speed up the answering process. Required fields are marked *.