
Popular categories
Looking for a yarn?


Comments / Questions (24)
![]() Gun-Britt Fredriksson wrote:
Gun-Britt Fredriksson wrote:
Efter a1 , 2 v slätstickning. På bilden ser det ut som 5 v. Vad ska det vara? Tacksam för svar. Rättelse?
16.05.2025 - 18:59DROPS Design answered:
Hej Gun-Britt, der skal være 2 v da det bliver finere inden du starter med A.2 :)
21.05.2025 - 14:01
![]() Gun-Britt Fredriksson wrote:
Gun-Britt Fredriksson wrote:
A2 rad 5 är fortfarande felaktig. Gör en rättelse!
06.05.2025 - 13:40
![]() Gun-Britt Fredriksson wrote:
Gun-Britt Fredriksson wrote:
I storlek S blir kjolen alldeles för vid, även med sticka 3 1/2 och lagt 40 m mindre.
06.05.2025 - 12:44
![]() Kota wrote:
Kota wrote:
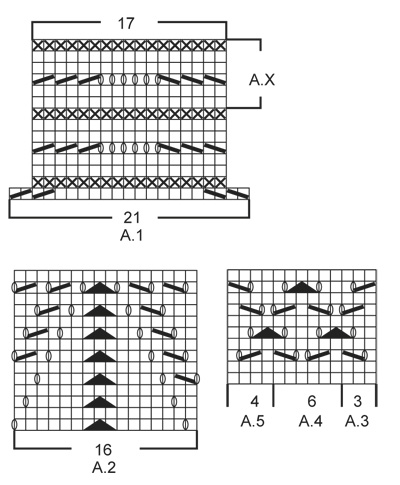
Trying to read through pattern before starting. I am not understanding what you are asking maker to do with a3, a4 &a5 chart. Is the pattern saying repeat a3 &a4 until the last 4 stitches of the row then follow a5? If so following the diagrams it looks like the pattern is broken. Or do you mean for the blocks that line up with a2 follow a3,4,5 so that the slk, k2tog,paso triangle aligns up with the matching stitch combo triangle in a4 chart top matches top a2 triangle combo
13.04.2023 - 23:50DROPS Design answered:
Dear Mrs Kota, when working these diagrams, start the round with the 3 stitches in A.3, then repeat the 6 sts in A.4 until 5 stitches remain on the round and finish with the 4 sts in A.5. On 5th round, work the last stitch in A.3/A.4 tog with the next 2 sts in first/next A.4 then A.5 at the end of the round (the first YO is now the last st in A.3/A.4 and the 2nd YO in every A.4 is the first st next A.4/A.5). Happy knitting!
14.04.2023 - 07:58
![]() Mamta wrote:
Mamta wrote:
Namaste DROPS, Row number 5 of the design number A.2 is wrong. Kindly look through it. Thank you!
21.12.2020 - 20:38
![]() Charmaine wrote:
Charmaine wrote:
Hi, does the skirt require both 60 and 80 cm circular needles? Or either? Thank you
20.03.2020 - 20:33DROPS Design answered:
Dear Charmaine, it would be easier and more comfortable to knit the skirt on the given needles, as at the waist part and teh smaller needles, you will have to pull the line between the needles less, and later the larger number of stitches will fit more comfortably on the longerones. You can knit the skirt onone needles too, in this case I suggest to get the longer ones as it is less hassle to have to pull the needles, than trying to fit a large number of stitches on a short needle. Happy Knitting!
22.03.2020 - 11:36
![]() Marianne N wrote:
Marianne N wrote:
Enligt beskrivningen stickas 2 v slätstickning efter A1 men på bilden ser det ut som om det är betydligt fler (åtm. fyra varv) innan A2 börjar. Hur kommer det sig?
04.01.2020 - 17:09
![]() Glenis McLaren wrote:
Glenis McLaren wrote:
I am having trouble with the 5th row on the pattern of A3 A4 and A5 I understand that we do A3 and 4 all the way around and then A5 with the 4 remaining sts. But when you get to row 5 of that it is not working out to be 9 sts. I saw that someone else posted about it but its in German and I don't understand the answer. Please advise.
07.06.2018 - 21:12DROPS Design answered:
Dear Mrs McLaren, on 5th row in A.3-A.5 work the last st in A.3 together with the first 2 sts in A.4 ie the first YO is now the last st in A.3 and work the last st in A.4 together with the first 2 sts next A.4/A.5 - the first YO is now the last st A.4. Make sure there are always the correct number of sts in each repeat: 3 sts in A.3, 6 sts in each A.4 and 4 sts in A.5. Happy knitting!
08.06.2018 - 08:20
![]() Rebecca wrote:
Rebecca wrote:
HI, I love this skirt but I see that the yarn is a cotton/wool blend, is there a reason for this as to drape or durability ? Will a wool alpaca work as well or will it effect the drape of the skirt? Also I have noticed a few comments about size is this pattern running big or true to size . Thank you, Rebecca
12.12.2017 - 05:04DROPS Design answered:
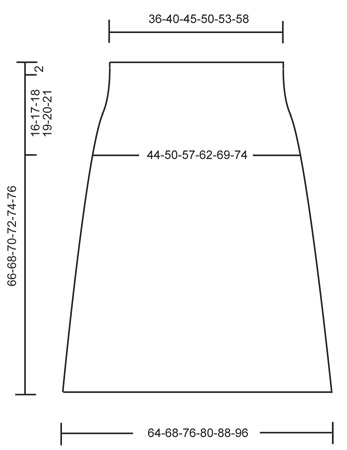
Dear Rebecca, yarn is designer choice, feel free to use any alternative yarn, but remember yarn will different texture will have different look (read more here. You will find at the bottom of the pattern a measurement chart with all measures for each size taken flat from side to side, compare these to a similar garment you have to find out the matching size, and remember to check and keep correct tension to get these finished measurements. Happy knitting!
12.12.2017 - 08:13
![]() Rebecca wrote:
Rebecca wrote:
Liebes Drops- Team. Bitte helft mir Ich liebe das Bild von diesem Rock, doch auch ich komme bei A3- A5 nicht weiter. Ich stricke in Größe M und habe daher grade 271 M auf der Nadel. Bei dieser Maschenanzahl können aber am Ende nicht 4 M für A5 übrig bleiben. Und warum A5 nur am Ende der Reihe? So kann das Muster doch gar nicht entstehen. Wäre sehr dankbar für eine Antwort. Liebe Grüße!! Rebecca
28.04.2017 - 16:03DROPS Design answered:
Liebe Rebecca, so sollen Sie die 271 M stricken: A.3 über die ersten 3 M), die 6 Maschen in A.4 insgesamt 44 Mal wiederholen, dann 4 M sind in der Rd noch übrig mit A.5 (= 4 M) beenden. Viel Spaß beim stricken!
02.05.2017 - 08:52
|
|||||||||||||||||||
Madison#madisonskirt |
|||||||||||||||||||
 |
 |
||||||||||||||||||
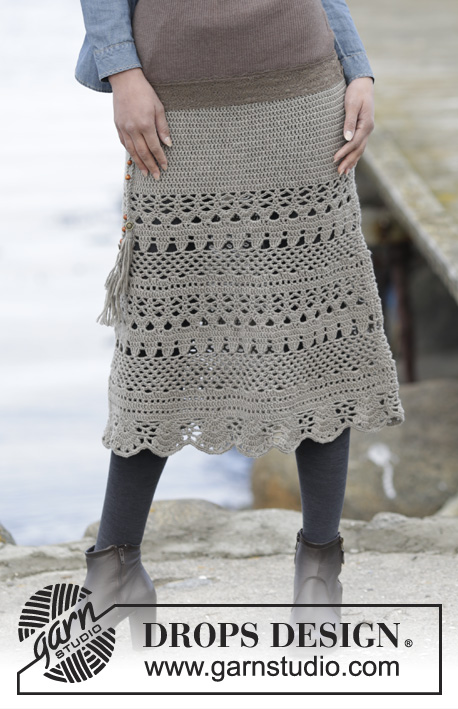
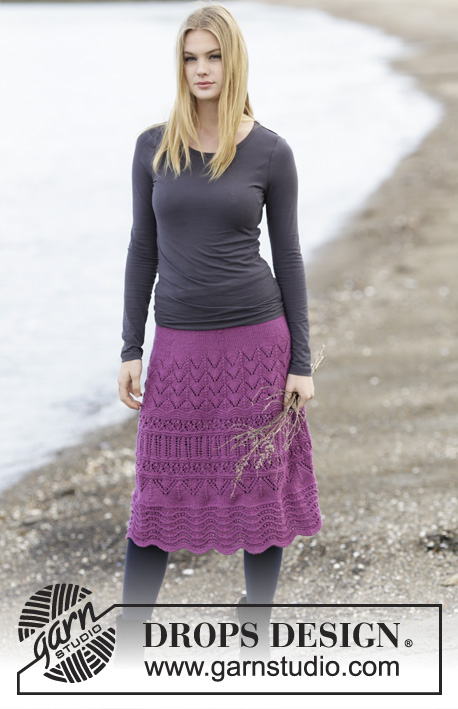
Knitted DROPS skirt with lace pattern in ”Cotton Merino”. Size: S - XXXL.
DROPS 164-18 |
|||||||||||||||||||
|
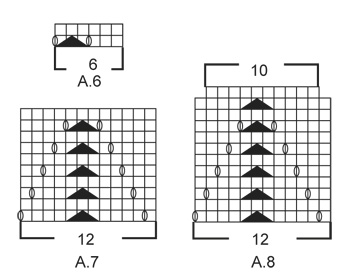
GARTER ST (worked in the round): * K 1 round and P 1 round *, repeat from *-*. 1 ridge = 2 rounds. PATTERN: See diagrams A.1 to A.8. DECREASE TIP 1: When dec in a ridge, always dec on a round with K. Dec 1 st by K 2 sts tog. DECREASE TIP 2: Dec as follows before marker: Work until 2 sts remain before marker, K 2 tog. Dec as follows after marker: Slip 1 st as if to K, K 1, psso. ---------------------------------------------------------- SKIRT: Worked in the round on circular needle from bottom up. Cast on 336-357-399-420-462-504 sts on circular needle size 4 mm / US 6 with Cotton Merino. Work 1 ridge in GARTER ST - see explanation above. Then work A.1 (= 21 sts) 16-17-19-20-22-24 times in width. When A.1 has been worked 1 time vertically, there are 272-289-323-340-374-408 sts on round. Repeat A.X 4 more times vertically in all sizes. REMEMBER THE KNITTING GAUGE Now work 2 rounds in stockinette st, on last round dec as follows: * K 2 tog, work in stockinette st over the next 15 sts *, repeat from *-* 15-16-18-19-21-23 more times = 256-272-304-320-352-384 sts. Work 7 sts in stockinette st - NOTE: NOW ROUND BEG HERE. Continue with A.2 (= 16 sts) 16-17-19-20-22-24 times in width. Piece measures approx. 17 cm / 6¾". Work 2 ridges while AT THE SAME TIME dec 3-1-3-1-3-5 sts evenly - READ DECREASE TIP 1 = 253-271-301-319-349-379 sts. Now work pattern as follows: A.3 (= 3 sts), A.4 (= 6 sts) until 4 sts remain on round, A.5 (= 4 sts). When A.3-A.5 has been worked, work 2 ridges AT THE SAME TIME dec 1 st in all sizes = 252-270-300-318-348-378 sts. Work 1 round in stockinette st, then work A.6 (= 6 sts) over all sts on round. When A.6 has been worked 7-8-10-11-13-14 times vertically, piece measures approx. 27-28-29-30-31-32 cm / 10½"-11"-11½"-11¾"-12¼"-12½". Now work 2 ridges AT THE SAME TIME dec 23-17-11-5-5-5 sts evenly = 229-253-289-313-343-373 sts. Then work pattern as follows: A.3 (= 3 sts), A.4 until 4 sts remain, A.5 (= 4 sts). When entire A.3-A.5 has been worked vertically, continue with 4 ridges. Work 1 round in stockinette st AT THE SAME TIME adjust no of sts to 228-252-288-312-348-372. Work 2 round in stockinette st. Then continue with A.7 (= 12 sts) over all sts on round. Repeat A.7 2 times vertically, then work A.8 over every repetition with A.7. When A.8 has been worked vertically, 190-210-240-260-290-310 sts remain on round. Continue in stockinette st. On next round, dec 3-0-3-2-3-2 sts evenly = 187-210-237-258-287-308 sts. Now insert 6 markers in the piece as follows: Work 16-18-21-21-26-26 sts, insert a marker, then insert 5 markers 31-35-39-43-47-51 sts apart. 16-17-21-22-26-27 sts remain after last marker. On next round dec 1 st before every marker - SEE DECREASE TIP 2. Repeat dec alternately on right and left side of every marker every 7th round 5-5-3-3-1-1 more time, and every 5th round 0-1-4-4-9-9 times = 151-168-189-210-221-242 sts. When piece measures 66-68-70-72-74-76 cm / 26"-26¾"-27½"-28⅜"-29⅛"-30", P one round (= folding edge), then continue in stockinette st for 2 cm / ¾". Bind off. ASSEMBLY: Fold the edge at the top towards WS and fasten neatly. Leave a little opening to thread the elastic through. |
|||||||||||||||||||
Diagram explanations |
|||||||||||||||||||
|
|||||||||||||||||||
 |
|||||||||||||||||||
 |
|||||||||||||||||||
 |
|||||||||||||||||||
Have you finished this pattern?Tag your pictures with #dropspattern #madisonskirt or submit them to the #dropsfan gallery. Do you need help with this pattern?You'll find 19 tutorial videos, a Comments/Questions area and more by visiting the pattern on garnstudio.com. © 1982-2026 DROPS Design A/S. We reserve all rights. This document, including all its sub-sections, has copyrights. Read more about what you can do with our patterns at the bottom of each pattern on our site. |
|||||||||||||||||||


With over 40 years in knitting and crochet design, DROPS Design offers one of the most extensive collections of free patterns on the internet - translated to 17 languages. As of today we count 325 catalogs and 12298 patterns - 12288 of which are translated into English (US/in).
We work hard to bring you the best knitting and crochet have to offer, inspiration and advice as well as great quality yarns at incredible prices! Would you like to use our patterns for other than personal use? You can read what you are allowed to do in the Copyright text at the bottom of all our patterns. Happy crafting!
Post a comment to pattern DROPS 164-18
We would love to hear what you have to say about this pattern!
If you want to leave a question, please make sure you select the correct category in the form below, to speed up the answering process. Required fields are marked *.