
Popular categories
Looking for a yarn?


Comments / Questions (44)
![]() Shirin wrote:
Shirin wrote:
Hi, Do I still have to inc every inch when making the armholes, as I inc on the sides ? Won’t make the armholes weird? Regards
29.10.2024 - 23:44DROPS Design answered:
Dear Shirin, the increases on right front piece are worked at the beg of a row from RS, ie towards mid front/jacket opening (= on the right hand side of piece, seen from right side) and not towards side/armhole, so that you will increase all the way as explained on every ⅞" until finished measurements (= until you cast off) - see diagonal line on the left front piece in the chart (on the left front piece you will increase at the end of a row from RS = on the left side of piece, seen from RS). Happy knitting!
30.10.2024 - 08:38
![]() Yannick wrote:
Yannick wrote:
Pour le dos, après le point fantaisie, vos explications concernant le point A3 sont bonnes si on ne compte pas la première m en point mousse. Si on compte cette première m en point mousse alors il reste 7 m du diagramme A3 à la fin du rang. Je parle pour la taille L. Quand pensez-vous ?
20.03.2022 - 10:12DROPS Design answered:
Bonjour Yannick, en L tricotez A.3 (dos) ainsi: 1 m lis au point mousse, 12 fois les 8 mailles de A.3 (= 96 m), tricotez la 1ère maille de A.3 (pour que le motif soit symétrique), 1 m lis au point mousse soit: 1+96+1+1=99 m. Bon tricot!
21.03.2022 - 09:46
![]() Hengie Hengelmann wrote:
Hengie Hengelmann wrote:
Bonjour Quand j'arrive sur le rang à trous dans le schéma A7 je suis sur un rang envers Et pour faire le trou il est indiqué de tricoter 2 mailles ensemble À L'ENDROIT ce qui ne rend pas beau du tout... Je pense avoir bien respecté toutes les consignes de tricot donc Je suis un peu perplexe Merci de m'aider si possible
18.11.2020 - 11:57DROPS Design answered:
Bonjour Mme Hengelmann, en fait le dernier rang avant A.7 doit se tricoter à l'envers sur l'envers pour qu'ainsi le 1er rang de A.7 soit sur l'endroit, la correction a été faite, merci pour votre retour. Bonne continuation!
19.11.2020 - 09:40
![]() Murielle Kingsbury wrote:
Murielle Kingsbury wrote:
J'aimerais comprendre le schéma a-2 du modèle........1) je tricote le 1er rang à l'envers avec un point mousse de chaque côté????? Jusqu, à ce qu,il reste 2mailles? 15 fois???? Et je continue en complétant le reste du schéma?...... Où je répète le schéma a-2 15 fois avant de passer au schéma a-3 ???????merci beaucoup à l'avance pour vos indications qui seront grandement apprécié s
22.05.2020 - 21:12DROPS Design answered:
Bonjour Mme Kingsbury, tricotez le diagramme a.2 ainsi au 1er rang (= sur l'envers): 1 maille lisière, tricotez la 1ère maille de A.2 (= vu sur l'endroit, autrement dit, sur l'envers, c'est la dernière m de A.2), répétez 15 fois les 8 m de A.2 (= 120 mailles), 1 m lis = 123 m. Sur l'endroit, tricotez: 1 m lis, répétez 15 fois les 8 m de A.2 et terminez par la 1ère m de A.2, 1 m lis. Ainsi, votre motif va commencer de la même façon de chaque côté (la 1ère m de A.2 doit être tricotée en début de rang sur l'envers, une correction sera faite). Bon tricot!
25.05.2020 - 08:20
![]() Carmen-Gabriela wrote:
Carmen-Gabriela wrote:
Vielen Dank für Ihre rasche Antwort:) Eben, weil die hier die Schultern kürzer sind, ist doch der Oberarm stärker. Oder denke ich nun ganz verkehrt?
06.11.2019 - 17:28DROPS Design answered:
An sich ist Ihre Überlegung richtig. Aber im Vergleich zu "London Fog" ist diese Jacke etwas enger geschnitten, insbesondere die Ärmel liegen enger an, wenn Sie einmal die Fotos vergleichen, ist das auch an den Modellen erkennbar. Daher ist auch der Armausschnitt kleiner. Viel Spaß beim Stricken!
07.11.2019 - 08:30
![]() Carmen-Gabriela wrote:
Carmen-Gabriela wrote:
Hallo:) Wieder ein Traum-Modell! Ich habe es gerade begonnen (orange-mix; ähnlich Cayenne:), super + die Nepal ist klasse). Frage: Mir erscheint die Armöffnung zu klein (S=17 / M=18 cm) die Schultern sind mit ca. 15 cm br. (S) nicht weiter überschnitten als z.B. das ebenso oversized Mod. "London Fog" mit 20 cm br. Schulter (S), Armtiefe 20 (S)/21(M) cm. Also weniger überschnitten. - Sollte man nicht besser den Armausschnitt eher im Muster ansetzen ? Es ist ja eine Jacke^^.
06.11.2019 - 16:49DROPS Design answered:
Liebe Carmen-Gabriela, beide Modellen haben eine unterschiedlichen Schnitt, London Fog ist 54 cm breit oben von einem Schulter zum anderen, diese Jacket ist nur 45 cm, deshalb sind die Schulter hier etwas kürzer. Vile Spaß beim stricken!
06.11.2019 - 17:07
![]() Kay wrote:
Kay wrote:
Finished knit ting the cardigan but im stuck on collar...dont know what to do? Please help
05.12.2018 - 10:50DROPS Design answered:
Dear Kay, after you have cast off the stitches for shoulder (from WS) on right front piece, work next row from RS and cast on 13-14-15 new sts for the collar (these stitches will be sewn afterwards along neckline on back piece). Work all stitches in garter stitch. After 3 cm increase 4-5 sts evenly on row and repeat these increase 2 more times every 4th cm. Cast off after 12-14 cm. Happy knitting!
05.12.2018 - 12:44
![]() Kay wrote:
Kay wrote:
Knitted the cardigan..but dont understand what to do dor collar?
05.12.2018 - 10:45Helen Hatcher wrote:
Hi, what is the gauge for this pattern please? I will make it out of yarn that I can purchase here in Australia, so would love to know the number of stitches/cm for the yarn you have used. Thanks in advance, I LOVE this pattern and have been thinking about knitting it for ages :) Thank you also for all of the other gorgeous free patterns you have published! Kind regards, Helen
07.07.2018 - 01:50DROPS Design answered:
Dear Helen, gauge for this pattern is 17 sts x 22 rows in stocking st on needles 5 mm = 10 x 10 cm. More info abou this yarn you can see here - DROPS Nepal Happy knitting!
07.07.2018 - 20:36
![]() Foiratier Christine wrote:
Foiratier Christine wrote:
Bonsoir, merci pour votre réponse, c'est très aimable à vous. Cordialement Christine
19.09.2016 - 21:34
|
||||||||||
Cheyenne#cheyennejacket |
||||||||||
 |
 |
|||||||||
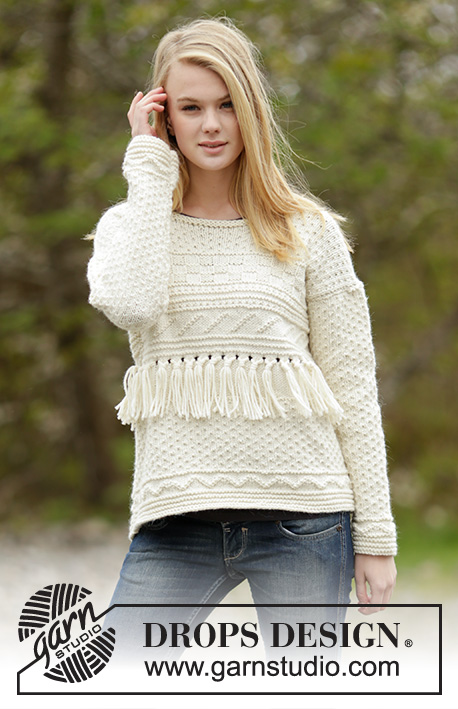
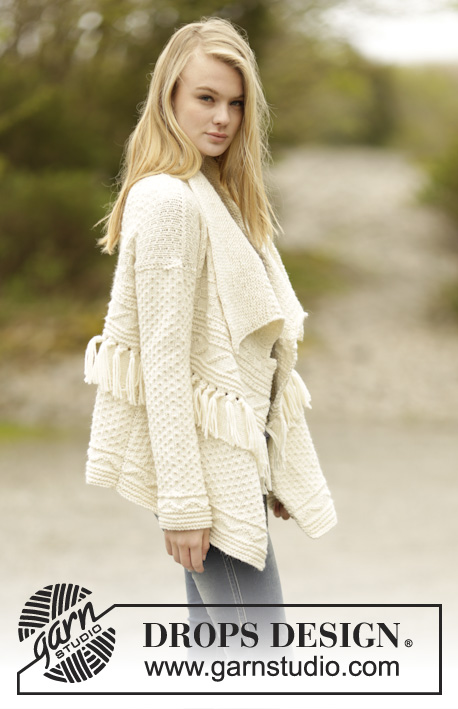
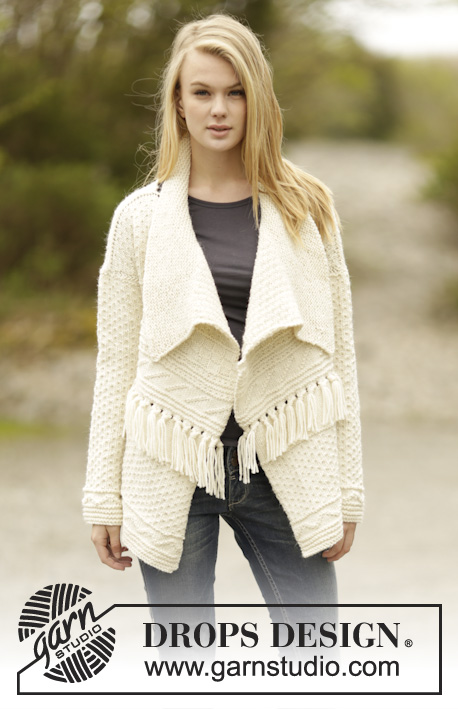
Knitted DROPS jacket with textured pattern, fringes and shawl collar in ”Nepal”. Size: S - XXXL.
DROPS 166-47 |
||||||||||
|
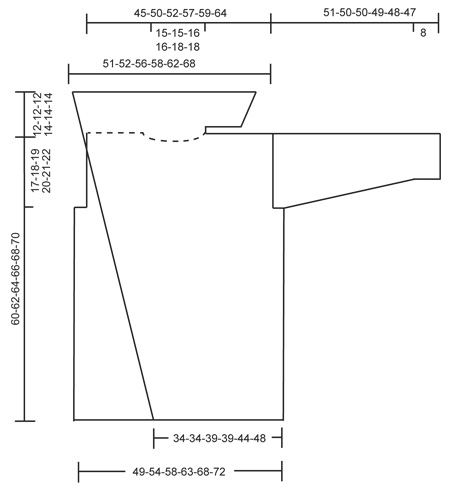
GARTER ST (back and forth): K all rows. 1 ridge = K2 rows. PATTERN: See diagrams A.1 to A.7. The diagrams show all rows in pattern seen from RS. PATTERN-1: Work A.1 a total of 2-2-2-3-3-4 times vertically. Work A.4 1 time in total vertically. Work A.5 1 time in total vertically. Work A.1 1 time in total vertically. Work A.5 1 time in total vertically. Work A.6 1 time in total vertically AT THE SAME TIME on last row from RS inc 1 st. INCREASE TIP 1: Always inc from RS. Inc with 1 YO, K YO twisted on next row to avoid holes. INCREASE TIP 2: Always inc from RS. Inc with 1 YO, work YO twisted on next row to avoid holes. Work the inc sts in to pattern. ---------------------------------------------------------- BACK PIECE: Worked back and forth on circular needle. Cast on 83-91-99-107-115-123 sts on circular needle size 5 mm / US 8 with Nepal. Work 1 ridge in GARTER ST - see explanation above. Work A.1 with 1 st in garter st in each side of piece. Repeat A.1 3 times in total vertically. Work A.2 as follows (first row = WS): 1 st in garter st, work first st in A.2 (so make it the same in both sides of piece) work A.2 until 2 sts remain (= 10-11-12-13-14-15 times), finish with 1 st in garter st. When A.2 has been worked 1 time vertically, work A.3 over A.2 as follows (first row = RS): 1 st in garter st, A.3 until 2 sts remain, work first st of A.3, finish with 1 st in garter st. Work sts in garter st in each side of piece in garter st until finished measurements. REMEMBER THE KNITTING GAUGE Work A.3 until piece measures 20-21-22-22-23-23 cm / 8"-8¼"-8¾"-8¾"-9"-9" (adjust so that last row is from RS). K 1 row from WS. Then work in stockinette st with 1 st in garter st in each side for 7 cm / 2¾", adjust so that last row is from RS. P 1 row from WS AT THE SAME TIME dec 1 st = 82-90-98-106-114-122 sts. Work A.7 with 1 st in garter st in each side of piece. Then work PATTERN-1 - see explanation above. When piece measures 43-44-45-46-47-48 cm / 17"-17¼"-17¾"-18"-18½"-19", bind off 3-3-5-5-7-7 sts in each side for armholes at beg of the 2 next rows. When armholes have been bind off and pattern 1 has been worked 1 time vertically, there are 77-85-89-97-101-109 sts on needle (NOTE: Inc 1 st on last row in pattern 1). Work A.3 until 5-5-1-1-5-5 sts remain, work the first 5-5-1-1-5-5 sts of A.3. Continue pattern until finished measurements. When piece measures 58-60-62-64-66-68 cm / 22¾"-23⅝"-24⅜"-25¼"-26"-26¾", adjust so that next row is from RS, bind off the middle 25-25-27-27-29-29 sts for neck = 26-30-31-35-36-40 sts remain on each shoulder. Now finish each shoulder separately. Bind off 1 st on next row from neck = 25-29-30-34-35-39 sts remain on the shoulder. Bind off when piece measures 60-62-64-66-68-70 cm / 23⅝"-24⅜"-25¼"-26"-26¾"-27½". Work the other shoulder the same way. RIGHT FRONT PIECE: Worked back and forth on circular needle. Cast on 58-58-66-66-74-82 sts (includes 1 band st in garter st) on circular needle size 5 mm / US 8 with Nepal. Work 1 ridge. READ ALL OF THE FOLLOWING SECTION BEFORE CONTINUING! WORK PATTERN WHILE AT THE SAME TIME INC IN THE SIDE AS FOLLOWS: INCREASE: Inc 1 st at the start of row from RS, inside 1 st in garter st when piece measures 2½ cm / ⅞" – READ INCREASE TIP 2, repeat inc every 2½ cm / ⅞" until finished measurements. PATTERN: Work as follows from RS: 1 band st in garter st, A.1 until 1 st remains, finish with 1 st in garter st. Repeat A.1 3 times in total vertically. Work A.2 over A.1 (first row = WS): Work band st and 1 st in the side in garter st until finished measurements. When A.2 has been worked 1 time vertically, work A.3 over A.2. Repeat A.3 until piece measures 20-21-22-22-23-23 cm / 8"-8¼"-8¾"-8¾"-9"-9" (adjust so that last row is from RS). K 1 row from WS. Then work in stockinette st with 1 band st and 1 st in garter st in the side for 7 cm / 2¾", adjust so that last row is from WS. Work A.7 with 1 st in garter st in each side of piece as before. Work pattern 1 with 1 st in garter st in each side of piece as before. When piece measures 43-44-45-46-47-48 cm / 17"-17¼"-17¾"-18"-18½"-19", bind off 3-3-5-5-7-7 sts for armhole on next row from WS. Continue with pattern and 1 band st in garter st towards mid front until piece measures 60-62-64-66-68-70 cm / 23⅝"-24⅜"-25¼"-26"-26¾"-27½", adjust so that next row is from WS. Bind off the first 25-29-30-34-35-39 sts for shoulder, K the remaining sts. Work in garter st until finished measurements. On first row (= from RS) cast on 13-13-14-14-15-15 sts at the end of row (these are sewn to neck = shawl collar). Work the new sts in garter st. REMEMBER: Inc mid front until finished measurements. When piece measures 3 cm / 1", inc 4-4-4-4-5-5 sts evenly - READ INCREASE TIP 1, repeat inc every 4 cm / 1½" 2 more times. Bind off when ridges have been worked for 12-12-12-14-14-14 cm / 4¾"-4¾"-4¾"-5½"-5½"-5½". LEFT FRONT PIECE: Work as right but reversed. I.e inc in the side inside 1 st in garter st at end of row from RS. Bind off sts for armhole at beg of row from RS. Bind off for shoulder at beg of row from RS. Cast on new sts for shawl collar at the end of row from WS. SLEEVE: Worked back and forth on needle. Cast on 42-42-42-50-50-50 sts (includes 1 edge st in each side) on circular needle size 5 mm / US 8 with Nepal. Work 1 ridge. Then work as follows from RS: 1 edge st in garter st, A.1 until 1 st remains, 1 edge st in garter st. Work A.1 3 times in total vertically. Work edge sts in garter st until finished measurements. Work A.2 (first row = WS) 5-5-5-6-6-6 times in total in width with 1 edge st in garter st in each side of piece. When A.2 has been worked 1 time vertically, work A.3 until finished measurements. When piece measures 8 cm / 3⅛", inc 1 st inside 1 edge st in each side of piece. Work the inc sts in the pattern A.3. Repeat inc every 5-4-3½-4-3½-3 cm / 2"-1½"-1¼"-1½"-1¼"-1⅛" 8-10-11-9-11-12 more times = 60-64-66-70-74-76 sts. Bind off when piece measures 51-50-50-49-48-47 cm / 20"-19¾"-19¾"-19¼"-19"-18½" (shorter measurements in the larger sizes because of wider shoulders). Make another sleeve the same way. ASSEMBLY: Sew the shoulder seams. Sew in sleeves. Sew the sleeve seams inside 1 edge st. Sew side seams in outer loops of edge sts. Sew shawl collar tog mid back and sew it to the neckline. FRINGES: Cut 3 strands of approx. 34 cm / 13½", thread them through the holes (in A.7), tie a LOOSE knot, i.e. let the knot hang approx. 1 cm / ⅜" down from holes. Insert 1 fringe between every holes. |
||||||||||
Diagram explanations |
||||||||||
|
||||||||||
 |
||||||||||
 |
||||||||||
Have you finished this pattern?Tag your pictures with #dropspattern #cheyennejacket or submit them to the #dropsfan gallery. Do you need help with this pattern?You'll find 23 tutorial videos, a Comments/Questions area and more by visiting the pattern on garnstudio.com. © 1982-2026 DROPS Design A/S. We reserve all rights. This document, including all its sub-sections, has copyrights. Read more about what you can do with our patterns at the bottom of each pattern on our site. |
||||||||||


With over 40 years in knitting and crochet design, DROPS Design offers one of the most extensive collections of free patterns on the internet - translated to 17 languages. As of today we count 325 catalogs and 12298 patterns - 12288 of which are translated into English (US/in).
We work hard to bring you the best knitting and crochet have to offer, inspiration and advice as well as great quality yarns at incredible prices! Would you like to use our patterns for other than personal use? You can read what you are allowed to do in the Copyright text at the bottom of all our patterns. Happy crafting!
Post a comment to pattern DROPS 166-47
We would love to hear what you have to say about this pattern!
If you want to leave a question, please make sure you select the correct category in the form below, to speed up the answering process. Required fields are marked *.