
Popular categories
Looking for a yarn?


Comments / Questions (37)
![]() Marion wrote:
Marion wrote:
Is this pattern available in written form without the chart.
21.05.2025 - 22:57DROPS Design answered:
Dear Marion, there are only diagrams to this pattern, but you will find some help on how to read diagrams here. Happy knitting!
22.05.2025 - 09:09
![]() Riikka wrote:
Riikka wrote:
Mitä tehdään lopuille silmukoille etukappaleen, kun tässä lukee että aina oikeaa etureunan 7 silmukalla ja silmukoitahan on 15. Missään ei kerrota, mitä niillä 8 on tarkoitus tehdä. Kaksi kerrosta ne ilmeisesti neulotaan aina oikein, mutta entä ne toiset kaksi kerrosta?
19.01.2025 - 08:49DROPS Design answered:
Keskellä edessä neulotaan lyhennettyjä kerroksia, eli neulot seuraavasti: *Neulo aluksi tasona kaikilla silmukoilla 2 kerrosta ainaoikeaa, neulo sitten keskiedun reunimmaisilla 7 silmukalla ainaoikeaa, käännä työ ja neulo näillä 7 silmukalla ainaoikeaa. Eli näiden 2 kerroksen aikana muita silmukoita ei neulota.
20.01.2025 - 17:41
![]() Eñisa Sanchez wrote:
Eñisa Sanchez wrote:
Hola, fvr explíquenme ¿cómo hago el pliegue para terminar con el cuello? no entiendo la instrucción. gracias!!
01.08.2021 - 18:20DROPS Design answered:
Hola Enisa, la técnica es como en el video AQUI pero ademas tienes que aumentar los puntos para el cuello. Mira TIP PARA LOS AUMENTOS (se aplica al cuello). Buen trabajo!
06.08.2021 - 10:01
![]() Lucia wrote:
Lucia wrote:
Buongiorno, i simboli relativi a "passare 1 m a dir senza lavorarla, 1 m dir, accavallare la m passata sopra quella appena lavorata" e " 2 m insieme a dir" sembra siano stati invertiti.
21.12.2020 - 13:28DROPS Design answered:
Buongiorno Lucia, la spiegazione della legenda è corretta. Buon lavoro!
21.12.2020 - 15:47
![]() Lonca Mireille wrote:
Lonca Mireille wrote:
Vous donnez le début du dos uniquement , , le devant est il fait avec la moitié des mailles exactement ?
07.11.2018 - 16:25DROPS Design answered:
Bonjour Mme Lonca, pour cette veste, on tricote le dos et les 2 devants en même temps du bas jusqu'aux emmanchures (en augmentant en même temps pour le col de chaque côté), quand les mailles des emmanchures sont rabattues, on termine le dos et chaque devant séparément. Bon tricot!
08.11.2018 - 09:30
![]() Maj-Britt Höckert Notini wrote:
Maj-Britt Höckert Notini wrote:
Tacksam för att få mönstret till After Eight koftan
24.04.2018 - 12:25
![]() Frank wrote:
Frank wrote:
Im confused about how to work the diagram A.1 going across the body, because the number of cast-on stitches is odd, and the side bands in garter stitch make up 10 stitches, leaving an odd number. Diagram A.1 is 4 stitches across (an even number), which leaves one stitch left before the band section, and the pattern does not explain how to work this stitch. Will someone please advise what to do with this extra stitch? Thanks.
06.01.2018 - 19:21DROPS Design answered:
Dear Frank, just work the last st before front band sts as the first st in A.1, but on 7th round, knit this stitch to keep correct number of sts (no YO at the end of 7th row). Happy knitting!
08.01.2018 - 09:04
![]() Caroline Muylle wrote:
Caroline Muylle wrote:
Jammer dat al jullie patronen met een rondbreinaald zijn. Ik heb dat nooit leren gebruiken, heb het 1 maal geprobeerd en lukte totaal niet.
07.12.2017 - 17:44
![]() Julia Adam wrote:
Julia Adam wrote:
Do I bind off 3 STS on each side of marker for armhole, continue across to next marker, repeat BO then finish the row? Then how do I get to the back piece to work it? On the BACK PIECE, do I BO 2 sts, work across the row then BO 2 sts for every other row? Please help as I would like to finish this project.
01.11.2016 - 01:43DROPS Design answered:
Dear Mrs Adam, after you have bound off sts for armhole, you can cut the yarn (or put it aside for next piece), slip sts on both front pieces on a thread or a st holder, then join yarn to work back piece, starting with 1 row from WS, then at the beg of next row from RS bind off 2 sts at the beg of next 2 rows (1-5 times in total depending on size). Happy knitting!
01.11.2016 - 12:30
![]() Ilaria Crestani wrote:
Ilaria Crestani wrote:
Tanto bello molto raffinato
29.12.2015 - 13:58
|
|||||||||||||||||||
After Eight#aftereightcardigan |
|||||||||||||||||||
 |
 |
||||||||||||||||||
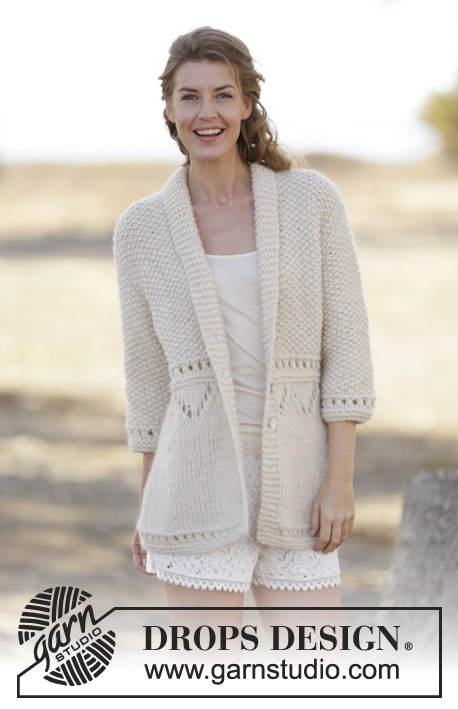
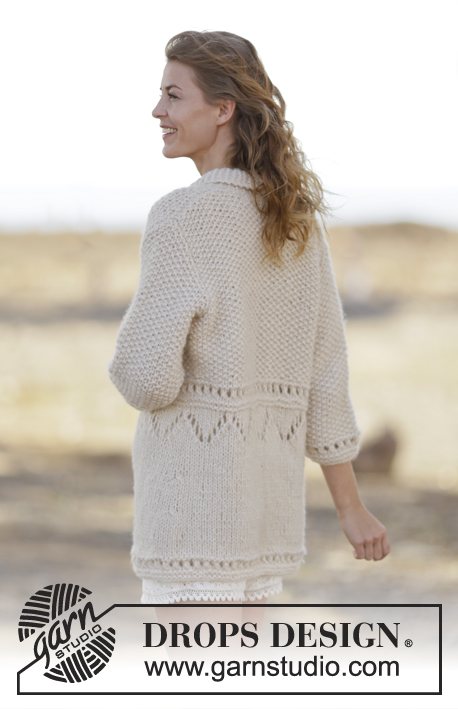
Knitted DROPS jacket in seed st with lace pattern and shawl collar in 1 thread Cloud or 2 threads Air. Size: S - XXXL.
DROPS 159-21 |
|||||||||||||||||||
|
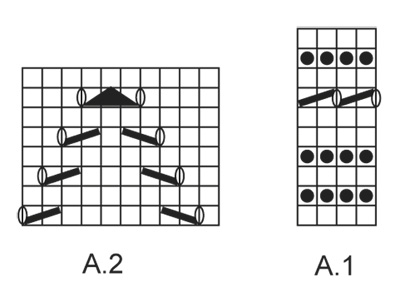
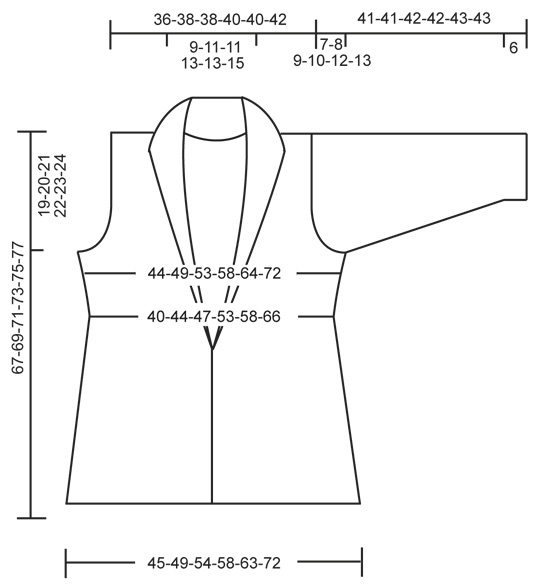
GARTER ST (back and forth on needle): K all rows. 1 ridge = K2 rows. SEED ST: Row 1: * K 1, P 1 *, repeat from *-*. Row 2: K over P and P over K. Repeat 2nd row. PATTERN: See diagrams A.1 and A.2. In diagram A.1 make sure not to work more YOs than sts worked tog, otherwise the no of sts will not fit. BUTTONHOLES: Dec for buttonholes on right band: 1 buttonhole = K tog 3rd and 4th st and make a YO, K YO on next row. Dec for buttonholes in all sizes when piece measures: approx. 26, 32 and 38 cm / 10¼", 12½", 15" INCREASE TIP (applies to collar): Inc inside 1 band st as follows: Make 1 YO, on next row K YO twisted (work st twisted by working in back loop of st instead of front loop). Work all the inc sts in garter st. ---------------------------------------------------------- BODY: Worked back and forth on circular needle. Cast on 109-119-129-139-149-169 sts (includes 5 band sts in each side) on circular needle size 8 mm / US 11 with 1 thread Cloud or 2 threads Air. Work diagram A.1 with 5 band sts in GARTER ST - see explanation above, in each side, work diagram 1 time vertically. REMEMBER THE KNITTING GAUGE Then work in stockinette st but work the outermost 5 sts in each side (= band) in garter st until finished measurements. AT THE SAME TIME insert 2 markers in the piece as follows: 1 marker after 30-32-35-37-40-45 sts (= 1st front piece) and 1 after the next 49-55-59-65-67-79 sts (= back piece), there is 30-32-35-37-40-45 sts left for 2nd front piece. When piece measures 15 cm / 6", dec 1 st on each side of each marker, repeat dec when piece measures 22 cm / 8¾" = 101-111-121-131-141-161 sts. When piece measures approx. 26 cm / 10¼", work according to diagram A.2 with 5 band sts in garter st as before, AT THE SAME TIME beg dec for BUTTONHOLES - see explanation above. After diagram A.2 work diagram A.1. Then work in SEED ST - see explanation above - continue band in GARTER ST - AT THE SAME TIME dec on first row from RS 3-5-7-5-3-5 sts evenly = 98-106-114-126-138-156 sts. Move the markers in the side so that there are 27-29-31-34-37-41 sts on each front piece and 44-48-52-58-64-74 sts on back piece. READ ALL OF THE FOLLOWING SECTION BEFORE CONTINUING! COLLAR INC: When piece measures 34-35-36-37-38-39 cm / 13⅜"-13¾"-14¼"-14½"-15"-15¼", inc for collar - read INCREASE TIP - in each side, inc 1 st every 7-10-10-18-18-18 cm / 2¾"-4"-4"-7"-7"-7" 4-3-3-2-2-2 times in total. At the same time when piece measures 34-35-36-37-38-39 cm / 13⅜"-13¾"-14¼"-14½"-15"-15¼", work 1 st in garter st into band (i.e. no of sts stays the same but no of sts in garter st inc while no of sts in seed st dec) every 7-6-6-5-5-5 cm / 2¾"-2½"-2½"-2"-2"-2" 5-6-6-7-7-7 times in total. SIDE INC: When piece measures 37 cm / 14½", inc 1 st on each side of each marker every 5-3-3-3-3-3 cm / 2"-1"-1"-1"-1"-1" 2-3-3-3-3-3 times in total. When piece measures 48-49-50-51-52-53 cm / 19"-19¼"-19¾"-20"-20½"-21", bind off 3 sts on each side of each marker for armhole and finish each part separately. BACK PIECE: = 42-48-52-58-64-74 sts. Bind off for armholes in each side on every other row as follows: 2 sts 0-1-1-2-3-5 times and 1 st 1-1-3-3-4-4 times = 40-42-42-44-44-46 sts. When piece measures 65-67-69-71-73-75 cm / 25½"-26⅜"-27⅛"-28"-28¾"-29½", bind off the middle 8-10-10-12-12-14 sts for neck. Then bind off 1 st on next row towards the neck = 15 sts remain on each shoulder. Bind off when piece measures 67-69-71-73-75-77 cm / 26⅜"-27⅛"-28"-28¾"-29½"-30⅜". RIGHT FRONT PIECE: Continue inc for collar. Bind off for armholes as on back piece. After all inc and dec, 29 sts remain on needle. When piece measures 67-69-71-73-75-77 cm / 26⅜"-27⅛"-28"-28¾"-29½"-30⅜", bind off the outermost 15 sts for shoulder = 14 sts for collar. Insert 1 marker. Continue to work in garter st over collar as follows: * 1 ridge over all sts, 1 ridge over the outermost 7 sts towards mid front *, repeat from *-* until collar measures 4½-5½-5½-6½-6½-7½ cm / 1¾"-2¼"-2¼"-2½"-2½"-2⅞" from marker on the shortest side. Loosely bind off. LEFT FRONT PIECE: Work as right but reversed. SLEEVE: Worked back and forth on circular needle. Cast on 30-30-32-32-34-34 sts (includes 1 edge st each side) on needle size 8 mm / US 11 with Cloud. Then work pattern A.1 1 time vertically. Then work in seed st. READ ALL OF THE FOLLOWING SECTION BEFORE CONTINUING! AT THE SAME TIME when piece measures 6 cm / 2⅜", inc 1 st in each side every 8-5½-4½-3½-3-2½ cm / 3⅛"-2¼"-1¾"-1¼"-1⅛"-⅞" 4-5-6-7-8-9 times in total = 38-40-44-46-50-52 sts. When piece measures 34-33-33-32-31-30 cm / 13½"-13"-13"-12½"-12¼"-11¾", bind off for sleeve cap in each side on every other row: 3 sts 1 time, 2 sts 1 time, 1 st 1-2-3-4-5-6 times, then bind off 2 sts in each side until piece measures approx. 40-40-41-41-42-42 cm / 15¾"-15¾"-16⅛"-16⅛"-16½"-16½", then bind off 3 sts 1 time in each side. Bind off the remaining sts, piece measures approx. 41-41-42-42-43-43 cm / 16⅛"-16⅛"-16½"-16½"-17"-17". ASSEMBLY: Sew the shoulder seams. Sew sleeve seams and sew in sleeves. Sew collar tog mid back. Sew collar along the back of the neck, sew edge to edge to avoid a chunky seam. Sew the buttons on to left front piece. |
|||||||||||||||||||
Diagram explanations |
|||||||||||||||||||
|
|||||||||||||||||||
 |
|||||||||||||||||||
 |
|||||||||||||||||||
Have you finished this pattern?Tag your pictures with #dropspattern #aftereightcardigan or submit them to the #dropsfan gallery. Do you need help with this pattern?You'll find 23 tutorial videos, a Comments/Questions area and more by visiting the pattern on garnstudio.com. © 1982-2026 DROPS Design A/S. We reserve all rights. This document, including all its sub-sections, has copyrights. Read more about what you can do with our patterns at the bottom of each pattern on our site. |
|||||||||||||||||||


With over 40 years in knitting and crochet design, DROPS Design offers one of the most extensive collections of free patterns on the internet - translated to 17 languages. As of today we count 325 catalogs and 12298 patterns - 12288 of which are translated into English (US/in).
We work hard to bring you the best knitting and crochet have to offer, inspiration and advice as well as great quality yarns at incredible prices! Would you like to use our patterns for other than personal use? You can read what you are allowed to do in the Copyright text at the bottom of all our patterns. Happy crafting!
Post a comment to pattern DROPS 159-21
We would love to hear what you have to say about this pattern!
If you want to leave a question, please make sure you select the correct category in the form below, to speed up the answering process. Required fields are marked *.