
Popular categories
Looking for a yarn?


Comments / Questions (73)
![]() Kirsten wrote:
Kirsten wrote:
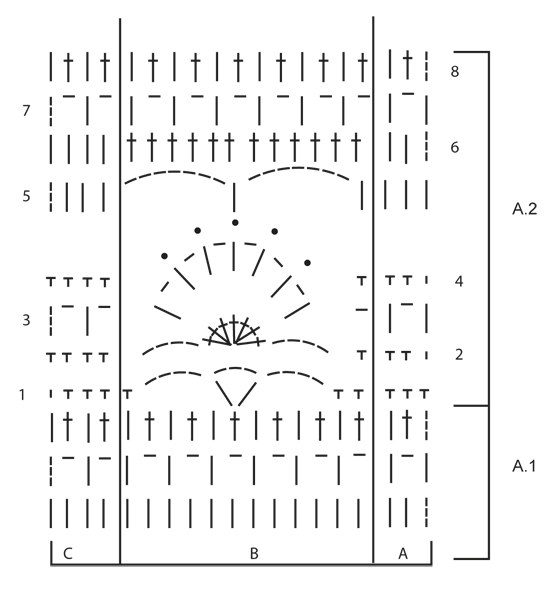
I'm a beginner, but love Drops. I often struggle to understand, even if the pattern is clear. My advice is to read other people's questions, watch the video and don't give up. I was confused about the picots until I saw in the video that each picot goes across 2 chain spaces, it starts in one ch sp and finishes in the next ch sp. Also the 14 ch in row 5 are increasing for the arms, as shown in the diagram. Hope this helps, Drops patterns always turn out lovely
26.04.2026 - 16:20
![]() Christina Melin wrote:
Christina Melin wrote:
Hej. Hur skall man veta vilken storlek som passar mig? Jag förstår inte hur jag skall mäta på mig.
16.02.2026 - 21:09DROPS Design answered:
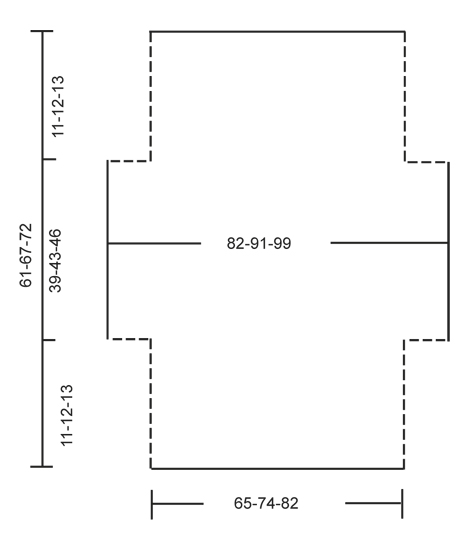
Hei Christina. Scroll deg helt nederst på oppskriften og se på målskissen med tall (cm mål). mvh DROPS Design
23.02.2026 - 10:29
![]() Jennie wrote:
Jennie wrote:
Jag måste ha förstått helt fel när man gör ökningarna i sidorna. Det hade vart enklare om jag kunde visa en bild, men de första maskorna man ökar i slutet av varv 6 får ju ett extra varv med stolpar jämfört med ökningarna i andra sidan och blir ju en helt centimeter längre/bredare beroende på hur man mäter. Trodde detta skulle kompenseras för när man slutar virka de extra maskorna men då slutar man ju virka alla samtidigt. Ska det se ut så?
04.07.2025 - 18:37DROPS Design answered:
Hei Jennie. Det kan bli en liten "høyde" forskjell på radene, men den skal ikke være av noe stor betydning. Har du mulighet må du må gjerne ta et bilde eller ta med deg hele jakken til en butikk som selger DROPS garn. Da er det lettere for dem å se mer nøyaktig hva du mener. mvh DROPS Design
07.07.2025 - 11:30
![]() Caroline wrote:
Caroline wrote:
Je l’achète à qui arrive à me le faire 🤗
30.04.2024 - 01:47
![]() Gabriela wrote:
Gabriela wrote:
Ich verstehe nicht, wie die Seiten zusammengenäht werden müssen, ansonsten gefällt mir das Modell sehr gut
14.04.2024 - 16:37DROPS Design answered:
Liebe Gabriela, falten Sie die Arbeit in 2 in der Mitte (wo die 82-91-99 cm in der Maßskizze geschrieben sind), dann nähen Sie zusammen die ersten und die lezten 11-12-13 cm (links und rechts) zusammen, dann nähen Sie die neuen angeschlagenen Maschen mit den abgenommenen Maschen zusammen = es bleibt eine Öffnung an den mittleren 39-43-46 cm für die Arme. Viel Spaß beim Fertigstellen!
15.04.2024 - 08:18
![]() Lesley wrote:
Lesley wrote:
I can work the diagram until the picots in Row 5. The key says start the picot with a dc in a chain space, but there are 6 ch spaces and only 5 picots and the diagram makes it look like you start the picot in the treble st and not the ch space . I'm not sure where to put my picots!
13.09.2023 - 16:36DROPS Design answered:
Dear Lesley, do you mean row called 4 in the diagram? You will start the diagram B with 1 dc in the chain, then crochet the dc in the next ch-space, work 3 ch, and worked 1 treble crochet in the 1st of this 3 chains, then crochet 1 dc in next ch-space to start next picot. that way, the picot will be over the treble crochets from previous row. Happy crocheting!
14.09.2023 - 09:40
![]() Nicole Rebiffé wrote:
Nicole Rebiffé wrote:
Bonjour, Dans le point Picot, il faut faire une bride ou une maille serrée?. Dans les explications ci-dessus, vous indiquez la bride, mais dans la vidéo , c'est une maille serrée.. Merci de votre réponse
20.08.2023 - 19:09DROPS Design answered:
Bonjour Mme Rebiffé, selon le diagramme, c'est bien 1 bride dans la 1ère des 3 mailles en l'air qu'il faut faire, merci pour votre retour, j'ai transféré à notre équipe vidéo. Bonne continuation!
21.08.2023 - 09:12
![]() Mini Varkey wrote:
Mini Varkey wrote:
Am I supposed to reduce 12 stitches from row 6 on either side once I reach 55 cms.
01.08.2022 - 21:51DROPS Design answered:
Hi Mini, Yes, you do not work the 12 stitches on each side. Happy crocheting!
02.08.2022 - 06:53
![]() Mini Mathew Varkey wrote:
Mini Mathew Varkey wrote:
How do you decrease after you reach 55 cm
01.08.2022 - 21:43DROPS Design answered:
Dear Mr Varkey, cut the yarn at the end of the row when you reach 55 cm and turn piece, skip the first 12 sts at the beg of next row, join the yarn and work the next 103 sts (12 sts remain at the end of the row). Alternately you can also slip stitch over the first 12 sts if you want to avoid cutting the yarn. Happy crocheting!
02.08.2022 - 09:00
![]() Diana De Witt wrote:
Diana De Witt wrote:
In het patroon staat bij de picot 1 stk in de 1 e van de 3 l. Dit is waarschijnlijk verkeerd vanuit het engels naar het nederlands vertaald dit moet zijn 1 vaste in de 1 e van de 3 lossen. Uk = 1 dc en us 1 sc = een vaste in nl
17.06.2021 - 17:56
|
||||||||||||||||
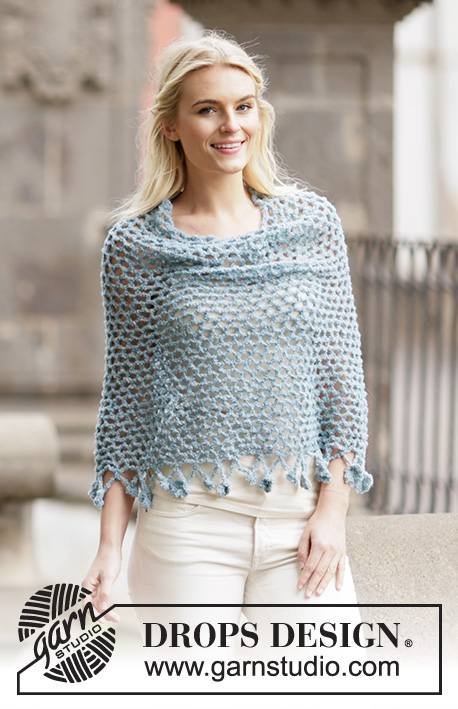
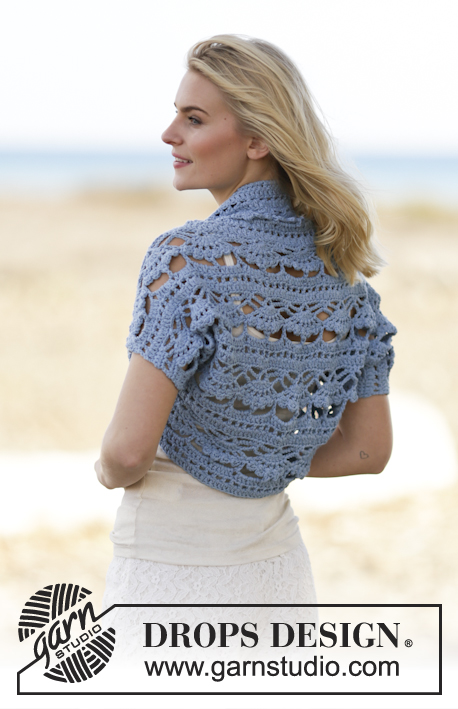
Blue Wonder#bluewondershoulderpiece |
||||||||||||||||
 |
 |
|||||||||||||||
Crochet DROPS shoulder piece in "Paris". Size. S-XXXL
DROPS 162-34 |
||||||||||||||||
|
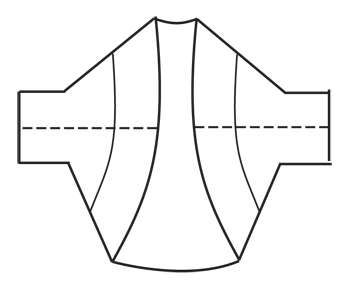
PATTERN: Se diagram A.1 and A.2. ---------------------------------------------------------- SHOULDER PIECE: Work 110-125-139 ch on hook size 5 mm / H/8 with Paris. ROW 1 Turn and work 1 dc in fourth ch from hook (= 2 dc), work 1 dc in each of the next 4-1-3 ch, * skip ch 1, 1 dc in each of the next 5 ch *, repeat from *-* = 91-103-115 dc. ROW 2 Then work according to diagram A.1 as follows: A.1 A, A.1 B 7-8-9 times in total, finish with A.1 C. When A.1 has been worked 1 time vertically, repeat A.2 upwards. AT THE SAME TIME when piece measures approx. 11-12-13 cm / 4½"-4¾"-5" (adjust so that next row is 6th row in A.2), work 14 ch at the end of row (= row 5). Turn and work 1 dc in fourth ch from hook, then work 1 dc in each of the next 10 new ch. Continue with 6th row in A.2, at the end of row work 15 new ch. Turn and work 1 dc in the sixth ch from hook, * work ch 1, skip ch 1, 1 dc in next ch *, repeat from *-* over the next 9 new ch, finish with 1 ch. Work the rest of row according to A.2. On next row work as before until the new sts at the end of row, work 1 dc in each ch-space and 1 dc in each dc. 12 dc have been inc in each side = 115-127-139 dc. Then continue on row 8 as follows: A.2 A, A.2 B 9-10-11 times in total, finish with A.2 C. When piece measures approx. 50-55-59 cm / 19¾"-21½"-23¼" (adjust so that next row is 7th row), do not work over 12 dc in each side = 91-103-115 dc. Continue to work as follows: A.2 A, A.2 B 7-8-9 times in total, finish with A.2 C. Continue until piece measures approx. 61-67-72 cm / 24"-26½"-28½" - adjust after a whole repetition of A.2. Fasten off. ASSEMBLY: Sew side and underarm seams in one inside 1 edge st. |
||||||||||||||||
Diagram explanations |
||||||||||||||||
|
||||||||||||||||
 |
||||||||||||||||
 |
||||||||||||||||
 |
||||||||||||||||
Have you finished this pattern?Tag your pictures with #dropspattern #bluewondershoulderpiece or submit them to the #dropsfan gallery. Do you need help with this pattern?You'll find 7 tutorial videos, a Comments/Questions area and more by visiting the pattern on garnstudio.com. © 1982-2026 DROPS Design A/S. We reserve all rights. This document, including all its sub-sections, has copyrights. Read more about what you can do with our patterns at the bottom of each pattern on our site. |
||||||||||||||||


With over 40 years in knitting and crochet design, DROPS Design offers one of the most extensive collections of free patterns on the internet - translated to 17 languages. As of today we count 325 catalogs and 12298 patterns - 12288 of which are translated into English (US/in).
We work hard to bring you the best knitting and crochet have to offer, inspiration and advice as well as great quality yarns at incredible prices! Would you like to use our patterns for other than personal use? You can read what you are allowed to do in the Copyright text at the bottom of all our patterns. Happy crafting!
Post a comment to pattern DROPS 162-34
We would love to hear what you have to say about this pattern!
If you want to leave a question, please make sure you select the correct category in the form below, to speed up the answering process. Required fields are marked *.