DROPS Snow
DROPS Snow
100% Wool
from 2.65 $ /50g
Get the yarn to make this pattern from 34.45$.

The yarn cost is calculated from the pattern’s smallest size and the yarn’s cheapest product type. Looking for an even better price? You might find it on the DROPS Deals!

DROPS SS24

Virginia

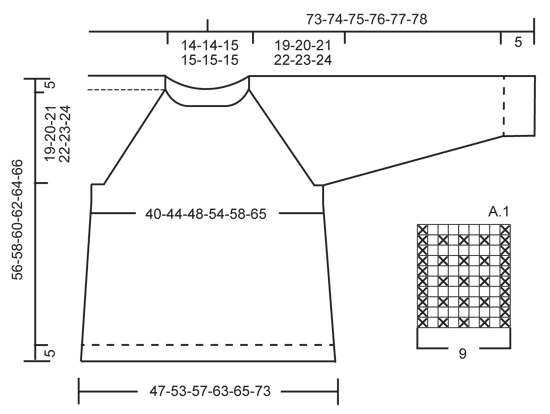
Knitted DROPS jumper with rib and raglan, worked top down in ”Snow”. Size: S - XXXL.

DROPS 157-29
DROPS design: Pattern no ee-504
Yarn group E or C + C
----------------------------------------------------------
Size: S - M - L - XL - XXL - XXXL
Finished measurements:
Bust: 80-88-96-108-116-130 cm / 31½"-34½"-37 3/4"-42½"-45 3/4"-51½"
Full length: 56-58-60-62-64-66 cm / 22''-22¾''-23 5/8''-24 3/8''-25¼''-26''

Materials:
DROPS SNOW from Garnstudio
650-700-750-850-950-1000 g color no 53, light gray

DROPS DOUBLE POINTED NEEDLES and CIRCULAR NEEDLE (80 cm / 32'') SIZE 8 mm / US 11 - or size needed to get 11 sts x 15 rows in stockinette st = 4'' x 4'' (10 x 10 cm).

-------------------------------------------------------

Alternative Yarn – See how to change yarns here
Yarn Groups A to F – Use the same pattern and change the yarn here
Yarn usage using an alternative yarn – Use our yarn converter here

-------------------------------------------------------

DROPS Snow
DROPS Snow
100% Wool
from 2.65 $ /50g
Get the yarn to make this pattern from 34.45$.

The yarn cost is calculated from the pattern’s smallest size and the yarn’s cheapest product type. Looking for an even better price? You might find it on the DROPS Deals!

Pattern instructions

NOTE: This pattern is written in American English. All measurements in charts are in cm. For conversion from inches to cm - click here. There are different terms for crocheting in American and British English. If this pattern includes crochet, click for "crochet terms" here. For this pattern in British English, please click here.
PATTERN:
See diagram A.1. The diagram shows all rows in pattern seen from RS.

RAGLAN:
Inc on each side of every A.1 by making 1 YO. On next round K YOs twisted (i.e. work in back loop of st instead of front) to avoid holes.

INCREASE TIP (applies to body):
Work until 1 st remains before marker, 1 YO, K 2, 1 YO = 2 sts inc. Repeat in the other side. On next round K YOs twisted (i.e. work in back loop of st instead of front) to avoid holes.

DECREASE TIP (applies to sleeves):
Dec before marker and 1 st as follows: K 2 tog.
Dec after marker and 1 st as follows: Slip 1 st as if to K, K 1, psso.
----------------------------------------------------------

JUMPER:
Worked in the round, top down.

YOKE:
Cast on 52-52-56-56-56-56 sts on circular needle size 8 mm / US 11 with Snow. Then work rib as follows from mid back: K 1, * P 2, K 2 *, repeat from *-* until 1 st remains, K 1. When rib has been worked for 3 cm / 1'', work 1 round in stockinette st while AT THE SAME TIME inc 10-10-8-8-10-10 sts evenly = 62-62-64-64-66-66 sts. Now work pattern as follows: 5-5-5-5-6-6 sts in stockinette st (= back piece), A.1, 3 sts in stockinette st (= sleeve), A.1, 10-10-11-11-12-12 sts in stockinette st (= front piece), A.1, 3 sts in stockinette st (= sleeve ), A.1, 5-5-6-6-6-6 sts in stockinette st (= back piece). There is now 1 repetition A.1 in each raglan. REMEMBER THE GAUGE! Continue with pattern like this AT THE SAME TIME on next round beg inc for RAGLAN – see explanation above! Inc differently on body and sleeves:
BODY:
Repeat inc every round 0-2-5-8-10-12 times, every other round 4-4-3-4-4-8 times and every 4th round 5-5-5-4-4-2 times.
SLEEVE:
Repeat inc every round 6-6-7-7-10-11 times, every other round 3-4-4-5-4-4 times and every 4th round 4 times in all sizes.

When all inc are done and piece measures 24-25-26-27-28-29 cm / 9½''-9 3/4''-10 1/4''-10 5/8''-11''-11 3/8'', there are 150-162-176-192-210-230 sts in total on needle. Then continue in stockinette st as follows: Work the first 18-20-22-25-28-32 sts, slip the next 39-41-43-45-49-51 sts on a stitch holder for sleeve, cast on 8 new sts under sleeve, insert a marker in the middle of these sts, work the next 36-40-45-51-56-64 sts, slip the next 39-41-43-45-49-51 sts on a stitch holder for sleeve, cast on 8 new sts under sleeve, insert a marker in the middle of these sts, work the remaining 18-20-23-26-28-32 sts. Work the new sts under each sleeve in stockinette st.

BODY:
There are now 88-96-106-118-128-144 sts for body. Continue in stockinette st. When piece measures 4 cm / 1½'' from the new sts under sleeve, beg inc on each side of markers - READ INCREASE TIP! Repeat inc every 5½-4½-5-5-6½-7 cm / 2 1/4"-1 3/4"-2"-2"-2½"-2 3/4" 3-4-4-4-3-3 more times = 104-116-126-138-144-160 sts. When piece measures 51-53-55-57-59-61 cm / 20''-21''-21 5/8''-22½''-23¼''-24''from shoulder, inc 0-0-2-2-0-0 sts = 104-116-128-140-144-160 sts. Now work rib from mid back as follows: K 1, * P 2, K 2 *, repeat from *-* until 1 st remains, K 1. Continue like this until rib has been worked for 5 cm / 2'', bind off with K over K and P over P.

SLEEVE:
Slip sts back on double pointed needles. Work in stockinette st and cast on 8 new sts at the end of row = 47-49-51-53-57-59 sts. Insert a marker in the middle of the new sts under the sleeve. NOW MEASURE THE PIECE FROM HERE. Then work in stockinette st in the round – AT THE SAME TIME dec 1 st on each side of marker – READ DECREASE TIP. Repeat dec every other round 2 more times in all sizes = 41-43-45-47-51-53 sts. Then dec every 4-3½-4-3½-3-3 cm / 1½"-1 1/4"-1½"-1 1/4"-1"-1" 9-10-9-10-12-11 times = 23-23-27-27-27-31 sts. When sleeve measures 42-42-41-41-41-41 cm / 16½"-16½"-16"-16"-16"-16", inc 1 st in all sizes = 24-24-28-28-28-32 sts. Continue with rib as follows: K 1, * P 2, K 2 *, repeat from *-* until 1 st remains, K 1. Continue like this until rib has been worked for 5 cm / 2''. Bind off with K over K and P over P.

ASSEMBLY:
Sew the holes under the sleeves.

Diagram

All measurements in charts are in cm.

symbols = K
symbols = P
diagram
Do you have a question? See a list of frequently asked questions (FAQ)

Knitting tension is what determines the final measurements of your work, and is usually measured per 10 x 10 cm. It is provided like so: number of stitches in width x number of rows in height - eg: 19 stitches x 26 rows = 10 x 10 cm.

The knitting tension is very individual; some people knit/crochet loosely while others work tightly. You adjust the knitting tension with the needle size, which is why the suggested needle size only serve as a guide! You need to adjust this (up or down) to ensure that YOUR knitting tension matches the knitting tension provided in the pattern. If you work with a different knitting tension than provided you will have a different yarn consumption, and your work will have different measurements than what the pattern suggests.

The knitting tension also determines which yarns can replace each other. As long as you achieve the same knitting tension you can replace one yarn with another.

See DROPS lesson: How to measure your tension/gauge

See DROPS video: How to make a gauge tension swatch

The required amount of yarn is provided in grams, eg: 450 g. To calculate how many balls you’ll need you first need to know how many grams are in 1 ball (25g, 50g or 100g). This information is available if you click on the individual yarn quality on our pages. Divide the amount required with the amount of each ball. For example, if each ball is 50g (the most common amount), the calculation will be as follows: 450 / 50 = 9 balls.

The important thing when changing from one yarn to another is that the knitting/crochet tension remains the same. This is so that the measurements of the finished piece will be the same as on the sketch provided. It is easier to achieve the same knitting tension using yarns from the same yarn group. It is also possible to work with multiple strands of a thinner yarn to achieve the knitting tension of a thicker one. Please try our yarn converter. We recommend you to always work a test swatch.

Please NOTE: when changing yarn the garment might have a different look and feel to the garment in the photo, due to individual properties and qualities of each yarn.

See DROPS lesson: Can I use a different yarn than the one mentioned in the pattern?

All our yarns are categorised into yarn groups (from A to F) according to thickness and knitting tension – group A contains the thinnest yarns and group F the thickest. This makes it easier for you to find alternative yarns to our patterns, should you wish to switch yarn. All yarns within the same group have a similar knitting tension and can easily replace each other. However, different yarn qualities have different structures and properties which will give the finished work a unique look and feel.

Click here for an overview of the yarns in each yarn group

At the top of all our patterns you’ll find a link to our yarn converter, which is a helpful tool should you wish to use a different yarn than suggested. By filling in the yarn quality you wish to replace, the amount (in your size) and number of strands, the converter will present good alternative yarns with the same knitting tension. Additionally it will tell you how much you’ll require in the new qualities and whether you’ll need to work with multiple strands. Most skeins are 50g (some are 25g or 100g).

If the pattern is worked with multiple colours, every colour will have to be converted separately. Similarly, if the pattern is worked with several strands of different yarns (for example 1 strand Alpaca and 1 strand Kid-Silk) you will have to find alternatives for each, individually.

Click here to see our yarn converter

Since different yarns have different qualities and textures we have chosen to keep the original yarn in our patterns. However, you can easily find options among our available qualities by using our yarn converter, or simply pick a yarn from the same yarn group.

It is possible that some retailers still have discontinued yarns in stock, or that someone has a few skeins at home that they would like to find patterns for.

The yarn converter will provide both alternative yarn as well as required amount in the new quality.

If you think it's hard to decide what size to make, it can be a good idea to measure a garment you own already and like the size of. Then you can pick the size by comparing those measures with the ones available in the pattern's size chart.

You'll find the size chart at the bottom of the pattern.

See DROPS lesson: How to read size chart

The needle size provided in the pattern serves only as a guide, the important thing is to follow the knitting tension. And since knitting tension is very individual, you will have to adjust the needle size to ensure that YOUR tension is the same as in the pattern – maybe you’ll have to adjust 1, or even 2 needle sizes, up or down to achieve the correct tension. For this, we recommend that you work test swatches.

Should you work with a different knitting tension than the one provided, the measurements of the finished garment might deviate from the measurement sketch.

See DROPS lesson: How to measure your tension/gauge

See DROPS video: How to make a gauge tension swatch

Working a garment top-down provides more flexibility and room for personal adjustment. For example it is easier to try the garment on while working, as well as making adjustments to length of yoke and shoulder caps.

The instructions are carefully explaining every step, in the correct order. Diagrams are adjusted to the knitting direction and are worked as usual.

The diagram depicts all rows/rounds, and every stitch seen from the right side. It is read from bottom to top, from right to left. 1 square = 1 stitch.

When working back and forth, every other row is worked from the right side and every other row is worked from the wrong side. When working from the wrong side, the diagram will have to be worked reversed: from left to right, knit stitches are purled, purl stitches are knit etc.

When working in the round every round is worked from the right side and the diagram are worked from right to left on all rounds.

See DROPS lesson: How to read knitting diagrams

The diagram depicts all rows/rounds, and every stitch seen from the right side. It is worked from bottom to top, from right to left.

When working back and forth every other row is worked from the right side: from right to left and every other row is worked from the wrong side: from left to right.

When working in the round, every row in the diagram are worked from the right side, from right to left.

When working a circular diagram you start in the middle and work your way outwards, counter clockwise, row by row.

The rows usually start with a given number of chain stitches (equivalent to the height of the following stitch), this will either be depicted in the diagram or explained in the pattern.

See DROPS lesson: How to read crochet diagrams

Instructions for working several diagrams after each other on the same row/round, will often be written like so: “work A.1, A.2, A.3 a total of 0-0-2-3-4 times". This means you work A.1 once, then A.2 is worked once, and A.3 is repeated (in width) the number of times provided for your size – in this case like so: S = 0 times, M = 0 times, L=2 times, XL= 3 times and XXL = 4 times.

The diagrams are worked as usual: begin with the first row in A.1, then work the first row in A.2 etc.

See DROPS lesson: How to read knitting diagrams

See DROPS lesson: How to read crochet diagrams

The total width of the garment (from wrist-to-wrist) will be larger in the larger sizes, despite the actual sleeves being shorter. The larger sizes have longer sleeve caps and wider shoulders, so there will be a good fit in all sizes.

The measurement sketch/schematic drawing provides information regarding the full length of the garment. If it’s a jumper or a jacket the length is measured from the highest point on the shoulder (usually closest to the neckline), and straight down to the bottom of the garment. It is NOT measured from the tip of shoulder. Similarly, the length of yoke is measured from the highest point on the shoulder and down to where yoke is split into body and sleeves.

See DROPS lesson: How to read a schematic drawing

Diagrams are often repeated on the round or in height. 1 repeat is the diagram the way it appears in the pattern. If it says to work 5 repeats of A.1 in the round, then you work A.1 a total of 5 times after/next to each other in the round. If it says to work 2 repeats of A.1 vertically/in height you work the entire diagram once, then begin again at the start and work the entire diagram one more time.

Chain stitches are slightly narrower than other stitches and to avoid working the cast-on edge too tight, we simply chain more stitches to begin with. The stitch count will be adjusted on the following row to fit the pattern and measurement sketch.

The rib edge is more elastic and will contract slightly compared to, for example, stocking stitch. By increasing before the rib edge, you avoid a visible difference in width between the rib edge and the rest of the body.

It’s very easy to cast off too tightly, and by making yarn overs while casting off (and simultaneously casting these off) you avoid a too tight cast off edge.

See DROPS video: How to bind off with yarn overs (yo)

To achieve an even increase (or decrease) you can increase on, for example: every 3rd and 4th row alternately, like so: work 2 rows and increase on the 3rd row, work 3 rows and increase on the 4th. Repeat this until the increase is complete.

See DROPS lesson: Increase or decrease 1 st on every 3rd and 4th row alternately

Should you prefer to work in the round instead of back and forth, you may of course adjust the pattern. You’ll need to add steeks mid-front (usually 5 stitches), and follow the instructions. When you would normally turn and work from the wrong side, simply work across the steek and continue in the round. At the end you’ll cut the piece open, pick up stitches to work bands, and cover the cut edges.

See DROPS video: How to knit steeks and cut open

Should you prefer to work back and forth instead of in the round, you may of course adjust the pattern so you work the pieces separately and then assemble them at the end. Divide the stitches for the body in 2, add 1 edge stitch in each side (for sewing) and work the front and back pieces separately.

See DROPS lesson: Can I adapt a pattern for circular needles into straight needles?

Pattern repeats can vary slightly in the different sizes, in order to get the correct proportions. If you’re not working the exact same size as the garment in the photo, yours might deviate slightly. This has been carefully developed and adjusted so that the complete impression of the garment is the same in all sizes.

Make sure to follow instructions and diagrams for your size!

If you have found a pattern you like which is available in women’s size it’s not very difficult to convert it to men’s size. The biggest difference will be the length of sleeves and body. Start working on the women size that you think would fit across the chest. The additional length will be worked right before you cast off for the armhole/sleeve cap. If the pattern is worked top-down you can add the length right after the armhole or before the first decrease on sleeve.

Regarding additional yarn amount, this will depend on how much length you add, but it is better with a skein too many than too few.

All yarns will have excess fibres (from production) that might come off as lint or shedding. Brushed yarns (ie hairier yarns) have more of these loose, excess fibres, causing more shedding.

Shedding also depends on what is worn under or over the garment, and whether this pulls at the yarn fibres. It’s therefore not possible to guarantee that there will be no shedding

Below are some tips on how to get the best result when working with hairier yarns:

1. When the garment is finished (before you wash it) shake it vigorously so the looser hairs come off. NOTE: do NOT use a lint roller, brush or any method that pulls at the yarn.

2. Place the garment in a plastic bag and put it in your freezer - the temperature will cause the fibres to become less attached to each other, and excess fibres will come off easier.

3. Leave in the freezer for a few hours before taking it out and shaking it again.

4. Wash the garment according to the instructions on the yarn label.

Pilling is a natural process that happens to even the most exclusive of fibers. It's a natural sign of wear and tear that is hard to avoid, and that is most visible in high friction areas of your garment like a sweater's arms and cuffs.

You can make your garment look as new by removing the pilling, using a fabric comb or a pill/lint remover.

Still can't find the answer you need? Then scroll down and leave your question so one of our experts can try to help you. This will be done normally within 5 to 10 working days.
In the meantime, you can read the questions and answers that others have left to this pattern or join the DROPS Workshop on Facebook to get help from fellow knitters/crocheters!

You might also like...

Post a comment to pattern DROPS 157-29

We would love to hear what you have to say about this pattern!

If you want to leave a question, please make sure you select the correct category in the form below, to speed up the answering process. Required fields are marked *.

Comments / Questions (59)

country flag Mari Berge Lofthus wrote:

Hi! I'm contemplating knitting this sweater, but I have not been able to find any information about how many bundles of yarn I would need for a size L. I assume you can help with this. This is also my first time trying to knit from a written pattern. Is this sweater so easy to knit that it would be a good first project for a complete beginner in reading patterns? Have a wonderful day!

10.11.2023 - 10:51

country flag Anna wrote:

Dear Drops Design! I love the pattern, but I've got stuck with the raglan increases. Where should I place the markers? For the first increase in case of the body part of the raglan (size S), I knit 4sts (mid back) then make a YO, knit 1st, pass the marker, knit another st, and make a YO, but it means I ended up in pattern A.1, and there the first st is supposed to be a purl st not a knit st. Could you, please, help me with this? Thank You!

12.11.2020 - 22:44

DROPS Design answered:

Dear Anna, we do not place markers for the raglan in this pattern, but if you want to add some, add them before and after each A.1, so that you will have in S: 5 sts, marker, A.1, marker, 3 sts (sleeve), marker, A.1, marker, 10 sts (front), marker, A.1, marker, 3 sts (sleeve), marker, A.1, marker, 5 sts (back piece). You then increase before the marker/A.1 to increase at the end of back/front/sleeves and after A.1/marker at the end of back/front/sleeves. You will either increase 4 sts (sleeves only when inc every round) or 8 sts (body and sleeves). Happy knitting!

13.11.2020 - 08:23

country flag Lauurence wrote:

Bonjour je ne comprends pas quand je dois faire les augmentations des manches et du dos et du devant . ou dois je mettre les marqueurs? pour les manches , il me semble que je dois faire une augmentation après A1 puis une avant A1 , et cela 2 fois ce qui fait bien 4 mailles en plus . mais pour le dos et le devant ou placer le marqueur? est ce que je dois augmenter a mi dos et mi devant ? ( 2 mailles et 2 mailles soit 4 mailles ) merci d avance

02.11.2020 - 11:07

DROPS Design answered:

Bonjour Laurence, désolée pour la réponse tardive, vous augmentez pour le dos et le devant à un rythme différent des augmentations pour les manches, autrement dit, en fonction de la taille vous augmenterez soit 8 mailles (= dos et devant) soit 4 mailles (manches seulement par exemple quand on augmente tous les tours alors que l'on augmente tous les 2 tours pour le dos et le devant). Bon tricot!

26.04.2021 - 13:35

country flag Laurence wrote:

Bonjour je fais ce pull En XL , pour l’augmentation des manches je dois faire un jeté de chaque côté de chaque motif A1 , donc 2 jetés x 4 motifs = 8 augmentations ? si le compte est bon il est impossible d avoir 192 mailles à la fin des augmentation car 64 mailles + 16x 4 + 16x 8 = 256 et non 192 ?? merci de m expliquer ou est l erreur , cordialement

02.11.2020 - 01:03

DROPS Design answered:

Bonjour Laurence, vous augmentez pour le dos et le devant en XL: (8+4+4) fois 4 m = 64 m au total et pour les manches: (7+5+4) fois 4 m = 64 m; vous aviez 64 m + 64+64= 192 m. Bon tricot!

02.11.2020 - 09:31

country flag Anja wrote:

Offen gestanden ist mir nicht klar, warum die Drops-Pullover immer so designt sind, als müsste Frau aussehen wie Popeye nach einer Überdosis Spinat. Ernsthaft: 38 cm Oberarmumfang bei Gr. S? In den Projekten, die ich dazu gesehen habe, haben alle Frauen entweder den Armausschnitt verkleinert oder waren am Ende sehr unzufrieden damit. Ich muss das auch jedesmal anpassen.

10.08.2020 - 14:45

country flag Eve wrote:

Bonjour, j'ai enfin compris le diagramme c est que le 1er rang est sur l envers, mais par contre je galère avec les augmentations, est ce que quand vous mettez augmentez 6x c est 6x 1m ou 6m et est ce que les augmentations des 4ème rangs s ajoutent aux augmentations des 2ème rangs ou les remplacent ? Pour les augmentations dos et devant dois-je les repartir entre le milieu et les deux bouts du travail ? MERCI

03.05.2020 - 15:15

DROPS Design answered:

Bonjour Eve, ce modèle se tricote en rond, pas en allers et retours - cf description du diagramme en rond ci-dessous. Vous augmentez différemment en fonction de la taille sur le dos/devant et sur les manches = vous augmentez en même temps soit 4 mailles seulement (manches ou dos/devant uniquement ) soit 8 mailles (manches + dos/devant). En taille S vous commencez par 6 fois tous les tours et 4 fois tous les 2 tours (= 1er tour = 8 augmentations, 2ème tour = 4 seulement). Bon tricot!

04.05.2020 - 12:48

country flag Eve wrote:

Bonjour il n'y à pas un problème avec A1 ? Ça ne me fait pas le même dessin que sur le modèle 😓

30.04.2020 - 22:36

DROPS Design answered:

Bonjour Eve, lisez-vous bien le diagramme? A.1 se tricote en rond et se répète sur 2 rangs et 9 mailles ainsi: Tour 1: 1 m env, (1 m end, 1 m env) x 3, 1 m end, 1 m env. Tour 2: 1 m env, 7 m end, 1 m env. Vous obtenez ainsi des côtes 1 m jersey endroit/ 1 m point mousse entre les 2 m envers. Bon tricot!

04.05.2020 - 09:49

country flag Anna wrote:

Buongiorno purtroppo non riesco a capire gli aumenti per il davanti e il dietro. Se seguo le vostre indicazioni : fare un gettato prima del segno due maglie rasata è un gettato vado a prendere le maglie del diagramma 1. Cosa devo fare. Grazie mille

31.12.2019 - 15:17

DROPS Design answered:

Buongiorno Anna, se fa riferimento agli aumenti sul corpo dopo la divisione del lavoro per le maniche, il diagramma A.1 non viene più lavorato: il lavoro prosegue a maglia rasata, come indicato all'inizio del paragrafo. Buon lavoro!

03.01.2020 - 12:19

country flag Ludmilla wrote:

Ang. Ärmminskn: Eller så kanske ni menar att man stickar 2 rm ihop, stickar 1 rm, överför markör, 1 rm, öhpt? I så fall har jag gjort fel, men orkar inte repa upp ärmen. Vad är fördelen med att ha 2 m mellan minskningarna? Ser det bättre ut?

22.01.2019 - 00:25

DROPS Design answered:

Hei Ludmilla. Om man har 2 masker mellom fellingen blir det mindre synlig enn om man gjør 2 fellinger rett ved siden av hverandre. Det har ikke så mye å si akkurat her, denne fellingen skjer under armen og kommer ikke til å være særlig synlig når genseren er i bruk uansett. Så lenge du har felt 1 maske på hver side av merket, og maskeantallet ditt stemmer så går dette helt fint. God fornøyelse

29.01.2019 - 08:32

country flag Ludmilla wrote:

Blir konfunderad av beskrivningen för ärmminskningen. Tycker det borde stå att man stickar 2 m ihop före markören och en öhpt efter markören. Man kan ju inte sticka 2m ihop om man gör det när det är 1 rm före markören

22.01.2019 - 00:18