
Popular categories
Looking for a yarn?


Comments / Questions (6)
![]() Sigrid wrote:
Sigrid wrote:
Hallo liebes Team von drops dedign, wenn ich mir die deutsche Anleitung eurer Seite durchlese, dann heißt es beim Umhäkeln des Ausschnitts , dass ich feste Maschen und Luftmaschen häkeln soll. Wenn ich allerdings die englische Version nehme, dann sind es double crochets = Stäbchen und Luftmaschen. Ist wohl jedem selbst überlassen, richtig?
17.11.2025 - 10:57
![]() Manuela Münz wrote:
Manuela Münz wrote:
Hallo, liebes Team. Sind die Muster mit Rückreihen oder ohne Rückreihen eingezeichnet. Danke, für eine Antwort
17.11.2024 - 08:55DROPS Design answered:
Liebe Frau Münz, die Diagramme zeigen alle Reihen, dh die Hin- sowie die Rückreihen - hier werden alle Rückreihen in M.1, in M.2 sowie in M.3 links gestrickt. Viel Spaß beim Stricken!
18.11.2024 - 08:08
![]() Kasia wrote:
Kasia wrote:
Please translate into Polish
24.01.2021 - 18:49DROPS Design answered:
Witaj Kasiu, tłumaczenie będzie gotowe w tym tygodniu. Dziękujemy za zainteresowanie naszymi wzorami :)
25.01.2021 - 10:51
![]() Elsa wrote:
Elsa wrote:
Bonjour, en taille S comment la longueur du dos est-elle de 48 cm à la fin quand on commence l'encolure à 49 cm de hauteur totale -- alors qu'il reste deux rangs à tricoter ?
11.05.2018 - 10:39DROPS Design answered:
Bonjour Elsa, la hauteur de l'encolure doit se faire à 47 cm - correction faite, merci. Bon tricot!
11.05.2018 - 11:46
![]() Chantal wrote:
Chantal wrote:
Beste, Is het mogelijk mij deze patroon in pdf of zo te mailen aub. Ik vind hem echt prachtig. Ik bezit echter geen printer en zou dit dus op een usb stick moeten kunnen zetten om het dan in een center te gaan afdrukken. Wil je me daarbij helpen? Alvast bedankt.
19.10.2012 - 19:36Michèle wrote:
Il y a une erreur dans la section "Manche droite" où vous écrivez : Pour former le raglan, diminuer 13-15-16-18 fois 1 m tous les 2 rangs puis 7-5-5-3-3 fois 1 m tous les 2 rangs. Ici, il faudrait lire....7-5-5-3-3 fois 1 m tous les rangs (et non pas tous les 2 rangs). Michèle
04.10.2012 - 22:23DROPS Design answered:
Merci Michèle, le texte a été corrigé. Bon tricot !
05.10.2012 - 09:08
|
||||||||||||||||
DROPS 73-26 |
||||||||||||||||
|
|
||||||||||||||||
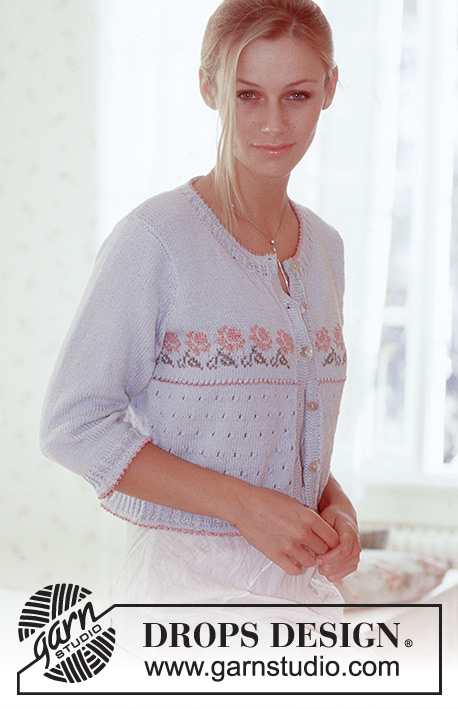
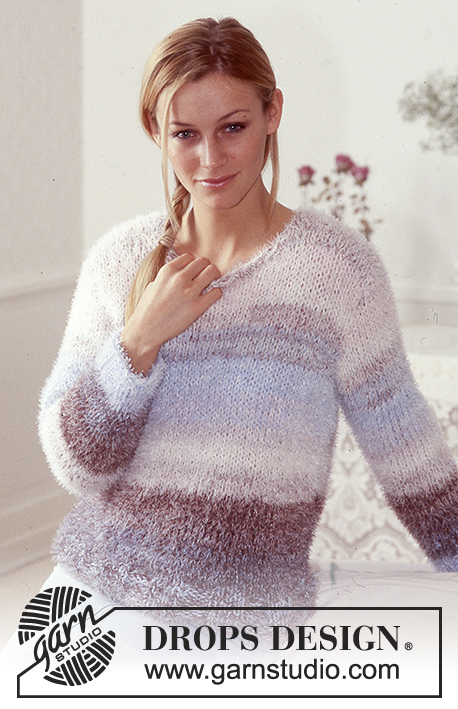
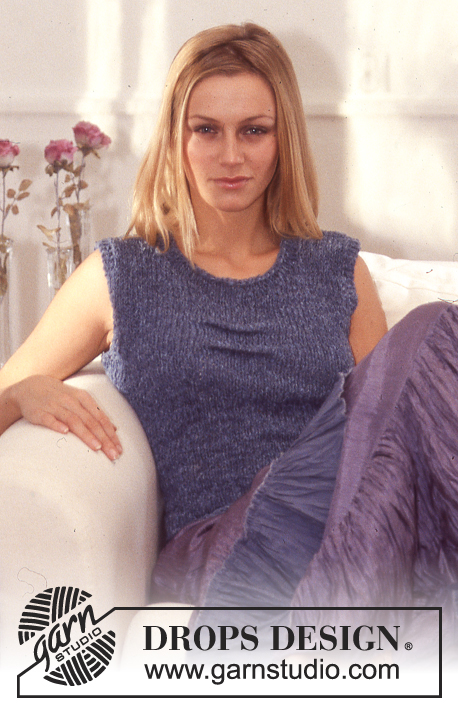
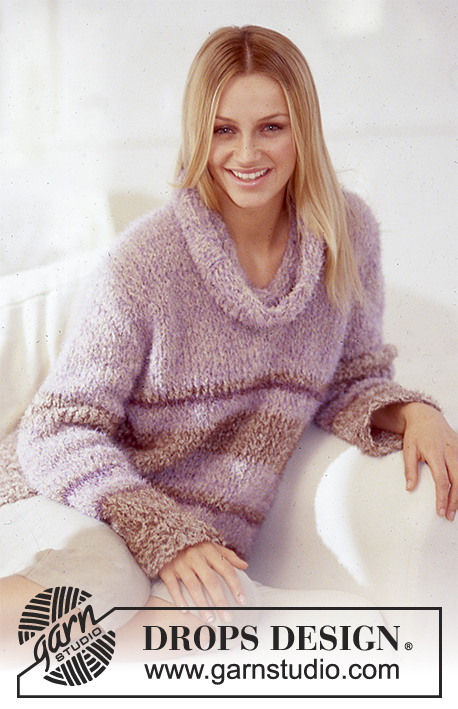
DROPS Pullover in Ribbon and Cotton-Viscose
DROPS 73-26 |
||||||||||||||||
|
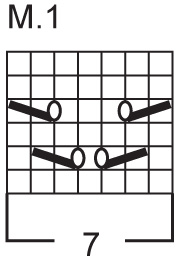
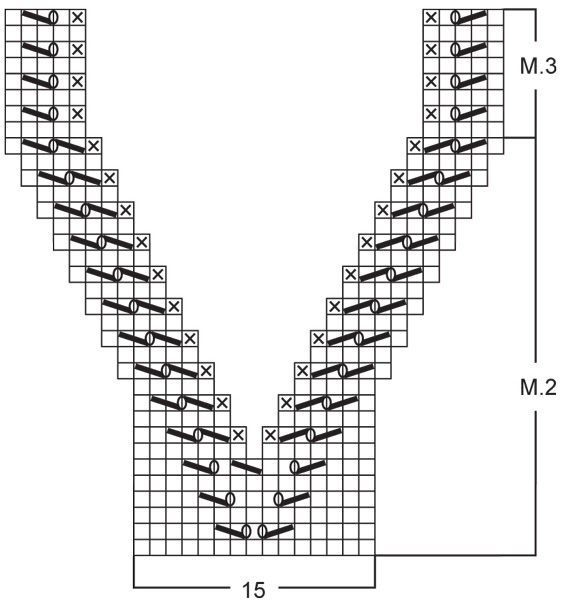
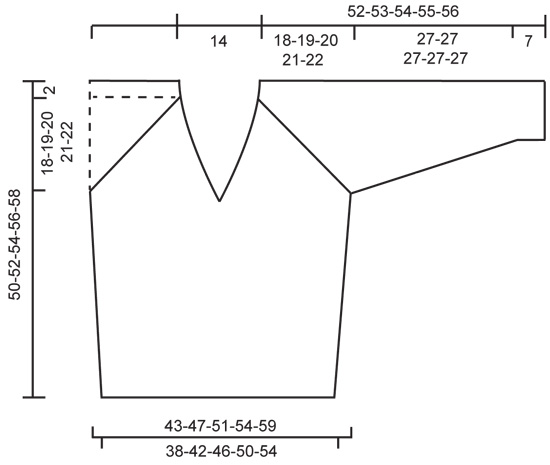
Gauge: 15 sts x 19 rows = 10 x 10 cm on larger needles in stockinette st. Knitting tip: Ribbon has a tendency to twist when knit. For best results, untwist the yarn as you go along. Garter st, when knitting flat: Knit all sts, all rows. Pattern: See charts. The pattern is seen from the right side. Knit the pattern according to chart, following Stripe Pattern below. Stripe Patterns: There are 3 different stripe patterns. Stripe Pattern 1: *12 rows Ribbon 4 rows Cotton Viscose 8 rows Ribbon 4 rows Cotton Viscose 20 rows Ribbon 8 rows Cotton Viscose 14 rows Ribbon 4 rows Cotton Viscose 6 rows Ribbon 8 rows Cotton Viscose 4 rows Ribbon 4 rows Cotton Viscose * Repeat from * - *. Stripe Pattern 2: * 20 rows Ribbon 8 rows Cotton Viscose 14 rows Ribbon 4 rows Cotton Viscose 6 rows Ribbon 8 rows Cotton Viscose 4 rows Ribbon 4 rows Cotton Viscose * Repeat from * - *. Stripe Pattern 3: * 6 rows Ribbon 8 rows Cotton Viscose 4 rows Ribbon 4 rows Cotton Viscose 8 rows Ribbon 4 rows Cotton Viscose 20 rows Ribbon 8 rows Cotton Viscose * Repeat from * - *. Knitting tips (for raglan): Dec 1 st inside of 1 edge sts: Right side rows: After 1 edge st: Slip 1 as if to knit, K 1, psso. Before 1 edge st: K 2 tog. Wrong side rows: After 1 edge st: P 2 tog. Before 1 edge st: slip 2, put back on left needle 1 by 1, twisting each, P 2 tog. -------------------------------------------------------------------- FRONT Cast on 59-65-71-77-83 sts on smaller needles with Ribbon. Knit 4 rows garter st, change to larger needles and knit the next row as follows: K 1 (edge st), 25-28-31-34-37 sts stockinette st, Pattern 1 (7 sts), 25-28-31-34-37 sts stockinette st, K 1 (edge st). Knit pattern as established according to Stripe Pattern 1 - see instructions above. When the piece measures 6 cm inc 1 st at each side every 6 cm a total of 4 times = 67-73-79-85-91 sts - knit the increased sts in stockinette st. When the piece measures approx. 30-31-32-33-34 cm -adjust to end after 1 complete repeat of Pattern 1 - and knit the next row as follows (right side row): bind off 3-4-5-6-7 sts for armhole, 23-25-27-29-31 sts stockinette st, Pattern 2 (15 sts), 23-25-27-29-31 sts stockinette st, bind off 3-4-5-6-7 sts for armhole. Read the entire next section before knitting – you will begin raglan and neck shaping at the same time: Neck shaping: Dec for the neck following Pattern 2 - on the 7th row of Pattern 2 bind off the center st - put sts on left side on a st holder and knit the right side following chart. Dec a total of 10 sts at neck edge. After all neck shaping is complete continue with Pattern 3 to finished measurements. Raglan shaping: Shape raglan inside 1 edge st - see knitting tips. Dec 1 st every other row 13 times, then every row 7-9-11-13-15 times. Now all sts are bound off and the piece measures approx. 48-50-52-54-56 cm. Left side: Put sts on st holder back on needles and knit the same as the right side - begin the 1st rows from center front (wrong side row) - start by picking up 1 st at the bound-off center st and knit together with the 1st st on the needle (this is the lower edge of the V-neck). BACK Cast on the same as front and knit stockinette st over all sts following Stripe Pattern 1 to finished measurements. Shape raglan as on front, and at the same time when the piece measures 47-49-51-53-55 cm (2 raglan decs remain and on a right side row) knit as follows over the center 19 sts: * K 2 tog, yo, repeat from * - * and finish with K 1. Then P 1 row and then on the next row bind off all sts. The piece measures approx. 48-50-52-54-56 cm. RIGHT SLEEVE Cast on 38-40-42-44-46 sts on smaller needles with Ribbon, knit 4 rows garter st. Change to larger needles and stockinette st following Stripe Pattern 2 - see instructions above. When the piece measures 7 cm inc 1 st at each side every 3.5-3.5-3-3-2.5 cm a total of 8-8-9-9-10 times = 54-56-60-62-66 sts. When sleeve measures 33 cm bind off 3-4-5-6-7 sts at each side. Then shape raglan at each side inside 1 edge st - see knitting tips. Dec 1 st every other row 13-15-16-18-19 times and then every row 7-5-5-3-3 times. At the same time when 2 decs remain knit as follows over the 6 center sts: * K 2 tog, yo * repeat from * - * a total of 3 times. Then knit 1 row stockinette st over the remaining 8 sts, bind off. The piece measures approx. 52-53-54-55-56 cm. LEFT SLEEVE Knit the same as the right but following Stripe Pattern 3. ASSEMBLY Sew raglan seams using edge sts as seam allowance - it is not intended that the stripes match up on sleeve and body. Sew sleeve and side seams using edge sts as a seam allowance. Crocheted edge: Crochet around the neck with Ribbon as follows: 1 sc in yo from previous row, * ch 1, 1 sc in the next yo from previous row *, repeat from * - * around entire neck. |
||||||||||||||||
Diagram explanations |
||||||||||||||||
|
||||||||||||||||
 |
||||||||||||||||
 |
||||||||||||||||
 |
||||||||||||||||
Have you finished this pattern?Tag your pictures with #dropspattern or submit them to the #dropsfan gallery. Do you need help with this pattern?You'll find 22 tutorial videos, a Comments/Questions area and more by visiting the pattern on garnstudio.com. © 1982-2026 DROPS Design A/S. We reserve all rights. This document, including all its sub-sections, has copyrights. Read more about what you can do with our patterns at the bottom of each pattern on our site. |
||||||||||||||||


With over 40 years in knitting and crochet design, DROPS Design offers one of the most extensive collections of free patterns on the internet - translated to 17 languages. As of today we count 324 catalogs and 12285 patterns - 12275 of which are translated into English (US/in).
We work hard to bring you the best knitting and crochet have to offer, inspiration and advice as well as great quality yarns at incredible prices! Would you like to use our patterns for other than personal use? You can read what you are allowed to do in the Copyright text at the bottom of all our patterns. Happy crafting!
Post a comment to pattern DROPS 73-26
We would love to hear what you have to say about this pattern!
If you want to leave a question, please make sure you select the correct category in the form below, to speed up the answering process. Required fields are marked *.