
Popular categories
Looking for a yarn?


Comments / Questions (19)
![]() Petra Marquardt wrote:
Petra Marquardt wrote:
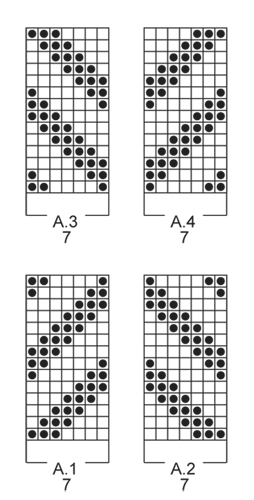
Wie hier öfters beschrieben muss in derMitte 8 Maschen gestrickt werden die aber nicht ins Diagramm gehören Die Diagramme werden innerhalb 7 Maschen gearbeitet die mittleren Maschen bleiben nach der Anleitung unangetastet das verstehen soviele hier nicht so kann man das Muster nicht arbeiten die mittleren 8 Maschen bleiben uneingeschränkt bestehen
13.04.2025 - 15:58DROPS Design answered:
Liebe Frau Marquardt, ganz am Anfang, wenn mann die Diagramme strickt, sind es 8 M (in 2. Größe) die glatt rechts gestrickt werden, aber wenn man die Diagramme weiterschickt werden sich die Diagonalen in der Mitte "treffen", so daß alle Maschen mit rechten/linken Maschen gestrickt werden. Viel Spaß beim Stricken!
22.04.2025 - 08:40
![]() Anna wrote:
Anna wrote:
Hei haluaisin tehdä tähän raglanhihat, mitenköhän se olisi mahdollista? Hi I would like to change sleeves to raglan sleeves, how could I do it?
21.10.2020 - 00:13
![]() Allison wrote:
Allison wrote:
I al making size XXXL. The pattern says do A2 6 times then 4 stitches stockinette stitch, and A1 6 times. Eventually the points should meet, but the 4 stockinette stitches are still in the middle. Am I supposed to decrease those at some point while I am following the chart?
31.03.2019 - 06:18DROPS Design answered:
Dear Allison, you don't have to decrease any stitches in the middle, when repeating the diagrams in height, these 4 sts will then be worked into the pattern creating the tip. Happy knitting!
01.04.2019 - 13:04
![]() Lela Zaranec wrote:
Lela Zaranec wrote:
I'm confused about the pattern too. I don't understand how the middle stitches disappear as you work the pattern vertically. Are you supposed to then work part of the diagram into the stockinette stitches on both sides? Also shouldn't the pattern go A1 then A2 so you get the point? I wish there was a picture of the back too.
19.11.2017 - 01:10DROPS Design answered:
Dear Mrs Zaranec, working A.1 and A.2 as explained will create diagonals with K andn P sts meeting tog mid on piece. Happy knititng!
20.11.2017 - 09:23Vanda wrote:
Hallo, can this pattern work without any adjustments with 1 strand of Melody instead of 2 strands of Brushed Alpaka Silk? Thanks.
26.01.2016 - 14:20DROPS Design answered:
Dear Vanda. Yes, that should be no problem, but don't forget to knit a sample anyway to check your gauge.
26.01.2016 - 14:24
![]() Lisa wrote:
Lisa wrote:
Hi, to be a bit more clear about my question, I don't understand how to make the pattern meet, when there are 8 stockinette stitches in the middle? What happens to those 8 stitches as I keep going vertically with the pattern? If I don't decrease those 8 stitches, there will be a break in the middle of the pattern that goes all the way up the whole sweater, unless I'm missing something?
24.12.2015 - 18:26DROPS Design answered:
Dear Lisa, at the beg on A.2/A.1 you will have 8 stocking sts between both diagrams in the middle, but repeating diagrams vertically, the pattern will meet on mid back = you will get a tip of reverse stocking st in the middle. Happy knitting!
02.01.2016 - 13:39
![]() Lisa wrote:
Lisa wrote:
So am I supposed to figure out when to reverse the stockinette? There are no instructions that I can see that say to repeat the 8 stitches for a certain number of rows and then reverse the stockinette. Should I be following an exact pattern as written or am I supposed to figure it out myself?
24.12.2015 - 04:06DROPS Design answered:
Dear Lisa, you work both diagrams A.2 and A.1 as explained and repeat displacement vertically until displacement meet at the middle of piece. Happy knitting!
02.01.2016 - 13:32
![]() Lisa wrote:
Lisa wrote:
Hi, I love this sweater but the pattern is not working for me. If I try to get the pattern to work for size "medium" there are 8 stockinette stitches between the pattern that create a thick stripe down the middle of the front and back. I can't figure out how to get the pattern right unless I make size "large" which has "0" stockinette stitches. Please let me know if I'm reading this wrong? I would love to get the pattern to work. Thanks! Lisa
20.12.2015 - 22:20DROPS Design answered:
Dear Lisa, that's correct, working the diagrams upwards will then create the "tip" in reverse stocking sts (= in P st) as you can see in the photo on the model (size M is here shown). Happy knitting!
21.12.2015 - 11:21
![]() Lillan Öhrn wrote:
Lillan Öhrn wrote:
Tycker det låter väldigt konstigt i mängd av garn! Det kraftiga garnet i 50 gr. nystan Drops Cloud skall det vara 750gr. av i storlek XL i Drops Brushed Alpaca (tror det är 25g. nystan) skall det bara vara 450 gr. fast man skall sticka med 2 trådar. I mina öron verkar detta inte stämma alls det borde väl vara mycket mer i det garnet eller??? Kanske jag tänker fel... Mvh Lillan
27.10.2014 - 19:12DROPS Design answered:
Jo Lillan, der er jo mange flere meter på 25gr i det tyndere garn. Se her hvordan man regner garnforbruget ud: I str XL skal du bruge følgende i Cloud: 750g = 15 nøgler x 80m = 1200 m Du deler 1200 med antal meter pr nøgle i Brushed Alpaca Silk 140 og får 8,5 nøgler det ganger du med 2 da du bruger dobbelt tråd = 17,14 nøgler á 25g = 428 gr (som vi da er nødt til af afrunde til 450 gr for at være sikker på at der er nok garn). Held og lykke!
28.10.2014 - 10:27
![]() Kari Bonnichsen wrote:
Kari Bonnichsen wrote:
Er den angivne mængde garn for bruched alpaka korrekt? Ser ulogisk ud at man skal bruge meget mere af det tykkere cloud når man tager i betragtning at man skal bruge 2 tråde af alpaka
27.10.2014 - 12:52DROPS Design answered:
Hej Kari Jo det stemmer, husk at 50 g Cloud = 80 m og Brushed Alpaca Silk ligger i 25 g nøgler og indeholder 140 m. God fornøjelse!
28.10.2014 - 09:00
|
|||||||
By The Lake#bythelakesweater |
|||||||
|
|
|||||||
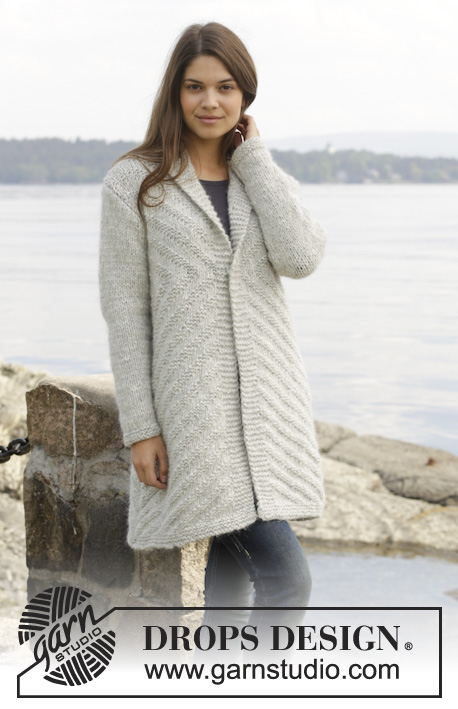
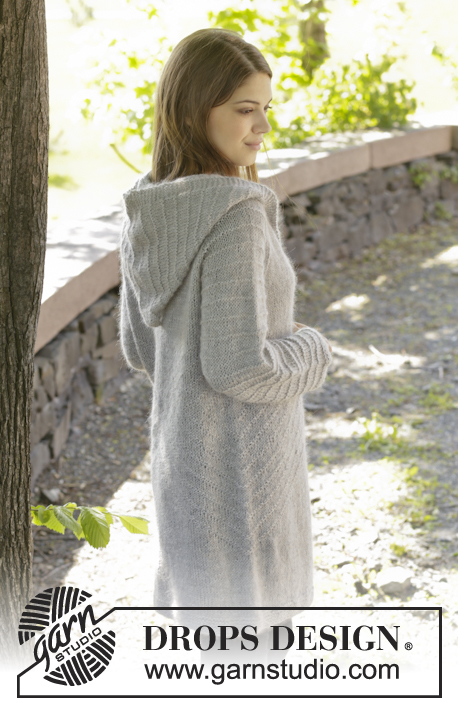
Knitted DROPS jumper with textured pattern in 1 strand ”Cloud” or 2 strands ”Brushed Alpaca Silk”. Size: S - XXXL.
DROPS 157-7 |
|||||||
|
GARTER ST (back and forth on needle): K all rows. 1 ridge = K2 rows. DECREASE TIP: All dec are done from RS. Dec 1 st at beg of row as follows: 1 edge st in garter st, slip next st as if to K, K 1, psso. Dec 1 st at end of row as follows: Work until 3 sts remain on needle, K the next 2 sts tog, 1 edge st in garter st. PATTERN: See diagram A.1-A.4, diagrams show all rows in pattern seen from RS. INCREASE TIP: Inc 1 st by making 1 YO, on next row work YO twisted to avoid holes. ---------------------------------------------------------- BACK PIECE: Worked back and forth on needle. Cast on 62-66-72-76-86-90 sts (includes 1 edge st in each side) on circular needle size 7 mm / US 10.75 with 1 strand Cloud or 2 strands Brushed Alpaca Silk. Work 3 ridges in GARTER ST - see explanation above. Switch to circular needle size 8 mm / US 11. Work as follows from RS: 1 edge st in garter st, A.2 (= 7 sts) 4-4-5-5-6-6 times in width, stockinette st over the next 4-8-0-4-0-4 sts, A.1 (= 7 sts) 4-4-5-5-6-6 times in width, 1 edge st in garter st. Work edge sts in the sides in garter st until finished measurements. REMEMBER THE GAUGE! Repeat displacement in A.1-A.2 vertically until displacement meet mid back. When piece measures 12 cm / 4¾", dec 1 st inside 1 edge st in each side - READ DECREASE TIP. Repeat dec every 7-7½-7-8½-6½-9 cm / 2¾"-2⅞"-2¾"-3¼"-2½"-3½" 6-6-7-6-8-6 more times = 48-52-56-62-68-76 sts. AT THE SAME TIME when piece measures 50-51-52-53-54-55 cm / 19¾"-20"-20½"-21"-21¼"-21⅝", adjust so that 1 whole or half repetition of A.1-A.2 has been worked, work A.4 over A.2 and A.3 over A.1 until finished measurements. When piece measures 61-63-65-67-69-71 cm / 24"-24¾"-25½"-26⅜"-27⅛"-28", bind off for armholes at the beg of every row in each side as follows: bind off 3 sts 0-0-1-1-1-1 time, 2 sts 1-1-1-1-2-3 times, and 1 st 2-3-1-3-3-4 times = 40-42-44-46-48-50 sts. When piece measures 78-81-84-87-90-93 cm / 30¾"-32"-33"-34¼"-35½"-36½", bind off the middle 14-14-14-16-16-16 sts for neck and finish each shoulder separately. On next row from the neck, bind off 1 st = 12-13-14-14-15-16 sts remain for shoulder. Loosely bind off all sts when piece measures 80-83-86-89-92-95 cm / 31½"-32¾"-33⅞"-35"-36¼"-37⅜". FRONT PIECE: Cast on and work as back piece. When piece measures 72-75-76-79-80-83 cm / 28½"-29½"-30"-31"-31½"-32¾", slip the middle 10-10-10-12-12-12 sts on a stitch holder for neck and finish each shoulder separately. Then bind off on every row from neck as follows: 2 sts 1 times and 1 st 1 time = 12-13-14-14-15-16 sts remain for shoulder. Loosely bind off all sts when piece measures 80-83-86-89-92-95 cm / 31½"-32¾"-33⅞"-35"-36¼"-37⅜". SLEEVE: Worked back and forth on needle. Cast on 26-26-30-30-34-34 sts (includes 1 edge st in each side) on circular needle size 7 mm / US 10.75 with 1 strand Cloud or 2 strands Brushed Alpaca Silk. Work 3 ridges. Switch to circular needle size 8 mm / US 11. Then work in stockinette st with 1 edge st in garter st in each side. When piece measures 9 cm / 3½", inc 1 st - Read INCREASE TIP - inside 1 edge st in each side. Repeat inc every 6½-4½-5-4½-5-4 cm / 2⅞"-1¾"-2"-1¾"-2"-1½" 6-8-7-8-7-8 times in total = 38-42-44-46-48-50 sts. When piece measures 47-46-45-44-43-43 cm / 18½"-18"-17¾"-17¼"-17"-17" (shorter measurements in the larger sizes because of longer sleeve cap), bind off at beg of every row in each side for sleeve cap as follows: 3 sts 1 time, 2 sts 1 time and 1 st 3-3-4-5-6-5 times. Then bind off 2 sts in each side until piece measures approx. 56 cm / 22", then bind off 3 sts 1 time in each side. Bind off the remaining sts, the piece measures approx. 57 cm / 22½". ASSEMBLY: Sew right shoulder seam. NECK EDGE: Worked back and forth on needle. Pick up 50 to 60 sts (includes sts on stitch holder) on circular needle size 7 mm / US 10.75 with 1 strand Cloud or 2 strands Brushed Alpaca Silk. Work 2 ridges. Bind off. ASSEMBLY: Sew left shoulder seam and neck edge. Sew in the sleeves in outer loops of edge sts. Sew sleeve and side seams in one inside 1 edge st. |
|||||||
Diagram explanations |
|||||||
|
|||||||
 |
|||||||
 |
|||||||
Have you finished this pattern?Tag your pictures with #dropspattern #bythelakesweater or submit them to the #dropsfan gallery. Do you need help with this pattern?You'll find 21 tutorial videos, a Comments/Questions area and more by visiting the pattern on garnstudio.com. © 1982-2026 DROPS Design A/S. We reserve all rights. This document, including all its sub-sections, has copyrights. Read more about what you can do with our patterns at the bottom of each pattern on our site. |
|||||||


With over 40 years in knitting and crochet design, DROPS Design offers one of the most extensive collections of free patterns on the internet - translated to 17 languages. As of today we count 325 catalogs and 12298 patterns - 12288 of which are translated into English (US/in).
We work hard to bring you the best knitting and crochet have to offer, inspiration and advice as well as great quality yarns at incredible prices! Would you like to use our patterns for other than personal use? You can read what you are allowed to do in the Copyright text at the bottom of all our patterns. Happy crafting!
Post a comment to pattern DROPS 157-7
We would love to hear what you have to say about this pattern!
If you want to leave a question, please make sure you select the correct category in the form below, to speed up the answering process. Required fields are marked *.