
Popular categories
Looking for a yarn?


Comments / Questions (56)
![]() Chantal Maillard wrote:
Chantal Maillard wrote:
Bonjour, où trouver la vidéo car je ne comprends pas toutes les explications. Notamment, pour tricoter le devant droit en relevant les mailles du dos ? Merci de m'éclairer.
16.03.2024 - 16:15DROPS Design answered:
Bonjour Mme Maillard, il n'existe pas de vidéo spécifique à cette technique, suivez attentivement les indications sous ASTUCE POUR RELEVER LES MAILLES :, autrement dit, en fin de rang sur l'endroit, relevez 1 maille au bord du dos, mettez cette maille sur l'aiguille droite et passez la dernière maille tricotée par-dessus la maille relevée (ainsi on n'augmente pas de mailles). Bon tricot!
18.03.2024 - 08:53
![]() Grit wrote:
Grit wrote:
Ich bin jetzt am Anfang des rechten Randteils, beim Stricken der verkürzten Reihen ist auf dem Foto ein Muster (Löcher) erkennbar, was bei mir nicht entsteht, wenn ich das Anleitungsvideo "Verkürzte Reihen kraus rechts" benutze. Gibt es da einen Trick? Vielen Dank
16.02.2023 - 17:00DROPS Design answered:
Liebe Grit, diese Löcher entstehen, wenn man diese Technik für verkürzten Reihen strickt, je mehr die erste Masche festgezogen wird, desto weniger wird das Loch. Viel Spaß beim stricken!
17.02.2023 - 11:30
![]() Ruth wrote:
Ruth wrote:
Hola! Tengo una pregunta la verdad no se como empezar a tejer, el patrón dice que tengo que montar puntos para la espalda pero que también tengo que unir con las delanteras izquierda y derecha ahi es donde no entiendo tengo que tener ya tejidas las delanteras para poder tejer la espalda la verdad estoy muy perdida no se como empezar de antemano agradezco su ayuda saludos.
30.06.2022 - 19:40DROPS Design answered:
Hola Ruth, primero trabajas la espalda. Cuando terminas la espalda, montas puntos para el delantero. Empiezas a trabajar el delantero en punto musgo y al mismo tiempo, lo unes a la parte de la espalda. Cuando trabajas por el lado derecho, al final de la fila, levanta 1 punto en el borde de la espalda, pasar el punto levantado a la aguja derecha y montar el último punto del delantero sobre el punto levantado de la espalda. Es decir, unimos el delantero y la espalda a la vez que tejemos el delantero. También puedes unir según el siguiente vídeo, trabajando 2pjd en vez de disminución simple: https://www.garnstudio.com/video.php?id=482&lang=es.
04.07.2022 - 19:37
![]() Tony And Linda Simmonds wrote:
Tony And Linda Simmonds wrote:
I am thinking about making this but would like to use a finer yarn that would normally use 3.25mm needles. What size difference would I need to make i.e would I go up 1 or 2 sizes? Also, I would like to add sleeves. Do you think this is possible and how would you suggest please. Thank you
11.02.2022 - 22:29DROPS Design answered:
Dear Tony and Linda, you would need to check the gauge by working one with your thread and needles, to compare it to the one in the pattern and then calculate which would be the proportional size taking into account the gauge. We don't make personalized patterns. Happy knitting!
13.02.2022 - 19:56
![]() Kopanyicza Gyöngyi wrote:
Kopanyicza Gyöngyi wrote:
Hogyan kell rövidített sorokat kötni? Mi lesz a többi szemmel? Üdv: Gyöngyi
31.01.2022 - 16:44DROPS Design answered:
Hi, if you could write your question in English, we will try to answer :)
22.04.2022 - 11:46
![]() Ragnhild Jordet wrote:
Ragnhild Jordet wrote:
Hva menes med garngruppe A+A? På bildet er angitt farge nr 38, korall i foreslått garntype (bomull), mens i fargekartet er farge nr 38 kalt bringebær; er dette samme farge? Hvordan holder fasongen seg i vask, ved bruk av foreslått bomullsgarn?
07.03.2021 - 09:43DROPS Design answered:
Hei Ragnhild, Under garngruppen er Parisgarnet fra gruppe C (som beskriver tykkelsen). Man kan erstatte et garn fra gruppe C med et annet garn fra samme gruppa, eller ved å bruke et garn fra Gruppe A og strikke med dobbelt garn (A+A). Farge 38 er Bringebær og er den samme fargen. Det er et høykvalitetsgarn som holder bra på fasongen. God fornøyelse!
08.03.2021 - 07:20
![]() Åse Søviknes wrote:
Åse Søviknes wrote:
Høyre forstykke str L Riller bakre arm (rygg) blir 7m + (1+6 økte masker) = 14 m Riller forstykke arm blir 4 m + (6 m økte masker) = 10 m Hva har jeg misforstått ?
19.12.2019 - 22:27DROPS Design answered:
Hej Åse, du øger lige mange masker i riller på rygstykket som på forstykket. God fornøjelse!
10.02.2020 - 15:26
![]() Gunilla Lindblad wrote:
Gunilla Lindblad wrote:
På sid 3 i mönstret står det " upprepa tills ar 1:a m som är ökt till armb. Eftersom jag inte förstod detta gick jag in på den engelska översättningen och där stod det kort och gott: repeat until piece measures 36 cm, Ni kanske bör ändra i den svenska varianten?
09.07.2019 - 13:25DROPS Design answered:
Hej. Tack för info, det har nu korrigerats på den svenska översättningen. Mvh DROPS Design
10.07.2019 - 13:34
![]() Carol wrote:
Carol wrote:
I am so confused. On the side (right or left) when one row is worked across in pattern with eg 7 sts, A1 - 4 times, 9 sts: then begin two rows, 25 sts ( A1 - 2 times in total) : two rows 34 sts (A1 - 3 times in total). Now two rows over all. The result over these last two rows do not line up with the A1 pattern. The stitches over the 3rd A1 are 2 rows behind pattern repeat. What is the secret to complete.
20.05.2019 - 18:20DROPS Design answered:
Dear Carol, you work A.1 on all this row, let's say on row 1 of the short rows you work row 1 in the first 2-3-3-4 A.1, you will work row 2 of A.1 over these 2-3-3-4 repeats on next row, then work row 3 in A.1 over the 2-3-3-4 first A.1, then row 1 over the next repeat (= 3-4-4-6 repeats on this row), turn and work row 2 over 1 repeat, row 4 over the next 2-3-3-4 repeats, on next row over all sts, work row 5 over the first 2-3-3-4 repeats, row 3 over next repeat and row 1 over the remaining repeat. ie you have to continue each repeat following the previous row worked on this repeat, not same row for all repeats so that the pattern will be the same on all repeats. Happy knitting!
21.05.2019 - 09:44
![]() Carol wrote:
Carol wrote:
I am starting the left side piece and am about to k7 sts (band) then continues with A1(4-5-5-6) times, finish with 9-4-8-3 sts. My question is, are there no sts worked between each A1?
09.05.2019 - 18:37DROPS Design answered:
Dear Carol, left front piece will be worked reversed/mirored to the right front piece, ie short rows will start from WS, then when working A.1 you will work from RS: 9-4-8-3 sts in garter st, repeat A.1 a total of 4-5-5-6 times and finish with 7 sts in garter st for front band. Then short rows will also be worked the same way but starting from WS (instead of from RS). Happy knitting!
10.05.2019 - 09:08
|
|||||||||||||||||||||||||||||||||||||
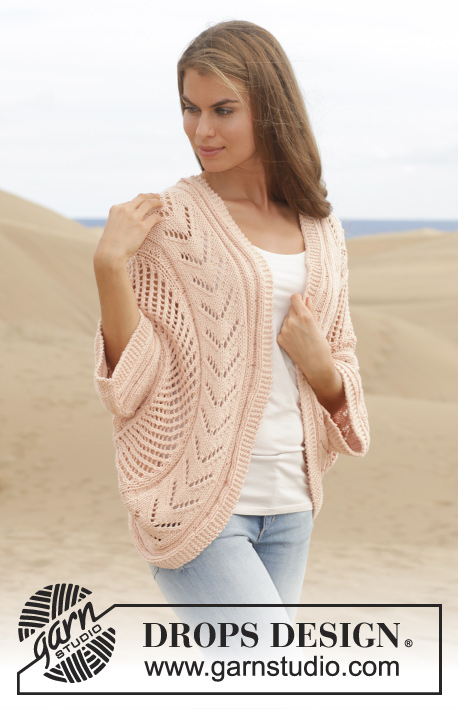
Evangeline#evangelinecardigan |
|||||||||||||||||||||||||||||||||||||
 |
 |
||||||||||||||||||||||||||||||||||||
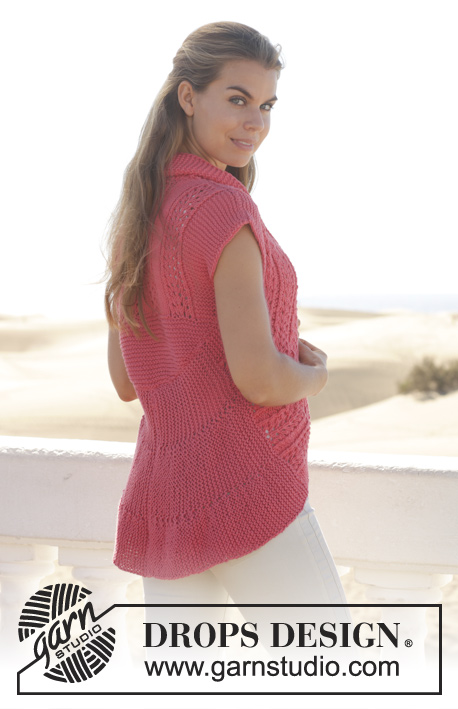
Knitted DROPS vest in garter st worked in a circle with lace pattern in "Paris". Size: S - XXXL.
DROPS 154-35 |
|||||||||||||||||||||||||||||||||||||
|
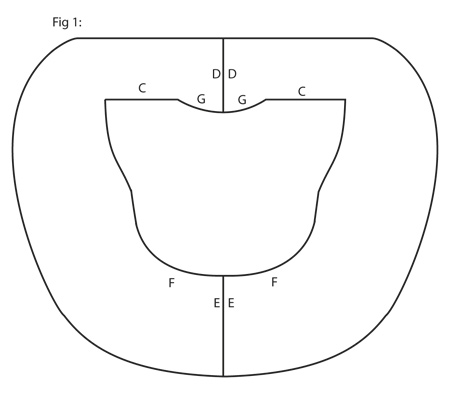
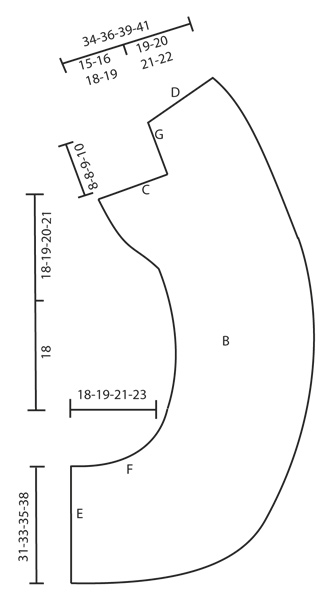
GARTER ST (back and forth on needle): K all rows. 1 ridge = K2 rows. PATTERN: See diagram A.1 (= 9 sts). The diagram shows all rows in pattern seen from RS. MEASURING TIP: All length measurements are done along the shorter side. INCREASE TIP: All inc are done from RS. Inc inside first st in garter st towards the side and work the inc sts in garter st. Inc by making 1 YO, on next row K YO twisted (i.e. work in back loop of st instead front) to avoid holes. PICK UP TIP: Right edge piece: * Pick up 1 st in outer loop of next st/row on back piece at the end of row from RS with left needle, slip the new st on to right needle and pass the st last worked over the new st, work 1 ridge *, repeat from *-* on every row from RS (i.e. edge piece is now worked tog with back piece). NOTE: To make the pattern fit on back piece there is 1 more ridge on right edge piece than on left edge piece. Left edge piece: Pick up as on right but beg at beg of every row from RS. ---------------------------------------------------------- VEST: The vest is worked in 3 parts: 1 back piece (A) + 2 edge pieces (B) are worked from mid back of back and end mid back of neck. These are worked tog with back piece and then sewn tog into a ring - see fig.1. BACK PIECE: Worked back and forth on needle. Cast on 29-33-39-47 sts on circular needle size 5 mm / US 8 with Paris. Insert 1 marker after 15-17-20-24 sts. Fasten right and left edge piece tog with back piece on each side of marker. Work in GARTER ST – see explanation above AT THE SAME TIME cast on 2 sts in each side of piece at the end of the next two rows, repeat inc in each side 2 more times, then cast on 1 st in each side of piece at the end of the next two rows, repeat inc 9 more times = 61-65-71-79 sts on needle. Then work as follows on next row from RS: 5-7-3-7 sts in garter st, A.1 (= 9 sts), * 5 sts in stockinette st, A.1 *, repeat from *-* 3-3-4-4 times in total, finish with 5-7-3-7 sts in garter st. Continue pattern vertically. When piece measures 14-13-13-12 cm/5½"-5"-5"-4¾" and 15-14-14-13 cm / 6"-5½"-5½"-5", inc 1 st in each side = 65-69-75-83 sts on needle (= on 1st or 4th row in A.1) – work the inc sts in garter st. When piece measures 16-15-15-14 cm / 6¼"-6"-6"-5½", inc 1 st for sleeve in each side – READ INCREASE TIP! Repeat inc every 2 rows a total of 6 times. When all inc are done, there are 77-81-87-95 sts on needle (= on 1st or 4th row in A.1). When piece measures 30-30-31-31 cm / 11¾"-11¾"-12¼"-12 1/" - adjust after 1 repetition of A.1 vertically - bind off the middle 21-23-25-27 sts for neck and finish each shoulder separately. Continue to bind off 1 st on next row towards the neck = 27-28-30-33 sts remain on each shoulder. Continue with pattern over the remaining sts. Bind off when piece measures 32-32-33-33 cm / 12½"-12½"-13"-13", adjust after 1 repetition vertically. RIGHT EDGE PIECE: Worked back and forth on needle. Cast on 52-56-60-64 sts on circular needle size 5 mm / US 8 with Paris. Cast-on edge is marked with E on chart. Work in garter st AT THE SAME TIME work edge piece tog with back piece from marker – SEE PICK UP TIP - AT THE SAME TIME work short rows, beg from RS as follows: * Work 2 rows over all sts, then work 2 rows over the first 34-36-40-42 sts, then 2 rows over the first 17-18-20-21 sts *, repeat from *-* until piece measures 18-19-21-23 cm / 7"-7½"-8¼"-9" at the shortest – READ MEASURING TIP. READ ALL OF THE FOLLOWING SECTION BEFORE CONTINUING! Continue the pick up AT THE SAME TIME work as follows on next row from RS: 7 sts in garter st (= band), A.1 4-5-5-6 times in total, finish with 9-4-8-3 sts in garter st AT THE SAME TIME when piece measures 19-20-22-24 cm / 7½"-8"-8¾"-9½", work as follows from RS: * 2 rows over the first 25-34-34-43 sts (7 sts in garter st, A.1 2-3-3-4 times in total), 2 rows over the first 34-43-43-52 sts (7 sts in garter st, A.1 3-4-4-5 times in total), 2 rows over all sts *, repeat from *-* until piece measures 36-37-39-41 cm / 14¼"-14½"-15¼"-16" - Remember MEASURING TIP. The short rows are done. Pick up is finished when sts have been picked up until 1st inc st for sleeve on back piece. Continue with pattern. When pick up is done, inc for sleeve in the side as on back piece (= 6 sts inc) = 58-62-66-70 sts on needle (= on 1st or 4th row in A.1). Then work pattern and in garter st over all sts. When piece measures 54-56-59-62 cm / 21¼"-22"-23¼"-24½", bind off the outermost 27-28-30-33 sts in the left side for shoulder - adjust after 1 repetition of A.1 vertically = 31-34-36-37 sts remain for shawl collar. Work the rest of row. Now measure piece from here. Now continue piece in garter st. Work as follows from RS: * 2 rows over the first 23-26-28-29 sts, 2 rows over all sts *, repeat from *-* until finished measurements. Bind off when piece measures 7-8-8-9 cm / 2¾"-3"-3"-3½" (measured on the shortest side). LEFT EDGE PIECE: Cast on and work as right but reversed. ASSEMBLY: - See chart. Sew in outer loops of edge sts, and make sure to avoid a tight edge. Sew the edge pieces tog in bottom edge (E to E) and in neck (D to D). Fasten edge piece to back piece by sewing shoulder seams (C) and edge piece up to back piece (G) in the back of neck. |
|||||||||||||||||||||||||||||||||||||
Diagram explanations |
|||||||||||||||||||||||||||||||||||||
|
|||||||||||||||||||||||||||||||||||||
 |
|||||||||||||||||||||||||||||||||||||
 |
|||||||||||||||||||||||||||||||||||||
 |
|||||||||||||||||||||||||||||||||||||
Have you finished this pattern?Tag your pictures with #dropspattern #evangelinecardigan or submit them to the #dropsfan gallery. Do you need help with this pattern?You'll find 19 tutorial videos, a Comments/Questions area and more by visiting the pattern on garnstudio.com. © 1982-2026 DROPS Design A/S. We reserve all rights. This document, including all its sub-sections, has copyrights. Read more about what you can do with our patterns at the bottom of each pattern on our site. |
|||||||||||||||||||||||||||||||||||||


With over 40 years in knitting and crochet design, DROPS Design offers one of the most extensive collections of free patterns on the internet - translated to 17 languages. As of today we count 324 catalogs and 12290 patterns - 12280 of which are translated into English (US/in).
We work hard to bring you the best knitting and crochet have to offer, inspiration and advice as well as great quality yarns at incredible prices! Would you like to use our patterns for other than personal use? You can read what you are allowed to do in the Copyright text at the bottom of all our patterns. Happy crafting!
Post a comment to pattern DROPS 154-35
We would love to hear what you have to say about this pattern!
If you want to leave a question, please make sure you select the correct category in the form below, to speed up the answering process. Required fields are marked *.