
Popular categories
Looking for a yarn?


Comments / Questions (92)
![]() Martina wrote:
Martina wrote:
Dobrý den, prosím, je tento návod z jednoho obdélníku či ze dvou obdélníků....🤔
05.07.2023 - 20:46DROPS Design answered:
Dobrý den, Martino, pončo je z 1 obdélníku - je obtočený kolem zad, jedna jeho krátká strana je na prsou sešitá s horním okrajem dlouhé strany, druhá krátká strana pak tvoří jednu stranu trojúhelníku - předního cípu. Pohodové háčkování! Hana
06.07.2023 - 04:48
![]() Hanneke wrote:
Hanneke wrote:
Leuk patroon om te haken, maar de hals zit niet netjes. Is teveel ruimte over, plooit. Op allerlei manieren aan elkaar gemaakt maar blijft rommelig. Nu maar gewoon als brede sjaal gebruiken.
23.08.2022 - 16:17
![]() Melanie wrote:
Melanie wrote:
I've noticed that with most of the patterns, after working chain stitches, the first row always seems to consist of working stitches over x amount of chains, then skipping 1 chain then repeating, why is this?
05.06.2021 - 12:14DROPS Design answered:
Dear Melanie, the first row always depends on the design. maybe the designer thinks the reasulting fabric will be softer, or it will be easier to follow the pattern. Happy Crafting!
07.06.2021 - 03:40
![]() Martha Salazar wrote:
Martha Salazar wrote:
Podrias decirnos las medias del rectángulo, antes de ensablarlo para una talla XL. Gracias
21.03.2021 - 21:03DROPS Design answered:
Hola Martha, las medidas para la talla XL son: ancho = 30cm y largo = 119 cm. Las medidas vienen en el apartado de materiales del patrón.
28.03.2021 - 20:30
![]() Toñi wrote:
Toñi wrote:
La verdad es que las indicaciones no estan nada claras. Sino tienes un poco de idea en crochet, es muy dificil seguir las explicaciones.
12.10.2020 - 22:38
![]() Juullss wrote:
Juullss wrote:
Har jag förstått det rätt, att på en rad gör jag en rep av A1, sen repeterar jag A2 igen o igen tills jag kommit upp i rätt antal stygn kvar, då gör jag en rep av A3? Sen på tillbakavägen så börjar jag med A3, sen flera rep av A2 o sist en rep av A1? Mvh Julia
25.10.2019 - 21:37DROPS Design answered:
Hei Julia. Ja, det stemmer :) God Fornøyelse!
28.10.2019 - 11:47
![]() Julia wrote:
Julia wrote:
Hej! Jag är vänsterhänt. Virkar jag från vänster till höger då på rätsidan? Och har jag förstått rätt att jag virkar A2 upprepade gånger i mitten och en repetition av A1 och A3 på varsin sida om? Med vänlig hälsning, Julia
02.10.2019 - 11:40DROPS Design answered:
Hej Julia, jag skulle tro att man virkar åt samma håll som mönstret är skrivit.... Fråga gärna i DROPS Workshop på Facebook :)
02.10.2019 - 12:27
![]() Julia wrote:
Julia wrote:
Hej! Jag undrar om någon kan säga vad som är sista stygnet i A2, om dubbelstolpen ska tillhöra A2 eller är första stygnet i A3? Med vänlig hälsning, Julua
01.10.2019 - 22:19DROPS Design answered:
Hej Julia, i A.2 virkar du 2 dbl-st i en m, virkar 3 lm, hoppar över 3m, 2 dbl-st, virkar 3 lm, hoppar över 3m osv. Lycka till :)
02.10.2019 - 11:00
![]() Sharon Warren wrote:
Sharon Warren wrote:
I bought this pattern recently and I cannot read a graph. Do you have a written pattern? Thank you in advance.
04.06.2019 - 02:22DROPS Design answered:
Hi Sharon. This pattern is only available as a diagram, unfortunately. You read the diagram from bottom to top, from right to left. 1 symbol = 1 stitch (specified in the symbol definition). You can read more about how to read a crochet diagram here. Happy crafting
04.06.2019 - 07:15
![]() Ingrid wrote:
Ingrid wrote:
Met welke steek naai je de uiteinden van de poncho best tegen elkaar ?
08.04.2019 - 03:44DROPS Design answered:
Dag Ingrid,
Dit kun je met maassteken doen. Bij de video's die bij dit patroon staat, vind je ook een video waarin uitgelegd wordt hoe je een halswarmer in elkaar naait. Hoewel deze video over een breiwerk gaat, kun deze techniek ook toepassen op haakwerk.
09.04.2019 - 21:00
|
||||||||||||||||
Atardecer#atardecer |
||||||||||||||||
|
|
||||||||||||||||
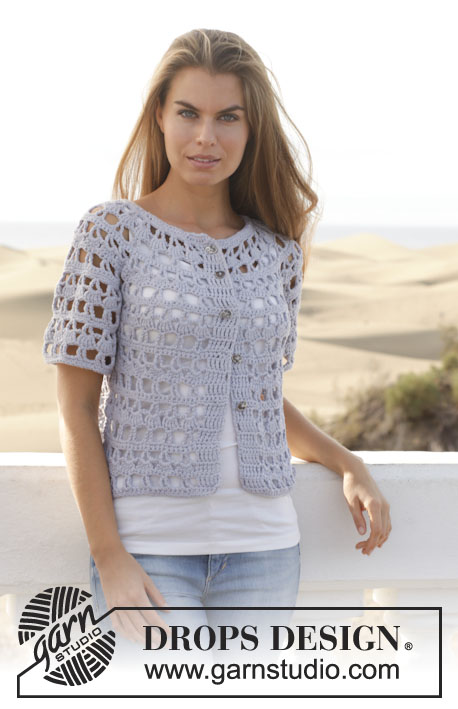
Crochet DROPS poncho in "Paris". Size: S - XXXL.
DROPS 153-11 |
||||||||||||||||
|
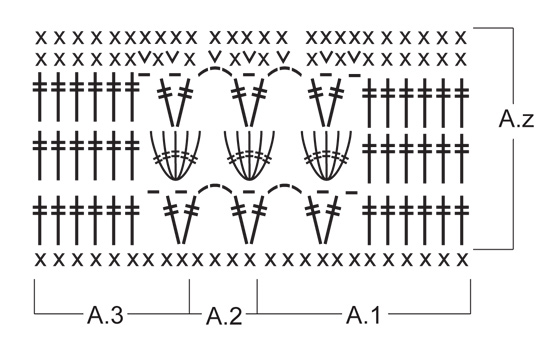
PATTERN: See diagrams A.1 to A.3. CROCHET INFO: Replace first sc on every sc row with 1 ch. Replace first tr on every tr row with 4 ch. ---------------------------------------------------------- PONCHO: Worked back and forth. Work 188-199-220-231 loose ch (includes 1 ch to turn with) on hook size 5 mm / H/8 with Paris. Work 1 sc in 2nd ch from hook, 1 sc in each of the next ch 2, skip ch 1, * work 1 sc in each of the next ch 3, skip 1 ch *, repeat from *-* and finish with 1 sc in each of the last 3-2-3-2 ch = 141-149-165-173 sc. Work 1 sc in every sc (= 1st row in diagrams A.1-A.3) – READ CROCHET INFO! Continue to work as follows: A.1, A.2 over the next 120-128-144-152 sc (= 30-32-36-38 times in width), finish with A.3. Repeat A.z upwards until piece measures approx. 30-30-38-38 cm / 11¾"-11¾"-15"-15", finish after one whole repetition of A.z. Fasten off. ASSEMBLY: Sew one short side edge to edge with the end on one long side to avoid a chunky seam (opposite long side now forms a tip towards mid front). |
||||||||||||||||
Diagram explanations |
||||||||||||||||
|
||||||||||||||||
 |
||||||||||||||||
Have you finished this pattern?Tag your pictures with #dropspattern #atardecer or submit them to the #dropsfan gallery. Do you need help with this pattern?You'll find 6 tutorial videos, a Comments/Questions area and more by visiting the pattern on garnstudio.com. © 1982-2026 DROPS Design A/S. We reserve all rights. This document, including all its sub-sections, has copyrights. Read more about what you can do with our patterns at the bottom of each pattern on our site. |
||||||||||||||||


With over 40 years in knitting and crochet design, DROPS Design offers one of the most extensive collections of free patterns on the internet - translated to 17 languages. As of today we count 325 catalogs and 12298 patterns - 12288 of which are translated into English (US/in).
We work hard to bring you the best knitting and crochet have to offer, inspiration and advice as well as great quality yarns at incredible prices! Would you like to use our patterns for other than personal use? You can read what you are allowed to do in the Copyright text at the bottom of all our patterns. Happy crafting!
Post a comment to pattern DROPS 153-11
We would love to hear what you have to say about this pattern!
If you want to leave a question, please make sure you select the correct category in the form below, to speed up the answering process. Required fields are marked *.