
Popular categories
Looking for a yarn?


Comments / Questions (16)
![]() Catherine Dahl wrote:
Catherine Dahl wrote:
How much yarn in yards or metres do I need for the XXL ? Please in English...?
30.03.2021 - 15:10DROPS Design answered:
Dear Catherine, if you wantto use a different DROPS yarn to knit this sweater, our Yarn Converter will help you to calculate the necessary amount. Happy Knitting!
30.03.2021 - 19:53
![]() Jutta wrote:
Jutta wrote:
Ist bei der Jacke unten kein Bündchen?
02.02.2021 - 16:06DROPS Design answered:
Liebe Jutta, es gibt tatsächlick kein Bündchen an der unteren Rand (= Randmaschen beidseitig krausrechts gestrickt). Viel Spaß beim stricken!
02.02.2021 - 16:46
![]() Mrs G Tweed wrote:
Mrs G Tweed wrote:
I am concerned the mohair yarn will be itchy. Please would you advise which yarn I could use to replace it?
05.05.2019 - 18:39DROPS Design answered:
Dear Mrs Tweed, you will read more about alternatives here - for any assistance choosing the best matching alternative, please contact your DROPS store even per mail or telephone. Happy knitting!
06.05.2019 - 10:59
![]() Irene wrote:
Irene wrote:
Jeg vil gerne lave den bare ikke af den farve. Kan du sige mig hvilken garn kan passe sammen med Drops Kid-Silk 08? Er der Drops BabyAlpaca Silk 8112? Eller 6235? Det er lidt svært at vurdere på skærmen.
25.01.2017 - 19:03DROPS Design answered:
Hej Irene. Her kan jeg desvaerre ikke hjaelpe dig. Du kan kontakte din DROPS butik med dette spörgsmaal. De har tit garnet liggende og kan hjaelpe dig med at finde den rette kombination. God förnöjelse.
26.01.2017 - 11:36
![]() Solrun Di Vecchia wrote:
Solrun Di Vecchia wrote:
Tak for svar. Har stadig problemer. Har strikket venstre ærme plus forstykke. Har strikket højre forstykke. Det er ganske kort? Rygstykke og højre ærme består ad de 102 m. på tråden plus m. fra højre forstykke?
03.08.2015 - 15:59DROPS Design answered:
Hej Solrun, Ja men du er så nødt til at tage ind så ærmet bliver smallere, nøjagtig som du gjorde i den anden side, bare modsat (hvor du tog ud da du strikkede det første ærme). Prøv gerne at få hjælp i butikken hvor du købte garnet. Held og lykke!
04.08.2015 - 15:53
![]() Solrun Di Vecchia wrote:
Solrun Di Vecchia wrote:
Jeg finder opskriften temmelig uforståelig efter højre forstykke? Rygstk. og Højre ærme - der snakkes om at sætte tråden tilbage på p og bagstrykket strikkes ....... Nu har man jo 2 dele på tråd, så er det de 68 m. (XXL) der sættes først på og så strikkes højre ærme???? det har man jo ikke strikket endnu? Skal jeg blot sætte maskerne fra højre FORSTK. ind her? Bedste hilsener, Solrun
30.07.2015 - 09:45DROPS Design answered:
Hej Solrun, Jeg ved ikke helt hvor du er i opskrften, så jeg forklarer fra starten. Du starter med venstre ærme, slår nye m op til forstk i den ene side og til rygstk i den anden side. Strikker ifølge opskriften, lukker af til hals, sætter rygstykket på en tråd, strikker forstykket færdig. Nu strikker du det andet forstykke. Fortsætter med bagstykket, sætter m fra højre forstykke ind på samme pind og fortsætter med højre ærme. God fornøjelse!
30.07.2015 - 10:32
![]() Tina wrote:
Tina wrote:
Fertig! Ein Hauch von nichts in Natur mit schönen alten Permuttknöpfen, die ich noch hatte. Vielen Dank mal wieder für die Anleitung. Ich liebe diese leichten und dennoch warmen Teile - bitte weiter so!
22.04.2015 - 22:15
![]() Tone W. Tolfsby wrote:
Tone W. Tolfsby wrote:
Hei! Jeg lurer på hvorfor mine gamle favoritter er borte? Kan man finne tilbake til dem? De tilhører samme e-postadresse som nå. Hilsen Tone
23.03.2015 - 13:43DROPS Design answered:
Hei Tone. Vi opdaterede og forbedrede favoritsiden for en maaneds tid siden. Det betöd desvaerre at alle favoriter blev slettet, saa du bliver nödt til at finde dem igen og tilföje. Undskyld ulejligheden.
23.03.2015 - 14:41
![]() Nicole wrote:
Nicole wrote:
Bin gerade am Stricken, die Jacke wird wunderschön! Eine Frage jedoch: wie kann man den zweiten Fäden mitführen, wenn man im Muster nur mit einem strickt und am Anfang der Reihe für den Ausschnitt abkettet? Gibt es da einen Trick?
09.09.2014 - 15:08DROPS Design answered:
Liebe Nicole, wenn im Muster 2 Krausrippen mit Kid-Silk gestrickt werden (5.-8. R) können Sie den Faden BabyAlpaca Silk auf der Rückseite verkreuzen. Achten Sie darauf, dass die Fäden bei der Schräge weder zu fest noch zu locker gespannt sind.
09.10.2014 - 12:05
![]() Else-Vibeke wrote:
Else-Vibeke wrote:
Det ville være dejligt hvis der i opskrifterne var et alternativt farveforslag.
29.04.2014 - 00:35
|
||||
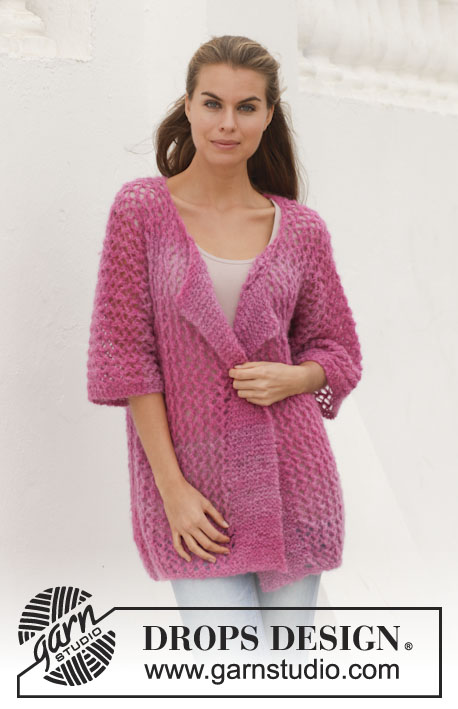
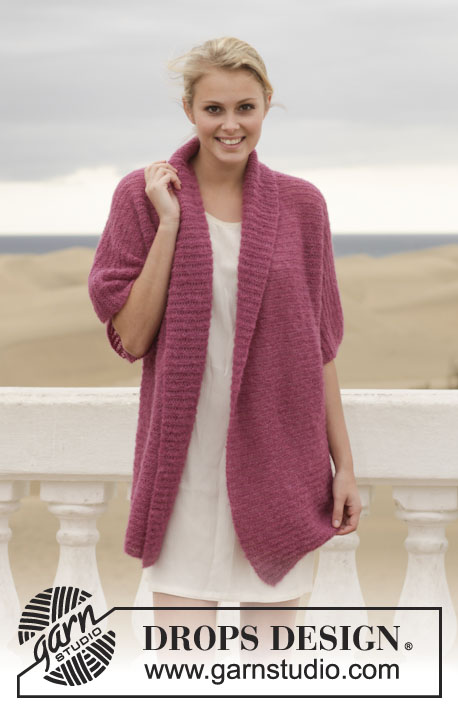
Sweet Rose Cardigan#sweetrosecardigan |
||||
|
|
||||
Knitted DROPS jacket in garter st in "Kid-Silk" and "BabyAlpaca Silk". Size: S - XXXL.
DROPS 155-35 |
||||
|
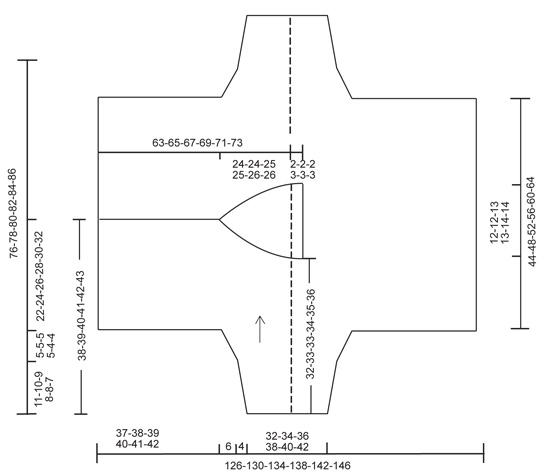
GARTER ST (back and forth on needle): K all rows. 1 ridge = K2 rows. PATTERN: Work pattern as follows, beg from RS: 1st-4th row = K 4 rows with 1 strand BabyAlpaca Silk and 1 strand Kid-Silk (= 2 strands). 5th-8th row = K 4 rows with 1 strand Kid-Silk. 9th-10th row = K 2 rows with 1 strand BabyAlpaca Silk and 1 strand Kid-Silk (= 2 strands). 11th-14th row = K 4 rows with 1 strand Kid-Silk. Repeat rows 1 to 14. INCREASE TIP: Inc 1 st by working 2 sts in 1 st. When inc 2 sts in each side, inc by working 2 sts in each of the first 2 and 2 last sts on needle. DECREASE TIP: Dec 1 st inside 1 edge st by K 2 sts tog. Dec 2 st inside 1 edge st by K 3 sts tog. MEASURING TIP: To make left and right front piece the same width it is important to measure when piece is flat. BUTTONHOLES: Dec for buttonholes on right band. Beg from RS and dec as follows: K 48-51-52-55-57-60, 1 YO, K 2 tog, K 7-7-7-7-7-7, 1 YO, K 2 tog, and K the rest of row. On next row K YOs. ---------------------------------------------------------- JACKET: Worked sideways back and forth on needle. LEFT SLEEVE + BODY: Beg at the edge of sleeve, cast on new sts for front piece and back piece and work until mid front. Loosely cast on 48-52-54-58-60-64 sts on circular needle size 6 mm / US 10 with 1 strand BabyAlpaca Silk and 1 strand Kid-Silk (= 2 strands). Work 1 ridge in GARTER ST - see explanation above. On next row (from RS) work PATTERN - see explanation above REMEMBER THE GAUGE! AT THE SAME TIME when piece measures 3-2-4-3-3-2 cm / 1⅛"-¾"-1½"-1⅛"-1⅛"-¾", inc 1 st in each side of piece from RS - READ INCREASE TIP! Continue same inc in each side of piece approx. every 1½-1½-1-1-1-1 cm / ½"-½"-⅜"-⅜"-⅜"-⅜" 5 more times (= 6 times in total) = 60-64-66-70-72-76 sts on needle and piece measures 11-10-9-8-8-7 cm / 4⅜"-4"-3½"-3⅛"-3⅛"-2¾". Continue as before, but now inc 1 st in each side of piece on every row from RS 7-7-7-7-5-5 times and then 2 sts in each side of piece on every row from RS 1-1-1-1-2-2 times (= 15-15-15-15-15-15 sts inc in total in each side from beg and 78-82-84-88-90-94 sts on needle). Piece now measures 16-15-14-13-12-11 cm / 6¼"-6"-5½"-5⅛"-4¾"-4⅜". On the next 2 rows loosely cast on 56-57-59-60-62-63 new sts at the end of every row = 190-196-202-208-214-220 sts. NOTE! Adjust pattern to cast on new sts on 2 rows in pattern with 2 strands. Continue back and forth with pattern as before until piece measures 32-33-33-34-35-36 cm / 12½"-13"-13"-13⅜"-13¾"-14¼" in total. On next row from RS work the first 92-95-98-99-102-105 sts before slipping them on a stitch holder for back piece. Then bind off the next 3-3-3-5-5-5 sts for neck, insert a marker in the middle of the last bind off st and next st (= mid on top of shoulder), bind off the next 9 sts = 86-89-92-95-98-101 sts remain on left front piece. Then continue pattern as before AT THE SAME TIME bind off sts for neck on every row from RS as follows: bind off 4 sts 1 time, 3 sts 7-7-7-7-6-6 times, and 2 sts 1-1-2-2-4-4 (= 27-27-29-29-30-30 sts bind off) = 59-62-63-66-68-71 sts remain. Slip the remaining sts on a stitch holder for band. RIGHT FRONT PIECE: Loosely cast on 59-62-63-66-68-71 sts on circular needle size 6 mm / US 10 with 1 strand of each yarn (= 2 strands). K 1 row from WS. Then work pattern as before, AT THE SAME TIME cast on new sts for neck at the end of every row from WS as follows: Cast on 2 new sts 1-1-2-2-4-4-times, 3 sts 7-7-7-7-6-6 times and 4 sts 1 time (= 27-27-29-29-30-30 sts inc in total) = 86-89-92-95-98-101 sts on needle. Put piece aside and knit the back piece. BACK PIECE AND RIGHT SLEEVE: READ ALL OF THE FOLLOWING SECTION BEFORE CONTINUING! Slip sts from stitch holder back on needle and work back piece before slipping sts from right front piece on to same needle and working them. Then work right sleeve. Slip the 92-95-98-99-102-105 sts from stitch holder on back piece back on needle and continue with pattern from WS, AT THE SAME TIME dec 1 st at beg of row for neck – READ DECREASE TIP! = 91-94-97-98-101-104 sts remain on needle. Continue with pattern until piece measures 11-11-12-12-13-13 cm / 4⅜"-4⅜"-4¾"-4¾"-5⅛"-5⅛" from marker mid on top of shoulder. NOTE! Jacket will be wider when used so it is important not to make it too long in the back of neck. At the end of next row from RS, inc 1 st for neck at the end of row by working 2 sts in last st = 92-95-98-99-102-105 sts on needle. NOTE! Adjust according to pattern on right front piece here to beg on same row in pattern on next row from RS on both front and back piece. On next row from RS work all sts on needle before casting on 12-12-12-14-14-14 sts for neck at the end of row. Then work all sts from stitch holder (right front piece) = 190-196-202-208-214-220 sts. Continue over all sts until piece measures 44-48-52-56-60-64 cm / 17¼"-19"-20½"-22"-23⅝"-25¼" in total at the bottom of back piece - adjust pattern so that next row is a row in pattern with 2 strands. At beg of the next 2 rows, loosely bind off 56-57-59-60-62-63 sts = 78-82-84-88-90-94 sts remain. Then dec sts for sleeve the same way as inc sts for left sleeve as follows: Bind off/dec sts in each side of piece at beg of the next rows as follows: bind off 2 sts in each side of piece 1-1-1-1-2-2 times and 1 st 7-7-7-7-5-5 times. Continue as before but now dec 1 st in each side of piece approx. every 1½-1½-1-1-1-1 cm / ½"-½"-⅜"-⅜"-⅜"-⅜" 6 times in total = 48-52-54-58-60-64 sts remain. Continue with pattern and adjust length according to left sleeve. Work 1 ridge with 1 strand of each yarn. Work 1 row and loosely bind off. BAND AND NECK EDGE: Beg from RS along cast-on edge on right front piece and pick up 59-62-63-66-68-71 sts with 1 strand of each yarn on circular needle size 6 mm / US 10. Continue to pick up approx. 70-90 sts around neck edge, and work the 59-60-63-66-68-71 sts from stitch holder (i.e. sts on left front piece). K 1 row from WS. Continue with 3 ridges - AT THE SAME TIME on next row from RS dec for BUTTONHOLES – see explanation above! ASSEMBLY: Fold at the top of shoulder, sew underarm and side seams in one, in outer loops of edge sts. Sew the buttons on to the left band. |
||||
Diagram explanations |
||||
|
||||
 |
||||
Have you finished this pattern?Tag your pictures with #dropspattern #sweetrosecardigan or submit them to the #dropsfan gallery. Do you need help with this pattern?You'll find 16 tutorial videos, a Comments/Questions area and more by visiting the pattern on garnstudio.com. © 1982-2026 DROPS Design A/S. We reserve all rights. This document, including all its sub-sections, has copyrights. Read more about what you can do with our patterns at the bottom of each pattern on our site. |
||||


With over 40 years in knitting and crochet design, DROPS Design offers one of the most extensive collections of free patterns on the internet - translated to 17 languages. As of today we count 325 catalogs and 12298 patterns - 12288 of which are translated into English (US/in).
We work hard to bring you the best knitting and crochet have to offer, inspiration and advice as well as great quality yarns at incredible prices! Would you like to use our patterns for other than personal use? You can read what you are allowed to do in the Copyright text at the bottom of all our patterns. Happy crafting!
Post a comment to pattern DROPS 155-35
We would love to hear what you have to say about this pattern!
If you want to leave a question, please make sure you select the correct category in the form below, to speed up the answering process. Required fields are marked *.