
Popular categories
Looking for a yarn?


Comments / Questions (36)
![]() Monique wrote:
Monique wrote:
Heel erg jammer dat ik geen reactie kreeg op mijn vraag.
25.03.2026 - 12:58
![]() Monique wrote:
Monique wrote:
Ik heb voor dit patroon drops alpaca bouclé gekocht maar deze komt helemaal niet overeenstemmen de naalddikte van het patroon. In het patroon staat breien met 8 mm. Op het garen zelf staat 5 mm. Dit moet toch niet kunnen??. Er klopt op deze manier niets van de beschrijving.
07.03.2026 - 14:45
![]() Marieke wrote:
Marieke wrote:
Kun je dit patroon ook met 2 naalden breien ipv een rondbreinaald?
30.11.2025 - 16:49DROPS Design answered:
Dag Marieke,
Om een patroon aan te passen om op rechte naalden te breien hebben we een instructie gemaakt. Deze vind je hier. Dit kan helaas niet bij alle patronen.
30.11.2025 - 18:13
![]() Anna wrote:
Anna wrote:
Kan deze in drops Belle gebreid worden? zo ja welke naald zou ik dan nemen? en hoeveel bollen voor maat L
30.11.2025 - 15:20DROPS Design answered:
Dag Anna,
DROPS Belle valt in een andere garencategorie en heeft dus een andere stekenverhouding.
We hebben een artikel op de site staan waarin uitgelegd is hoe je garen kunt vervangen door een ander garen en hoe je dit uitrekent. Zie hier.
30.11.2025 - 15:52
![]() Martina wrote:
Martina wrote:
Buongiorno, nelle spiegazioni è possibile che il davanti è il dietro è che il dietro il davanti ??? Grazie
30.05.2024 - 10:04DROPS Design answered:
Buonasera Martina, al momento non sono segnalati errori per questo modello. Buon lavoro!
30.05.2024 - 20:04
![]() A Nijhof wrote:
A Nijhof wrote:
Kun je dit patroon ook met 2 naalden breien ipv een rondbreinaald?
29.04.2022 - 12:11
![]() Lorraine Harbin wrote:
Lorraine Harbin wrote:
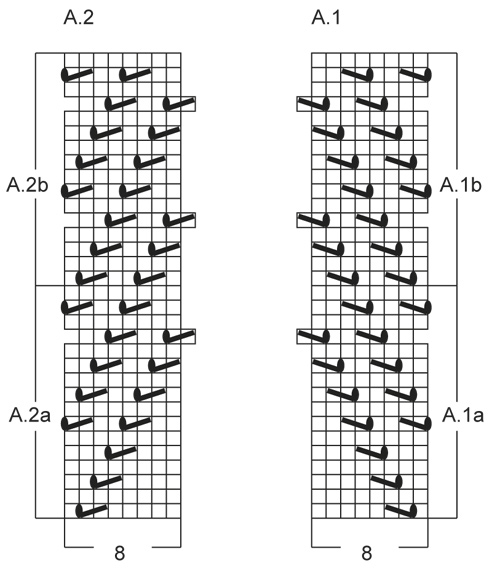
For pattern 155-25 In the chart pattern, 12th row up in the A1a stitch pattern there is a jog. I’m not sure how to handle it. Do I knit three stitches then YOslip1K1pssoK2 YOslip1? This pushes my pattern into my 44stocking stitch section. Is this correct? Thanks
07.02.2022 - 02:01DROPS Design answered:
Dear Mrs Harbin, on this row, start with another stitch in stocking stitch (2 sts then) and start diagram, so that you will now continue the lace pattern diagonally. On next row from RS you will star a new repeat/diagonal inside the 1 st in stocking stitch. Happy knitting!
07.02.2022 - 10:45
![]() Nancy wrote:
Nancy wrote:
I have question on lace pattern. After 1st row with 2 YO is said on next row P 1st YO drop 2nd YO. This is knitted in the round so there is no wrong side until you separate. I would like to know if every even row if you K the 1st YO & drop 2nd YO. Thank you.
07.10.2021 - 01:09DROPS Design answered:
Dear Nancy, knitting one yo and droppong the other makes the hole left after the yo bigger. In this case it does not really matter if you knit the first and drop the 2nd one or vica versa, however it will be easier to knit if you knit the first and drop the second. Happy Stitching!
07.10.2021 - 03:11
![]() Dorthe wrote:
Dorthe wrote:
Hej Jeg er nu kommet dertil hvor jeg har lukket masker af til hals på ryggen og skal nu strikke tre retmasker ind mod halsen på hver pind + tage masker ind gange to. Min udfordring er at når jeg har gjort dette kommer det til at påvirke diagrammet som for hver ret pind skråner ind mod halsen. Håber dette giver mening og at i kan hjælpe mig. På forhånd tak. Med venlig hilsen Dorthe
12.07.2021 - 22:54DROPS Design answered:
Hej Dorthe, når du tager ind i diagrammet, strikkes de masker som ikke går op i glatstrik :)
14.07.2021 - 09:39
![]() Inger Holzmann wrote:
Inger Holzmann wrote:
Mht det ene omslag, der skal strikkes vrang. Når man deler til for- og bagstykke og altså strikker frem og tilbage, skal omslaget så stadig strikkes vrang? Eller skal man nu strikke det ret?
10.02.2021 - 07:23DROPS Design answered:
Hej Inger, det skal strikkes ret fra retsiden :)
16.02.2021 - 13:56
|
|||||||||||||
Sofie#sofietop |
|||||||||||||
|
|
|||||||||||||
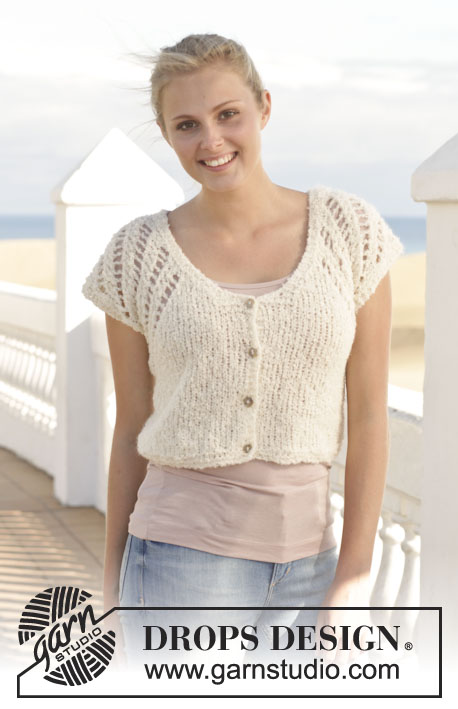
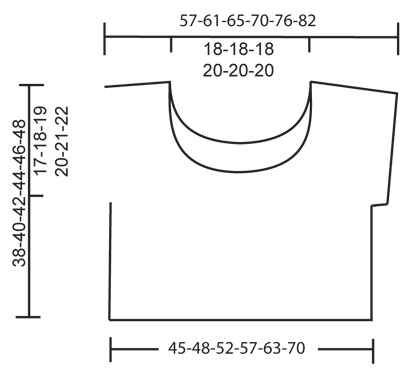
Knitted DROPS top with lace pattern in ”Alpaca Bouclé”. Size: S - XXXL.
DROPS 155-25 |
|||||||||||||
|
GARTER ST (in the round on circular needle): * K 1 round and P 1 round *, repeat from *-*. 1 ridge = 2 rounds. GARTER ST (back and forth on needle): K all rows. 1 ridge = K2 rows. PATTERN: See diagrams A.1-A.2. The diagrams show all rows in pattern seen from RS. DECREASE TIP: Dec 1 st after 3 sts in garter st as follows: Slip 1 st as if to K, K 1, psso. Dec 1 st before 3 sts in garter st as follows: K 2 tog. ---------------------------------------------------------- BODY: Worked in the round on circular needle. Cast on 108-116-124-136-152-168 sts on circular needle size 8 mm / US 11 with Alpaca Bouclé. Work 2 ridges in GARTER ST - see explanation above. Then work in stockinette st. When piece measures 14-15-16-17-18-19 cm / 5½"-6"-6¼"-6¾"-7"-7½", insert a marker in the piece, AT THE SAME TIME work as follows: Work 1 st in stockinette st, A.1a (= 8 sts), 36-40-44-50-58-66 sts in stockinette st, A.2a (= 8 sts), 1 st in stockinette st (= back piece), insert 1 marker, 1 st in stockinette st, A.1a (= 8 sts), 36-40-44-50-58-66 sts in stockinette st, A.2a (= 8 sts), 1 st in stockinette st (= front piece). NOTE: Diagrams A.1a/A.2a are displaced 1 st towards mid front and mid back every other round. Continue pattern like this. When A.1a and A.2a have been worked 1 time vertically, work A.1b instead of A.1a and A.2b instead of A.2a. Diagrams A.1b and A.2b are repeated until finished measurements, AT THE SAME TIME continue eyelet rows already begun. When piece measures 21-22-23-24-25-26 cm / 8¼"-8¾"-9"-9½"-9¾"-10¼", finish each part separately. Now divide the piece between each marker. BACK PIECE: = 54-58-62-68-76-84 sts. Work A.1/A.2 and in stockinette st as before AT THE SAME TIME cast on 3 sts in each side of piece at the end of the next 2 rows = 60-64-68-74-82-90 sts on needle. Work the 3 new sts in each side of piece in GARTER ST - see explanation above, until finished measurements. When piece measures 27-29-30-32-33-35 cm / 10½"-11½"-11¾"-12½"-13"-13¾" (adjust so that next row is from RS), work 3 ridges over the middle 24-24-24-26-26-26 sts (= 18-20-22-24-28-32 sts in each side in stockinette st, A.1/A.2 and edge sts as before). On next row from RS bind off the middle 18-18-18-20-20-20 sts for neck (= 21-23-25-27-31-35 sts remain on each shoulder). Now finish each shoulder separately. Continue in garter st over the 3 sts towards the neck and edge, stockinette st and A.1/A.2 as before AT THE SAME TIME on next row from RS dec 1 st after/before the 3 sts in garter st in the neck – see DECREASE TIP. Repeat dec 1 more time (= 2 times in total) = 19-21-23-25-29-33 sts remain on needle. Work as before until piece measures 38-40-42-44-46-48 cm / 15"-15¾"-16½"-17¼"-18"-19". Bind off. FRONT PIECE: Work front piece as back piece until piece measures 23-25-26-28-29-31 cm / 9"-9¾"-10¼"-11"-11½"-12¼" (adjust so that next row is from RS). Work 3 ridges over the middle 18 sts (= 21-23-25-28-32-36 sts in each side), in stockinette st and A1/A.2 and edge sts as before. On next row from RS bind off for neck as follows: bind off the middle 12 sts (= 24-26-28-31-35-39 sts on each shoulder). Now finish each shoulder separately. Continue in garter st over the 3 sts towards the neck and edge, stockinette st and A.1/A.2 as before AT THE SAME TIME on next row from RS dec 1 st after the 3 sts in garter st in the neck – see DECREASE TIP. Repeat dec on every row from RS 4-4-4-5-5-5 more times = 19-21-23-25-29-33 sts remain on needle. Work as before until piece measures 38-40-42-44-46-48 cm / 15"-15¾"-16½"-17¼"-18"-19". Bind off. ASSEMBLY: Sew the shoulder seams. Sew underarm seams. |
|||||||||||||
Diagram explanations |
|||||||||||||
|
|||||||||||||
 |
|||||||||||||
 |
|||||||||||||
Have you finished this pattern?Tag your pictures with #dropspattern #sofietop or submit them to the #dropsfan gallery. Do you need help with this pattern?You'll find 18 tutorial videos, a Comments/Questions area and more by visiting the pattern on garnstudio.com. © 1982-2026 DROPS Design A/S. We reserve all rights. This document, including all its sub-sections, has copyrights. Read more about what you can do with our patterns at the bottom of each pattern on our site. |
|||||||||||||


With over 40 years in knitting and crochet design, DROPS Design offers one of the most extensive collections of free patterns on the internet - translated to 17 languages. As of today we count 324 catalogs and 12290 patterns - 12280 of which are translated into English (US/in).
We work hard to bring you the best knitting and crochet have to offer, inspiration and advice as well as great quality yarns at incredible prices! Would you like to use our patterns for other than personal use? You can read what you are allowed to do in the Copyright text at the bottom of all our patterns. Happy crafting!
Post a comment to pattern DROPS 155-25
We would love to hear what you have to say about this pattern!
If you want to leave a question, please make sure you select the correct category in the form below, to speed up the answering process. Required fields are marked *.