
Popular categories
Looking for a yarn?


Comments / Questions (66)
![]() Karin wrote:
Karin wrote:
Hulmønstret er superfint og jeg vil gerne strikke et sjal kun med de fire hulmønster-pinde. Jeg er ikke så erfaren med at strikke og jeg kan ikke regne ud, hvordan jeg skal gøre - Hvis man i det hele taget kan få mønstret til at gå op, hvis man strikker et sjal!??
30.12.2024 - 14:46DROPS Design answered:
Hei Karin. Design avd har dessverre ikke anledningen til å skrive en "ny" oppskrift kun basert på hullmønstret. Men ta en titt på våre hullmønster video, kanskje de kan være til hjelp / inspirasjon. Klikk på: Tips & Hjælp - Instruktionsvideoer - Strikke - Strukturer - Hulmønstre. Evnt. ta en titt på oppskrift: DROPS 229-12, 158-5, 129-30. God Fornøyelse. mvh DROPS Design
07.01.2025 - 08:09
![]() Marie-Paule Klinger wrote:
Marie-Paule Klinger wrote:
Je suis arrivée avec 137 m sur l'aiguille. Mais ne comprends pas quand vous dites continuer au point mousse avec des augmentations/diminutions jusqu'à avoir 149 m
14.03.2024 - 15:18
![]() Marie-Paule Klinger wrote:
Marie-Paule Klinger wrote:
Bonjour, Merci pour ce joli modèle. J'ai mes 137 m sur l'aiguille. Et là je ne comprends pas quand vous écrivez : continuer au point mousse jusqu à ce qu'il y ait 149 m. Merci pour votre réponse
14.03.2024 - 15:16DROPS Design answered:
Bonjour Mme Klinger et merci; continuez maintenant au point mousse avec les augmentations et les diminutions comme avant, mais cette fois sans remplacer le rang 3 par le rang ajouré, jusqu'à ce que vous ayez 149 mailles, puis tricotez maintenant le point fantaisie ajouré et répétez les 4 rangs du point ajouré jusqu'à 106 cm de hauteur totale. Bon tricot!
14.03.2024 - 16:26
![]() Chantal Mathieu wrote:
Chantal Mathieu wrote:
Bonjour, Est-il possible que l’on doive terminer la partie « châle » par un rang 2 (K all sts) pour que l’augmentation sur le R3 de la partie « point fantaisie ajouré » se fasse du même côté que les augmentations de la partie « châle »?
23.08.2022 - 15:36DROPS Design answered:
Bonjour Mme Mathieu, en fait, vous devez répéter les rangs 2 à 5, autrement dit, après le rang 5, tricotez le rang 2 de nouveau. Puis, quand indiqué, tricotez le RANG AJOURÉ à la place du rang 3. Le nombre de mailles d'augmente pas quand on tricote ce rang ajouré: on doit avoir autant de mailles tricotées ensemble à l'endroit que de jeté. Bon tricot!
23.08.2022 - 15:55
![]() Marlène Tremblay wrote:
Marlène Tremblay wrote:
Le point de fantaisie ajouré doit-il toujours être tricoté sur 149 mailles?
08.03.2022 - 21:21DROPS Design answered:
Bonjour Mme Tremblay, oui, vous tricotez les 4 rangs du point ajouré jusqu'à ce que l'ouvrage mesure 106 cm le long du petit côté. Bon tricot!
09.03.2022 - 19:09
![]() Montserrat wrote:
Montserrat wrote:
Con 4 trocas Drops Baby Alpaca Silk perfecto! He conseguido que quede bien . El patron un poc lioso para mi, no he sabido encontrar la lògica de la muestra del calado. Un resultado muy agradable. Les gustara a su propietaria? seguro que sí.
26.12.2021 - 12:29
![]() Hélène wrote:
Hélène wrote:
Bonjour! Quand on commence le point fantaisie ajourée, le rang 3 rajoute automatiquement une maille! Donc, quand on refait le rang 1 et’qu'il faut tricoter 2 mailles ensemble endroit et un jeté jusqu'à ce qu'il reste une maille cela n'arrive pas parce qu'il y a une maille en trop (150 mailles au lieu de 149) Si je continue je rajoute toujours une maille au rang 3. Est-ce normal?
07.10.2021 - 17:28DROPS Design answered:
Bonjour Hélène, au rang 3 du point fantaisie ajouré, vous ajoutez 2 mailles: vous terminez par: 2 m end, 1 jeté, 1 m end, 1 jeté, 1 m end, ainsi, au rang 1, vous pouvez de nouveau commencer par 1 diminution, répéter (1 dim, 1 jeté), et terminer par 1 jeté, 1 m end. Bon tricot!
08.10.2021 - 07:07
![]() Lorraine Pelletier wrote:
Lorraine Pelletier wrote:
Je voudrais des explications quand vous dites Continuer comme avant mais remplacer le rg 3 par le RANG AJOURÉ. Tricoter ensuite comme avant au point mousse avec augmentations/diminutions comme avant mais sans le rang ajouré. est-ce le point ajouré ? car sur le point mousse, il n'y a pas d'augmentations et diminutions....
31.08.2021 - 20:38DROPS Design answered:
Bonjour Mme Pelletier, vous devez tricoter les rangs 2 à 5 en remplaçant le rang 3 par le rang ajouré = 29 m; puis vous répétez la partie de ** à ** jusqu'à ce que vous ayez tricoté 11 fois le rang ajouré, autrement dit, les rangs ajourés se tricotent lorsque vous avez 17, 29, 41, 53, 65, 77, 89, 101, 113, 125 et 137 m. Cette vidéo montre comment tricoter le début du châle et pourra fort probablement vous aider. Bon tricot!
01.09.2021 - 07:06
![]() Mathea wrote:
Mathea wrote:
Tar tilbake min tidligere kommentar ang. garn mengde.. Jeg som brukte annet garn og ikke tenkte på om de hadde samme antall meter.
29.04.2021 - 22:22
![]() Bea K Michalidesova wrote:
Bea K Michalidesova wrote:
Dobry den, v popisu je chyba v prekladu. Dirkovy vzor, 3.rada: "opakujeme po poslední 4 oka, 2 oka spleteme hladce, 1x nahodíme, 1 oko upleteme hladce, 1x nahodíme, 1 oko upleteme hladce." 2 oka se nemaji "splest hladce", ale uplest hladce, kazde samostatne. tj, preklad by mohl byt:" opakujeme po poslední 4 oka, 2 oka hladce, 1x nahodíme, 1 oko upleteme hladce, 1x nahodíme, 1 oko upleteme hladce."
07.03.2021 - 23:14DROPS Design answered:
Dobrý den, Beo, díky za upozornění - opraveno! Hana
08.03.2021 - 06:41
|
|
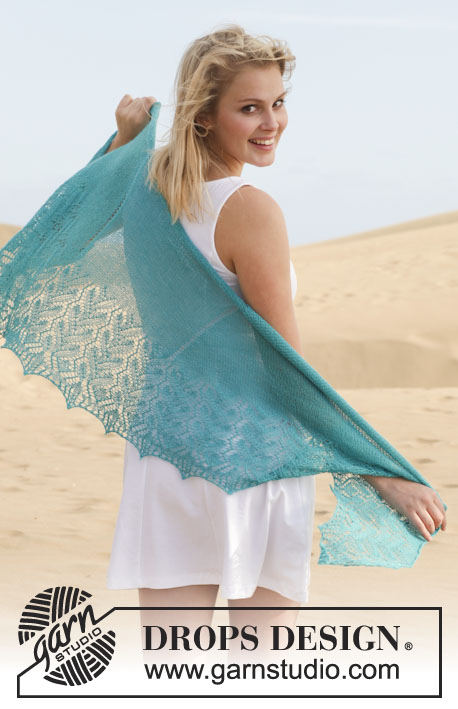
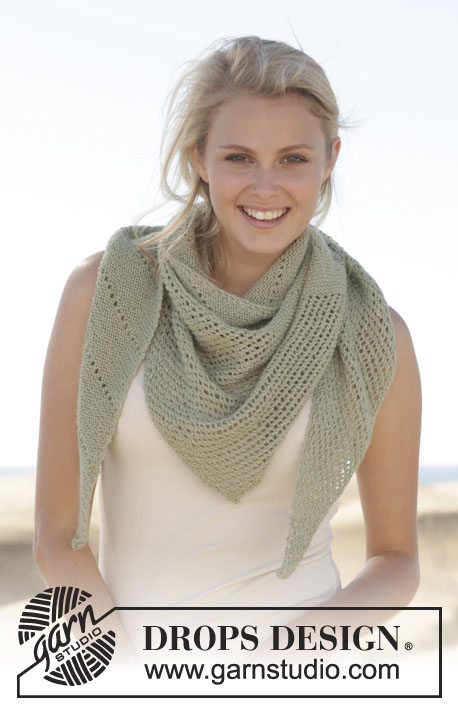
Soir d'Été#soirdeteshawl |
|
 |
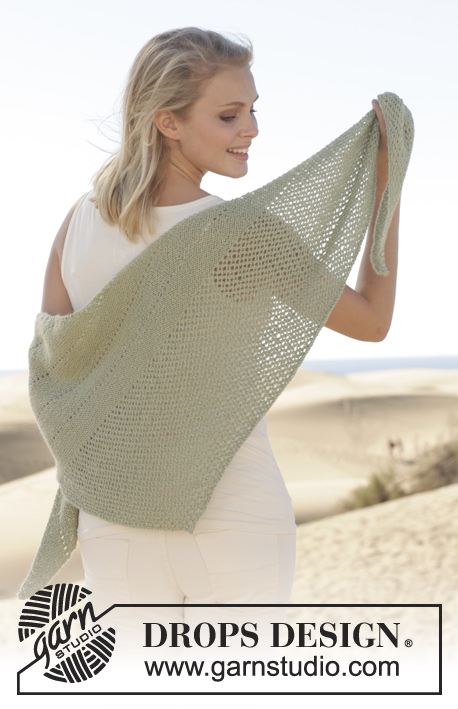 |
Knitted DROPS shawl in garter st with lace pattern in ”BabyAlpaca Silk”.
DROPS 152-16 |
|
|
GARTER ST (back and forth on needle): K all rows. 1 ridge = K2 rows. EYELET ROW: Work an eyelet row every 11th ridge, first eyelet row when there are 17 sts on needle. Eyelet row is always worked on 3rd row, i.e. row that beg with K 2 tog. Work eyelet row as follows: K 2 tog, * 1 YO, K 2 tog *, repeat from *-* until 1 st remains, 1 YO and K 1. LACE PATTERN: Row 1: K 2 tog, * 1 YO, K 2 tog *, repeat from *-* until 1 st remains, 1 YO and K 1. Row 2: K all sts and YO. Row 3: K 1, * K 2 tog, 1 YO *, repeat from *-* until 4 sts remain, K2, 1 YO, K 1, 1 YO and K 1. Row 4: K all sts and YO. Repeat row 1 to 4. ---------------------------------------------------------- SHAWL: Worked back and forth on circular needle. Cast on 3 sts on circular needle size 3.5 mm / US 4 with BabyAlpaca Silk and K 1 row. Then work in GARTER ST - see explanation above, as follows: ROW 1: K 1, 1 YO, K 1, 1 YO and K 1 = 5 sts. ROW 2: K all sts. ROW 3: K 2 tog (loosely), K until 1 st remains, 1 YO and K 1. This row is replaced with eyelet row every 11th ridge. ROW 4: K all sts. ROW 5: Work until 2 sts remain, 1 YO, K 1, 1 YO and K 1. Then repeat rows 2 to 5 until there are 17 sts on needle. ** Continue as before, but replace 3rd row with EYELET ROW - see explanation above. Then work as before in garter st and with inc/dec as before without eyelet row until 12 new sts have been inc ** = 29 sts on needle. Repeat from **-** until 11 eyelet rows have been worked (12 new sts inc). Work eyelet row when there are: 17, 29, 41, 53, 65, 77, 89, 101, 113, 125 and 137 sts on needle. Continue in garter st with inc/dec as before until there are 149 sts on needle, then work LACE PATTERN - see explanation above. Repeat rows 1 to 4 of lace pattern until piece measures approx. 106 cm / 41¾" measured along needle/short side. Finish after 2nd or 4th row in lace pattern and loosely bind off with K sts. Cut and fasten the yarn. |
|
Have you finished this pattern?Tag your pictures with #dropspattern #soirdeteshawl or submit them to the #dropsfan gallery. Do you need help with this pattern?You'll find 9 tutorial videos, a Comments/Questions area and more by visiting the pattern on garnstudio.com. © 1982-2026 DROPS Design A/S. We reserve all rights. This document, including all its sub-sections, has copyrights. Read more about what you can do with our patterns at the bottom of each pattern on our site. |
|


With over 40 years in knitting and crochet design, DROPS Design offers one of the most extensive collections of free patterns on the internet - translated to 17 languages. As of today we count 324 catalogs and 12290 patterns - 12280 of which are translated into English (US/in).
We work hard to bring you the best knitting and crochet have to offer, inspiration and advice as well as great quality yarns at incredible prices! Would you like to use our patterns for other than personal use? You can read what you are allowed to do in the Copyright text at the bottom of all our patterns. Happy crafting!
Post a comment to pattern DROPS 152-16
We would love to hear what you have to say about this pattern!
If you want to leave a question, please make sure you select the correct category in the form below, to speed up the answering process. Required fields are marked *.