
Popular categories
Looking for a yarn?


Comments / Questions (62)
![]() Kerstin wrote:
Kerstin wrote:
Hallo, ich verstehe die 5. Runde nicht ganz. Verschiebt sich der Rundenanfang in JEDER 2. Reihe um eine Masche nach links oder nur einmal und der Rundenanfang bleibt in der Ecke. Bisher gab es leider widersprüchliche Antworten und ich bin jetzt verwirrt.
19.05.2025 - 09:13DROPS Design answered:
Liebe Kerstin, die Runden sollen jetzt mit der Masche mit der 1. Markierung beginnen, dh die Zunahme der 3. Runde soll jetzt die letzte Masche der Runde sein, so beginnen die Runden/Streifen in der Ecke (so wird der Umschlag vor 1. Markierung jetzt am Ende der Runde bearbeitet und nicht am Anfang der Runde, vor der 1. Markierung). Viel Spaß beim Stricken!
19.05.2025 - 10:29
![]() Lena R wrote:
Lena R wrote:
Garnåtgång enligt beskrivning är endast tre färger , det måste saknas färger? På bilden ser jag i varje fall vitfärg. Dessutom har drops Delight ugått nu, vilken ersättare rekommenderar ni?
14.01.2025 - 14:37DROPS Design answered:
Hej Lena, Der er brugt 2 farver! Ja det stemmer DROPS Delight er udgået, den var meleret og du kan erstatte den med den farve du synes bedst om i DROPS Fabel (som også er meleret) og så vælger du den farve i DROPS Alpaca som passer bedst til din valgte farve :)
15.01.2025 - 10:36
![]() Brigitte Tönnies wrote:
Brigitte Tönnies wrote:
Nachdem die angefangene Jacke nun leider 2 Jahre im Schrank lag, habe ich nun weiter gemacht. Allerdings habe ich jetzt das Problem, das ich wenn ich die benötigte Weite erreicht habe, einfach viel zu viel Länge habe. Kann ich Rücken und Vorderteile verbreitern ohne mehr Länge zu bekommen?
13.07.2023 - 22:52DROPS Design answered:
Liebe Frau Tönnies, es wird zuerst als Quadrat gestrickt, dann werden das obere Teil (Schulter) und das untere Teil separat gestrickt, also wenn Sie die gewünschte Breite und Höhe bekommen haben, können Sie dann das Modell so anpassen - aber mit solchen Modellen ist es immer einfacher, die Anleitung genauso zu folgen (beachten Sie auch daß Ihre Maschenprobe (in der Breite sowie in der Höhe) stimmt. Viel Spaß beim stricken!
27.07.2023 - 10:40
![]() Brigitte Tönnies wrote:
Brigitte Tönnies wrote:
Es geht sich um die 5. Rd. Dort muss ich die 1. Masche ungestrickt auf die andere Nadel legen. Meine Frage ist nun, da ich ja Rd. 5 und 6 immer wiederholen muss, ob ich jedesmal die 1. Masche auf die andere Nadel legen muss. Vielen lieben Dank
25.05.2021 - 16:43DROPS Design answered:
Liebe Frau Tönnies, bei der 5. Runde wird die Rundbeginn verschoben, damit die Runden nun in die Ecke beginnen; dh ab 5. Runde beginnen alle Runde in einer Ecke. Viel Spaß beim stricken!
26.05.2021 - 09:33
![]() ARLENE NAZARÉ wrote:
ARLENE NAZARÉ wrote:
Boa tarde, Para este modelo aplica-se ALPACA cor 8105 - azul glaciar. Contudo, esta cor consta da lista de produtos como lilás pálido... Está correto ou é um substituto recomendado por rutura de stock do azul glaciar? Obrigada.
05.01.2020 - 18:10DROPS Design answered:
Boa tarde, Muito obrigado pela sua chamada de atenção. Com a introdução de novas cores nas gamas (neste caso, na gama do fio Alpaca); alguns nomes de cores são alterados para se adaptarem às novas cores introduzidas. Tal foi o caso, Já actualizámos o nome para lilás pálido. Bom tricô!
06.01.2020 - 19:28
![]() Nidaa wrote:
Nidaa wrote:
Thanks for your replying. I'm really fascinated by your amazing website. I follow your Instagram account sweetheart
31.12.2019 - 21:26
![]() Nidaa95 wrote:
Nidaa95 wrote:
It's a great pattern. I just have a question, can I use circular needle instead of pointed needles using magic circular technique?
31.12.2019 - 21:08DROPS Design answered:
Hi, yes you can. Happy knitting!
31.12.2019 - 21:18
![]() Margherita wrote:
Margherita wrote:
Nel testo non è indicato se lavorare le gettate ritorte quindi immagino che vadano lavorate normalmente per formare un buco
22.12.2019 - 18:49DROPS Design answered:
Buonasera Margherita, se non è indicato si lavorano normalmente. Buon lavoro!
22.12.2019 - 21:00
![]() Margherita wrote:
Margherita wrote:
Buonasera vorrei sapere se le maglie gettate devono essere lavorate ritorte oppure normalmente per creare un buco?
21.12.2019 - 23:11DROPS Design answered:
Buonasera Margherita, di volta in volta è indicato nel testo come devono essere lavorati i gettati. Buon lavoro!
22.12.2019 - 17:48
![]() Ingrid Bahnsen wrote:
Ingrid Bahnsen wrote:
Skal der tages ud på hver eller hver 2. omgang på rygstykket? mvh Ingrid Bahnsen
25.06.2019 - 12:36DROPS Design answered:
Hei ingrid. Du øker på annenhver omgang: Du øker først på omgang 3, og omgang 5, og øker ikke på omgang 2, 4 og 6. Videre skal du gjenta omgang 5 og 6 oppover. God fornøyelse
26.06.2019 - 08:10
|
|
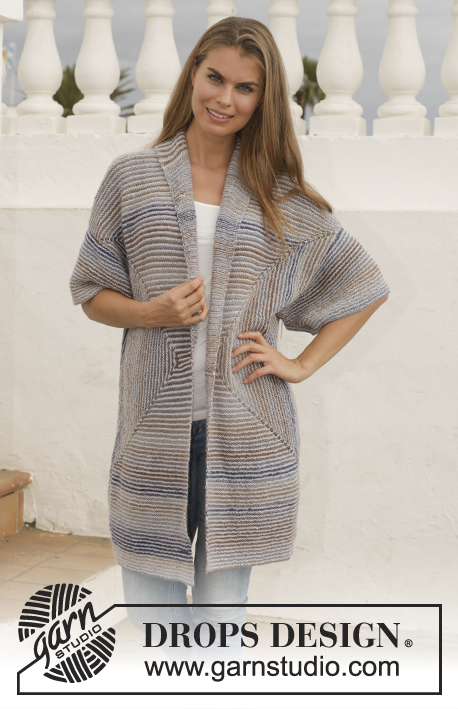
Blue Maze#bluemazejacket |
|
 |
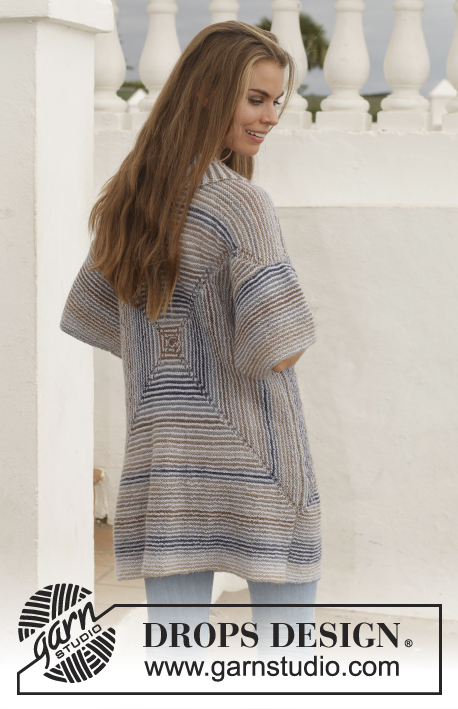 |
Knitted DROPS jacket in garter st with shawl collar in ”Delight” and "Alpaca". Size: S - XXXL.
DROPS 153-13 |
|
|
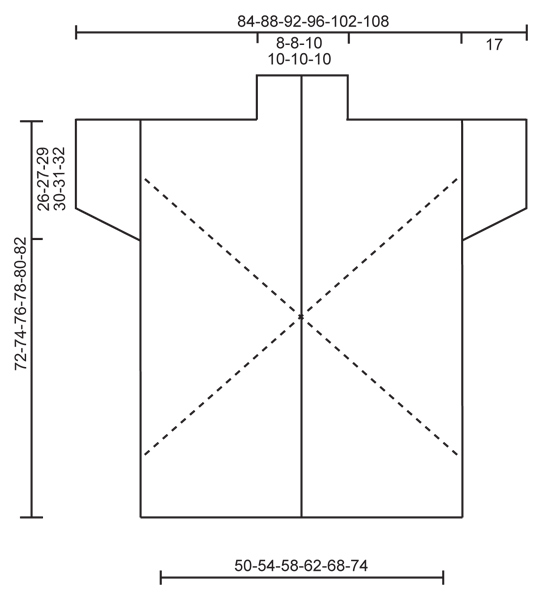
GARTER ST (back and forth on needle): K all rows. 1 ridge = K2 rows. GARTER ST (in the round): * K 1 round and P 1 round *, repeat from *-*. 1 ridge = 2 rounds. STRIPES: *1 ridge Delight, 1 ridge Alpaca *, repeat from *-* the entire piece. MEASURING TIP: Measure piece when held up. ---------------------------------------------------------- JACKET: Back piece is worked from mid back in a square. Then work at the top of yoke and at the bottom of back piece. Front piece is worked the same way but as half of back piece. I.e. half a square but with band and collar in addition. Work sleeves at the end. BACK PIECE: Cast on 8 sts with Delight and divide them on 4 double pointed needles size 3.5 mm / US 4 (= 2 sts on every needle). Work in the round in GARTER ST and STRIPES - see explanation above. ROUND 1: K all sts. ROUND 2: P and insert marker in the first, third, fifth and seventh st (= 4 markers). ROUND 3: K and inc with YOs on each side of every marker the entire round. ROUND 4: P all sts and YOs = 16 sts. ROUND 5: Now displace beg of round with 1 st to get the color change in one corner of piece so that it looks nice. Move first st on round on to right needle without working it, this st is now last st on round. Then K with YOs on each side of every marker the entire round. ROUND 6: P all sts and YOs = 24 sts. Then repeat 5th and 6th round, distribute sts on needle to make it easier to work and switch to circular needle when needed. Continue working like this until there are 456-496-536-568-624-680 sts on needle (= 56-61-66-70-77-84 inc and 114-124-134-142-156-170 sts along each side). On next round with P work as follows: P 114-124-134-142-156-170, bind off the next 114-124-134-142-156-170 sts (= side of jacket), work the next 114-124-134-142-156-170 sts and slip them on 1 stitch holder (= bottom edge on jacket) and bind off the next 114-124-134-142-156-170 sts (= side of jacket). Work in garter st and stripes back and forth over the 114-124-134-142-156-170 sts on needle for yoke. When piece measures 59-62-65-68-72-76 cm / 23¼"-24½"-25½"-26¾"-28½"-30" - READ MEASURING TIP ABOVE, bind off the middle 14-14-16-16-18-18 sts for neck and finish each shoulder separately. Then bind off at beg of every row from neck as follows: bind off 1 st 2 times = 48-53-57-61-67-74 sts remain on shoulder. Continue until piece measures 61-64-67-70-74-78 cm / 24"-25¼"-26"½-27½"-29"-30¾" and bind off. Insert 2 markers in the piece; insert a marker on each of the long sides 26-27-29-30-31-32 cm / 10¼"-10½"-11½"-11¾"-12¼"-12½" down from each shoulder, use markers for assembly. Slip the 114-124-134-142-156-170 sts from stitch holder in bottom edge back on circular needle size 3.5 mm / US 4 and work in garter st and stripes back and forth until piece measures 72-74-76-78-80-82 cm / 28⅜"-29⅛"-30"-30¾"-31½"-32¼" from shoulder, loosely bind off. RIGHT FRONT PIECE: Loosely cast on 12 sts with Delight on double pointed needles size 3.5 mm / US 4. Switch to Alpaca and work 1 ridge, switch to Delight and work 1 ridge. Switch to Alpaca and K 1 row, turn piece clockwise and pick up 4 sts along the side of ridges. Turn piece again and pick up 12 sts on the under side of cast-on edge = 28 sts on needle. K 1 row over all sts. Insert a marker in the 13th and 16th st. Then work in garter st and stripes AT THE SAME TIME inc with 1 YO on each side of 13th and 16th st on every row from RS (=4 sts inc), K YOs to make a small hole. Switch to circular needle when needed. Continue to inc this way until inc has been done 56-61-66-70-77-84 times in total and there are 252-272-292-308-336-364 sts on needle. On next row from WS K the first 69-74-79-83-90-97 and then slip them on 1 stitch holder (= bottom edge of jacket), bind off the next 114-124-134-142-156-170 sts (= side of jacket). Work in garter st and stripes back and forth over the last 69-74-79-83-90-97 sts on needle for yoke, work until piece measures 61-64-67-70-74-78 cm / 24"-25¼"-26"½-27½"-29"-30¾". On next row from WS bind off the first 48-53-57-61-67-74 sts. Insert 1 marker in the piece; insert a marker on the long side 26-27-29-30-31-32 cm / 10¼"-10½"-11½"-11¾"-12¼"-12½" down from shoulder, use marker when sewing in sleeve. 21-21-22-22-23-23 sts remain on needle for collar. Then continue in garter st and stripes back and forth over these sts AT THE SAME TIME work short rows as follows: Beg from WS towards shoulder. * K 1 row over all sts, work 1 ridge (2 rows) over only the outermost 12 sts from mid front, K 1 row over all sts, switch color *, repeat from *-* onwards. There is 1 ridge on the inside and 2 ridges at the edge in the same color consecutively on collar. Work until collar measures approx. 5-5-5.5-5.5-6-6 cm / 2"-2"-2¼"-2¼"-2½"-2½" on the inside on the most narrow part and bind off. Slip the 69-74-79-83-90-97 sts on stitch holder back on needle and work in garter st back and forth until piece measures 72-74-76-78-80-82 cm / 28⅜"-29⅛"-30"-30¾"-31½"-32¼" from shoulder, loosely bind off. LEFT FRONT PIECE: Work as right but reversed until inc has been done 56-61-66-70-77-84 times in total and there are 252-272-292-308-336-364 sts on needle. K the first 69-74-79-83-90-97 sts from RS and then slip them on 1 stitch holder (= bottom edge of jacket), bind off the next 114-124-134-142-156-170 sts (= side of jacket). Work in garter st back and forth over the last 69-74-79-83-90-97 sts on needle for yoke, work until piece measures 61-64-67-70-74-78 cm / 24"-25¼"-26"½-27½"-29"-30¾". On next row from RS bind off the first 48-53-57-61-67-74 sts, work the last 21-21-22-22-23-23 sts. Insert 1 marker in the piece; insert a marker on the long side 26-27-29-30-31-32 cm / 10¼"-10½"-11½"-11¾"-12¼"-12½" down from shoulder, use marker when sewing in sleeve. Then continue in garter st back and forth over these sts AT THE SAME TIME work short rows as follows: Turn piece and beg from WS towards mid front. * Work 1 ridge (2 rows) over the outermost 12 sts from mid front, work 1 ridge (2 rows) over all sts, switch color *, repeat from *-* onwards. There is 1 ridge on the inside and 2 ridges at the edge in the same color consecutively on collar. Work until collar measures approx. 5-5-5.5-5.5-6-6 cm / 2"-2"-2¼"-2¼"-2½"-2½" on the inside on the most narrow part and bind off. Slip the 69-74-79-83-90-97 sts on stitch holder back on needle and work in garter st back and forth until piece measures 72-74-76-78-80-82 cm / 28⅜"-29⅛"-30"-30¾"-31½"-32¼" from shoulder, loosely bind off. SLEEVE: Worked back and forth on circular needle from shoulder. Cast on 122-126-132-136-140-146 sts on circular needle size 3.5 mm / US 4 with Delight and work in garter st and stripes back and forth on needle as before until piece measures approx. 2 cm / ¾". Dec 1 st inside 1 edge st in each side by K 2 sts tog. Repeat approx. every cm / ½" 13 more times (= 14 times in total) = 94-98-104-108-112-118 sts. Work until piece measures 17 cm / 6¾" and loosely bind off. Make another sleeve the same way. ASSEMBLY: Sew in outer loops of edge sts to avoid a chunky seam. Sew the shoulder seams. Sew in sleeves between markers in the sides. Sew underarm and side seams in one. Sew collar tog mid back (seam should be out on RS so that when collar is folded, the edge will be under collar and be invisible). Sew collar to neckline in the back of neck. Fasten off. |
|
 |
|
Have you finished this pattern?Tag your pictures with #dropspattern #bluemazejacket or submit them to the #dropsfan gallery. Do you need help with this pattern?You'll find 24 tutorial videos, a Comments/Questions area and more by visiting the pattern on garnstudio.com. © 1982-2026 DROPS Design A/S. We reserve all rights. This document, including all its sub-sections, has copyrights. Read more about what you can do with our patterns at the bottom of each pattern on our site. |
|


With over 40 years in knitting and crochet design, DROPS Design offers one of the most extensive collections of free patterns on the internet - translated to 17 languages. As of today we count 325 catalogs and 12298 patterns - 12288 of which are translated into English (US/in).
We work hard to bring you the best knitting and crochet have to offer, inspiration and advice as well as great quality yarns at incredible prices! Would you like to use our patterns for other than personal use? You can read what you are allowed to do in the Copyright text at the bottom of all our patterns. Happy crafting!
Post a comment to pattern DROPS 153-13
We would love to hear what you have to say about this pattern!
If you want to leave a question, please make sure you select the correct category in the form below, to speed up the answering process. Required fields are marked *.