Daylight

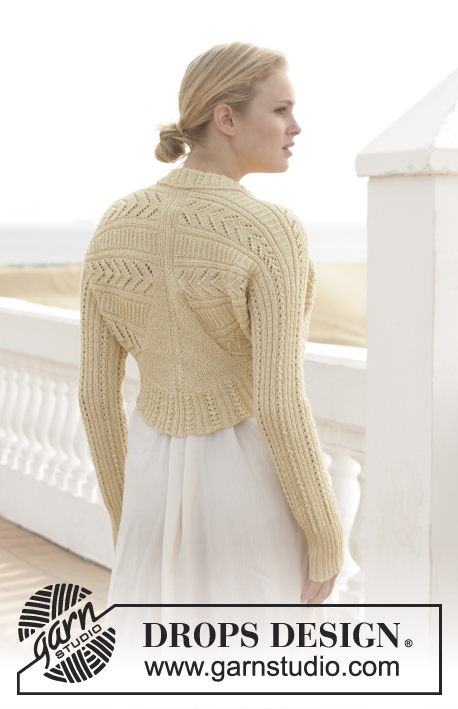
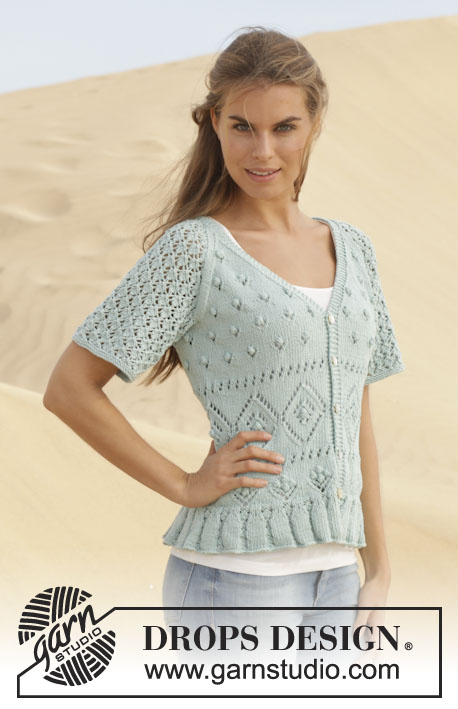
Knitted DROPS top with lace pattern and raglan in ”BabyAlpaca Silk”. Size S-XXXL

DROPS 152-13
DROPS design: Pattern no bs-063
Yarn group A
-----------------------------------------------------------
Size: S - M - L - XL - XXL - XXXL
Finished measurements:
Bust: 76-86-92-100-110-120 cm / 30"-34"-36 1/4"-39½"-43½"-47 1/4"
Full length: 56-58-60-62-64-66 cm / 22''-22¾''-23 5/8''-24 3/8''-25¼''-26''

Materials:
DROPS BABYALPACA SILK from Garnstudio
150-200-200-200-250-250 g color no 2110, wheat

DROPS CIRCULAR NEEDLE (60 or 80 cm / 24'' or 32'') SIZE 3 mm / US 2.5 - or size needed to get 24 sts x 32 rows in stockinette st = 4'' x 4'' (10 x 10 cm).
DROPS CIRCULAR NEEDLE (40 and 80 cm / 16'' and 32'') SIZE 2.5 mm / US 1.5 - for rib.

-------------------------------------------------------

Alternative Yarn – See how to change yarns here
Yarn Groups A to F – Use the same pattern and change the yarn here
Yarn usage using an alternative yarn – Use our yarn converter here

-------------------------------------------------------

Pattern instructions

NOTE: This pattern is written in American English. All measurements in charts are in cm. For conversion from inches to cm - click here. There are different terms for crocheting in American and British English. If this pattern includes crochet, click for "crochet terms" here. For this pattern in British English, please click here.
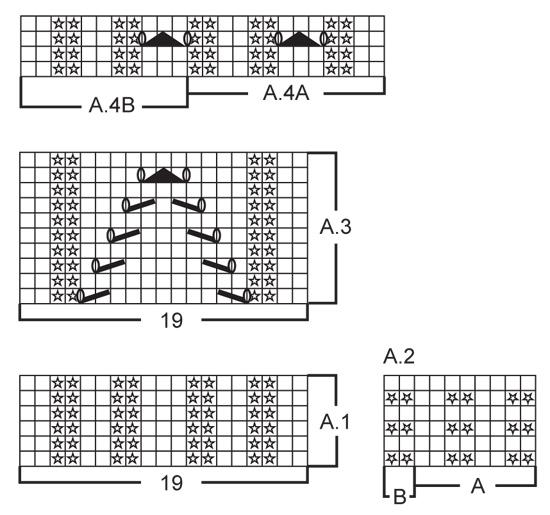
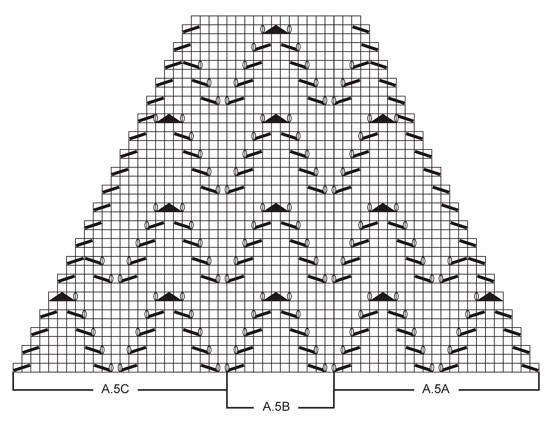
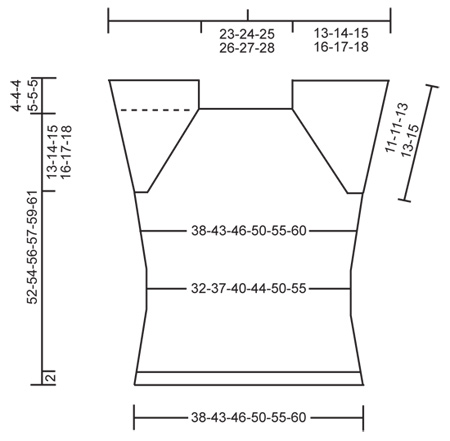
PATTERN:
See diagrams A.1 to A.5. The diagrams show all rows in pattern seen from RS.

GARTER ST (in the round on circular needle):
* K 1 round and P 1 round *, repeat from *-*. 1 ridge = 2 rounds.

DECREASE TIP 1:
Dec in each side of body, i.e. outside A.3 in each side.
Dec as follows after A.3: Slip 1 st as if to K, K 1, psso.
Dec as follows before A.3: Beg 2 sts before A.3 and K 2 tog.

INCREASE TIP:
Inc 1 st by making 1 YO. On next round K YO twisted to avoid holes.

DECREASE TIP 2 (applies to raglan):
Beg 3 sts before marker: K 2 tog, K 2 (marker is between these 2 sts), slip 1 st as if to K, K 1, psso.
----------------------------------------------------------

TOP:
Worked in the round on circular needle from bottom up.

BODY:
Cast on 226-250-274-298-330-354 sts on circular needle size 2.5 mm / US 1.5 with Baby Alpaca Silk. K 1 round. Then work next round as follows: A.1 (= 19 sts), A.2A over the next 92-104-116-128-144-156 sts, A.2B (= 2 sts), A.1 (= 19 sts), A.2A over the next 92-104-116-128-144-156 sts and finish with A.2B (= 2 sts). Continue pattern like this until A.1/A.2 has been worked 1 time vertically, piece measures approx. 2 cm / 3/4''. Switch to circular needle size 3 mm / US 2.5, work next round as follows: A.3 (= 19 sts – work A.3 directly above A.1), work in stockinette st over the next 94-106-118-130-146-158 sts AT THE SAME TIME dec 23-23-27-29-33-33 sts evenly over these sts, work A.3 (= 19 sts – NOTE: work A.3 directly above A.1) and work the last 94-106-118-130-146-158 sts AT THE SAME TIME dec 23-23-27-29-33-33 sts evenly over these sts = 180-204-220-240-264-288 sts on needle. Continue in the round in stockinette st and A.3 in each side. REMEMBER THE GAUGE! When piece measures 6 cm / 2 3/8'', dec 1 st on each side of A.3 in each side on every 6th-6th-6th-6th-7th-7th round 7-7-7-7-6-6 times in total – READ DECREASE TIP = 152-176-192-212-240-264 sts. When piece measures 22-22-23-23-24-24 cm / 8 3/4"-8 3/4"-9"-9"-9½"-9½", inc 1 st on each side of A.3 in each side on every 8th-8th-8th-8th-10th-10th round 7-7-7-7-6-6 times in total – READ INCREASE TIP = 180-204-220-240-264-288 sts. When piece measures 38-39-40-40-41-42 cm / 15"-15 1/4"-15 3/4"-15 3/4"-16"-16½", work in garter st - see GARTER ST above - over 15 sts in each side (i.e. over the middle 15 sts in A.3 in each side) AT THE SAME TIME on 1st round dec 5 sts evenly in each side over these 15 sts, the remaining sts are worked in stockinette st as before. When 3 rounds in garter st have been worked over the 10 sts in each side, bind off 10 sts for armholes = 75-87-95-105-117-129 sts remain on each front and back piece.
Piece measures approx. 39-40-41-41-42-43 cm / 15 1/4"-15 3/4"-16"-16"-16½"-17".

YOKE:
Work next round as follows: Work in stockinette st over the first 75-87-95-105-117-129 sts (= back piece), AT THE SAME TIME insert 1st marker after first st and 2nd marker before last st, then cast on 57-57-65-65-73-73 new sts on needle over armhole, work in stockinette st over the next 75-87-95-105-117-129 sts (= front piece), AT THE SAME TIME insert 3rd marker after the first of these sts and 4th marker before the last of these, then cast on 57-57-65-65-73-73 new sts on needle over the other armhole = 264-288-320-340-380-404 sts on needle.
READ ALL OF THE FOLLOWING SECTION BEFORE CONTINUING!
Work first round as follows:
K over back piece (i.e. until 1 st past 2nd marker), work as follows over sleeve: * P 2, K 2 *, repeat from *-* 2-2-3-3-4-4 times in total, P 2, work A.4A (= 13 sts) 2 times in total, work A.4B (= 11 sts), * P 2, K 2 *, repeat from *-* 2-2-3-3-4-4 times in total, P 2, K over front piece (i.e. from 1 st before 3rd marker and until 1 st past 4th marker) and work over sleeve as on first sleeve (NOTE: 1 st on each side of all markers are worked in stockinette st until finished measurements).

RAGLAN:
On next round beg dec for raglan and dec for raglan on each side of the 4 markers – READ DECREASE TIP 2 (= 8 sts dec). Repeat dec every other round 21-22-24-25-26-26 times in total.

PATTERN:
AT THE SAME TIME on 1st-1st-4th-3rd-3rd-3rd round with raglan dec (i.e. on 1st-1st-7th-5th-5th-5th round worked when raglan dec beg) work pattern according to diagram A.5 on front and back piece (work the other sts as explained above). NOTE: When pattern beg, there should be 73-85-85-97-109-121 sts between markers on front and back piece. Work as follows on front and back piece: K 1 st after first marker, work diagram A.5A (= 23 sts, raglan dec is marked in diagram), work pattern according to diagram A.5B over the next 24-36-36-48-60-72 sts, A.5C (= 24 sts, raglan dec is marked in diagram) and finish with K 1 before marker (continue as before over sts on sleeve with raglan dec as explained above). Continue pattern like this.
When A.5 has been worked 1 time vertically, work 0-2-0-2-4-4 rounds in stockinette st over front and back piece and pattern as before over sleeves AT THE SAME TIME continue raglan dec in size M + XL + XXL + XXXL. After all dec for raglan 96-112-128-140-172-196 sts remain on needle.

NECK EDGE:
Switch to circular needle size 2.5 mm / US 1.5 and P 1 round, K 1 round and P 1 round, before loosely binding off with K sts.

This pattern has been corrected.

Updated online: 24.02.2014
New chart A.5A (a missing yo on row 1, 11, 21 and 31).
Updated online: 04.06.2014
under YOKE (4 th marker BEFORE, not after):
....AT THE SAME TIME insert 3rd marker after the first of these sts and 4th marker before the last of these, then cast on 57-57-65-65-73-73 ....

Diagram

All measurements in charts are in cm.

symbols = K
symbols = P
symbols = 1 YO between 2 sts
symbols = K 2 tog
symbols = slip 1 st as if to K, K 1, psso
symbols = slip 1 st as if to K, K 2 tog, psso
diagram
diagram
diagram
Do you have a question? See a list of frequently asked questions (FAQ)

Knitting tension is what determines the final measurements of your work, and is usually measured per 10 x 10 cm. It is provided like so: number of stitches in width x number of rows in height - eg: 19 stitches x 26 rows = 10 x 10 cm.

The knitting tension is very individual; some people knit/crochet loosely while others work tightly. You adjust the knitting tension with the needle size, which is why the suggested needle size only serve as a guide! You need to adjust this (up or down) to ensure that YOUR knitting tension matches the knitting tension provided in the pattern. If you work with a different knitting tension than provided you will have a different yarn consumption, and your work will have different measurements than what the pattern suggests.

The knitting tension also determines which yarns can replace each other. As long as you achieve the same knitting tension you can replace one yarn with another.

See DROPS lesson: How to measure your tension/gauge

See DROPS video: How to make a gauge tension swatch

The required amount of yarn is provided in grams, eg: 450 g. To calculate how many balls you’ll need you first need to know how many grams are in 1 ball (25g, 50g or 100g). This information is available if you click on the individual yarn quality on our pages. Divide the amount required with the amount of each ball. For example, if each ball is 50g (the most common amount), the calculation will be as follows: 450 / 50 = 9 balls.

The important thing when changing from one yarn to another is that the knitting/crochet tension remains the same. This is so that the measurements of the finished piece will be the same as on the sketch provided. It is easier to achieve the same knitting tension using yarns from the same yarn group. It is also possible to work with multiple strands of a thinner yarn to achieve the knitting tension of a thicker one. Please try our yarn converter. We recommend you to always work a test swatch.

Please NOTE: when changing yarn the garment might have a different look and feel to the garment in the photo, due to individual properties and qualities of each yarn.

See DROPS lesson: Can I use a different yarn than the one mentioned in the pattern?

All our yarns are categorised into yarn groups (from A to F) according to thickness and knitting tension – group A contains the thinnest yarns and group F the thickest. This makes it easier for you to find alternative yarns to our patterns, should you wish to switch yarn. All yarns within the same group have a similar knitting tension and can easily replace each other. However, different yarn qualities have different structures and properties which will give the finished work a unique look and feel.

Click here for an overview of the yarns in each yarn group

At the top of all our patterns you’ll find a link to our yarn converter, which is a helpful tool should you wish to use a different yarn than suggested. By filling in the yarn quality you wish to replace, the amount (in your size) and number of strands, the converter will present good alternative yarns with the same knitting tension. Additionally it will tell you how much you’ll require in the new qualities and whether you’ll need to work with multiple strands. Most skeins are 50g (some are 25g or 100g).

If the pattern is worked with multiple colours, every colour will have to be converted separately. Similarly, if the pattern is worked with several strands of different yarns (for example 1 strand Alpaca and 1 strand Kid-Silk) you will have to find alternatives for each, individually.

Click here to see our yarn converter

Since different yarns have different qualities and textures we have chosen to keep the original yarn in our patterns. However, you can easily find options among our available qualities by using our yarn converter, or simply pick a yarn from the same yarn group.

It is possible that some retailers still have discontinued yarns in stock, or that someone has a few skeins at home that they would like to find patterns for.

The yarn converter will provide both alternative yarn as well as required amount in the new quality.

If you think it's hard to decide what size to make, it can be a good idea to measure a garment you own already and like the size of. Then you can pick the size by comparing those measures with the ones available in the pattern's size chart.

You'll find the size chart at the bottom of the pattern.

See DROPS lesson: How to read size chart

The needle size provided in the pattern serves only as a guide, the important thing is to follow the knitting tension. And since knitting tension is very individual, you will have to adjust the needle size to ensure that YOUR tension is the same as in the pattern – maybe you’ll have to adjust 1, or even 2 needle sizes, up or down to achieve the correct tension. For this, we recommend that you work test swatches.

Should you work with a different knitting tension than the one provided, the measurements of the finished garment might deviate from the measurement sketch.

See DROPS lesson: How to measure your tension/gauge

See DROPS video: How to make a gauge tension swatch

Working a garment top-down provides more flexibility and room for personal adjustment. For example it is easier to try the garment on while working, as well as making adjustments to length of yoke and shoulder caps.

The instructions are carefully explaining every step, in the correct order. Diagrams are adjusted to the knitting direction and are worked as usual.

The diagram depicts all rows/rounds, and every stitch seen from the right side. It is read from bottom to top, from right to left. 1 square = 1 stitch.

When working back and forth, every other row is worked from the right side and every other row is worked from the wrong side. When working from the wrong side, the diagram will have to be worked reversed: from left to right, knit stitches are purled, purl stitches are knit etc.

When working in the round every round is worked from the right side and the diagram are worked from right to left on all rounds.

See DROPS lesson: How to read knitting diagrams

The diagram depicts all rows/rounds, and every stitch seen from the right side. It is worked from bottom to top, from right to left.

When working back and forth every other row is worked from the right side: from right to left and every other row is worked from the wrong side: from left to right.

When working in the round, every row in the diagram are worked from the right side, from right to left.

When working a circular diagram you start in the middle and work your way outwards, counter clockwise, row by row.

The rows usually start with a given number of chain stitches (equivalent to the height of the following stitch), this will either be depicted in the diagram or explained in the pattern.

See DROPS lesson: How to read crochet diagrams

Instructions for working several diagrams after each other on the same row/round, will often be written like so: “work A.1, A.2, A.3 a total of 0-0-2-3-4 times". This means you work A.1 once, then A.2 is worked once, and A.3 is repeated (in width) the number of times provided for your size – in this case like so: S = 0 times, M = 0 times, L=2 times, XL= 3 times and XXL = 4 times.

The diagrams are worked as usual: begin with the first row in A.1, then work the first row in A.2 etc.

See DROPS lesson: How to read knitting diagrams

See DROPS lesson: How to read crochet diagrams

The total width of the garment (from wrist-to-wrist) will be larger in the larger sizes, despite the actual sleeves being shorter. The larger sizes have longer sleeve caps and wider shoulders, so there will be a good fit in all sizes.

The measurement sketch/schematic drawing provides information regarding the full length of the garment. If it’s a jumper or a jacket the length is measured from the highest point on the shoulder (usually closest to the neckline), and straight down to the bottom of the garment. It is NOT measured from the tip of shoulder. Similarly, the length of yoke is measured from the highest point on the shoulder and down to where yoke is split into body and sleeves.

See DROPS lesson: How to read a schematic drawing

Diagrams are often repeated on the round or in height. 1 repeat is the diagram the way it appears in the pattern. If it says to work 5 repeats of A.1 in the round, then you work A.1 a total of 5 times after/next to each other in the round. If it says to work 2 repeats of A.1 vertically/in height you work the entire diagram once, then begin again at the start and work the entire diagram one more time.

Chain stitches are slightly narrower than other stitches and to avoid working the cast-on edge too tight, we simply chain more stitches to begin with. The stitch count will be adjusted on the following row to fit the pattern and measurement sketch.

The rib edge is more elastic and will contract slightly compared to, for example, stocking stitch. By increasing before the rib edge, you avoid a visible difference in width between the rib edge and the rest of the body.

It’s very easy to cast off too tightly, and by making yarn overs while casting off (and simultaneously casting these off) you avoid a too tight cast off edge.

See DROPS video: How to bind off with yarn overs (yo)

To achieve an even increase (or decrease) you can increase on, for example: every 3rd and 4th row alternately, like so: work 2 rows and increase on the 3rd row, work 3 rows and increase on the 4th. Repeat this until the increase is complete.

See DROPS lesson: Increase or decrease 1 st on every 3rd and 4th row alternately

Should you prefer to work in the round instead of back and forth, you may of course adjust the pattern. You’ll need to add steeks mid-front (usually 5 stitches), and follow the instructions. When you would normally turn and work from the wrong side, simply work across the steek and continue in the round. At the end you’ll cut the piece open, pick up stitches to work bands, and cover the cut edges.

See DROPS video: How to knit steeks and cut open

Should you prefer to work back and forth instead of in the round, you may of course adjust the pattern so you work the pieces separately and then assemble them at the end. Divide the stitches for the body in 2, add 1 edge stitch in each side (for sewing) and work the front and back pieces separately.

See DROPS lesson: Can I adapt a pattern for circular needles into straight needles?

Pattern repeats can vary slightly in the different sizes, in order to get the correct proportions. If you’re not working the exact same size as the garment in the photo, yours might deviate slightly. This has been carefully developed and adjusted so that the complete impression of the garment is the same in all sizes.

Make sure to follow instructions and diagrams for your size!

If you have found a pattern you like which is available in women’s size it’s not very difficult to convert it to men’s size. The biggest difference will be the length of sleeves and body. Start working on the women size that you think would fit across the chest. The additional length will be worked right before you cast off for the armhole/sleeve cap. If the pattern is worked top-down you can add the length right after the armhole or before the first decrease on sleeve.

Regarding additional yarn amount, this will depend on how much length you add, but it is better with a skein too many than too few.

All yarns will have excess fibres (from production) that might come off as lint or shedding. Brushed yarns (ie hairier yarns) have more of these loose, excess fibres, causing more shedding.

Shedding also depends on what is worn under or over the garment, and whether this pulls at the yarn fibres. It’s therefore not possible to guarantee that there will be no shedding

Below are some tips on how to get the best result when working with hairier yarns:

1. When the garment is finished (before you wash it) shake it vigorously so the looser hairs come off. NOTE: do NOT use a lint roller, brush or any method that pulls at the yarn.

2. Place the garment in a plastic bag and put it in your freezer - the temperature will cause the fibres to become less attached to each other, and excess fibres will come off easier.

3. Leave in the freezer for a few hours before taking it out and shaking it again.

4. Wash the garment according to the instructions on the yarn label.

Pilling is a natural process that happens to even the most exclusive of fibers. It's a natural sign of wear and tear that is hard to avoid, and that is most visible in high friction areas of your garment like a sweater's arms and cuffs.

You can make your garment look as new by removing the pilling, using a fabric comb or a pill/lint remover.

Still can't find the answer you need? Then scroll down and leave your question so one of our experts can try to help you. This will be done normally within 5 to 10 working days.
In the meantime, you can read the questions and answers that others have left to this pattern or join the DROPS Workshop on Facebook to get help from fellow knitters/crocheters!

You might also like...

Post a comment to pattern DROPS 152-13

We would love to hear what you have to say about this pattern!

If you want to leave a question, please make sure you select the correct category in the form below, to speed up the answering process. Required fields are marked *.

Comments / Questions (39)

country flag Annie Pang wrote:

RAGLAN After raglan dec stitches in A.4A & A.4B become less. Next row do i knit knit upon knit and purl upon purl ?

20.09.2021 - 03:58

DROPS Design answered:

Dear Mrs Pang, continue working the stiches in A.4 as before, ie K over K and P over P - do not work the lace pattern over 3 sts if you don't have these 3 sts "available" towards raglan, then just knit these sts instead. Happy knitting!

20.09.2021 - 11:20

country flag Maryline wrote:

Bonsoir J'ai terminé le top. En diminuant à tous les tours,j'ai obtenu en fin d'ouvrage les 128 mailles. Par contre il faut commencer l'empiecement en même temps que le raglan pas au 7eme rang sinon le motif est trop haut.

03.08.2020 - 22:45

country flag Maryline wrote:

J'ai pris la taille L. Je n'ai pas diminué ni augmenté au debut de l'ouvrage,il est droit. Mais l'explication dit "rabattre les 128 m restantes"C'est énorme, il y a peut etre une erreur.J'ai bien les 24 diminutions tout le 2 tours Il faut peut etre diminuer tous les tours En conclusion,les explications ne sont pas très claires, il faut être expérimentée

30.07.2020 - 13:28

DROPS Design answered:

Bonjour Maryline, en L vous tricotez l'empiècement sur 320 m, et diminuez pour le raglan 8 mailles tous les 2 tours un total de 24 fois soit 24x8= 192 diminutions; il reste donc 320-192 = 128 mailles quand toutes les diminutions du raglan sont terminées. Avez-vous bien la bonne tension en hauteur, soit 32 rangs jersey = 10 cm? Cela peut faire la différence pour le raglan. Bon tricot!

04.08.2020 - 09:53

country flag Maryline wrote:

Bonjour J'adore ce modèle J'ai terminé mais l'encolure ne correspond pas au modèle Il me reste 108 mailles à rabattre et l'encolure reste trop grande Je ne peux pas vous laisser de photo Merci

30.07.2020 - 11:26

DROPS Design answered:

Bonjour Maryline, dans ce modèle, on n'a pas de réhausse pour l'encolure dos, l'encolure dos et devant seront toutes deux identiques - en revanche, les 108 m ne correspondent effectivement à aucune taille, laquelle tricotez-vous? Jusqu'à quel niveau aviez-vous le bon nombre de mailles? Avez-vous vérifié les diminutions du raglan?

30.07.2020 - 12:37

country flag Catherine wrote:

Ok merci cette partie est faite, j'ai une autre question....j'ai rabattu les 10 mailles de chaque côté, mais le rang suivant je dois tricoterr les 87 premières mailles...est ce que je dois couper le fils ?? Sinon ça fait un trou... idem pour les 87 autres mailles. merci de votre aide

26.03.2020 - 17:37

DROPS Design answered:

Bonjour Catherine, tout à fait, vous coupez le fil puis tricotez les 87 m du dos, montez les mailles de la manche, tricotez les mailles du devant, montez les mailles de la 2ème manche et joignez en rond pour tricoter maintenant l'empiècement - mettez bien les marqueurs. Bon tricot!

27.03.2020 - 09:40

country flag Catherine wrote:

Bonjour, j'ai effectivement fini les augmentations, vous avez repondu à ma première question, cependant si vous lisez le patron ça dis après 3 tours au point mousse sur les 10 mailles de chaque côté rabattre 10 mailles pour les emmanchures, est ce que ces mailles sont celles avant et après ce qui était À.3? Merci

26.03.2020 - 14:19

DROPS Design answered:

Bonjour Catherine, oups et un bon point pour vous, j'avais zappé ces diminutions, alors vous allez donc procéder ainsi: sur les 15 mailles de chacun des côtés (= les 15 mailles centrales de A.3), vous diminuez 5 mailles à intervalles réguliers (= 2 m ens à l'end) pour qu'il ne reste plus que 10 mailles (= autrement dit vous aurez au-dessus de A.3: 2 m comme avant, 15 mailles diminuées à 10, 2 m comme avant soit 2 m jersey, 10 m point mousse, 2 m jersey. Après 3 tours point mousse, vous rabattez ces 10 mailles de chaque côté pour les emmanchures. Bon tricot!

26.03.2020 - 15:02

country flag Catherine wrote:

Bonjour Je suis à tricoter au point mousse sur les 15 mailles de chaque côté....Je ne suis pas certaine de bien comprendre, je tricotte au point Moïse dans ce qui était À.3?? Et en même temps je fais 5 diminutions de chaque côtes.....Après et avant ce qui était À.3???? Merci

26.03.2020 - 00:24

DROPS Design answered:

Bonjour Catherine, auparavant, vous tricotez A.3 sur chaque côté du top, maintenant vous tricotez les 15 m de chaque côté au point mousse, ces 15 mailles correspondent aux 15 m centrales de A.3, autrement dit les 19 m de A.3 vont se tricoter ainsi: 2 m end, 15 m point mousse et 2 m end. Mais ça c'est pour la bordure des emmanchures, or, vous parlez de diminutions, à quel niveau précis en êtes-vous? Car quand on commence à tricoter 15 m point mousse de chaque côté (au-dessus de A.3) les diminutions et les augmentations des côtés (de chaque côté de chaque A.3) doivent être terminées. Bon tricot!

26.03.2020 - 09:59

country flag Linda Panighetti wrote:

Hi again, after finishing the first round in A.4.A and A.4.B, do you start raglan and pattern below( all 3) at the same time? Thank you for your help. Linda

29.08.2018 - 20:18

DROPS Design answered:

Dear Linda, Yes, you are right. We start raglan and all 3 patterns at the same time. Happy Knitting!

30.08.2018 - 14:06

country flag Linda Panighetti wrote:

Hi, after working first round on yoke do you finish all of A.4B and A.4A before you start the raglan and the pattern or do you do all 3 at the same time? Thank you for your help. Linda

29.08.2018 - 03:27

country flag Mary wrote:

I need help with the beginning of the yoke section. After casting off the 10 stitches when proceeding to the 87 stocking stitches when I get to the second cast on 57 stitches there is a loop across the space where I should cast on. What am I doing wrong?

09.07.2018 - 02:52

DROPS Design answered:

Dear Mary, I'm not sure what you mean with "loop", after you have cast off the 10 sts on each side for armholes, you will cast on 57 sts for the sleeves over the 10 sts cast off. It may look a bit tricky on the first rounds but yoke will then work better in the round after few round. Happy knitting!

09.07.2018 - 08:54