
Popular categories
Looking for a yarn?


Comments / Questions (27)
![]() Karen wrote:
Karen wrote:
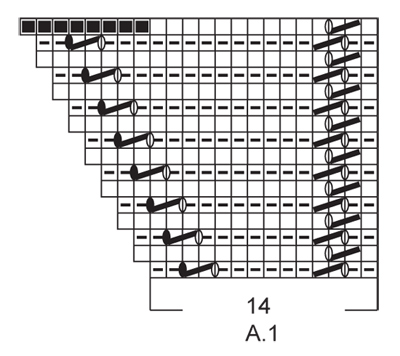
This is a beautiful shawl and I have now reached the edging part. Looking at diagram A1, I am a bit confused. Is the whole edging part done in garter stitch or stocking stitch? The squares with the lines through say K from WS, then the blank squares say K from RS, P from WS, but on that row you are always on the RS, so how can you purl? Any advice gratefully received.
03.03.2022 - 00:17DROPS Design answered:
Dear Karen, A.1 is worked in garter stitch; first row in A.1 is worked from WS = K from WS and on the RS row you will K from RS. Happy knitting!
03.03.2022 - 10:30
![]() Anne Bernard wrote:
Anne Bernard wrote:
Bonjour Je suis arrivée à la bordure mais je ne comprends pas que la 1ère maille est à l'endroit sur le l'envers si je dois glisser la 1ère m à l'envers. Merci
22.03.2020 - 14:44DROPS Design answered:
Bonjour Mme Bernard, pour attacher la bordure au châle, vous tricotez la dernière maille de la bordure et la maille en attente du châle ensemble à l'endroit, tournez et glissez la 1ère maille de la bordure comme pour la tricoter à l'envers (et continuez ensuite le diagramme). Bon tricot!
23.03.2020 - 10:43
![]() Emma wrote:
Emma wrote:
Das Tuch ist fertig.Sieht toll .Mit Armstulpen ist es perfekt.
26.03.2018 - 12:25
![]() Emma Model wrote:
Emma Model wrote:
Ich bin von Tuch begeistert.Gestern abend habe ich angefangen. Ich habe die Farbe uni Weiß und Grün gewählt. Sieht toll aus. Die Anleitung nach 2maligen lesen hat geklappt. An alle Strickbegeisterte grüße Emma
15.03.2018 - 16:53
![]() Elisabeth Dürrbeck wrote:
Elisabeth Dürrbeck wrote:
Ich möchte das o.g. Modell Stricken. Aber eine andere Farbe verwenden, und zwar Drops Delight 12, Regenbogen . Kann ich das zusammen mit der Farbe Fabel 800, Natur-beige stricken oder sieht eine andere Farbe dazu besser aus?
22.10.2015 - 10:04DROPS Design answered:
Das ist letztendlich immer Geschmackssache. Natur/beige ist ja sehr neutral und passt daher auch zu regenbogen, allerdings wird diese Farbe aus dem Programm genommen. Alternativ bietet sich natur oder einer der Grautöne an, je nachdem, wie hell die hellen Bereiche werden sollen. Ich würde zu regenbogen einen hellen Ton wählen, damit sich die Farben gut davon absetzen und somit noch mehr zum Leuchten kommen.
30.10.2015 - 12:29
![]() Regina Hausdorf wrote:
Regina Hausdorf wrote:
Was bedeutet Drops Rundnadel 4? Wenn am Knäuel selbst 2,5mm Nadelstärke steht. Mit welcher Stärke stricht Ihr jetzt dieses Tuch? Ich habe die Wolle bereits vor mir liegen. Danke für Eure Antwort
15.01.2015 - 23:55DROPS Design answered:
Sie halten sich immer an die in der Anleitung angegebene Nadelstärke, also 4 mm. Die Angabe auf der Banderole ist nur ein Richtwert. Für Tücher wird gerne eine etwas dickere Nadel genommen, damit sie lockerer fallen. Sie müssen aber auch die Maschenprobe einhalten und die Nadelstärke verwenden, die Sie zum Erreichen der Maschenprobe benötigen, das kann dann ggf. von der 4er-Nadel abweichen. Gutes Gelingen!
17.01.2015 - 19:05
![]() Marlou wrote:
Marlou wrote:
Prachtige sjaal waarbij ik al moeite heb met het begin! Vraag 1 Brei ik iedere nld aan de goede kant 1 omslag 1 r, 1 omslag 1 r en meerder ik dan ook nog 2 x2 steken. Vraag 2 ik begin met delight begin ik dan met de eerste naald van de strepen - in ribbel dus?
14.01.2015 - 20:20DROPS Design answered:
Hoi Marlou. Je meerdert zoals beschreven in elke nld op de goede kant (Zie TIP VOOR HET MEERDEREN). 1 omslag aan beide kanten van de markeerder = 4 omslagen per keer = 4 st. Vraag 2: Ja! :-)
15.01.2015 - 16:56
![]() Jutta wrote:
Jutta wrote:
Hallo, ich habe das Tuch schon zwei mal gestrickt und bei beiden Tücher brauchte ich je 50 g Delight mehr. Da ich immer 50 g mehr kaufe als angebegen war es bei mir nicht so schlimm. Aber Ihr sollte die menge von Delight anpassen. LG Jutta
25.06.2014 - 22:32
![]() Anna wrote:
Anna wrote:
Hallo, ich hab ein ähnliches Problem wie Barbara; mein drittes Knäuel Delight ist ca 60 Reihen vor Schluss der Bordüre zu Ende gegangen. Trotzdem: Ein wunderschöner Schal. Ich habe noch Wolle für ein zweites Exemplar in einer anderen Farbe, werde dann die zwei fehlenden Knäuel nachbestellen und bis dahin ist mein erstes (ja noch nicht vollendetes) Tuch zumindest davor sicher, dass meine Schwester es mir mopst. :)
23.04.2014 - 23:15
![]() Marijke wrote:
Marijke wrote:
Ik ben bezig met de punten van de sjaal, dat gaat op zich goed. Maar klopt het dat deze in ribbels wordt gebreid? Ziet er een beetje vreemd (grof) uit. Maar in het patroon staat toch dat de steken aan beide kanten recht moeten worden gebreid.
20.04.2014 - 09:55DROPS Design answered:
Hoi Marijke. De sjaal wordt in ribbelst en tricotsteken gebreid. Dit staat beschreven in het patroon zelf en onder de strepen.
22.04.2014 - 17:04
|
|||||||||||||||||||
Sierra#sierrashawl |
|||||||||||||||||||
|
|
|||||||||||||||||||
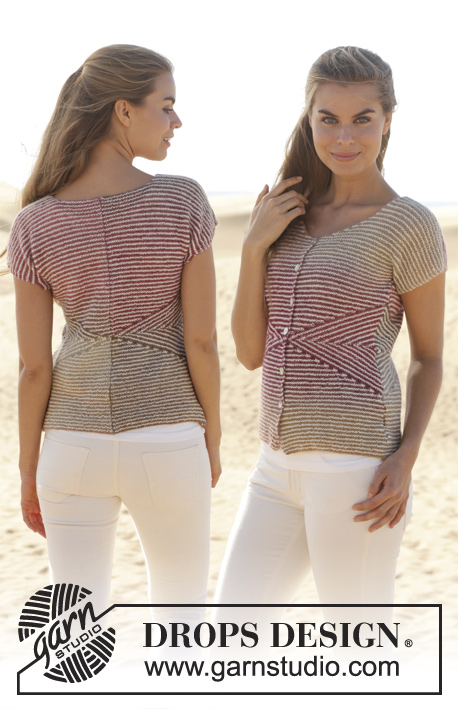
Knitted DROPS shawl with stripes and lace pattern in "Fabel" and "Delight".
DROPS 155-9 |
|||||||||||||||||||
|
GARTER ST (back and forth on needle): K all rows. 1 ridge = K2 rows. PATTERN: See diagram A.1. The diagram shows all rows in pattern seen from RS. INCREASE TIP: Inc 1 st from RS by making 1 YO. NOTE: Do not work YO twisted on next row, make a small hole. LACE PATTERN: Row 1 (= RS): K all sts. Row 2 (= WS): P all sts. Row 3 (= RS): Work 2 edge sts in garter st, 1 YO (= 1 st inc), * K 2 tog, 1 YO *, repeat from *-* until 2 sts remain before 1st marker, K 1, 1 YO (= 1 st inc), K 1, then work * K 2 tog, 1 YO *, repeat from *-* until 1 st remains before 2nd marker, K 2 (markers is between these sts), 1 YO (= 1 st inc), * K 2 tog, 1 YO *, repeat from *-* until 3 sts remain, K 1, 1 YO (= 1 st inc), finish with 2 edge sts in garter st. Row 4 (= WS): P all sts. PATTERN 1: * 1 ridge (= 2 rows), LACE PATTERN (= 4 rows) – see explanation above *, repeat from *-*. STRIPES: 1 ridge with Delight (= 2 rows) LACE PATTERN – see explanation above - with Fabel (= 4 rows) 1 ridge with Delight (= 2 rows) 2 rows in stockinette st with Fabel 2 rows in stockinette st with Delight 2 rows in stockinette st with Fabel 2 rows in stockinette st with Delight 2 rows in stockinette st with Fabel 2 rows in stockinette st with Delight 2 rows in stockinette st with Fabel ---------------------------------------------------------- SHAWL: Worked back and forth in STRIPES - see explanation above - on circular needle to make room for all the sts. Cast on 113 sts on circular needle size 4 mm / US 6 with Delight. Insert 1 marker after 4 sts in each side of shawl (= 105 sts between markers) and move markers upwards when working. Work as follows from RS: 2 edge sts in GARTER ST - see explanation above, 1 YO, K 1, 1 YO, K 1, work this st in stockinette st until finished measurements, (1st marker), K the next 105 sts, (2nd marker), K 1, 1 YO, K 1, 1 YO, finish with 2 edge sts in garter st. Work stripes in stockinette st with 2 edge sts in garter st in each side AT THE SAME TIME inc – read INCREASE TIP above, 1 st inside 2 edge sts in garter st in each side of piece and inc 1 st before 1st marker and 1 st after 2nd marker on every row from RS (= 4 sts inc on every row from RS). NOTE: Inc sts are explained on 3rd row in lace pattern. Work the inc sts in the pattern. Continue working and inc this way until 6 repetitions with stripes have been worked in total = 136 sts before 1st marker, 105 sts in the middle and 136 sts after 2nd marker = 377 sts on needle (66 inc in total). Piece measures approx. 36 cm / 14 1/4'' measured in knitting direction along one of the markers. Then work with Fabel and PATTERN 1 – see explanation above, with 2 edge sts in garter st in each side AT THE SAME TIME continue inc as before on every row from RS. Work the inc sts in the pattern. Continue working and inc this way until 4 repetitions of PATTERN 1 have been worked in total = 160 sts before 1st marker, 105 sts in the middle and 160 sts after 2nd marker (78 inc in total) = 425 sts on needle. Then K 1 row from RS with Delight as follows: Work 2 edge sts in garter st, * 1 YO, K 1 *, repeat from *-* 4 more times (= 5 sts inc), work until 5 sts remain before 1st marker, then work as follows * 1 YO, K 1 *, repeat from *-* 9 more times (= 10 sts inc), work 52 sts in stockinette st, 1 YO (= 1 st inc), work in stockinette st until 5 sts remain before 2nd marker, then work * 1 YO, K 1 *, repeat from *-* 9 more times (= 10 sts inc), work in stockinette st until 7 sts remain on row, * 1 YO, K 1 *, repeat from *-* 4 more times (= 5 sts inc), finish with 2 edge sts in garter st. K 1 row from WS, K YOs from previous row twisted to avoid holes = 456 sts on needle. Piece measures approx. 42 cm / 16½'' measured in knitting direction along one of the markers. Then work the edge of shawl. EDGE: Do not turn piece, but cast on 14 new sts with Delight for shawl edge from WS. Turn piece, K 1 row over the 14 new sts. Turn piece. Then work according to diagram A.1 over these sts from WS (1st row in diagram = WS). NOTE! On every row from RS work last st tog with next free st from shawl – this way the shawl edge is worked tog and fastened on shawl. On next row slip 1st st as if to P. Continue working A.1 along the entire edge of shawl = 57 tips along edge. Loosely bind off. SHAPING: Place the piece in lukewarm water until it is soaking wet. Carefully squeeze out the water - do not twist. Then roll the piece in a towel and squeeze to remove more water - the piece will now only be moist. Place piece on a carpet or mattress. Leave to dry. Repeat the process when the garment has been washed. |
|||||||||||||||||||
Diagram explanations |
|||||||||||||||||||
|
|||||||||||||||||||
 |
|||||||||||||||||||
Have you finished this pattern?Tag your pictures with #dropspattern #sierrashawl or submit them to the #dropsfan gallery. Do you need help with this pattern?You'll find 20 tutorial videos, a Comments/Questions area and more by visiting the pattern on garnstudio.com. © 1982-2026 DROPS Design A/S. We reserve all rights. This document, including all its sub-sections, has copyrights. Read more about what you can do with our patterns at the bottom of each pattern on our site. |
|||||||||||||||||||


With over 40 years in knitting and crochet design, DROPS Design offers one of the most extensive collections of free patterns on the internet - translated to 17 languages. As of today we count 325 catalogs and 12298 patterns - 12288 of which are translated into English (US/in).
We work hard to bring you the best knitting and crochet have to offer, inspiration and advice as well as great quality yarns at incredible prices! Would you like to use our patterns for other than personal use? You can read what you are allowed to do in the Copyright text at the bottom of all our patterns. Happy crafting!
Post a comment to pattern DROPS 155-9
We would love to hear what you have to say about this pattern!
If you want to leave a question, please make sure you select the correct category in the form below, to speed up the answering process. Required fields are marked *.