
Popular categories
Looking for a yarn?


Comments / Questions (77)
![]() KATIE wrote:
KATIE wrote:
I am working the body and have reached 42cm in length. So far I have completed 6 decreases on alternate RS rows. I started this section with the correct 251 stitches, but now have 239 st. If I am to have 115 across the back and 53 across each front after I have cast off the armholes, I have too many stitches at this point. How many decrease rows should I have done by this point? Does the estimated 53 st include the 5st of the band? Many thanks
01.11.2025 - 11:16
![]() Lis Andersen wrote:
Lis Andersen wrote:
Kan godt se de forskellige str. har forskellige maskeantal, men hvordan bliver den længere når der kun er en lænde i opskriften, selv om at der står det samme i f.eks. At str. S er 56 cm og xxxl er 66 cm. Jeg er vant til ar strikke, men den kan jeg ikke greje
27.01.2025 - 11:09DROPS Design answered:
Hej Lis, når du følger opskriften skal du også følge længden i de forskellige størrelser, de er skrevet ind bla under bærestykket og igen når du kommer længere ned :)
29.01.2025 - 11:15
![]() Julia wrote:
Julia wrote:
Ich bin bei der Passe angelangt, finde aber keine Angaben, wie der rückwärtige Halsausschnitt abgenommen wird. Oder habe ich da etwas übersehen? Glg
25.07.2024 - 15:00DROPS Design answered:
Liebe Julia, es wird nicht gesondert für den hinteren Halsausschnitt abgenommen. Wenn die Raglanabnahmen beendet sind, werden die vorderen Blenden wie beschrieben stillgelegt und noch 1 Reihe mit gleichmäßig verteilten Abnahmen gestrickt, dann wird abgekettet. Sie haben also nichts übersehen. Viel Spaß beim Weiterstricken!
26.07.2024 - 22:35
![]() Julia wrote:
Julia wrote:
Werden die verkürzten Reihen an der Blende nur einmalig gestrickt?
11.07.2024 - 15:04DROPS Design answered:
Liebe Julia, ja, die verkürzten Reihen werden an der Blende nur 1 x wie beschrieben gestrickt, damit die Blende beim Übergang zu den V-Ausschnitt-Abnahmen schön liegt und sich nicht wellt. Viel Spaß beim Weiterstricken!
12.07.2024 - 10:10
![]() Morys wrote:
Morys wrote:
Wäre gut wenn man am Anfang des Diagrammes gesagt hätte , dass alle Reihen = Hinreihe und Rückreihe gezeichnet sind. Sonst war alles okay d die Jacke ist schön geworden.
09.05.2021 - 19:35
![]() Karen Lampe wrote:
Karen Lampe wrote:
Raglanschrägung: beidseitig des Markierungsfadens soll in jeder Hin-R je 1 M abgenommen werden, also auch beim Ärmel. Dadurch wird der Ärmel aber doch um ca .1/3 enger (Größe L: Abnahme von 21 M von insgesamt 61) und damit zu eng. Wo liegt mein Fehler ?
19.02.2019 - 17:51DROPS Design answered:
Liebe Frau Lampe, es soll ja 21 M für jeden Ärmel bleiben, es sollte so stimmen, was meinen Sie mit "zu eng", Stimmt Ihre Maschenprobe in der Höhe auch?
20.02.2019 - 09:15
![]() Karen Lampe wrote:
Karen Lampe wrote:
Muster Ocean Breeze 152-1: Wie wird im Muster A1 der Bereich mit den Umschlägen (= 3 M: Umschlag - M -Umschlag) in der Rückreihe gestrickt , linke oder rechte M, alle M gleich links bzw. rechts ?
25.01.2019 - 09:33DROPS Design answered:
Liebe Frau Lampe, die Diagramme zeigen alle Reihen (= die Hin- sowie die Rückreihen), die 3 erstenM in A.1 z.B werden bei der 1. Reihe (Hinreihe) links gestrickt, und rechts bei der Rückreihe. Bei der 3. Reihe stricken Sie 1 Umschlag, 1 Abnahme, 1 Umschlag (= 3 M) und bei der 4. Reihen stricken Sie diese 3 M rechts (= Rückreihe). Viel Spaß beim stricken!
25.01.2019 - 09:39
![]() Bente Gregersen wrote:
Bente Gregersen wrote:
Vedr. model nr. 152-1 på side 3 af 8. Når arbejdet måler 36 cm i S strikkes forkortede forkanter. Er det hele vejen op i begge sider, eller kun den ene gang?
14.08.2015 - 13:48DROPS Design answered:
Hej Bente, Det er kun den ene gang du strikker forkortede pinde i hver side. God fornöjelse!
09.09.2015 - 08:17
![]() Lisa Lebrija wrote:
Lisa Lebrija wrote:
Den er utrolig stram i ærmegabet.
19.07.2015 - 20:10
![]() Sue wrote:
Sue wrote:
Is there a way to see all the posts in English?
14.06.2015 - 23:30
|
|||||||||||||||||||||||||
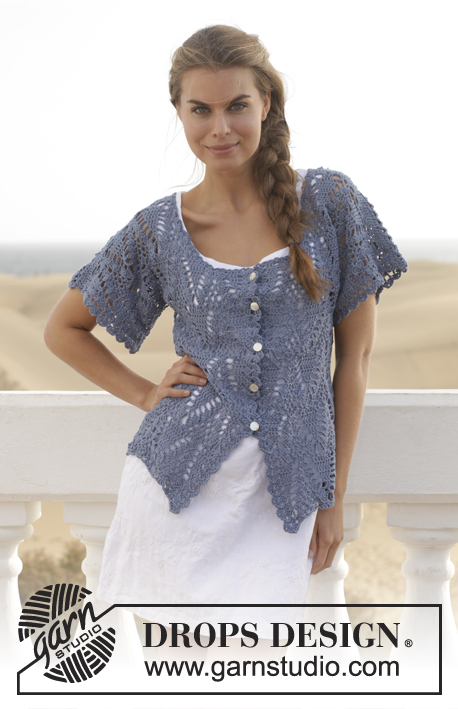
Ocean Breeze#oceanbreezecardigan |
|||||||||||||||||||||||||
 |
 |
||||||||||||||||||||||||
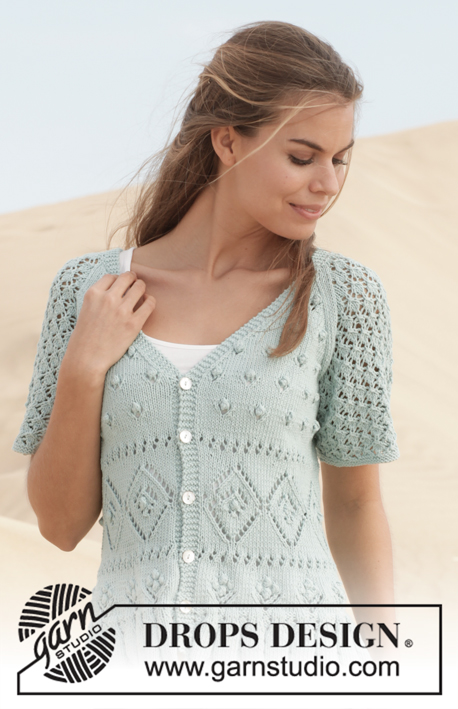
Knitted DROPS jacket with lace pattern and raglan in ”Cotton Light”. Size: S - XXXL.
DROPS 152-1 |
|||||||||||||||||||||||||
|
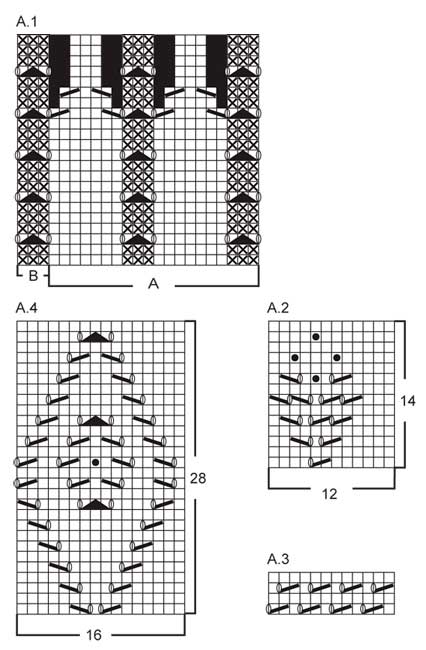
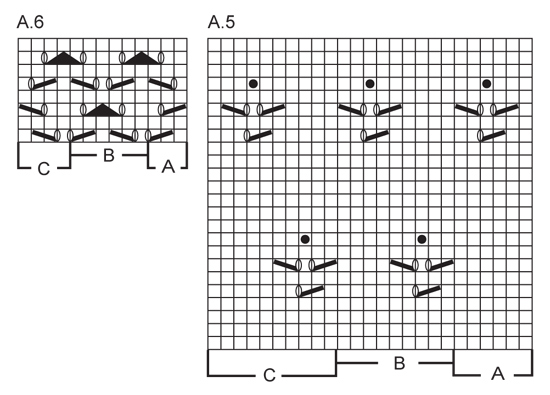
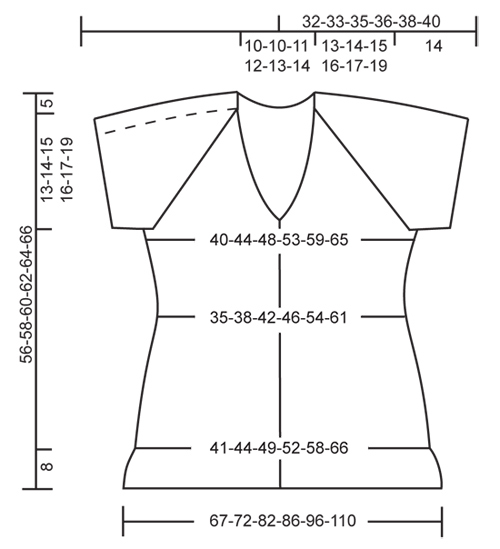
GARTER ST (back and forth on circular needle): K all rows. 1 ridge = K2 rows. GARTER ST (in the round on double pointed needles): * K 1 round and P 1 round *, repeat from *-*. 1 ridge = 2 rounds. PATTERN: See diagrams A.1 to A.6. The diagrams show all rows in pattern seen from RS. BUTTONHOLES: Dec for buttonholes on right band. 1 buttonhole = K tog second and third st from edge and make 1 YO. Dec for buttonholes when piece measures: SIZE S: 8, 15, 22, 29 and 35 cm / 3", 6", 8¾", 11½", 13¾" SIZE M: 8, 15, 22, 29 and 35 cm / 3", 6", 8¾", 11½", 13¾" SIZE L: 8, 15, 22, 29 and 35 cm / 3", 6", 8¾", 11½", 13¾" SIZE XL: 8, 15, 22, 29 and 35 cm / 3", 6", 8¾", 11½", 13¾" SIZE XXL: 8, 15, 22, 29 and 35 cm / 3", 6", 8¾", 11½", 13¾" SIZE XXXL: 8, 14, 20, 26 and 32 cm / 3", 5½", 8", 10¼", 12½" DECREASE TIP 1: All dec are done from RS! Dec 1 st by K 2 sts tog. DECREASE TIP 2: Dec inside 5 band sts in each side. All dec are done from RS! Dec as follows after 5 band sts: Slip 1 st as if to K, K 1, psso. Dec as follows before 5 band sts: K 2 tog. INCREASE TIP: Inc 1 st by making 1 YO. On next row work YO twisted to avoid holes. RAGLAN: Dec on each side of marker in each raglan line. All dec are done from RS! Beg 3 sts before marker and work as follows: K 2 tog, K 2 (marker is between these 2 sts), slip 1 st as if to K, K 1, psso (= 2 sts dec). ---------------------------------------------------------- BODY: Worked back and forth on circular needle from mid front. Cast on 293-313-353-373-413-473 sts (includes 5 band sts in each side towards mid front) on circular needle size 3.5 mm / US 4 with Cotton Light. P 1 row from WS. Work next row as follows from RS: 5 band sts in GARTER ST - see explanation above, work pattern according to diagram A.1A until 8 sts remain, work A.1B (= 3 sts) and finish with 5 band sts in GARTER ST. Continue pattern like this back and forth. When A.1 has been worked, there are 181-193-217-229-253-289 sts on needle and piece measures approx. 8 cm / 3" vertically, remember BUTTONHOLES on right band - see explanation above. Work next row as follows from RS: 5 band sts in garter st, work pattern according to diagram A.2 until 8 sts remain, work 3 sts in stockinette st and finish with 5 band sts in garter st. Continue pattern like this. REMEMBER THE GAUGE! When A.2 has been worked, piece measures approx. 13 cm / 5". Work 4 rows in stockinette st (1st row = RS and continue bands in garter st) while AT THE SAME TIME on 3rd row (= RS) dec 15-12-15-15-9-12 sts evenly - READ DECREASE TIP 1 (do not dec over bands) = 166-181-202-214-244-277 sts remain on needle. Then work A.3 1 time vertically with 5 band sts in garter st in each side. After A.3 work 4 rows in stockinette st while AT THE SAME TIME on 1st row (= RS) dec 11-10-15-11-9-10 sts evenly (do not dec over bands) = 155-171-187-203-235-267 sts remain on needle. Work next row as follows from RS: 5 band sts as before, work pattern according to diagram A.4 until 6 sts remain on row, work 1 st in stockinette st and finish with 5 band sts in garter st as before. When A.4 has been worked 1 time vertically, work 4 rows in stockinette st (1st row = RS and continue bands in garter st) while AT THE SAME TIME on 2nd row (= WS) inc 11-13-9-14-9-4 sts evenly - READ INCREASE TIP (do not inc over bands) = 166-184-196-217-244-271 sts remain on needle. Then work A.3 1 time vertically with 5 band sts in garter st in each side. After A.3 work 4 rows in stockinette st while AT THE SAME TIME on 2nd row (= WS) inc 13-13-10-16-7-7 sts evenly (do not inc over bands) = 179-197-206-233-251-278 sts remain on needle. The piece now measures approx. 31 cm / 12¼" vertically in all sizes. Work next row as follows from RS: 5 band sts as before, work pattern according to diagram A.5A (= 6 sts), work pattern according to diagram A.5B until 15 sts remain on row, work A.5C (= 10 sts) and finish with 5 band sts as before. Continue pattern like this back and forth. AT THE SAME TIME insert 1 marker 47-52-54-61-65-72 sts in from each side (= 85-93-98-111-121-134 sts between markers on back piece). When piece measures 36-36-36-36-36-33 cm / 14¼"-14¼"-14¼"-14¼"-14¼"-13" (adjust so that approx. 2 rows have been worked after last buttonhole on right band), work short rows over bands as follows (beg from RS): K 5 band sts, turn piece, tighten yarn and K, turn piece and work as before over all sts, turn piece, K 5 band sts, turn piece, tighten yarn and K. Then work back and forth over all sts as before, AT THE SAME TIME on 1st row from RS dec 1 st in each side towards mid front for V-neck – READ DECREASE TIP 2. Repeat dec every other row (i.e. every row from RS) 21-24-26-30-33-38 times in total – NOTE: Work sts that do not fit the pattern in stockinette st while decreasing. AT THE SAME TIME when piece measures approx. 38-39-40-41-42-42 cm / 15"-15¼"-15¾"-16⅛"-16½"-16½" – adjust so that next row is worked from WS, bind off for armholes in each side as follows: Work until 3 sts remain before first marker in the side, bind off the next 6 sts, work until 3 sts remain before marker in the other side, bind off the next 6 sts and work the rest of row. There are now 79-87-92-105-115-128 sts on back piece and approx. 41-45-46-51-53-57 sts on each front piece (depending on no of sts dec for V-neck). Put piece aside and work the sleeves (dec for V-neck are continued on yoke). SLEEVE: Worked in the round on double pointed needles. Cast on 71-77-79-85-87-93 sts on double pointed needles size 3 mm / US 2.5 with Cotton Light. Work 2 ridges in GARTER ST in the round - see explanation above. Switch to double pointed needles size 3.5 mm / US 4 and K 1 round while AT THE SAME TIME dec 10-10-12-12-14-14 sts evenly = 61-67-67-73-73-79 sts on needle. On next round work as follows: Work A.6A (= 3 sts), work pattern according to diagram A.6B until 4 sts remain on round and finish with A.6C (= 4 sts). Continue pattern in the round like this. When piece measures approx. 14 cm / 5½" in all sizes – finish after 5th round in A.6, bind off on next round the middle 6 sts under sleeve = 55-61-61-67-67-73 sts remain on row. Put piece aside and Make another sleeve. YOKE: Slip sleeves on to same circular needle as body where armholes were bind off (without working them first) = approx. 271-299-306-341-355-388 sts on needle. Insert 1 marker in all transitions between sleeves and body (= 4 markers). Continue back and forth as before with A.5 on body, A.6 on sleeves and neck dec in each side towards mid front as before – NOTE: Make sure to make the same no of YOs as dec sts in the pattern on body and sleeves so that the no of sts is correct. In addition on first row (= RS) dec for RAGLAN on each side of all markers – see explanation above (= 8 sts dec). Repeat dec for raglan on every row from RS 18-20-21-23-24-26 times in total. After all dec for raglan and neck, 91-99-96-111-115-128 sts remain on needle. AT THE SAME TIME after last row with dec for raglan work 1 row from WS as before. Work next row as follows from RS: Work 5 band sts as before, slip them on 1 stitch holder, work until 5 band sts remain on row, slip these 5 sts on 1 stitch holder = 81-89-86-101-105-118 sts on row. K 1 row from WS while AT THE SAME TIME dec 18-26-21-34-36-47 sts evenly = 63-63-65-67-69-71 sts remain on needle. Bind off with K from RS and cut the yarn. BAND + NECK EDGE: Slip the 5 band sts from stitch holder on right front piece back on needle size 3.5 mm / US 4. Continue in garter st back and forth over these 5 sts. Work until neck edge measures approx. 15-17 cm / 6"-6¾" from where sts were slipped back on needle (place neck edge towards neckline on garment mid back, lightly pull it and make sure that it fits the measurements), then bind off. Repeat along left front piece. Sew seam mid back inside bind-off edge (seam should be in towards WS on garment). Sew neck edge to neckline - sew in outer loops of edge sts to edge in garter st so that neck edge is placed nicely towards the neckline. Sew the opening under the sleeves. Sew on buttons. |
|||||||||||||||||||||||||
Diagram explanations |
|||||||||||||||||||||||||
|
|||||||||||||||||||||||||
 |
|||||||||||||||||||||||||
 |
|||||||||||||||||||||||||
 |
|||||||||||||||||||||||||
Have you finished this pattern?Tag your pictures with #dropspattern #oceanbreezecardigan or submit them to the #dropsfan gallery. Do you need help with this pattern?You'll find 28 tutorial videos, a Comments/Questions area and more by visiting the pattern on garnstudio.com. © 1982-2026 DROPS Design A/S. We reserve all rights. This document, including all its sub-sections, has copyrights. Read more about what you can do with our patterns at the bottom of each pattern on our site. |
|||||||||||||||||||||||||


With over 40 years in knitting and crochet design, DROPS Design offers one of the most extensive collections of free patterns on the internet - translated to 17 languages. As of today we count 325 catalogs and 12298 patterns - 12288 of which are translated into English (US/in).
We work hard to bring you the best knitting and crochet have to offer, inspiration and advice as well as great quality yarns at incredible prices! Would you like to use our patterns for other than personal use? You can read what you are allowed to do in the Copyright text at the bottom of all our patterns. Happy crafting!
Post a comment to pattern DROPS 152-1
We would love to hear what you have to say about this pattern!
If you want to leave a question, please make sure you select the correct category in the form below, to speed up the answering process. Required fields are marked *.