
Popular categories
Looking for a yarn?


Comments / Questions (34)
![]() Joanna wrote:
Joanna wrote:
Hi, I am struggling with choosing size which will nicely fit me. I am 167 cm tall with 88 cm in bust, 74 cm in waist and 104 cm in hips. I usually wear sweaters and cardigans in size S, rarely M. However, I doubt that Celia cardigan in one of those sizes will be ok. I think it might be too short? What are body dimensions of the model on the photo and which size of the cardigan is she wearing? That would be a good reference. Thank you in advance for your kind help!
06.02.2026 - 12:58DROPS Design answered:
Witaj Joanno, modelka na zdjęciu zwykle nosi rozmiar S lub M. Jak wybrać właściwy rozmiar znajdziesz w kursie DROPS TUTAJ. Pozdrawiamy!
09.02.2026 - 22:12
![]() María Angeles wrote:
María Angeles wrote:
Quiero hacer un jersey de caballero empezado por abajo si se puede si me contesta muchísimas gracias
11.05.2024 - 15:51
![]() Abigail wrote:
Abigail wrote:
Hola nesecito ayuda a como empezar a tejer chaqueta no entiendo el patrón
22.04.2024 - 04:16DROPS Design answered:
Hola Abigail, ¿puedes concretar que talla estás trabajando? Primero trabajas los delanteros, junto con sus mangas y después la espalda y el cuello para terminar. Comienza montando : 21-22-24-25-27-29 pts según la talla que estés trabajando. Puedes también leer la siguiente lección sobre nuestros patrones: https://www.garnstudio.com/lesson.php?id=79&cid=23
28.04.2024 - 22:35
![]() Mandy Maahs wrote:
Mandy Maahs wrote:
Hallo soll beim Kragen 21 M rechts und links stricken. was ist aber mit dem Nacken? Der Kragen geht ja dann nicht komplett durch?
30.03.2022 - 07:27DROPS Design answered:
Liebe Frau Maahs, der Kragen wird in 2 Teilen gestrickt, dh zuerst die 12 stillgelegten Maschen am Ende von dem 1. Vorderteil - und wird mit verkürzten Reihen bis ca die Hälfte von der Breite des Halsausschnittes am Rückenteil; der Kragen bei dem 2. Vorderteil genauso stricken; dann nähen Sie beide Kragen zusammen und endlich am Halsausschnitt vom Rückenteil. Kann das Ihnen helfen?
30.03.2022 - 07:43
![]() Gourmelen wrote:
Gourmelen wrote:
Bonjour je suis au dos (20m du devant gauche 9mailles encolure dos et 20 mailles du devant droit je tricote en aller retour 1 rang endroit le retour en envers ou en rond tout les rangs à l endroit merci
03.10.2021 - 18:47DROPS Design answered:
Bonjour Mme Gourmelen, vous tricotez maintenant les mailles du dos en rangs, autrement dit alternativement 1 rang sur l'endroit et 1 rang sur l'envers, en jersey avec 2 mailles point mousse de chaque côté. Bon tricot!
04.10.2021 - 08:33
![]() Gourmelen wrote:
Gourmelen wrote:
Bonjour pourriez vous me dire quand je tricote A"3au dessus de bordure devant jersey au dessus des 9 mailles suiv;;;;;;;;; A 1 6 mailles = 1endroit 2m ensembles 1 jeté 2 m ensembles1 jeté 1 endroit;;;;;;;;;;; si je fais 1 endroit encore apres le shéma A1 merci
05.09.2021 - 10:07
![]() Gourmelen wrote:
Gourmelen wrote:
Bonjour pourriez vous me dire quand je tricote A"3au dessus de bordure devant jersey au dessus des 9 mailles suiv;;;;;;;;; A 1 6 mailles = 1endroit 2m ensembles 1 jeté 2 m ensembles1 jeté 1 endroit;;;;;;;;;;; si je fais 1 endroit encore apres le shéma A1 merci
05.09.2021 - 10:04DROPS Design answered:
Bonjour Mme Gourmelen, je suis désolée, je ne suis pas sûre de comprendre à quel niveau vous en êtes; A.1 se tricote effectivement: *1 m end, 2 m ens à l'end, 1 jeté, 2 m ens à l'end, 1 jeté, 1 m end* (=6 m), au rang suivant sur l'endroit, commencez1 maille avant la maille endroit du rang précédent sur l'endroit (tricotez 1 maille jersey en moins avant A.1 pour commencer A.1 1 maille plus tôt). Bon tricot!
06.09.2021 - 07:47
![]() Gourmelen wrote:
Gourmelen wrote:
Bonjour 1 m en jersey en moins avant de tricoter A1 je fais 1 surjet simple ou 2 mailles ensembles;;;;;;;;;;; je fais combien de diminutions en tout et j ai combien de mailles quand A1 rejoint A3 en taille M merci
27.08.2021 - 08:08DROPS Design answered:
Bonjour Mme Gourmelen, le nombre de mailles ne va pas changer car on ne diminue pas de mailles (chaque diminution est compensée par 1 jeté). Au tout 1er rang de A.1 vous tricotez 8-9-11-12-14-16 m jersey avant A.1, au 3ème rang de A.1, vous tricoterez 1 m en moins = 7-8-10-11-13-15 m jersey avant A.1, au 5ème rang, 6-7-9-10-12-14 m jersey avant A.1 etc. Quand A.1 rejoint la bordure devant, tricotez toutes les mailles en jersey (= la ligne diagonale ajourée est terminée). Bon tricot!
27.08.2021 - 08:15
![]() Gourmelen wrote:
Gourmelen wrote:
Bonjour je suis au dessin A4 je ne comprends pas trop je fais2 mailles ensemble et 1 jeté ou que 2 mailles ensemble et le rang envers sur le dessin A4 il ny a pas de diminution je pense merci encore pour votre réponse
24.08.2021 - 07:46DROPS Design answered:
Bonjour Mme Gourmelen, effectivement, on ne diminue pas dans A.4 car on fait 1 jeté qui va compenser la diminution, vous avez ainsi toujours 4 mailles dans A.4 au rang suivant sur l'envers. Bon tricot!
24.08.2021 - 08:15
![]() Gourmelen wrote:
Gourmelen wrote:
Pour commencer après avoir monter les 21 mailles de base je dois faire 2 rangs tout a l endroit ou je fais directement le point fantaisie merci
22.08.2021 - 16:06DROPS Design answered:
Bonjour Mme Gourmelen, vous passez directement au point fantaisie. Bon tricot!
22.08.2021 - 20:20
|
||||||||||||||||
Celia#celiacardigan |
||||||||||||||||
 |
 |
|||||||||||||||
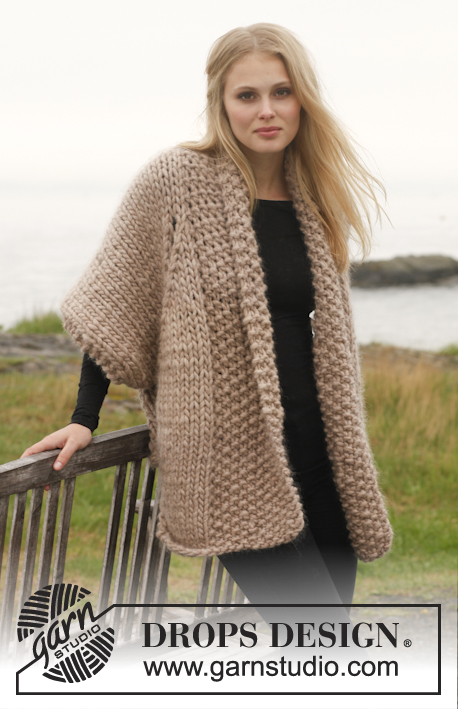
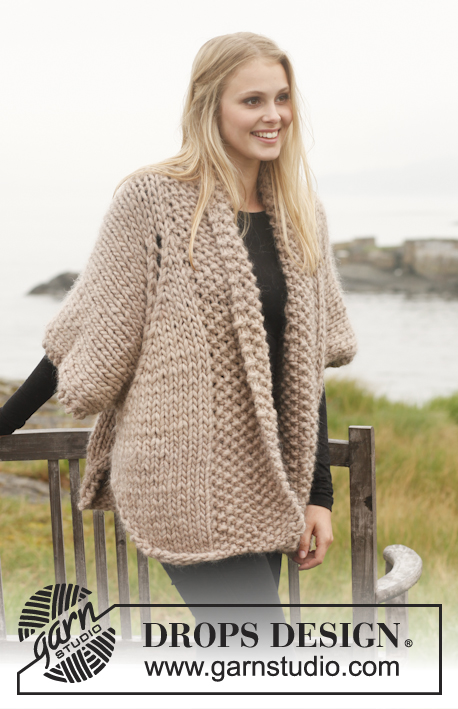
Knitted DROPS jacket with lace pattern in ”Polaris”. Size: S - XXXL.
DROPS 151-31 |
||||||||||||||||
|
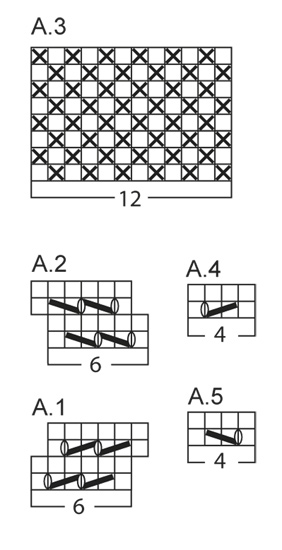
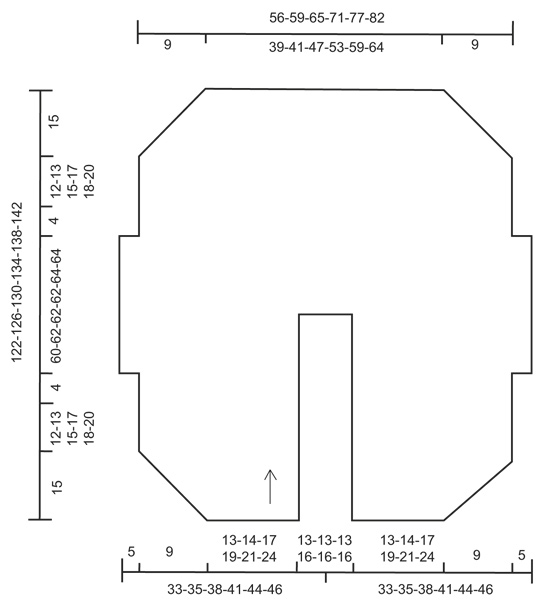
GARTER ST (back and forth on circular needle): K all rows. 1 ridge = K 2 rows. PATTERN: See diagrams A.1 to A.5. The diagrams show all rows in pattern seen from RS. TIP FOR SWITCHING YARN: When switching ball with Polaris, split the old strand in two on the last 15 cm / 6" – cut off one part, do the same on the new strand. Place the first and last 15 cm / 6" on top of each other so that the yarn is the normal thickness and continue to work – this is done to make the strand switch invisible in the yarn. INCREASE TIP: Inc 1 st from RS by making 1 YO, on next row P YO twisted (i.e. work in back loop of st instead front) to avoid holes. DECREASE TIP: Dec inside 1 edge st in garter st. All dec are done from RS! Dec before 1 edge st as follows: K 2 tog. Dec after 1 edge st as follows: Slip 1 st as if to K, K 1, psso. ---------------------------------------------------------- RIGHT FRONT PIECE + SLEEVE: To make room for all sts work piece back and forth on circular needle with 1 edge st in GARTER ST in the side – see explanation above! READ TIP FOR SWITCHING YARN! Cast on 21-22-24-25-27-29 sts on circular needle size 15 mm / US 19 with Polaris. On first row from RS work as follows: PATTERN according to diagram A.3 over the first 12 sts (= band), 8-9-11-12-14-16 sts in stockinette st, inc 1 st inside 1 edge st - READ INCREASE TIP, and finish with 1 edge st in garter st = 22-23-25-26-28-30 sts. Continue with stockinette st and A.3 over band, AT THE SAME TIME on every other row (i.e. every row from RS) inc 1 st inside 1 edge st until 6 inc in total have been done = 27-28-30-31-33-35 sts. Continue in A.3 and stockinette st until piece measures 27-28-30-32-33-35 cm / 10½"-11"-11¾"-12½"-13"-13¾". Work next row from RS as follows: A.3 (= 12 sts), stockinette st over the next 9-10-12-13-15-17 sts, A.4 (= 4 sts), K 1, 1 edge st in garter st. Work a row back with the same pattern. Work next row from RS as follows: A.3 over band, stockinette st over the next 8-9-11-12-14-16 sts, A.1 (= 6 sts), K 1, AT THE SAME TIME cast on 4 new sts at the end of row for sleeve = 31-32-34-35-37-39 sts on needle (piece now measures approx. 31-32-34-36-37-39 cm / 12¼"-12½"-13½"-14¼"-14½"-15¼" from cast-on edge). Work the new sts in stockinette st with 2 edge sts in garter st at the edge of sleeve. Continue the pattern like this AT THE SAME TIME as pattern in diagram A.1 is displaced 1 st towards mid front every time it is worked (i.e. on every row from RS work 1 st less in stockinette st before A.1 is worked), to get an even line diagonally up towards shoulder. When A.1 meets A.3 mid front work in stockinette st over sts in A.1. Then when piece measures 61-63-65-67-69-71 cm / 24"-24¾"-25½"-26½"-27"-28", insert a marker in piece (= mid on top of shoulder), NOW MEASURE PIECE FROM HERE! On next row from WS continue as follows (from sleeve and in): 2 edge sts in garter st, stockinette st over the next 17-18-20-21-23-25 sts, slip these 19-20-22-23-25-27 sts on 1 stitch holder, work A.3 as before over the last 12 sts on needle and slip these 12 sts on 1 new stitch holder for collar. LEFT FRONT PIECE + SLEEVE: Work as right front piece but reversed. Work pattern according to diagram A.2 instead of A.1 and A.5 instead of A.4. Work the 12 sts in diagram A.3 at the top by shoulder from WS before slipping them on 1 stitch holder. Work the rest of row, continue with back piece without slipping sts on 1 stitch holder. BACK PIECE: Work 1st row from RS as follows: Work 19-20-22-23-25-27 sts from left front piece, cast on 9-9-9-11-11-11 new sts (= back of neck) and work the 19-20-22-23-25-27 sts from right front piece on to circular needle = 47-49-53-57-61-65 sts. Continue back and forth in stockinette st with 2 edge sts in garter st in each side. Continue until there are approx. 4-5-5-5-6-6 cm / 1½"-2"-2"-2"-2½"-2½" in stockinette st from the marker on shoulder. Work next row from RS as follows: 2 edge sts in garter st, 14 sts in stockinette st, A.1 (= 6 sts), 3-5-9-13-17-21 sts in stockinette st, A.2 (= 6 sts), 14 sts in stockinette st, 2 edge sts in garter st. Work 1 row back as before with P from WS and 2 edge sts in garter st in each side. On next row from RS work as follows: 2 edge sts in garter st, 13 sts in stockinette st, A.1 (= 6 sts), 5-7-11-15-19-23 sts in stockinette st, A.2 (= 6 sts), 13 sts in stockinette st, 2 edge sts in garter st. Continue the pattern like this - NOTE: Lace pattern in diagram A.1 and A.2 will continue to displace 1 st towards the sides every time they are worked, so that pattern get an even line diagonally from shoulder down to the side (i.e. on every row from RS work 1 st in stockinette st less before A.1 and after A.2 towards the sides and work 2 sts more in stockinette st after A.1 and before A.2 towards the middle). Continue in stockinette st and pattern according to diagram A.1 and A.2 until 2 edge sts in garter and 3 sts in stockinette st remain in each side after A.1 and A.2 have been worked (sleeve measures 60-62-62-62-64-64 cm / 23½"-24½"-24½"-24½"-25¼"-25¼" in total from the inc sts). On next row from RS work as follows: bind off 4 sts, 1 edge st in garter st, K 2, A.4 (= 4 sts), work 25-27-31-35-49-43 sts in stockinette st, A.5 (= 4 sts), K 5, 2 edge sts in garter st = 43-45-49-53-57-61 sts. Turn piece and bind off 4 sts from WS = 39-41-45-49-53-57 sts on needle incl 1 edge st in garter st in each side. Piece now measures 34-35-35-35-36-36 cm / 14½"-13¾"-13¾"-13¾"-14¼"-14¼" from marker on shoulder. Continue in stockinette st with 1 edge st in garter st in each side until piece measures 46-48-50-52-54-56 cm / 18"-19"-19¾"-20½"-21¼"-22". On next row from RS, dec 1 st in each side of piece from RS - SEE DECREASE TIP! Repeat dec in each side every other row (i.e. every row from RS) 5 more times (= 6 dec in total in each side). When piece measures 61-63-65-67-69-71 cm / 24"-24¾"-25½"-26½"-27"-28" from marker on shoulder and there are 27-29-33-37-41-45 sts on needle, bind off all sts. COLLAR: Slip the 12 collar sts from stitch holder on right front piece back on needle. Then continue with seed st as before AT THE SAME TIME work short rows in seed st over collar, beg from RS = towards mid front: * 2 rows over all sts, 2 rows back and forth over the outermost 6 sts *. Repeat from *-* until collar measures approx. 7-7-7-8-8-8 cm / 2¾"-2¾"-2¾"-3"-3"-3" at the most narrow. Loosely bind off. Left half of collar are worked the same way but work 1 row over all sts before continuing with short rows. Sew collar parts tog edge to edge mid back, and sew collar to neck in the back of neck. ASSEMBLY: Sew sleeve and side seam in one, sew tog edge to edge in outer loops of edge sts to avoid a chunky seam. |
||||||||||||||||
Diagram explanations |
||||||||||||||||
|
||||||||||||||||
 |
||||||||||||||||
 |
||||||||||||||||
Have you finished this pattern?Tag your pictures with #dropspattern #celiacardigan or submit them to the #dropsfan gallery. Do you need help with this pattern?You'll find 23 tutorial videos, a Comments/Questions area and more by visiting the pattern on garnstudio.com. © 1982-2026 DROPS Design A/S. We reserve all rights. This document, including all its sub-sections, has copyrights. Read more about what you can do with our patterns at the bottom of each pattern on our site. |
||||||||||||||||


With over 40 years in knitting and crochet design, DROPS Design offers one of the most extensive collections of free patterns on the internet - translated to 17 languages. As of today we count 325 catalogs and 12298 patterns - 12288 of which are translated into English (US/in).
We work hard to bring you the best knitting and crochet have to offer, inspiration and advice as well as great quality yarns at incredible prices! Would you like to use our patterns for other than personal use? You can read what you are allowed to do in the Copyright text at the bottom of all our patterns. Happy crafting!
Post a comment to pattern DROPS 151-31
We would love to hear what you have to say about this pattern!
If you want to leave a question, please make sure you select the correct category in the form below, to speed up the answering process. Required fields are marked *.