
Popular categories
Looking for a yarn?


Comments / Questions (28)
![]() Francesca Cau wrote:
Francesca Cau wrote:
Come si lavora "costa" a legaccio. Grazie
20.04.2019 - 16:53DROPS Design answered:
Buongiorno Francesca. Una costa a legaccio sono due ferri lavorati a diritto. Buon lavoro!
20.04.2019 - 17:13
![]() Ruth wrote:
Ruth wrote:
Can anyone help me with stitching this together. I can't seem to figure out the seams properly. Doesn't anyone have a flat picture of how this should be assembled?
07.02.2014 - 10:45DROPS Design answered:
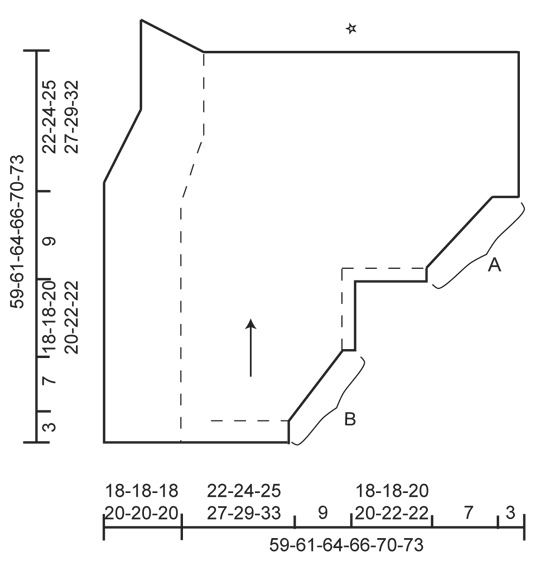
Dear Ruth, you can get help from the measurement chart at the end of the pattern : bottom line is bottom front, and top line (with a star) is mid back. Sew both mid back together. Then sew each side edge A with B together (hole between A and B is for arm). Happy assembly!
07.02.2014 - 11:07
![]() Corinna wrote:
Corinna wrote:
Zum Thema Noppen: Nach dem wenden 4R glatt rechts- fange ich hier erst mit einer linken oder rechten Reihe an? Und muss ich den Umschlag verkreuzt stricken? Die Noppe wölbt sich leider immer wieder nach innen, auch wenn ich nachhelfe.
28.01.2014 - 08:26DROPS Design answered:
Liebe Corinna, bitte schauen Sie sich unser Tutorial-Video zum Thema Noppen an.
30.01.2014 - 08:03
![]() Corinna wrote:
Corinna wrote:
Hallo! was mache ich falsch wenn sich die Noppen nach innen wölben? Und sie sehen auch kleiner aus als auf dem Foto?! Übrigens wird hier der falsche Preis angezeigt! Lg
25.01.2014 - 22:57DROPS Design answered:
Liebe Corinna, haben Sie die angegebene Anzahl Reihen über die Noppenmaschen gestrickt? Dann sollten die Noppen so aussehen wie auf dem Foto. Sie können evtl. von Hand etwas nachhelfen, damit sie sich nach aussen wölben.
27.01.2014 - 10:40
![]() Patzi wrote:
Patzi wrote:
Habe sie versucht zu stricken, aber anscheinend bin ich zu doof, um noppen zu stricken...mache alles nach anleitung, aber es sieht gar nicht so aus, wie auf dem bild...gebe total entnervt auf! Never again!
25.12.2013 - 23:06DROPS Design answered:
Liebe Patzi, es gibt ein Tutorial-Video dazu.
26.12.2013 - 10:43
![]() Lucia wrote:
Lucia wrote:
Ik wacht nog op een bericht van mijn zus uit Australie! Eerst wil ik weten welke kleur ze het mooiste vind. En ofdat wol niet te warm is voor Queensland. Anders ga ik hem, denk ik voor mezelf breien, ik vind hem prachtig.Mag ik de foto's wel op facebook zetten?? Er staat wel bij garnstudio maar anders kan ze het niet bekijken waar zij woont.Vanuit Zwitserland kreeg ik ook al een berichtje over dit vestje, dus ik heb jullie adres doorgegeven. groetjes Lucia
31.08.2013 - 11:03DROPS Design answered:
Hoi Lucia. Je bent van harte welkom om te linken naar onze patronen op Facebook. Als je klaar bent zien we ook graag je resultaten - je kan deze foto's met ons delen op onze pagina: https://www.facebook.com/Garnstudio.DROPS.design
04.09.2013 - 11:09φαιη wrote:
Great design! can't wait for the instructions! Καλημερα σε ολη την ομαδα του garnstudio!
03.07.2013 - 08:38
![]() Laurence wrote:
Laurence wrote:
Oh! Non... Ca tombe comme un sac. Le double boutonnage est vraiment lourd. Pas seyant du tout.
29.06.2013 - 06:58
![]() Gisy wrote:
Gisy wrote:
Très beau, bien hâte d'avoir les explications
27.06.2013 - 15:47
![]() Josette78 wrote:
Josette78 wrote:
MAGNIFIQUE. J'attends les explications avec impatience.
22.06.2013 - 17:59
|
||||||||||||||||||||||
Bouton de Rose#boutonderosejacket |
||||||||||||||||||||||
 |
 |
|||||||||||||||||||||
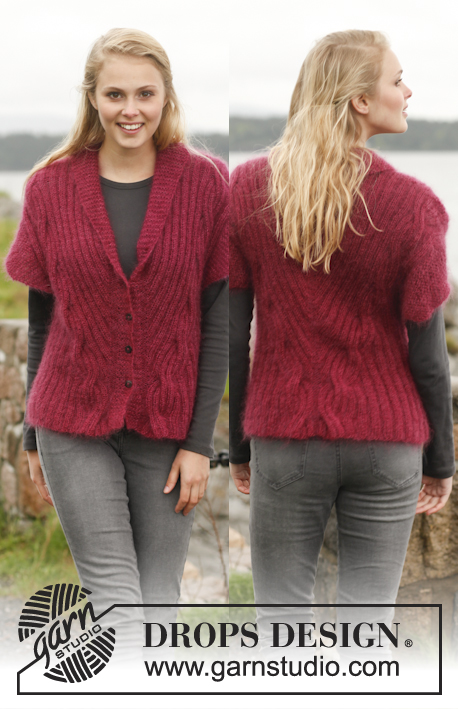
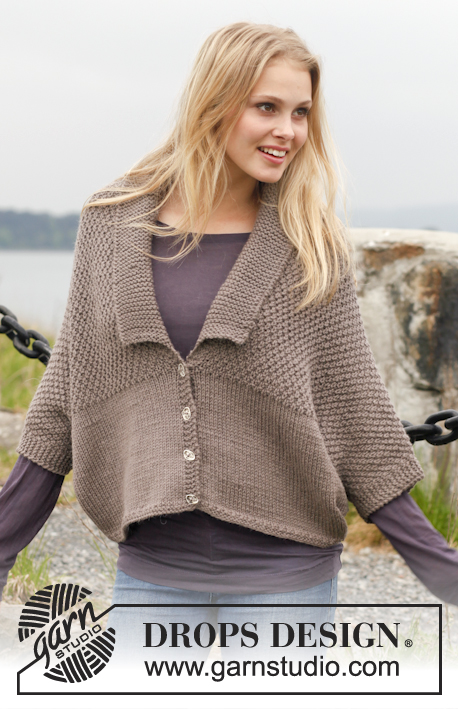
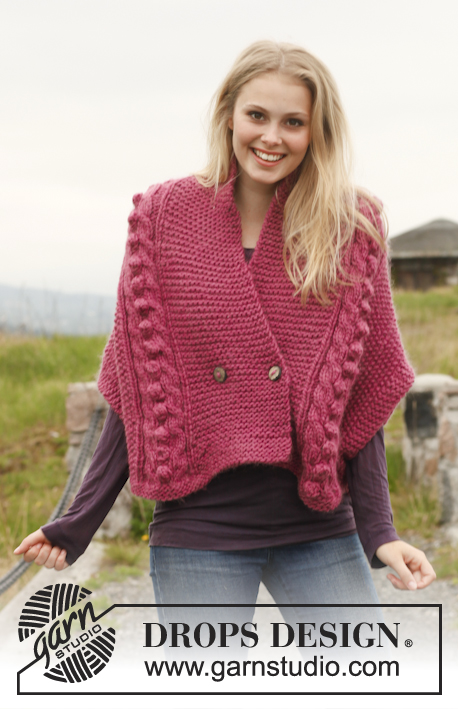
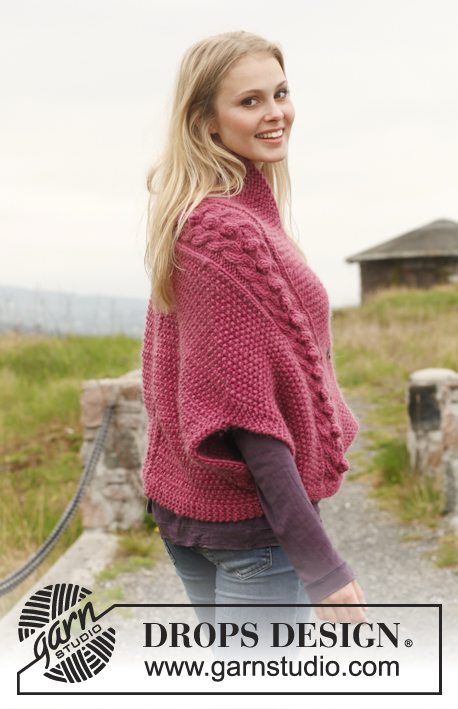
Knitted DROPS jacket in seed st with cables and shawl collar in ”Andes”. Size: S - XXXL.
DROPS 151-19 |
||||||||||||||||||||||
|
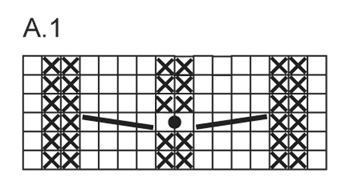
GARTER ST (back and forth on circular needle): K all rows. 1 ridge = K 2 rows. PATTERN: See diagram A.1. The diagram shows all rows in pattern seen from RS. SEED ST: Row 1: * K 1, P 1 *, repeat from *-*. Row 2: K over P and P over K. Repeat 2nd row. BUTTONHOLE: Dec for 2 buttonholes on right band as follows: 1st buttonhole = K tog second and third st from edge and make 1 YO. 2nd buttonhole = K tog 13th and 14th st from edge and make 1 YO. Dec for buttonholes when piece measures: SIZE S: 15 cm / 6" SIZE M: 15 cm / 6" SIZE L: 16 cm / 6¼" SIZE XL: 17 cm / 6¾" SIZE XXL: 18 cm / 7" SIZE XXXL: 19 cm / 7½" ---------------------------------------------------------- JACKET: Work back and forth in two parts from bottom edge on front piece to mid back. Sew tog the two parts when finished. LEFT FRONT PIECE/BACK PIECE: Worked back and forth on circular needle to make room for all the sts. Cast on 44-46-48-52-54-58 sts (includes 20-20-20-22-22-22 band sts towards mid front) on circular needle size 8 mm / US 11 with Andes. Work 3 ridges in GARTER ST - see explanation above - AT THE SAME TIME on last row inc 3 sts evenly (NOTE: Do not inc in the outermost 20-20-20-22-22-22 sts = band sts) = 47-49-51-55-57-61 sts. Work as follows from RS: 11-13-15-17-19-23 sts SEED ST - see explanation above, A.1 (= 16 sts) and 20-20-20-22-22-22 sts in garter st (= band – NOTE! Work band sts in garter st until finished measurements). AT THE SAME TIME on next row from WS beg inc towards the side and cast on new sts at end of every row from WS as follows: Cast on 1 st 4 times in total and 2 sts 1 time in total (these 6 sts are worked in seed st), then cast on 4 sts 1 time in total (these 4 sts are worked in garter st for sleeve edge) = 57-59-61-65-67-71 sts. Work as before until piece measures 28-28-30-30-32-32 cm / 11"-11"-11¾"-11¾"-12½"-12½". LOOSELY cast on 20-20-22-22-24-24 new sts for sleeve at the end of next row from WS = 77-79-83-87-91-95 sts. The 20-20-22-22-24-24 new sts are worked in garter st = 24-24-26-26-28-28 sts in garter st in right side seen from RS. Work 6 rows as before. Then work seed st over the 24-24-26-26-28-28 sts in garter st (= 41-43-47-49-53-57 sts in seed st), A.1 (= 16 sts), and 20-20-20-22-22-22 sts in garter st (= band sts). AT THE SAME TIME on next row from WS beg inc towards the side and cast on new sts at end of every row from WS as follows: Cast on 2 sts 4 times in total (these 8 sts are worked in seed st), then cast on 3 sts 1 time in total (these 3 sts are worked in garter st until finished measurements) = 88-90-94-98-102-106 sts. When piece measures 38-38-40-40-42-42 cm / 15"-15"-15¾"-15¾"-16½"-16½", from RS dec 1 st for neck by K tog the first 2 sts in garter st after A.1, repeat dec every 4th-4th-4th-4th-6th-6th rows 5 more times (= 6 times in total) = 82-84-88-92-96-100 sts (= 14-14-14-16-16-16 band sts in garter st remain on needle). When piece measures approx. 52-52-54-54-63-63 cm / 20½"-20½"-21¼"-21¼"-24¾"-24¾", work short rows over band sts in garter st, beg from neck (= WS) as follows: * 2 rows back and forth over the first 10-10-10-12-12-12 sts, 2 rows over all 82-84-88-92-96-100 sts *, repeat from *-* until finished measurements (continue with A.1 and seed st over the other sts as before). Work until piece measures 58-60-63-65-69-72 cm / 22¾"-23½"-24¾"-25½"-27"-28½". Work 1 ridge over all sts AT THE SAME TIME on 1st row from RS, dec 3 sts over cable as follows: K 55-57-61-63-67-71, K 2 tog, K 4, * K 2 tog *, repeat from *-* 1 more time (= 2 times in total), K 17-17-17-19-19-19 = 79-81-85-89-93-97 sts on needle. Bind off. RIGHT FRONT PIECE/BACK PIECE: Work as left front piece/back piece but reversed. I.e. dec and inc in left side of piece (i.e. at the end of every row from RS). NOTE: Dec for neck before A.1 (from RS). Dec by slipping 1 st as if to K, K 1, psso. In addition dec for BUTTONHOLES on band - see explanation above. ASSEMBLY: Sew the two parts tog mid back in outer loop of edge sts. Sew tog A against B - see chart – sew in front loop of outermost st. Sew on buttons. |
||||||||||||||||||||||
Diagram explanations |
||||||||||||||||||||||
|
||||||||||||||||||||||
 |
||||||||||||||||||||||
 |
||||||||||||||||||||||
Have you finished this pattern?Tag your pictures with #dropspattern #boutonderosejacket or submit them to the #dropsfan gallery. Do you need help with this pattern?You'll find 18 tutorial videos, a Comments/Questions area and more by visiting the pattern on garnstudio.com. © 1982-2026 DROPS Design A/S. We reserve all rights. This document, including all its sub-sections, has copyrights. Read more about what you can do with our patterns at the bottom of each pattern on our site. |
||||||||||||||||||||||


With over 40 years in knitting and crochet design, DROPS Design offers one of the most extensive collections of free patterns on the internet - translated to 17 languages. As of today we count 324 catalogs and 12245 patterns - 12235 of which are translated into English (US/in).
We work hard to bring you the best knitting and crochet have to offer, inspiration and advice as well as great quality yarns at incredible prices! Would you like to use our patterns for other than personal use? You can read what you are allowed to do in the Copyright text at the bottom of all our patterns. Happy crafting!
Post a comment to pattern DROPS 151-19
We would love to hear what you have to say about this pattern!
If you want to leave a question, please make sure you select the correct category in the form below, to speed up the answering process. Required fields are marked *.