DROPS Alpaca
DROPS Alpaca
100% Alpaca
from 4.85 $ /50g
DROPS Kid-Silk
DROPS Kid-Silk
75% Mohair, 25% Silk
from 6.75 $ /25g
Get the yarn to make this pattern from 51.25$.

The yarn cost is calculated from the pattern’s smallest size and the yarn’s cheapest product type. Looking for an even better price? You might find it on the DROPS Deals!

DROPS Super Sale

Eva Jacket

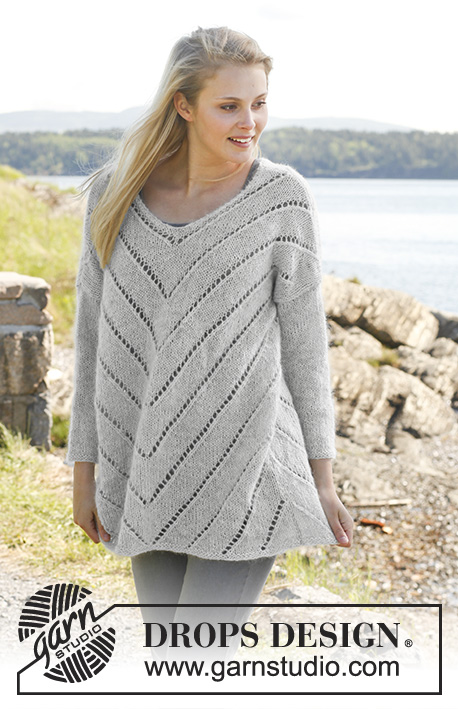
Knitted DROPS jacket with lace pattern and ¾ sleeves in "Alpaca" and "Kid-Silk". Size: S - XXXL.

DROPS 149-4
DROPS design: Pattern no z-648
Yarn group A + A
-----------------------------------------------------------
Size: S - M - L - XL - XXL - XXXL
Finished measurements:
Bust: 110-112-126-136-148-162 cm / 43½”-44”-49½”-53½”-58”-63¾”
Full length: 60-62-64-66-68-70 cm / 23 5/8’’-24 3/8’’-25¼’’-26’’-26¾’’-27½’’

Materials:
DROPS ALPACA from Garnstudio
250-250-300-300-350-400 g color no 9020, light pearl gray
And use:
DROPS KID-SILK from Garnstudio
100-125-125-125-150-175 g color no 01, off white

DROPS CIRCULAR NEEDLE (80 cm / 32’’) SIZE 5 mm / US 8 – or size needed to get 17 sts x 22 rows in stockinette st with 1 strand of each yarn = 10 x 10 cm / 4’’ x 4’’.
DROPS CIRCULAR NEEDLE (80 cm / 32’’) SIZE 4 mm / US 6 – for edges in garter st.

DROPS MOTHER-OF-PEARL BUTTON w/HOLES, NO 521: 7-7-7-7-8-8 pieces

-------------------------------------------------------

Alternative Yarn – See how to change yarns here
Yarn Groups A to F – Use the same pattern and change the yarn here
Yarn usage using an alternative yarn – Use our yarn converter here

-------------------------------------------------------

DROPS Alpaca
DROPS Alpaca
100% Alpaca
from 4.85 $ /50g
DROPS Kid-Silk
DROPS Kid-Silk
75% Mohair, 25% Silk
from 6.75 $ /25g
Get the yarn to make this pattern from 51.25$.

The yarn cost is calculated from the pattern’s smallest size and the yarn’s cheapest product type. Looking for an even better price? You might find it on the DROPS Deals!

DROPS Super Sale

SAVE 30% on 6 cotton favorites!
Valid until 04.12.2024

Pattern instructions

NOTE: This pattern is written in American English. All measurements in charts are in cm. For conversion from inches to cm - click here. There are different terms for crocheting in American and British English. If this pattern includes crochet, click for "crochet terms" here. For this pattern in British English, please click here.
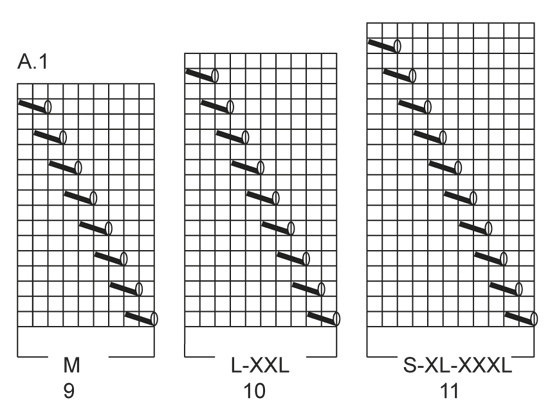
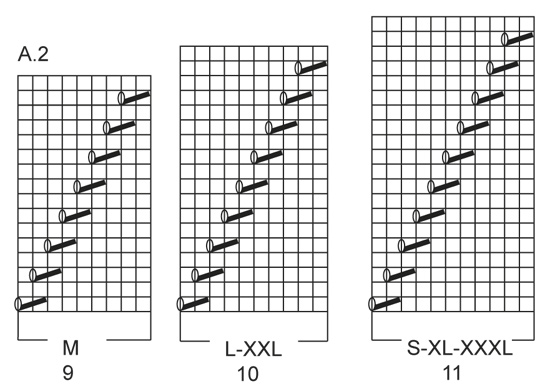
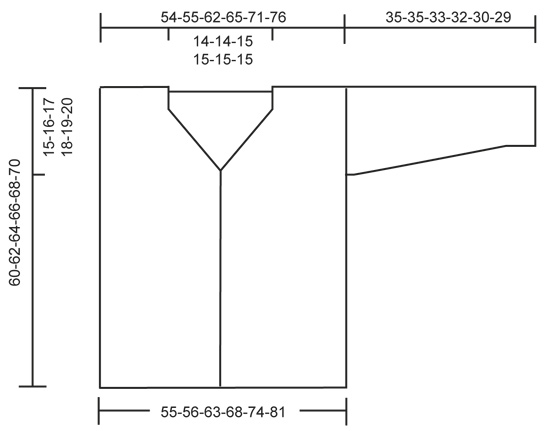
GARTER ST (back and forth on circular needle):
K all rows. 1 ridge = 2 rows K.

PATTERN:
See diagrams A.1 and A.2. The diagrams show all rows in pattern seen from RS. NOTE! See diagram for size!

KNITTING TIP:
When neck dec beg, continue lines with holes that have been started, but do not beg new lines with holes. NOTE: Make sure not dec for neck on the first 4 rows of diagram A.1/A.2.

DECREASE TIP (applies to neck dec):
Dec inside 2 sts in garter st. All dec are done from RS!
Dec before 2 sts as follows: K 2 tog.
Dec after 2 sts as follows: Slip 1 st as if to K, K 1, psso.

BUTTONHOLE:
Dec for buttonholes on right band from RS. 1 buttonhole = K tog third and fourth st from mid front and make 1 YO. Dec for buttonholes when piece measures:
SIZE S: 4, 11, 18, 25, 32, 39 and 46 cm /
1½”, 4 3/8”, 7”, 9¾”, 12½”, 15¼” and 18”
SIZE M: 6, 13, 20, 27, 34, 41 and 48 cm /
2 3/8”, 5 1/8”, 8”, 10 5/8”, 13 3/8”, 16 1/8” and 19”
SIZE L: 7, 14, 21, 28, 35, 42 and 49 cm /
2¾”, 5½”, 8¼”, 11” 13¾”, 16½” and 19¼”
SIZE XL: 9, 16, 23, 30, 37, 44 and 51 cm /
3½”, 6 ¼”, 9”, 11 ¾”, 14½”, 17 ¼” and 20”
SIZE XXL: 4, 11, 18, 25, 32, 39, 46 and 53 cm /
1½”, 4 3/8”, 7”, 9 ¾”, 12½”, 15 ¼”, 18” and 21”.
SIZE XXXL: 5, 12, 19, 26, 33, 40, 47 and 54 cm /
2”, 4¾”, 7½”, 10¼”, 13” 15¾”, 18½” and 21¼”
----------------------------------------------------------

BACK PIECE:
Worked back and forth on circular needle.
Cast on 93-95-107-115-125-137 sts on circular needle size 4 mm / US 6 with 1 strand of each yarn (= 2 strands). K 4 rows. Switch to circular needle size 5 mm / US 8. Work as follows from RS: 2-2-3-2-2-2 sts in stockinette st, diagram A.2 - see explanation above - over the next 44-45-50-55-60-66 sts (= 4-5-5-5-6-6 repetitions in width), 1 st in stockinette st, diagram A.1 over the next 44-45-50-55-60-66 sts (= 4-5-5-5-6-6 repetitions in width) and finish with 2-2-3-2-2-2 sts in stockinette st.
Pattern A.1/A.2 is displaced out to the 2-2-3-2-2-2 sts in the side worked in stockinette st until finished measurements.
Work 1 new repetition of A.1/A.2 vertically every 22nd-18th-20th-22nd-20th-22nd row.
Work like this until piece measures 45-46-47-48-49-50 cm / 17¾’’-18’’-18½’’-19’’-19¼’’-19¾’’.
Then bind off 1-1-1-2-2-4 sts for armhole in each side = 91-93-105-111-121-129 sts.
Continue pattern but work the outermost 5 sts in each side in stockinette st until finished measurements.
When piece measures 57-59-61-63-65-67 cm / 22½’’-23¼’’-24’’-24¾’’-25½’’-26 3/8’’ – read KNITTING TIP, work 1 ridge in garter st over the middle 27-27-29-29-29-29 sts (= 32-33-38-41-46-50 sts on each side), work the other sts as before.
Then bind off the middle 23-23-25-25-25-25 sts for neck = 34-35-40-43-48-52 sts remaining on each shoulder.
Now finish each shoulder separately.
Continue with garter st over the 2 outermost sts towards neck, pattern and 5 sts in stockinette st.
When piece measures 59-61-63-65-67-69 cm / 23¼’’-24’’-24¾’’-25½’’-26 3/8’’-27 1/8’’, work 2 rows in stockinette st with 2 sts in garter st in each side of neck. Bind off.
Piece measures 60-62-64-66-68-70 cm / 23 5/8’’-24 3/8’’-25¼’’-26’’-26¾’’-27½’’.

RIGHT FRONT PIECE:
Worked back and forth on circular needle.
Cast on 51-52-58-62-67-73 sts (includes 5 band sts) on circular needle size 4 mm / US 6 with 1 strand of each yarn (= 2 strands). Work 2 ridges in garter st. Switch to circular needle size 5 mm / US 8. Work as follows from RS: 5 sts in garter st (= band sts), then work diagram A.1 over the next 44-45-50-55-60-66 sts (= 4-5-5-5-6-6 repetitions in width), finish with 2-2-3-2-2-2 sts in stockinette st. Pattern A.1 is displaced out to the 2-2-3-2-2-2 sts in stockinette st. Work 1 new repetition of A.1 vertically every 22nd-18th-20th-22nd-20th-22nd row.
When piece measures 4-5-6-9-4-6 cm / 1½”-2”-2 3/8”-3½”-1½”-2 3/8”, dec for BUTTON HOLES - see explanation above. Continue pattern like this until piece measures 45-46-47-48-49-50 cm / 17¾’’-18’’-18½’’-19’’-19¼’’-19¾’’.
Then bind off 1-1-1-2-2-4 sts for armhole in left side = 50-51-57-60-65-69 sts.
Continue pattern but work the outermost 5 sts in left side in stockinette st until finished measurements.
When piece measures 47-49-50-52-54-55 cm / 18½”-19¼”-19¾”-20½”-21¼”-21 5/8”- remember knitting tip - bind off the 3 outermost band sts in the right side = 47-48-54-57-62-66 sts remain on needle.
Continue to work in garter st over the 2 outermost band sts towards the neck, pattern and 5 sts in stockinette st, AT THE SAME TIME on next row from RS dec 1 st for neck inside the 2 band sts in garter st - read DECREASE TIP, repeat dec on every row from RS 12-12-13-13-13-15 more times (= 13-13-14-14-14-16 times in total) = 34-35-40-43-48-50 sts remain on the shoulder.
Bind off when piece measures 60-62-64-66-68-70 cm / 23 5/8’’-24 3/8’’-25¼’’-26’’-26¾’’-27½’’.

LEFT FRONT PIECE:
Cast on and work the same way as on right front piece but reversed - i.e. work A.2 instead of A.1. Do not dec for buttonholes.

SLEEVE:
Worked back and forth on circular needle.
Cast on 42-42-44-48-48-50 sts on circular needle size 4 mm / US 6 with 1 strand of each yarn (= 2 strands). Work 2 ridges in garter st. Switch to circular needle size 5 mm / US 8 and work in stockinette st.
When piece measures 3 cm / 1’’, inc 1 st in each side, repeat inc every 7-6-4-4-3-3 cm / 2 ¾”-2 3/8”-1½”-1½”-1 1/8”-1 1/8” 4-5-6-6-8-8 more times (= 5-6-7-7-9-9 times in total) = 52-54-58-62-66-68 sts. Work in stockinette st until piece measures 35-35-33-32-30-29 cm / 13¾”-13¾”-13”-12½”-11¾”-11 3/8”. Bind off. Knit another sleeve.

ASSEMBLY:
Sew the shoulder seams. Sew in sleeves. Sew sleeve and side seam in outer loop of edge sts. Sew the buttons on to left front piece.

Diagram

All measurements in charts are in cm.

symbols = K from RS, P from WS
symbols = slip 1 st as if to K, K 1, psso
symbols = K 2 tog
symbols = 1 YO between 2 sts
diagram
diagram
diagram
Do you have a question? See a list of frequently asked questions (FAQ)

Knitting tension is what determines the final measurements of your work, and is usually measured per 10 x 10 cm. It is provided like so: number of stitches in width x number of rows in height - eg: 19 stitches x 26 rows = 10 x 10 cm.

The knitting tension is very individual; some people knit/crochet loosely while others work tightly. You adjust the knitting tension with the needle size, which is why the suggested needle size only serve as a guide! You need to adjust this (up or down) to ensure that YOUR knitting tension matches the knitting tension provided in the pattern. If you work with a different knitting tension than provided you will have a different yarn consumption, and your work will have different measurements than what the pattern suggests.

The knitting tension also determines which yarns can replace each other. As long as you achieve the same knitting tension you can replace one yarn with another.

See DROPS lesson: How to measure your tension/gauge

See DROPS video: How to make a gauge tension swatch

The required amount of yarn is provided in grams, eg: 450 g. To calculate how many balls you’ll need you first need to know how many grams are in 1 ball (25g, 50g or 100g). This information is available if you click on the individual yarn quality on our pages. Divide the amount required with the amount of each ball. For example, if each ball is 50g (the most common amount), the calculation will be as follows: 450 / 50 = 9 balls.

The important thing when changing from one yarn to another is that the knitting/crochet tension remains the same. This is so that the measurements of the finished piece will be the same as on the sketch provided. It is easier to achieve the same knitting tension using yarns from the same yarn group. It is also possible to work with multiple strands of a thinner yarn to achieve the knitting tension of a thicker one. Please try our yarn converter. We recommend you to always work a test swatch.

Please NOTE: when changing yarn the garment might have a different look and feel to the garment in the photo, due to individual properties and qualities of each yarn.

See DROPS lesson: Can I use a different yarn than the one mentioned in the pattern?

All our yarns are categorised into yarn groups (from A to F) according to thickness and knitting tension – group A contains the thinnest yarns and group F the thickest. This makes it easier for you to find alternative yarns to our patterns, should you wish to switch yarn. All yarns within the same group have a similar knitting tension and can easily replace each other. However, different yarn qualities have different structures and properties which will give the finished work a unique look and feel.

Click here for an overview of the yarns in each yarn group

At the top of all our patterns you’ll find a link to our yarn converter, which is a helpful tool should you wish to use a different yarn than suggested. By filling in the yarn quality you wish to replace, the amount (in your size) and number of strands, the converter will present good alternative yarns with the same knitting tension. Additionally it will tell you how much you’ll require in the new qualities and whether you’ll need to work with multiple strands. Most skeins are 50g (some are 25g or 100g).

If the pattern is worked with multiple colours, every colour will have to be converted separately. Similarly, if the pattern is worked with several strands of different yarns (for example 1 strand Alpaca and 1 strand Kid-Silk) you will have to find alternatives for each, individually.

Click here to see our yarn converter

Since different yarns have different qualities and textures we have chosen to keep the original yarn in our patterns. However, you can easily find options among our available qualities by using our yarn converter, or simply pick a yarn from the same yarn group.

It is possible that some retailers still have discontinued yarns in stock, or that someone has a few skeins at home that they would like to find patterns for.

The yarn converter will provide both alternative yarn as well as required amount in the new quality.

If you think it's hard to decide what size to make, it can be a good idea to measure a garment you own already and like the size of. Then you can pick the size by comparing those measures with the ones available in the pattern's size chart.

You'll find the size chart at the bottom of the pattern.

See DROPS lesson: How to read size chart

The needle size provided in the pattern serves only as a guide, the important thing is to follow the knitting tension. And since knitting tension is very individual, you will have to adjust the needle size to ensure that YOUR tension is the same as in the pattern – maybe you’ll have to adjust 1, or even 2 needle sizes, up or down to achieve the correct tension. For this, we recommend that you work test swatches.

Should you work with a different knitting tension than the one provided, the measurements of the finished garment might deviate from the measurement sketch.

See DROPS lesson: How to measure your tension/gauge

See DROPS video: How to make a gauge tension swatch

Working a garment top-down provides more flexibility and room for personal adjustment. For example it is easier to try the garment on while working, as well as making adjustments to length of yoke and shoulder caps.

The instructions are carefully explaining every step, in the correct order. Diagrams are adjusted to the knitting direction and are worked as usual.

The diagram depicts all rows/rounds, and every stitch seen from the right side. It is read from bottom to top, from right to left. 1 square = 1 stitch.

When working back and forth, every other row is worked from the right side and every other row is worked from the wrong side. When working from the wrong side, the diagram will have to be worked reversed: from left to right, knit stitches are purled, purl stitches are knit etc.

When working in the round every round is worked from the right side and the diagram are worked from right to left on all rounds.

See DROPS lesson: How to read knitting diagrams

The diagram depicts all rows/rounds, and every stitch seen from the right side. It is worked from bottom to top, from right to left.

When working back and forth every other row is worked from the right side: from right to left and every other row is worked from the wrong side: from left to right.

When working in the round, every row in the diagram are worked from the right side, from right to left.

When working a circular diagram you start in the middle and work your way outwards, counter clockwise, row by row.

The rows usually start with a given number of chain stitches (equivalent to the height of the following stitch), this will either be depicted in the diagram or explained in the pattern.

See DROPS lesson: How to read crochet diagrams

Instructions for working several diagrams after each other on the same row/round, will often be written like so: “work A.1, A.2, A.3 a total of 0-0-2-3-4 times". This means you work A.1 once, then A.2 is worked once, and A.3 is repeated (in width) the number of times provided for your size – in this case like so: S = 0 times, M = 0 times, L=2 times, XL= 3 times and XXL = 4 times.

The diagrams are worked as usual: begin with the first row in A.1, then work the first row in A.2 etc.

See DROPS lesson: How to read knitting diagrams

See DROPS lesson: How to read crochet diagrams

The total width of the garment (from wrist-to-wrist) will be larger in the larger sizes, despite the actual sleeves being shorter. The larger sizes have longer sleeve caps and wider shoulders, so there will be a good fit in all sizes.

The measurement sketch/schematic drawing provides information regarding the full length of the garment. If it’s a jumper or a jacket the length is measured from the highest point on the shoulder (usually closest to the neckline), and straight down to the bottom of the garment. It is NOT measured from the tip of shoulder. Similarly, the length of yoke is measured from the highest point on the shoulder and down to where yoke is split into body and sleeves.

See DROPS lesson: How to read a schematic drawing

Diagrams are often repeated on the round or in height. 1 repeat is the diagram the way it appears in the pattern. If it says to work 5 repeats of A.1 in the round, then you work A.1 a total of 5 times after/next to each other in the round. If it says to work 2 repeats of A.1 vertically/in height you work the entire diagram once, then begin again at the start and work the entire diagram one more time.

Chain stitches are slightly narrower than other stitches and to avoid working the cast-on edge too tight, we simply chain more stitches to begin with. The stitch count will be adjusted on the following row to fit the pattern and measurement sketch.

The rib edge is more elastic and will contract slightly compared to, for example, stocking stitch. By increasing before the rib edge, you avoid a visible difference in width between the rib edge and the rest of the body.

It’s very easy to cast off too tightly, and by making yarn overs while casting off (and simultaneously casting these off) you avoid a too tight cast off edge.

See DROPS video: How to bind off with yarn overs (yo)

To achieve an even increase (or decrease) you can increase on, for example: every 3rd and 4th row alternately, like so: work 2 rows and increase on the 3rd row, work 3 rows and increase on the 4th. Repeat this until the increase is complete.

See DROPS lesson: Increase or decrease 1 st on every 3rd and 4th row alternately

Should you prefer to work in the round instead of back and forth, you may of course adjust the pattern. You’ll need to add steeks mid-front (usually 5 stitches), and follow the instructions. When you would normally turn and work from the wrong side, simply work across the steek and continue in the round. At the end you’ll cut the piece open, pick up stitches to work bands, and cover the cut edges.

See DROPS video: How to knit steeks and cut open

Should you prefer to work back and forth instead of in the round, you may of course adjust the pattern so you work the pieces separately and then assemble them at the end. Divide the stitches for the body in 2, add 1 edge stitch in each side (for sewing) and work the front and back pieces separately.

See DROPS lesson: Can I adapt a pattern for circular needles into straight needles?

Pattern repeats can vary slightly in the different sizes, in order to get the correct proportions. If you’re not working the exact same size as the garment in the photo, yours might deviate slightly. This has been carefully developed and adjusted so that the complete impression of the garment is the same in all sizes.

Make sure to follow instructions and diagrams for your size!

If you have found a pattern you like which is available in women’s size it’s not very difficult to convert it to men’s size. The biggest difference will be the length of sleeves and body. Start working on the women size that you think would fit across the chest. The additional length will be worked right before you cast off for the armhole/sleeve cap. If the pattern is worked top-down you can add the length right after the armhole or before the first decrease on sleeve.

Regarding additional yarn amount, this will depend on how much length you add, but it is better with a skein too many than too few.

All yarns will have excess fibres (from production) that might come off as lint or shedding. Brushed yarns (ie hairier yarns) have more of these loose, excess fibres, causing more shedding.

Shedding also depends on what is worn under or over the garment, and whether this pulls at the yarn fibres. It’s therefore not possible to guarantee that there will be no shedding

Below are some tips on how to get the best result when working with hairier yarns:

1. When the garment is finished (before you wash it) shake it vigorously so the looser hairs come off. NOTE: do NOT use a lint roller, brush or any method that pulls at the yarn.

2. Place the garment in a plastic bag and put it in your freezer - the temperature will cause the fibres to become less attached to each other, and excess fibres will come off easier.

3. Leave in the freezer for a few hours before taking it out and shaking it again.

4. Wash the garment according to the instructions on the yarn label.

Pilling is a natural process that happens to even the most exclusive of fibers. It's a natural sign of wear and tear that is hard to avoid, and that is most visible in high friction areas of your garment like a sweater's arms and cuffs.

You can make your garment look as new by removing the pilling, using a fabric comb or a pill/lint remover.

Still can't find the answer you need? Then scroll down and leave your question so one of our experts can try to help you. This will be done normally within 5 to 10 working days.
In the meantime, you can read the questions and answers that others have left to this pattern or join the DROPS Workshop on Facebook to get help from fellow knitters/crocheters!

You might also like...

Post a comment to pattern DROPS 149-4

We would love to hear what you have to say about this pattern!

If you want to leave a question, please make sure you select the correct category in the form below, to speed up the answering process. Required fields are marked *.

Comments / Questions (14)

country flag Marga Van Dijk wrote:

Kunt u mij zeggen op welke manier ik de delen en mouwen moet samen naaien welke steek kan ik hier het beste voor gebruiken

19.05.2020 - 16:31

DROPS Design answered:

Dag Marga,

Je kunt dit het beste met maassteken doen, zoals in deze video.

20.05.2020 - 08:57

country flag Mieke wrote:

Dus bij naald 21 moet ik het patroon gaan herhalen?

02.01.2020 - 14:19

DROPS Design answered:

Dag Mieke,

Ja, dat klopt, want je hebt een herhaling van 10 steken in de breedte en elke 2 naalden in de hoogte verschuift het patroon 1 steek.

08.01.2020 - 09:02

country flag Mieke wrote:

Ik wil de trui in maat L gaan breien maar begrijp het patroon niet. Elke 20ste naald moet ik het patroon in de hoogte herhalen. Het patroon bestaat uit 18 nld. Hoe moet ik nld. 19 breien?

25.12.2019 - 17:52

DROPS Design answered:

Dag Mieke,

Het lijkt er inderdaad op dat het niet klopt in de beschrijving wbt. het aantal naalden in de hoogte, dit moeten we even nakijken bij de design afdeling. Maar op zich heb je daar geen last van, want je kant het patroon gewoon voortzetten. Het idee is dat de omslag met de mindering steeds een steek opschuift en dat het aantal steken dat hiertussen zit gelijk blijft.

26.12.2019 - 16:18

country flag Berith wrote:

Når man tager ind til ærmegab på hø. forstykke, er det vel på hø. side at man tager 1 maske ind og modsatte side til v- halsen?

12.03.2015 - 12:38

DROPS Design answered:

Hej Berith, højre forstykke (når du har det på). Dvs at højre side fra retsiden er mod midt foran og venstre side fra retsiden en mod ærmet. God fornøjelse!

21.05.2015 - 11:19

country flag Olivia wrote:

When you are binding off the neck on the back of the sweater do you do the bind off on a RS or WS row?

18.04.2014 - 19:19

DROPS Design answered:

Dear Olivia, depending on your tension and number of rows, you may reach the given measurement on a RS or on a WS row. Happy knitting!

19.04.2014 - 10:01

country flag Olivia wrote:

If you repeat the m chart A1/A2 every 18th row you have 6 stitches between each new yarnover strip but 7 between the originals, should you introduce a new row every 20th set of stiches?

22.10.2013 - 05:00

DROPS Design answered:

Dear Olivia, in size M, you work the 16 rows in diag + 2 more rows as before (with yo and dec) then start a new repeat on row 19 (back to row 1 in A1/A2). Happy knitting!

22.10.2013 - 21:01

country flag Vanhée wrote:

Bonjour ce modèle est super et doit être très léger à porter

18.06.2013 - 15:23

country flag Adelheid wrote:

Sieht toll aus

15.06.2013 - 18:51

country flag Herma Van Den Hoven wrote:

Ik kan niet wachten tot het patroon er is.Wat een mooi vest!!!

05.06.2013 - 10:47

country flag Isa wrote:

Sooo gemütlich und mal was ganz anderes. Möchte ich unbedingt stricken.

03.06.2013 - 20:37