
Popular categories
Looking for a yarn?


Comments / Questions (43)
![]() Alison Sadler wrote:
Alison Sadler wrote:
Apologies. Please disregard my question about A.3. I made a mistake when copying the pattern!
26.01.2024 - 16:19
![]() Alison Sadler wrote:
Alison Sadler wrote:
The instructions for the yoke include the following: When A.2 has been worked 1 time vertically, work next round as follows: * Work A.4 (= 19 sts), A.3 (= 13 sts) * I can't fnd any mention of A.3 anywhere else in the pattern diagrams. Could you clarify, please? Thank you.
26.01.2024 - 16:14DROPS Design answered:
Dear Alison, A.3 is the very last chart, under A.7 and A.5. You can find it at the very bottom of the pattern. Happy knitting!
28.01.2024 - 23:35
![]() Els-Marie wrote:
Els-Marie wrote:
Har stickat A5 i M med de extra 4 varven och gå vidare till A7. Då blir det ett varv för mycket med räta maskor i M i A7. Mönstret stämmer inte. Har själv korrigerat. Mvh Els-Marie
30.06.2022 - 19:39DROPS Design answered:
Hei Els-Marie. Takk for din tilbakemelding. Oppskriften er oversendt til design avd. slik at de kan ta en dobbeltsjekk. mvh DROPS Design
04.07.2022 - 11:02
![]() Grethe Sørensen wrote:
Grethe Sørensen wrote:
Det er en skøn bluse, sjov at strikke, men jeg er i tvivl om hvornår jeg skal begynde på A7, jeg kan se det er efter A3, 1 gang, A5 2+4 gange,så når jeg op overfor A6 L, der må være noget jeg har misforstået, jeg har prøvet at tælle pindene. Venligst Grethe Sørensen
24.06.2021 - 17:27DROPS Design answered:
Hej Grethe, Når du er færdig med A.4 er du også færdig med A.5, du starter med A.6 og A.7 samtidigt for at det skal passe i højden. God fornøjelse!
30.06.2021 - 14:30
![]() Beverley Kennedy wrote:
Beverley Kennedy wrote:
When the pattern says to cast on using two circular needles and then pull one needle to start knitting g, I don’t understand. Could you explain how to cast onto two circular needles at the same to e please?
25.03.2021 - 16:47DROPS Design answered:
Dear Mrs Kennedy, the video below shows how to cast on on two needle, when casting on with 1 circular needle, just use both needle tips. This way your cast on edge will be elastic. Happy knitting!
26.03.2021 - 06:56
![]() Doris Stockmanns wrote:
Doris Stockmanns wrote:
Hallo, ich benötige Hilfe. An welcher Stelle ist der Rundenanfang ab der Verbindung Rumpfteil / Raglan? Ich habe ein Problem mit der Musterfolge, obwohl die Maschenanzahl stimmt. Werden die Raglanabnahmen ab Beginn des Musters A2 nicht mehr fortgesetzt? Ich stricke in Gr.L . Vielen Dank im voraus für eine Hilfestellung. Viele Grüße Doris
30.01.2020 - 14:28DROPS Design answered:
Liebe Frau Stockmanns, es gibt nur einige Raglanabnahmen, dann wird die Passe mehr als Rundpasse (mit Diagramme) gestrickt (= die Muster können in jede Grösse nicht symetrisch sein), es wird in den Diagrammen abgenommen.. Viel Spaß beim stricken!
30.01.2020 - 15:36
![]() Maisie McNeill wrote:
Maisie McNeill wrote:
I do not knit well on circular needles, is it possible to convert this to do it on two needles? I am 76 years old and have never used either circular or double-pointed needles well. I am so used to holding one of the needles under my arm. Shalom!
06.12.2019 - 11:21DROPS Design answered:
Dear Mrs McNeill, you will read some more informations about adapting a pattern into straight needles here. Happy knitting!
06.12.2019 - 11:45
![]() Carole Longhurst wrote:
Carole Longhurst wrote:
I have a friend who is going to spin some alpaca and silk for me- I would like to do this pattern in a 4ply yarn. Will this be possible?
27.01.2019 - 08:41DROPS Design answered:
Dear Mrs Longhurst, We are able to provide free patterns thanks to our yarns sold throughout the world. You will therefore understand that we can only recomand you to contact your DROPS Store for any further help & assistance. Thank you for your comprehension.
28.01.2019 - 11:08Valerie wrote:
It was pretty annoying that the end row of A5 did not line up with the bottom of A7 for the medium size. I did not want two extra rows in there so I have had to improvise this pattern all the rest of the way up.
20.04.2018 - 18:08
![]() Monika wrote:
Monika wrote:
Die Anleitung stimmt zumindest in Größe S ab dem Abschnitt A.4 / A.5 nicht. Die angegebenen Reihenanzahlen sind nicht mustergemäß und die Abnahmen in A.6/A.7 erfolgen dadurch auch nicht in der selben Runde. Der Fehler zieht sich bis zum Ende durch.
07.11.2016 - 09:47DROPS Design answered:
Liebe Monika, man muß A.5 in der Höhe wiederhole, und dann noch 4-6 Runde noch stricken - Korrektur kommt gleich. Viel Spaß beim stricken!
15.11.2016 - 13:31
|
|||||||||||||||||||||||||
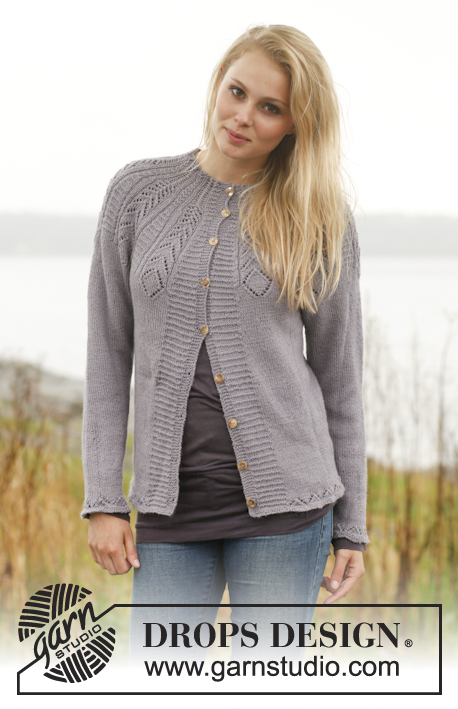
Lady Feather Sweater#ladyfeathersweater |
|||||||||||||||||||||||||
|
|
|||||||||||||||||||||||||
Knitted DROPS jumper with lace pattern and round yoke in ”BabyAlpaca Silk”. Size S - XXXL
DROPS 149-29 |
|||||||||||||||||||||||||
|
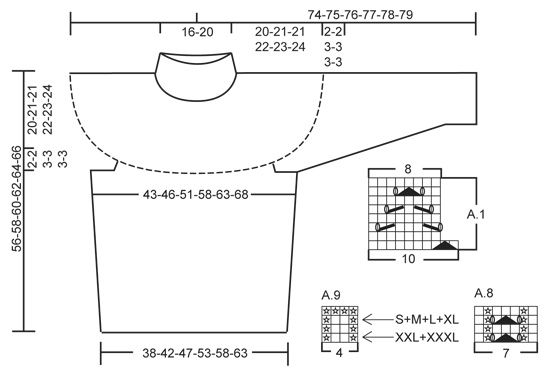
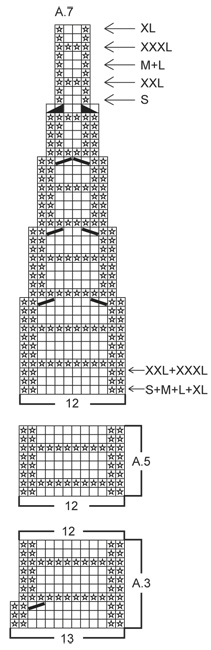
GARTER ST (in the round on circular needle): * K 1 round and P 1 round *, repeat from *-*. 1 ridge = 2 rounds. PATTERN: See diagrams A.1 to A.9. DECREASE TIP: Dec for raglan in every transition between sleeves and body. Beg 3 sts before marker and dec as follows: K 2 tog, K 2 (marker is between these 2 sts), slip 1 st as if to K, K 1, psso. ---------------------------------------------------------- JUMPER: Worked in the round on circular needle. Cast on 230-250-280-320-350-380 sts on 2 circular needles size 3 mm / US 2.5 with Baby Alpaca Silk. Pull out one circular needle and then work 2 ridges in GARTER ST in the round – see explanation above (this is done to avoid a tight edge in garter st when working pattern later). Then work pattern according to diagram A.1. When A.1 has been worked 1 time vertically, there are 184-200-224-256-280-304 sts on needle. Then work in stockinette st. REMEMBER THE KNITTING GAUGE. When piece measures 8 cm / 3", insert 1 marker at beg of round and 1 marker after 92-100-112-128-140-152 sts (= in the sides). Now inc 1 st on each side of both markers (= 4 sts inc). Repeat inc every 6-6-6-6-7-7 cm / 2⅜"-2⅜"-2⅜"-2⅜"-2¾"-2¾" 4 more times (= 5 inc in total in each side) = 204-220-244-276-300-324 sts on needle. When piece measures 34-35-36-37-38-39 cm / 13⅜"-13¾"-14¼"-14½"-15"-15¼", bind off 12-12-12-14-14-14 sts in each side for armholes (i.e. 6-6-6-7-7-7 sts on each side of both markers) = 90-98-110-124-136-148 sts remain on front and back piece. Put piece aside and knit the sleeves. SLEEVE: Work in the round on double pointed needles, switch to circular needle when needed. Cast on 70-70-70-80-80-80 sts on 2 circular needles size 3 mm / US 2.5 with Baby Alpaca Silk. Pull out one circular needle, distribute sts on double pointed needles size 3 mm / US 2.5 and work 2 ridges in GARTER ST. Then work pattern according to diagram A.1. When A.1 has been worked 1 time vertically, there are 56-56-56-64-64-64 sts on needle. Then work in stockinette st in the round. When piece measures 10-10-8-8-10-8 cm / 4"-4"-3⅛"-3⅛"-4"-3⅛", insert 1 marker at the beg of round. Now inc 2 sts mid under sleeve (i.e. 1 st on each side of marker). Repeat inc every 6th-5th-5th-5th-4th-4th round 17-19-21-20-22-25 more times (= 18-20-22-21-23-26 inc in total) = 92-96-100-106-110-116 sts. When piece measures 44-44-43-43-42-42 cm / 17 ¼"-17 ¼"-17"-17"-16½"-16½", bind off 12-12-12-14-14-14 sts mid under sleeve (i.e. 6-6-6-7-7-7 sts on each side of marker) = 80-84-88-92-96-102 sts remain on needle. Put piece aside and knit another sleeve. YOKE: Slip sleeves on to same circular needle as body where armholes were bound off (without working them first) = 340-364-396-432-464-500 sts. Insert 1 marker in all transitions between sleeves and body piece = 4 markers. Work in stockinette st in the round AT THE SAME TIME on first round dec for raglan on each side of the 4 markers – READ DECREASE tip (= 8 sts dec). Repeat dec every other round 2-2-3-3-3-3 more times (= 3-3-4-4-4-4 dec in total) = 316-340-364-400-432-468 sts. On next round, dec 28-20-12-16-48-20 sts evenly = 288-320-352-384-384-448 sts remain on needle. Work next round as follows: * Work A.2 (= 19 sts), 13 sts in stockinette st *, repeat from *-* 9-10-11-12-12-14 times in total. Continue the pattern like this. When A.2 has been worked 1 time vertically, work next round as follows: * Work A.4 (= 19 sts), A.3 (= 13 sts) *, repeat from *-* 9-10-11-12-12-14 times in total. Continue the pattern like this. When A.4/A.3 has been worked 1 time vertically, there are 279-310-341-372-372-434 sts on needle. Work next round as follows: * A.4 (= 19 sts), A.5 (= 12 sts) *, repeat from *-* 9-10-11-12-12-14 times in total. Continue the pattern like this. When A.4 has been worked 2-2-2-2-3-3 times in total vertically ((2-2-2-2-3-3 full repeats of A.5 have been worked plus 4-4-4-4-6-6 more rounds of A.5 in height), work A.6 instead of A.4 and A.7 instead of A.5 (beg A.7 at arrow at the bottom in diagram for correct size). Continue pattern like this while AT THE SAME TIME dec as shown in diagram. When A.6/A.7 has been worked 1 time vertically (finish after round marked with arrow at the top in diagram for correct size), 135-150-165-180-180-210 sts remain on needle. Insert 1 marker in last round – now measure piece from here (yoke measures approx. 22-23-24-25-26-27 cm / 8¾"-9"-9½"-9¾"-10¼"-10½" from armhole, the entire jacket measures approx. 56-58-60-62-64-66 cm / 22"-22¾"-23⅝"-24⅜"-25¼"-26" from bottom). Work next round as follows: * K 1, P 2 tog, K 1, slip 1 st as if to K, K 2 tog, psso, K 1, P 2 tog, K 1, work A.9 (= 4 sts – beg at arrow in diagram for correct size) *, repeat from *-* 9-10-11-12-12-14 times in total = 99-110-121-132-132-154 sts remain on needle. Work 1 round with K over K and P over P. Then work a high collar as follows: * Work A.8 (= 7 sts), A.9 (= 4 sts) *, repeat from *-* 9-10-11-12-12-14 times in total. Continue pattern like this until piece measures approx. 6 cm / 2½" from marker. Then loosely bind off with K over K and P over P. ASSEMBLY: Sew the opening under the sleeves. |
|||||||||||||||||||||||||
Diagram explanations |
|||||||||||||||||||||||||
|
|||||||||||||||||||||||||
|
|||||||||||||||||||||||||

|
|||||||||||||||||||||||||
|
|||||||||||||||||||||||||
Have you finished this pattern?Tag your pictures with #dropspattern #ladyfeathersweater or submit them to the #dropsfan gallery. Do you need help with this pattern?You'll find 20 tutorial videos, a Comments/Questions area and more by visiting the pattern on garnstudio.com. © 1982-2025 DROPS Design A/S. We reserve all rights. This document, including all its sub-sections, has copyrights. Read more about what you can do with our patterns at the bottom of each pattern on our site. |
|||||||||||||||||||||||||


With over 40 years in knitting and crochet design, DROPS Design offers one of the most extensive collections of free patterns on the internet - translated to 17 languages. As of today we count 314 catalogs and 11821 patterns - 11811 of which are translated into English (US/in).
We work hard to bring you the best knitting and crochet have to offer, inspiration and advice as well as great quality yarns at incredible prices! Would you like to use our patterns for other than personal use? You can read what you are allowed to do in the Copyright text at the bottom of all our patterns. Happy crafting!
Post a comment to pattern DROPS 149-29
We would love to hear what you have to say about this pattern!
If you want to leave a question, please make sure you select the correct category in the form below, to speed up the answering process. Required fields are marked *.