
Popular categories
Looking for a yarn?


|
|
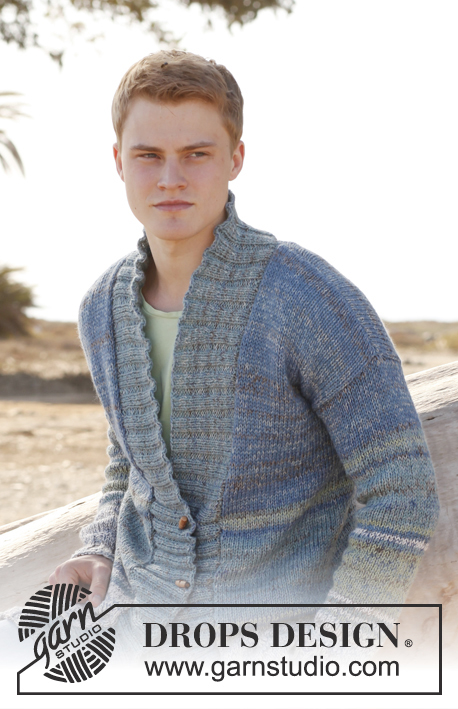
Beren |
|
 |
 |
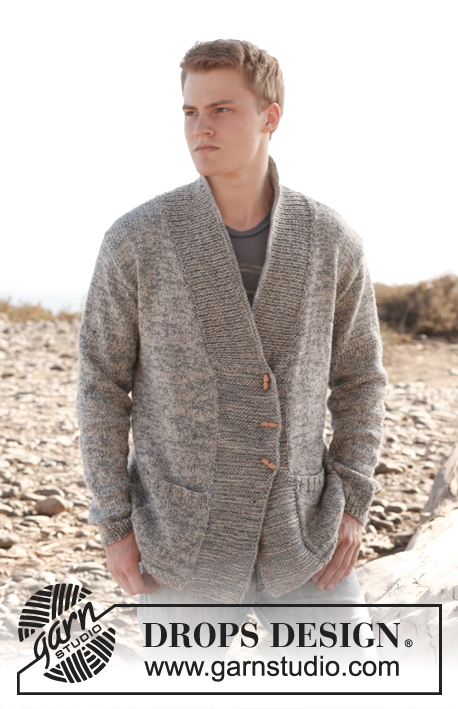
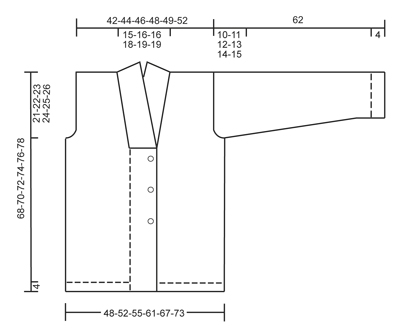
Men's jacket, knitted in 2 threads DROPS Fabel or DROPS Flora, with with shawl collar. Size: S to XXXL.
DROPS Extra 0-897 |
|
|
GARTER ST: K back and forth on all rows. SHORT ROWS: Work short rows every 5 cm / 2'' vertically until finished measurements as follows: Work 20 band sts in garter st from RS, turn piece, tighten thread and K back from WS. Then work over all sts as before from RS, turn piece and work 20 band sts in garter st from WS, turn piece, tighten thread and K back from RS. Then work over all sts from WS as before. BUTTONHOLES: Bind off for 3 buttonholes from RS on right band. 1 buttonhole = work the first 4 sts from mid front, bind off next st and cast on 1 new st over this st on next row. Bind off for buttonholes when piece measures: SIZE S: 26, 33 and 40 cm / 10 1/4", 13 and 15 3/4" SIZE M: 27, 34 and 41 cm / 10½", 13½" and 16" SIZE L: 28, 35 and 42 cm / 11", 13 3/4" and 16½" SIZE XL: 29, 36 and 43 cm / 11½", 14 1/4" and 17" SIZE XXL: 30, 37 and 44 cm / 11 3/4", 14½" anbd 17 1/4" SIZE XXXL: 31, 38 and 45 cm / 12 1/4", 15" and 17 3/4" 1 cm / ½'' should remain before binding off on band. DECREASE TIP (applies to neck dec mid front): Dec from RS inside 1 edge st in garter st. Dec AFTER 1 edge st as follows: Slip 1 st as if to K, K 1, psso. Dec BEFORE 1 edge st as follows: K 2 tog. INCREASE TIP: Inc 1 st by making 1 YO inside 1 edge st in each side. On next row work YO twisted to avoid holes. ---------------------------------------------------------- BODY: Worked back and forth on circular needle from mid front. Cast on 205-217-229-249-269-289 sts (includes 20 band sts in each side towards mid front) on circular needle size 4.5 mm / US 7 with 1 strand of each color. Work rib as follows (1st row = RS): 20 band sts in GARTER ST - see explanation above - * K 1, P 1 *, repeat from *-* until 20 sts remain, work these band sts in garter st. Continue with rib and 20 band sts in garter st in each side. When piece measures 4 cm / 1½'', switch to circular needle size 5 mm / US 8, work next row from RS as follows: Work the first 20 band sts in garter st, in stockinette st over the middle sts - at the same time dec 1 st, finish with 20 band sts in garter st = 204-216-228-248-268-288 sts on row. Continue in stockinette st with 20 band sts in garter st in each side. When piece measures 5 cm / 2'', work SHORT ROWS - see explanation above. When piece measures 26-27-28-29-30-31 cm / 10¼''-10½''-11''-11½''-11¾''-12¼'', start to bind off for BUTTONHOLE on right band - Read explanation above. REMEMBER THE GAUGE! READ ALL OF THE FOLLOWING 2 SECTIONS BEFORE CONTINUING. When piece measures 41-42-43-44-45-46 cm / 16 1/8''-16½''-17''-17¼''-17¾''-18'', insert 1 marker 61-64-67-72-77-82 sts in from each side ( = 82-88-94-104-114-124 sts between each marker on back piece), move the marker upwards when working. On the beg of the next 2 rows, bind off the first 19 sts = 166-178-190-210-230-250 sts remain, then insert 1 marker at beg and end of row (marks where to start knitting up the collar). On next row from RS, dec 1 st from neck in each side - SEE DECREASE TIP! Repeat dec every 4th row 13-14-14-15-16-16 more times (14-15-15-16-17-17 times in total) - AT THE SAME TIME when piece measures 47-48-49-50-51-52 cm / 18½''-19''-19¼''-19¾''-20''-20½'', bind off 3 sts on each side of each marker (= 6 dec sts in each side) for armholes. Now divide the piece and finish each part separately. LEFT FRONT PIECE: Continue in stockinette st and with neck dec mid front - AT THE SAME TIME bind off for armhole at the beg of every row from RS as follows: 3 sts 0-0-0-1-1-1 times, 2 sts 0-1-1-1-3-4 times and 1 st 2-2-3-3-3-4 times. After all bind offs and dec are done, 23-23-25-26-26-28 sts remain on shoulder. Bind off all sts when piece measures 68-70-72-74-76-78 cm / 26¾''-27½''-28 3/8''-29 1/8''-30''-30¾''. RIGHT FRONT PIECE: Work as left front piece but reversed. BACK PIECE: = 76-82-88-98-108-118 sts. Continue in stockinette st while at the same time casting/binding off for armholes at the beg of every row in each side as on front piece = 72-74-78-82-84-88 sts. When piece measures 66-68-70-72-74-76 cm / 26''-26¾''-27½''-28 3/8''-29 1/8''-30'', bind off the middle 22-24-24-26-28-28 sts for neck and finish each shoulder separately. At beg of next row from neck, bind off 2 sts = 23-23-25-26-26-28 sts remain on shoulder. Bind off all sts when piece measures 68-70-72-74-76-78 cm / 26¾''-27½''-28 3/8''-29 1/8''-30''-30¾''. SLEEVE: Worked back and forth on needle. Cast on 40-42-44-46-48-50 sts (incl 1 edge st in each side) on circular needle size 4.5 mm / US 7 with 1 strand of each color. Work rib as follows (1st row = RS): 1 edge st in garter st, * K 1, P 1 *, repeat from *-* and finish with 1 edge st in garter st. When piece measures 4 cm / 1½'', switch to circular needle size 5 mm / US 8, work in stockinette st with 1 edge st in garter st in each side. When piece measures 8 cm / 3 1/8'', inc 1 st in each side - READ INCREASE TIP! Repeat inc every 3½-3½-3-2½-2½-2 cm / 1 1/4"-1 1/4"-1"-7/8"-7/8"-3/4" 11-11-13-14-15-16 more times (12-12-14-15-16-17 times in total) = 64-66-72-76-80-84 sts. When piece measures 52-51-50-49-48-47 cm / 20½"-20"-19 3/4"-19 1/4"-19"-18½" (shorter measurements in the larger sizes because of longer sleeve cap and wider shoulders) bind off for sleeve cap at beg of every row in each side: 3 sts 1-1-1-2-2-2 times, 2 sts 1-2-2-2-4-4 times and 1 st 1-2-2-3-3-4 times. Then bind off 2 sts in each side until piece measures 61 cm / 24'', then bind off 3 sts 1 time in each side. Bind off all sts, piece measures approx. 62 cm / 24½'' in all sizes. ASSEMBLY: Sew the shoulder seams. Sew in sleeves and sew sleeve seams inside 1 edge st. SHAWL COLLAR: Worked back and forth on needle. Knit up inside 1 edge st on circular needle size 4.5 mm / US 7 with 1 strand of each color: Beg mid front at the marker on right front piece, knit up approx. 60 to 70 sts up to shoulder, then approx. 40 to 50 sts around the neck, and approx. 60 to 70 sts down along left front piece until marker = approx. 160 to 190 sts. K 1 row from WS while AT THE SAME TIME adjusting no of sts to 153-159-163-169-175-181. On next row from RS work rib as follows: 1 st in garter st, * K 1, P 1 *, repeat from *-* and finish with K 1 and 1 st in garter st. Continue rib until collar measures approx. 6 cm / 2½''. On next row from RS inc 1 P st in each of the middle 12-13-13-14-13-14 P-sections (= back of neck) = 165-172-176-183-188-195 sts. Continue rib until collar measures approx. 10 cm / 4'' (finish with 1 row from RS). K 3 rows over all sts, then loosely bind off all sts with K from RS. Neatly fasten collar at the bottom in each side towards band with stitches – sew edge to edge to avoid a chunky seam. Sew the buttons on to the left band. POCKET: Cast on 30 sts with 1 strand of each color on needle size 5 mm / US 8, work in stockinette st until pocket measures 16 cm / 6 1/4''. Then switch to needle size 4.5 mm / US 7 and work rib as follows: * K 2, P 2 *, repeat from *-*. Continue rib until pocket measures 18 cm / 7'', loosely bind off with K over K and P over P. Knit another pocket the same way. Sew pockets on jacket towards band mid front and down to rib at the bottom. |
|
|
|
|
Have you made this or any other of our designs? Tag your pictures in social media with #dropsdesign so we can see them! Do you need help with this pattern?You'll find tutorial videos, a Comments/Questions area and more by visiting the pattern on garnstudio.com. © 1982-2024 DROPS Design A/S. We reserve all rights. This document, including all its sub-sections, has copyrights. Read more about what you can do with our patterns at the bottom of each pattern on our site. |
|


With over 40 years in knitting and crochet design, DROPS Design offers one of the most extensive collections of free patterns on the internet - translated to 17 languages. As of today we count 304 catalogs and 11422 patterns - 11417 of which are translated into English (US/in).
We work hard to bring you the best knitting and crochet have to offer, inspiration and advice as well as great quality yarns at incredible prices! Would you like to use our patterns for other than personal use? You can read what you are allowed to do in the Copyright text at the bottom of all our patterns. Happy crafting!
Comments / Questions (29)
Hei! I oppskriften står det at jeg skal hente opp masker til kragen innenfor kantmasken, mens i videoen benyttes selve kantmasken. Hvilken er riktig?
29.01.2024 - 13:47DROPS Design answered:
Hei Lena, Det som står i teksten gjelder for denne oppskriften. Videoene er for å vise teknikk og er ikke alltid det samme som står i oppskriften. God fornøyelse!
30.01.2024 - 06:48Bonjour, pour la fin des manches, quand vous dites de rabattre 2m de chaque côté jusqu'à ce que la manche mesure 61cm, vous voulez dire 4m rabattues par rang (2m au début et 2m à la fin) ou alors 2m rabattues au début de chaque rang ? car j'ai l'impression qu'avec 4m rabattues par rang je me suis trompée... Merci d'avance pour votre aide ! :)
19.03.2023 - 15:07DROPS Design answered:
Bonjour Emilie, on veut bien dire 2 mailles de chaque côté, autrement dit rabattez 2 mailles au début du rang suivant sur l'endroit, 2 mailles au début du rang suivant sur l'envers et répétez ces 2 rangs jusqu'à ce que la manche mesure 61 cm (il faut bien avoir rabattu le même nombre de mailles de chaque côté, ajustez si besoin un peu avant ou un peu après les 61 cm). Bon tricot!
20.03.2023 - 09:37Bonjour,lorsque je monte les mailles,vous dites monté 289 est ce que je dois faire + 2×20......ou si le 2×20 est inclut dans le 289?
10.03.2023 - 00:49DROPS Design answered:
Bonjour Hélène, les 20 mailles de bordure devant sont comptées dans ces 289 mailles, vous n'avez pas à les monter en plus. Bon tricot!
10.03.2023 - 09:49Hej Udtagningen i nakken på sjalskraven forstår jeg ikke. Hvad er et vr-parti? Skal man efter udtagning i nakken strikke 1 ret og 2 vrang? Mh Majken
21.04.2022 - 09:52DROPS Design answered:
Hej Majken, ja det stemmer du strikker 1 ret og 2 vrang i de midterste masker bag i nakken :)
22.04.2022 - 12:42Thank you for the reply. I would like to say that a "section" implies more than one or a group of something. P is a stitch, just one. I would like to suggest saying "in the middle 12(13) or(14) sts convert to K1P2". Finish row with K1P1. I hope it helps others.
24.12.2021 - 12:55I solved the yarn shortage. I desperately want to finish the collar. Can you explain how to do the increases in the back of the neck? What are "On next row from RS inc 1 P st in each of the middle 12-13-13-14-13-14 P-sections " . What are P sections?
20.12.2021 - 14:43DROPS Design answered:
Dear Irene, you are working collar in rib K1/P1, where P1 is a P-section, you will increase in the middle 12-13-13-14-13-14 sections of the collar (to make the collar fold nicely), this means you will continue with K1/P1 (seen from RS) over the first stitches before the 12-13-14 P-sections on mid back, then work K1/P2 a total of 12-13-14 times (along mid-back) and finish with K1/P1 to the bottom edge. Happy knitting!
20.12.2021 - 14:58It appears I may run out of yarn to finish. I am at the point where I'll start the sleeves. I'm using Hayfield Journey in Silver Storm. What do you suggest?
26.11.2021 - 16:48DROPS Design answered:
Dear Irene, please understand that these patterns are made available to support DROPS yarns, therefore we cannot advise you about yarns from other brands. Happy Stiching!
28.11.2021 - 00:24"On the beg of the next 2 rows, bind off the first 19 sts = 166-178-190-210-230-250 sts remain, then insert 1 marker at beg and end of row (marks where to start knitting up the collar). On next row from RS, dec 1 st from neck in each side - " Please explain where to bind off. Can't be the beginning of row-there is a border.
23.10.2021 - 15:32DROPS Design answered:
Dear Irene, yes, cou binding off the stitches of the button band. (If you look at the picture and the drawing, you can see that the shawlcollar if knitted separately and sewn to the band later. Happy stitching!
24.10.2021 - 03:07Please explain exactly where to bind off the 19 sts. Certainly you can't mean at the beginning of the garter sts. I placed markers 72 sts inside from edge each row.
23.10.2021 - 15:08I want to substitute Drops Air with 167 yds. How many balls do I need?
10.07.2021 - 03:59DROPS Design answered:
Dear Irene, to calculate the amount of substitute yarns, use our yarn converter HERE. Happy Stitching!
11.07.2021 - 06:30