
Popular categories
Looking for a yarn?


Comments / Questions (48)
![]() Mari wrote:
Mari wrote:
Sto notando che l'inizio del lavoro essendo a maglia rasata senza un bordo si arriccia tantissimo, come si può risolvere questo problema? Grazie.
12.02.2023 - 00:32DROPS Design answered:
Buonasera Mari, è proprio una caratteristica del modello, con il bloccaggio si noterà meno, ma rimane comunque. Buon lavoro!
13.02.2023 - 16:15
![]() Renate Van Nuland wrote:
Renate Van Nuland wrote:
Goedemiddag, ik heb een vraag over de omslagdoek Wings, beschreven met garen Lace Lace is niet meer verkrijgbaar en bij jullie lijst met alternatieve garen komt niets op. Is Kid-silk te gebruiken? Zo ja, moet ik dan nog ergens rekening mee houden? Ik heb eerder Kid-silk gebruikt maar op naalden 7 en 8, ga ik voor omslagdoek Wings dan 3 gebruiken? Vriendelijke groet Renate
29.12.2022 - 15:37DROPS Design answered:
Dag Renate,
DROPS Lace is inderdaad helaas niet meer in de handel. Dit garen valt in categorie A, dus je kunt een garen kiezen uit dezelfde categorie, zoals bijvoorbeeld Kid-Silk. Maak een proeflapje om te kijken of de stekenverhouding overeenkomt en pas eventueel de naalddikte aan zodat je dezelfde stekenverhouding hebt als in het patroon.
01.01.2023 - 11:32
![]() Tini Von Nessen wrote:
Tini Von Nessen wrote:
Guten Tag, es sollen ja insgesamt 317 Maschen sein. Ich habe links und rechts 60 und in der Mitte 59. Habe ich etwas falsch gemacht? Vielen Dank für die Hilfe.
24.08.2020 - 15:59DROPS Design answered:
Liebe Frau Von Nessen, die Zunahmen stricken Sie noch weiter bis es 129 M vor der 1. Markierung und genau sovile nach der 2. Markierung sind, + die mittleren 59 M = 129+59+129= dann haben Sie die 317 Maschen. Viel Spaß beim stricken!
24.08.2020 - 16:11
![]() Jyotsna wrote:
Jyotsna wrote:
Please explain or some video " Cast of the first 3 sts in garter st (lightly pull them when casting off so that they are loose), * make 1 loose YO on right needle, cast off YO, cast off 2 sts (lightly pull when casting off so that they are loose) *, repeat from *-* until 2 sts remain, cast off these sts."
23.08.2020 - 11:10DROPS Design answered:
Dear Jyotsna, this video shows how to bind off with yarn overs. make sure the stitches are worked loosely as explained in the pattern to avoid cast off edge being too tight. Happy knitting!
24.08.2020 - 08:39
![]() Jyotsna wrote:
Jyotsna wrote:
Please explain or send video of : Cast of the first 3 sts in garter st (lightly pull them when casting off so that they are loose), * make 1 loose YO on right needle, cast off YO, cast off 2 sts (lightly pull when casting off so that they are loose) *, repeat from *-* until 2 sts remain, cast off these sts.
22.08.2020 - 07:08
![]() Karina Zimmermann wrote:
Karina Zimmermann wrote:
Hej. Tak for svaret. Hvis jeg gerne vil have en mønsterrapport i hver side mere, hvor mange masker skal jeg så have udover de 129 masker pr side?
15.08.2017 - 17:57DROPS Design answered:
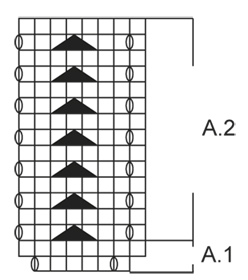
Hej Karina, Du skal bruge 6 masker mere for at kunne strikke 1 rapport mere af første pind i diagram A.1. God fornøjelse!
17.08.2017 - 15:21
![]() Karina Zimmermann wrote:
Karina Zimmermann wrote:
Hej. Er det korrekt læst, at der tages ud på både ret- og vrangsiden?
12.08.2017 - 19:30DROPS Design answered:
Hei Karina. Ja, det stemmer. Når du starter på diagrammene, økes det bare fra retten. God Fornøyelse!
14.08.2017 - 16:02Selma wrote:
Je ne comprend pas tres bien au debut lorsqu'il est dit:"tricoter en jersey avec 2m au point mousse.........1er rg sur l'endroit",ces 2 m pt mousse doit on les tricoter sur tous les rangs?ou sur le 1er rg seulement?merci!
11.08.2016 - 12:04DROPS Design answered:
Bonjour Selma, on tricote les 2 premières m et les 2 dernières m au point mousse jusqu'à la fin du châle. Bon tricot!
15.08.2016 - 09:44
![]() Frauke wrote:
Frauke wrote:
Hallo, wie verstehe ich "man nimmt in jeder R 1M neben den 2 M kraus rechts auf jeder Seite auf" h.d. vor den 2 M kraus rechts oder nach den 2 M kraus rechts? Danke LG Frauke
03.05.2015 - 23:11DROPS Design answered:
Die jeweils 2 kraus-re-M bilden stets Anfang und Ende, Sie nehmen also am R-Anfang 1 M nach diesen 2 M zu und am R-Ende nehmen Sie 1 M vor diesen 2 M zu. Diese beidseitige Zunahme machen Sie in jeder R.
04.05.2015 - 22:07
![]() Triin wrote:
Triin wrote:
Eesti keeles on sõnastus küll veidi ebaõnnestunud. Mida tähendab mustris lause "Kasvata 1 silmus mõlemal serval 2 ripskoes silmuse kõrvalt" Mida see kõrvalt seal tähendab? Kas ma peaks sealt välja lugema, et kasvatada tuleb kahe ripskoes silmuse järel?
23.02.2015 - 14:12DROPS Design answered:
Justnimelt! Rea alguses pärast 2 ripskoes silmust ja rea lõpus enne 2 ripskoes silmust.
02.09.2015 - 15:19
|
||||||||||
Wings#wingsshawl |
||||||||||
 |
 |
|||||||||
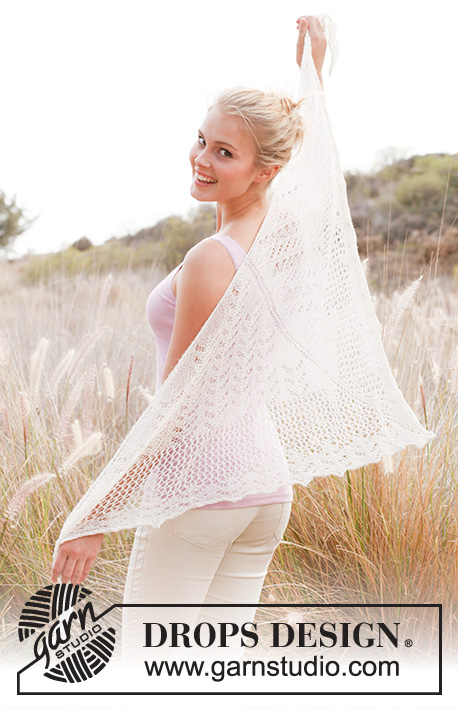
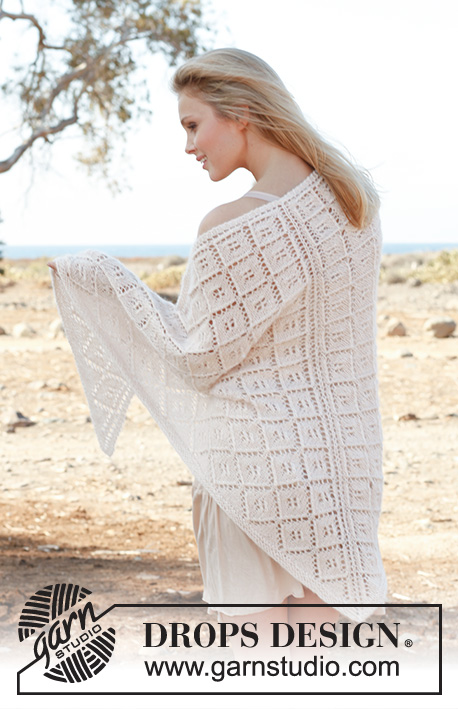
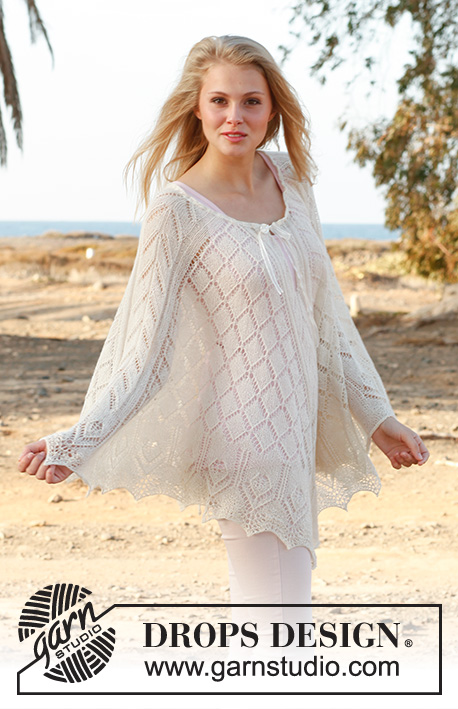
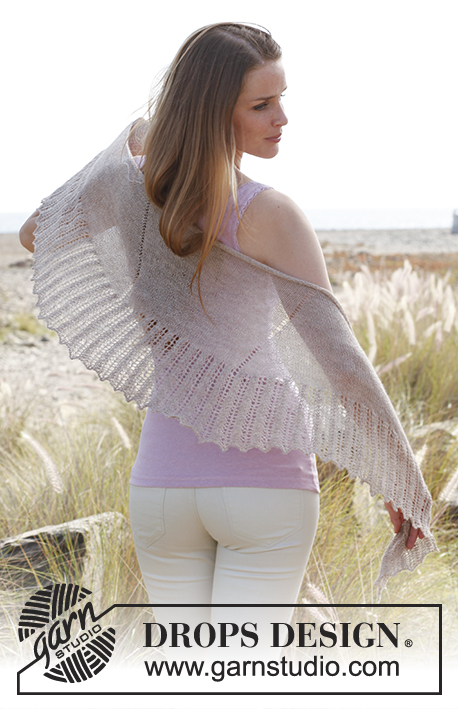
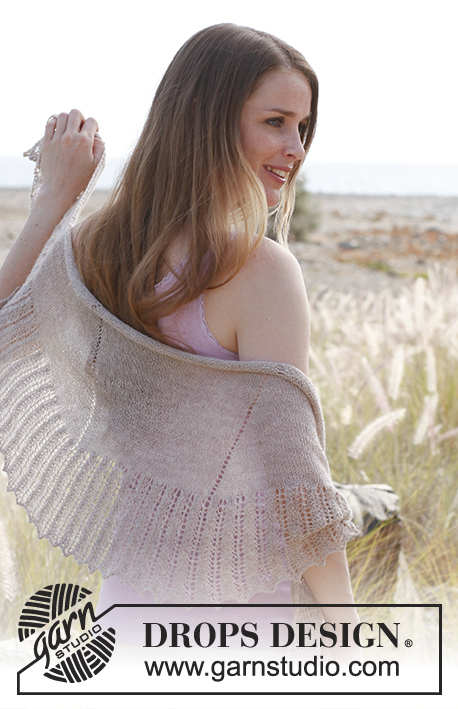
Knitted DROPS shawl with lace pattern in ”Lace”.
DROPS 146-28 |
||||||||||
|
GARTER ST (back and forth on needle): K all rows. PATTERN: See diagrams A.1 and A.2. Diagrams show all rows in pattern seen from RS. INCREASE TIP: Inc 1 st inside 2 sts in garter st in each side of piece on every row by making a YO, P the YO from WS and K the YO from RS to make holes. Inc 1 st before 1st marker from RS by making a YO before marker and inc 1 st after 2nd marker from RS by making a YO after marker, P the YOs from WS to make holes. ---------------------------------------------------------- SHAWL: Worked back and forth on circular needle to make room for all the sts. Cast on 65 sts on circular needle size 3.5 mm / US 4 with Lace. Insert markers inside 3 sts in each side of shawl (= 59 sts between markers) and move the markers upwards when working. Work in stockinette st with 2 sts in GARTER ST - see explanation above, in each side (1st row = RS) - AT THE SAME TIME inc - read INCREASE TIP above, 1 st inside 2 sts in garter st in each side of piece on every row, and inc 1 st before 1st marker and 1 st after 2nd marker on every row from RS (= 6 inc sts after every other row). Continue to work and inc this way until there are 129 sts before 1st marker, 59 sts in the middle and 129 sts after 2nd marker = 317 sts on row. After all inc piece measures approx. 28 cm / 11" in the knitting direction along one of the markers. On next row from RS work as follows: 2 sts in garter st and diagram A.1(= 6 sts) 52 times until 3 sts remain, work 1 st in stockinette st and finish with 2 sts in garter st. When diagram A.1 has been worked 1 time vertically, there are 421 sts on row. Continue to work 2 sts in garter st, diagram A.2 until 3 sts remain, 1 st in stockinette st and 2 sts in garter st, work until diagram A.2 has been worked a total of 3 times vertically, piece measures approx. 42 cm / 16½" measured in knitting direction along one of the markers. On next row from RS, loosely bind off as follows – NOTE: It is very important to bind off very LOOSELY otherwise the edge cannot be shaped into tips: Cast of the first 3 sts in garter st (lightly pull them when casting/binding off so that they are loose), * make 1 loose YO on right needle, bind off YO, bind off 2 sts (lightly pull when casting/binding off so that they are loose) *, repeat from *-* until 2 sts remain, bind off these sts. BLOCKING: Place the shawl in lukewarm water until it is soaking wet. Carefully squeeze the water out of the shawl - do not twist the shawl - then roll the shawl in a towel and squeeze to remove more water - the shawl will now only be moist. Place the shawl on a carpet or mattress (or blocking boards) - carefully stretch it out to size and fasten it with pins. NOTE: Fasten several pins in the outermost sts along cast on edge and out to the outermost sts in each side of shawl, fasten 1 pin between every repetition along the 2 diagonal sides, lightly pull at every pin so that the edge is shaped with small tips. Leave to dry. Repeat the process when the shawl is being washed. |
||||||||||
Diagram explanations |
||||||||||
|
||||||||||
 |
||||||||||
Have you finished this pattern?Tag your pictures with #dropspattern #wingsshawl or submit them to the #dropsfan gallery. Do you need help with this pattern?You'll find 13 tutorial videos, a Comments/Questions area and more by visiting the pattern on garnstudio.com. © 1982-2026 DROPS Design A/S. We reserve all rights. This document, including all its sub-sections, has copyrights. Read more about what you can do with our patterns at the bottom of each pattern on our site. |
||||||||||


With over 40 years in knitting and crochet design, DROPS Design offers one of the most extensive collections of free patterns on the internet - translated to 17 languages. As of today we count 324 catalogs and 12290 patterns - 12280 of which are translated into English (US/in).
We work hard to bring you the best knitting and crochet have to offer, inspiration and advice as well as great quality yarns at incredible prices! Would you like to use our patterns for other than personal use? You can read what you are allowed to do in the Copyright text at the bottom of all our patterns. Happy crafting!
Post a comment to pattern DROPS 146-28
We would love to hear what you have to say about this pattern!
If you want to leave a question, please make sure you select the correct category in the form below, to speed up the answering process. Required fields are marked *.