
Popular categories
Looking for a yarn?


Comments / Questions (61)
![]() Nicole Miller wrote:
Nicole Miller wrote:
Is this top joined in the round right after the case on before the ribbing is worked? Also ate there any edge stitches before chart is started?
20.06.2022 - 05:56DROPS Design answered:
Dear Mrs Miller, top is worked bottom up, first in the round to the armholes (so that there are no edge stitches when working the diagrams), then you divide piece and finish back and front piece back and forth separately - you will then sew shoulder and sleeve seams. Happy knitting!
20.06.2022 - 08:10
![]() Jackie wrote:
Jackie wrote:
I just sent a question but will do so again as this page reappeared and I don't know if it went through the first time. I love this pattern - the boatneck and cap sleeves - however, I am not advanced enough to make the lacing nor have I ever followed a diagram. Would it be possible for you to send me a correction using only the garter st all the way through? Thank you.
09.09.2020 - 19:01DROPS Design answered:
See answer below :)
10.09.2020 - 09:28
![]() Jackie wrote:
Jackie wrote:
Hello. I love the shape of this top - the boatneck and the cap sleeves - and have been looking for a pattern exactly like this one. However, I am not advanced enough to make the lacing and have never followed a diagram before. Would it be possible for you to send me a correction, continuing with the garter st all the way through? Thank you. By the way, your patterns are all lovely.
09.09.2020 - 18:58DROPS Design answered:
Dear Jackie, we are unfortunately not able to adjust every pattern to every single request - you can will find how to read knitting diagrams here - should you need any individual assistance, your DROPS store can help you even per mail or telephone. Happy knitting!
10.09.2020 - 09:27
![]() Giorgia wrote:
Giorgia wrote:
Grazie , mi sono accorta solo ora della vostra rapida risposta che mi ha tolto il dubbio. Avevo dimenticato che il punto legaccio lavorato in tondo é il risultato di 1 ferro a diritto e 1 a rovescio.
12.10.2019 - 00:58
![]() Giorgia wrote:
Giorgia wrote:
Lavorando in tondo coi ferri circolari e quindi lavorando sempre sul dritto del lavoro, come si fa a capire se si è il giro successivo sul rovescio del lavoro quando si devono intrecciare le maglie per gli scalfi?
12.10.2019 - 00:45
![]() Giorgia wrote:
Giorgia wrote:
Cosa intendete quando nel paragrafo finale del TOP scrivete:" quando il lavoro misura 10 cm,assicurarsi che il giro successivo sia un giro a rovescio" se lavorando invece in tondo coi ferri circolari si lavora solo sul dritto del lavoro? Come si fa a capire se il giro successivo é a rovescio?
10.10.2019 - 21:55DROPS Design answered:
Buongiorno Giorgia. Quando lavora il legaccio in tondo (quindi sempre sul diritto del lavoro), lavora un giro a diritto e un giro a rovescio. Deve intrecciare le maglie su un giro lavorato a rovescio. Buon lavoro!
11.10.2019 - 08:25
![]() Giorgia wrote:
Giorgia wrote:
Grazie per i vostri bellissimi modelli! Non riesco a capire cosa intendete quando scrivete nelle ultime righe del paragrafo del TOP "Quando il lavoro misura 10 cm – assicurarsi che il giro successivo sia un giro a rov, " Ma lavorando in tondo coi ferri circolari non si lavora sempre sul diritto del lavoro? Come faccio a capire allora se il giro seguente è a rovescio per gli scalfi? Grazie per la vostra risposta
10.10.2019 - 20:05DROPS Design answered:
Buongiorno Giorgia. Abbiamo modificato leggermente il testo. Il giro deve essere lavorato a rovescio. Buon lavoro!
10.10.2019 - 21:42
![]() Carine wrote:
Carine wrote:
Is niet mooi wanneer af is Valt veel groter uit zelfs na proeflapje Is precies een zak jammer
06.06.2015 - 16:47
![]() Carine wrote:
Carine wrote:
Graag antwoord op mijn vorige vraag
01.06.2015 - 16:29
![]() Carine wrote:
Carine wrote:
Bij afwerking staat bovenkant mouw naar beneden langs mouwkop dichtnaaien maar niks uitleg over onderkant en oksel is toch niet bedoeling dat er daar open gat is
30.05.2015 - 12:38DROPS Design answered:
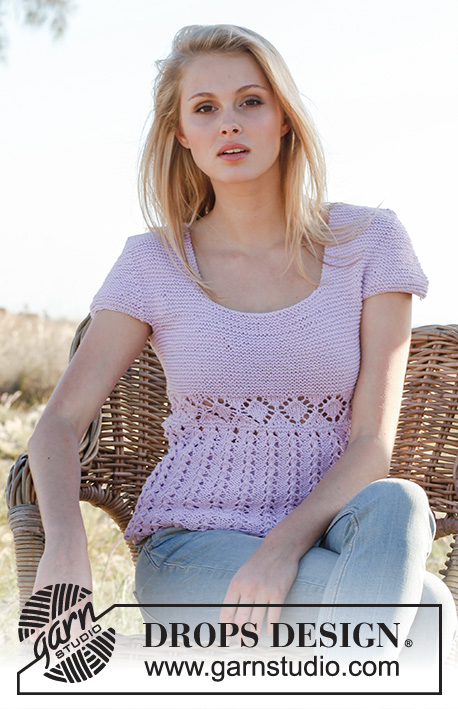
Hoi Carina. Je sluit de schoudernaad tot over de mouwen (bovenkant van de mouw), de opening, die je dan onder krijgt is het armsgat. Zie ook foto - het is een hele korte mouw, hij loopt niet door onder de oksel.
03.06.2015 - 14:14
|
|||||||||||||||||||
Jodi#joditop |
|||||||||||||||||||
 |
 |
||||||||||||||||||
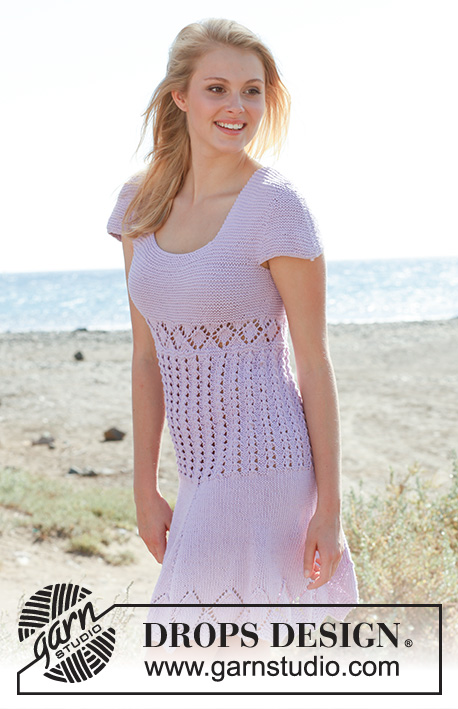
Knitted DROPS top in garter st with short sleeves and lace pattern in ”Cotton Light”. Size: S - XXXL.
DROPS 148-11 |
|||||||||||||||||||
|
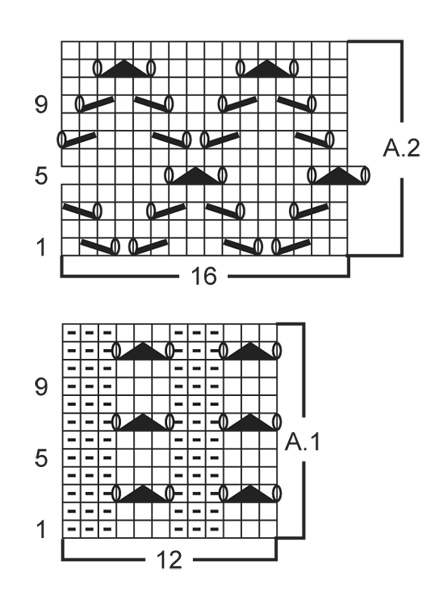
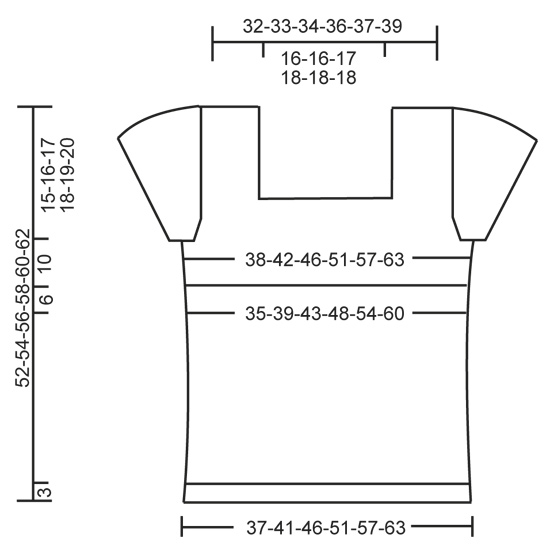
GARTER ST (in the round on circular needle): * K 1 round and P 1 round *, repeat from *-*. 1 ridge = 2 rounds. GARTER ST (back and forth on needle): K all rows. 1 ridge = 2 rows K. PATTERN: See diagrams A.1 and A.2. INCREASE TIP: Inc 1 st by working 2 sts in the same st. DECREASE TIP (applies to dec at the sleeves): All dec are done from RS! Dec as follows before marker and before edge st: K 2 tog. Dec as follows after marker and after edge st: Slip 1 st as if to K, K 1, psso. ---------------------------------------------------------- TOP: Cast on 156-174-192-216-240-264 sts on circular needle size 3.5 mm / US 4 with Cotton Light. K 1 round, then work rib = K 3/P 3. When rib measures 3 cm / 1⅛", work pattern according to diagram A.1. When piece measures approx. 21-22-23-24-25-26 cm / 8¼"-8¾"-9"-9½"-9¾"-10¼" (stop after 1 round with holes), K 1 round while AT THE SAME TIME dec 8-10-12-14-14-14 sts evenly = 148-164-180-202-226-250 sts. P 1 round, K 1 round and P 1 round. K 1 round while AT THE SAME TIME dec 28-36-36-42-42-42 sts evenly = 120-128-144-160-184-208 sts. Switch to circular needle size 4 mm / US 6 and work pattern according to diagram A.2. When A.2 has been worked, K 1 round while AT THE SAME TIME inc 28-36-36-42-42-44 sts evenly = 148-164-180-202-226-252 sts. P 1 round. Insert 1 marker at beg of round and 1 marker after 74-82-90-101-113-126 sts (= sides) – NOW MEASURES PIECE FROM HERE! Then work in GARTER ST in the round on circular needle - see explanation above. When piece measures 3 cm / 1⅛", inc 1 st on each side of both markers – READ INCREASE TIP (= 4 sts inc). Repeat inc when piece measures 6 and 9 cm / 2½" and 3½" = 160-176-192-214-238-264 sts. When piece measures 10 cm / 4" - make sure that next round is a P round, bind off 8-10-12-16-20-24 sts in each side for armholes (i.e. Bind off 4-5-6-8-10-12 sts on each side of both markers) = 72-78-84-91-99-108 sts remain on front and back piece. BACK PIECE: = 72-78-84-91-99-108 sts. Beg with K from RS and bind off at beg of row in each side as follows: bind off 2 sts 1-1-2-2-2-2 times in each side = 68-74-76-83-91-100 sts, cut the yarn. Now work in sleeve caps on back piece as follows (1st row = RS): Cast on 30-30-32-34-36-38 sts on needle, insert 1 marker, work the 68-74-76-83-91-100 sts from back piece, insert 1 marker and cast on 30-30-32-34-36-38 sts on needle = 128-134-140-151-163-176 sts. Continue in garter st back and forth on circular needle size 4 mm / US 6. AT THE SAME TIME on next row from RS beg dec as follows - READ DECREASE TIP: Dec 1 st at beg and end of row inside 1 edge st: Dec every 4th row (i.e. every other row from RS) a total of 12-12-13-13-14-14 times. AT THE SAME TIME dec in each side in towards sleeves (i.e. before first marker and after 2nd marker seen from RS): Dec every 4th row (i.e. every other row from RS): 1 st 12-12-13-13-14-14 times in total. AT THE SAME TIME dec in each side in towards back piece (i.e. after first marker and before 2nd marker seen from RS): Dec every other row (i.e. every row from RS): 1 st 0-2-2-4-7-9 times in total. NECK DEC: AT THE SAME TIME when piece measures 48-50-52-54-56-58 cm / 19"-19¾"-20½"-21¼"-22"-22¾", bind off the middle 34-34-36-37-37-38 sts from RS for neck and finish each shoulder separately. RIGHT SHOULDER: Continue dec towards sleeve cap as before. After last dec there are 23-24-24-27-28-32 sts on needle (i.e. 17-18-18-19-20-22 shoulder sts + 6-6-6-8-8-10 sts remain at the top on sleeve cap). K 1 row from WS and slip the outermost 6-6-6-8-8-10 sts on sleeve cap on 1 stitch holder. Continue in garter st back and forth over the 17-18-18-19-20-22 shoulder sts AT THE SAME TIME as sts from sleeve cap is worked tog with sts on needle as follows: K 1 row from RS until 1 st remains on left needle, slip last st over to right needle without working it, slip first and second st from stitch holder back on left needle, pass the slipped st from right needle back on left needle and K these 3 sts tog, turn, tighten yarn and K 1 row from WS, * K 1 row from RS until 1 st remains on left needle, slip last st over to right needle without working it, slip next st from stitch holder back on left needle, pass the slipped st from right needle back on left needle and K these 2 sts tog, turn, tighten yarn and K 1 row from WS *, repeat these 2 rows from *-* until all sts on stitch holder have been worked tog with last st on row, loosely bind off. Yoke measures approx. 25-26-27-28-29-30 cm / 9¾"-10¼"-10⅝"-11"-11⅜"-11¾" from marker and the entire top measures approx. 52-54-56-58-60-62 cm / 20½"-21¼"-22"-22¾"-23⅝"-24⅜". LEFT SHOULDER: Work as right shoulder but after last dec, slip the outermost 6-6-6-8-8-10 sts on sleeve cap on 1 stitch holder. Beg from WS and K 1 row until 1 st remains on left needle, slip last st over on right needle without working it, slip first and second st from stitch holder back on left needle, pass the slipped st from right needle back on left needle and K these 3 sts tog, turn, tighten yarn and K 1 row from RS, then repeat the 2 rows from *-* as on right shoulder (but with start from WS) until all sts on stitch holder have been worked tog with last st on row, loosely bind off. FRONT PIECE: = 72-78-84-91-99-108 sts. Work as back piece and cast on for sleeve caps in each side as on back piece = 128-134-140-151-163-176 sts. Then dec on front piece and sleeve caps as on back piece but when piece measures 40-42-44-46-48-50 cm / 15¾"-16½"-17¼"-18"-19"-19¾", bind off the middle 34-34-36-37-37-38 sts for neck and finish each shoulder separately. Continue dec and then work as right and left shoulder on back piece. Yoke measures approx. 25-26-27-28-29-30 cm / 9¾"-10¼"-10⅝"-11"-11⅜"-11¾" from marker and the entire top measures approx. 52-54-56-58-60-62 cm / 20½"-21¼"-22"-22¾"-23⅝"-24⅜". ASSEMBLY: Sew shoulder seams and down along sleeve caps - sew in front loop of outermost st to avoid chunky seams. |
|||||||||||||||||||
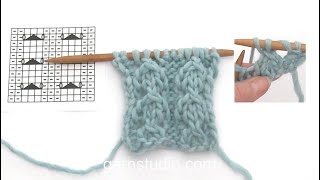
Diagram explanations |
|||||||||||||||||||
|
|||||||||||||||||||
 |
|||||||||||||||||||
 |
|||||||||||||||||||
Have you finished this pattern?Tag your pictures with #dropspattern #joditop or submit them to the #dropsfan gallery. Do you need help with this pattern?You'll find 18 tutorial videos, a Comments/Questions area and more by visiting the pattern on garnstudio.com. © 1982-2026 DROPS Design A/S. We reserve all rights. This document, including all its sub-sections, has copyrights. Read more about what you can do with our patterns at the bottom of each pattern on our site. |
|||||||||||||||||||


With over 40 years in knitting and crochet design, DROPS Design offers one of the most extensive collections of free patterns on the internet - translated to 17 languages. As of today we count 324 catalogs and 12285 patterns - 12275 of which are translated into English (US/in).
We work hard to bring you the best knitting and crochet have to offer, inspiration and advice as well as great quality yarns at incredible prices! Would you like to use our patterns for other than personal use? You can read what you are allowed to do in the Copyright text at the bottom of all our patterns. Happy crafting!
Post a comment to pattern DROPS 148-11
We would love to hear what you have to say about this pattern!
If you want to leave a question, please make sure you select the correct category in the form below, to speed up the answering process. Required fields are marked *.