
Popular categories
Looking for a yarn?


Comments / Questions (20)
![]() Susanne Nielsen wrote:
Susanne Nielsen wrote:
Hej. Jeg er ved at strikke det første ærme. Der står at man skal tage 2 masker ud på hver 8 cm. Vil det sige at der skal være 8 cm mellem hver gang der tages ud? På forhånd tak Venlig hilsen Susanne
09.02.2026 - 19:38DROPS Design answered:
Hej Susanne, ja det stemmer, du tager 2 masker ud når arb måler 6 cm, så igen efter 8 cm = 14 cm osv :)
11.02.2026 - 15:05
![]() Christine wrote:
Christine wrote:
Bonjour, je tricote ce modèle taille 7/8 ans. Je monte 107 mailles avec les diminutions 100 mailles. Ok. Vous dites d’augmenter de chaque côté une maille deux fois tous les 10cm donc nous obtenons 104 mailles et non 108…. Merci!!!
31.10.2024 - 18:36DROPS Design answered:
Bonjour Christine, vous devez augmenter sur les côtés du gilet - de chaque côté de chacun des marqueurs, vous allez ainsi augmenter 4 mailles à chaque fois soit 108 mailles quand toutes les augmentations sont faites. Cette partie a été reformulée pour être plus facile à comprendre, merci pour votre retour. Bon tricot!
01.11.2024 - 08:15
![]() Christine wrote:
Christine wrote:
Sur la photo il me semble que le raglan commence après les 3 cm de côtes. Dans les explications vous dites de commencer le raglan après avoir tricoter 10 cm en jersey, c’est surprenant de commencer un raglan si loin après les côtes. Merci.
29.10.2024 - 22:55DROPS Design answered:
Bonjour Christine, ce gilet se tricote de bas en haut, autrement dit, après les côtes du bas du gilet, on diminue (pour bien conserver la bonne largeur), puis on augmente sur les côtés du gilet (= de chaque côté de chacun des 2 marqueurs = 4 augmentations par rang); puis on va rabattre les mailles des emmanchures et mettre en attente, tricoter les manches puis reprendre toutes les pièces ensemble pour tricoter l'empiècement et diminuer pour le raglan. Bon tricot!
30.10.2024 - 08:34
![]() Gabriele wrote:
Gabriele wrote:
Ich verstehe den Abschnitt Halsausschnitt/Hals nicht.Nach dem Abketten sind noch 46 Maschen übrig, Später sind aber wiez68 Maschen auf der Rundstricknadel???
28.07.2024 - 22:47DROPS Design answered:
Liebe Gabriele, wenn die Raglanabnahmen + Maschen für den Hals abgenommen /abgekettet sind, sind es noch 46 Maschen übrig, dann fassen Sie ca 11 Maschen beim rechten Vorderteil (die stillgelegten Maschen + die abgekettetene Maschen) auf, stricken Sie die 46 Maschen und fassen Sie ca 11 Maschen beim linken Vorderteil = 68 Maschen für die Halsblende. Viel Spaß beim Stricken!
01.08.2024 - 09:13
![]() Carina wrote:
Carina wrote:
Hej! Kan jag använda enbart Drops Muscat utan någon följetråd? Eller bör jag byta till ett annat garn i så fall? Vill ha enbart bomull.
01.03.2024 - 17:07DROPS Design answered:
Hei Carina. Nei, da vil ikke oppskriften stemme. Anbefaler deg å bruke vår søkemotor og søke på jakker til barn. Velger du Garngruppe B under Garngruppe kan alle modellene du får opp brukes med DROPS Muskat (men dobbeltsjekk strikkefastheten). Ønsker du tykkere garn, velg Paris. mvh DROPS Design
04.03.2024 - 13:43
![]() Karin Foerster wrote:
Karin Foerster wrote:
146--152
10.09.2022 - 09:26
![]() Sylvie Bérard wrote:
Sylvie Bérard wrote:
Les manches pour la plus petite taille 5-6 doivent mesurer 38 cm sous le bras. Cependant si je compare à plusieurs de vos autres modèles pour cet âge c`est plutôt 30 cm qui serait assez long; n`est-ce pas une erreur ?
20.05.2022 - 16:06DROPS Design answered:
Bonjour Mme Bérard, comparez les mesures du schéma à celles d'un vêtement similaire allant à l'enfant (pensez à bien vérifier également la longueur de l'empiècement) et adaptez la longueur si besoin. Bon tricot!
23.05.2022 - 07:50
![]() Joan Brennan wrote:
Joan Brennan wrote:
Hi With regard to the sleeve instructions:- It says ‘When piece measures 6cm increase 2 stitches mid under sleeve ………….’ What does ‘mid under’ mean precisely? Does it mean on the outer edges which will form the seam of the sleeve or something else? Please clarify.
16.11.2021 - 12:37DROPS Design answered:
Dear Mrs Brennan, sleeves are worked in the round on double pointed needles, you can increase as follows: work until 1 stitch before the end of the round, increase 1 stitch, knit 2 (marker for beg of round is between these 2 sts), increase 1 stitch. Happy knitting!
16.11.2021 - 13:40
![]() Ada Hernandez wrote:
Ada Hernandez wrote:
Hola! Quiero hacer este patrón, pero tengo una lana acrílica más delgada (descrita como super fina) que la que uds sugieren. Mi lana dice que es para agujas o crochet de 2,5-3. Hice el cuadro de tensión y me salió con 27 corridas y 23 puntos... Usé agujas No 3. Estoy pensando en usar agujas más pequeñas ya que el, tejido de muestra igual quedó un poco suelto. Espero me puedan ayudar. Gracias
03.05.2021 - 17:26DROPS Design answered:
Hola Ada, Para trabajar con una aguja tan pequeña, tienes que trabajar con más de un hilo o recalcular todos los puntos del patrón. Es dificil poder contestar sin ver el hilo ni la muestra, ten en cuenta que esta labor se trabaja con una aguja de 6 mm y doble hilo, por lo que el resultado final comparado con una aguja tan pequeña va a ser muy diferente.
09.05.2021 - 20:17
![]() Mia Hansen wrote:
Mia Hansen wrote:
Begge garntypene er utgått
28.01.2019 - 17:32
|
|
Lindsay Smiles |
|
|
|
|
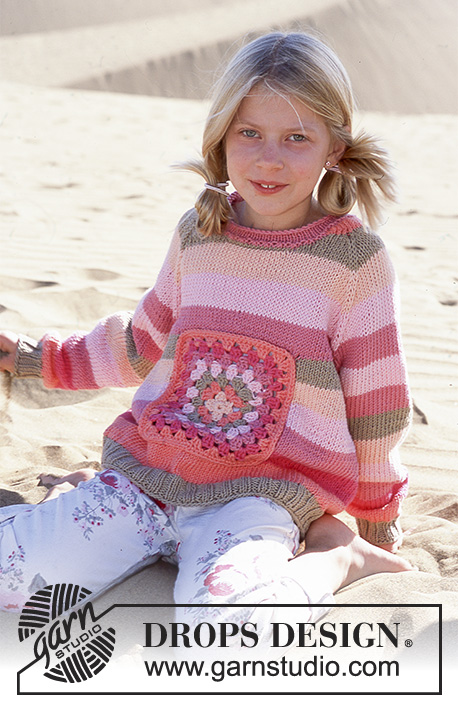
DROPS Girl’s Cardigan in Muskat and Vivaldi
DROPS 89-2 |
|
|
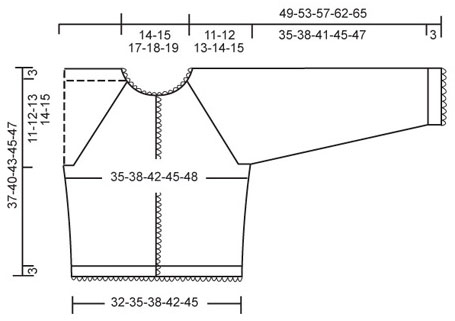
Gauge: 13 sts x 17 rows on larger needles in stockinette st = 10 x 10 cm. Rib: * K 3, P 3 *, repeat * - *. Buttonband: The buttonbands are knit in garter st – for a neat edge, knit the buttonband sts a little tight. You may wish to knit the buttonband sts on smaller double-pointed needles. Knitting tips (for raglan shaping): All decs are made on right side rows. Dec as follows in each transition between sleeve, front and back (start 3 sts before the marker): K 2 tog, K 2 (the marker sits between these 2 sts), slip 1 st as if to knit, K 1, psso. Knitting tip: If the row gauge is not correct, the yoke will not be the right length. If your gauge is too tight, you need to add rows between decs. If your gauge is too loose, you need to have fewer rows between decs. Buttonholes: Make buttonholes as follows on right buttonband (from edge as seen from the right side): 4 sts garter st, yo, K 2 tog. On the row back, twist and K the yo. Make buttonholes when the piece measures: Size 5/6: 3-8-14-19-25-30 cm Size 7/8: 4-10-15-21-26-32 cm Size 9/10: 3-9-16-22-29-35 cm Size 11/12 years: 3-10-16-23-29-36 cm Size 13/14 years: 3-10-17-24-31-38 cm Stripe Pattern- Body: 5-6-6-7-7 cm (incl. rib) with 1 strand pink Muskat + 1 strand cerise Vivaldi. 8-9-10-10-10 cm with 1 strand rose Muskat + 1 strand cerise Vivaldi 6-7-7-7-8 cm with 1 strand rose Muskat + 1 strand watermelon Vivaldi 11-11-12-12-13 cm with 1 strand apricot Muskat + 1 strand watermelon Vivaldi Then knit to finished measurements with 1 strand coral Muskat + 1 strand watermelon Vivaldi. Stripe Pattern-sleeve: 9-10-11-12-13 cm (incl. rib) with 1 strand pink Muskat + 1 strand cerise Vivaldi 15-16-17-18-19 cm with 1 strand rose Muskat + 1 strand cerise Vivaldi 12-13-14-16-16 cm with 1 strand rose Muskat + 1 strand watermelon Vivaldi Continue with 1 strand apricot Muskat + 1 strand watermelon Vivaldi until sleeves are put together with Body. Then change to 1 strand coral Muskat + 1 strand watermelon Vivaldi and knit to finished measurements on front, back and sleeve. Body: Cast on 95-107-113-119-131 sts on smaller circular needles with 1 strand pink Muskat + 1 strand cerise Vivaldi (= 2 strands). Follow Stripe Pattern-Body – see instructions above. P 1 row (wrong side), then knit the following 3 cm in rib, keeping 4 sts at each front edge in garter st and begin rib with K 3 - see instructions for buttonband above. Make buttonholes on right buttonband. After the rib change to larger circular needles and stockinette st, decreasing to 92-100-108-116-124 sts evenly spaced on the 1st row. Place a marker 25-27-29-31-33 sts in from each side (42-46-50-54-58 sts between markers for back). When the piece measures 10 cm inc 1 st at each side of each marker every 10 cm a total of 2 times = 100-108-116-124-132 sts. When the piece measures 23-25-27-28-29 cm knit the next row as follows (right side row): 24-26-28-29-31 sts = right front, bind off 6-6-6-8-8 sts for armhole, 40-44-48-50-54 sts = back, bind off 6-6-6-8-8 sts for armhole, 24-26-28-29-31 sts = left front. Lay piece aside and knit the sleeves. Sleeve: Cast on 28-28-35-35-35 sts on smaller double-pointed needles with 1 strand pink Muskat + 1 strand cerise Vivaldi (= 2 strands); join and place a marker at the join. Follow Stripe Pattern-sleeve – see instructions above. Start with K 1 row (stockinette st), then 2 rows rib (K 3/ P 4). On the next row dec all P 4 to P 3 = 24-24-30-30-30 sts. Continue until the rib measures 3 cm. Change to larger double-pointed needles and stockinette st, adjusting (dec if needed) to 22-24-26-26-26 sts on the 1st row. When the piece measures 6 cm inc 1 st at each side of marker every 7.5-8-9-6.5-6 cm a total of 5-5-5-7-8 times = 32-34-36-40-42 sts. When the piece measures 38-41-44-48-50 cm bind off 3-3-3-4-4 sts each side of marker = 26-28-30-32-34 sts. Lay piece aside and knit 2nd sleeve. Yoke: Put the sleeves in on the same circular needles as body where you bound off for armholes = 140-152-164-172-184 sts. Put a marker in each transition between front, back and the sleeve (4 markers). Knit 2-1-1-2-2 rows before beginning shaping. Raglan shaping: Dec 1 st at each side of all markers (= 8 decs per row) every other row – see knitting tips above – 9-10-11-12-13 times. Neck: When the piece measures 31-33-36-37-39 cm – adjust so that there are at least 2 rows with the colors in the last stripe before beginning neck shaping (= 1 strand coral Muskat + 1 strand watermelon Vivaldi) – put the outermost 8-8-9-8-9 sts at each side on a st holder for the neck. Then bind off at each neck edge every other row: 2 sts 1-0-0-0-0 time and 1 st 1-3-3-4-4 times. After all raglan and neck shaping is complete 46-50-52-52-54 sts remain on needles. Neckband: Pick up approx. 11-15 sts at front neck (incl. sts from st holder) with 1 strand coral Muskat + 1 strand watermelon Vivaldi and put all sts on smaller circular needles = approx. 68-84 sts. P 1 row (wrong side), decreasing evenly distributed to 44-46-48-50-55 sts, K 1 row (right side), and then P and bind off all sts loosely on the next row – so that the bound off edge will not be too tight, make a yo approx. every 5 sts and bind it off as a st. Assembly: Sew opening under the sleeve. Crocheted edge: Crochet 1 row of ch-loops around lower edge of sleeves, around the neck, along both fronts and along bottom edge of Body with lime Vivaldi as follows: * 1 sc in first st, * ch 5, skip over approx. 1 cm, 1 sc in the next st *, repeat * - * and finish with ch 5 and 1 sl st in first sc at start of row. Sew on buttons. |
|
 |
|
Have you finished this pattern?Tag your pictures with #dropspattern or submit them to the #dropsfan gallery. Do you need help with this pattern?You'll find 30 tutorial videos, a Comments/Questions area and more by visiting the pattern on garnstudio.com. © 1982-2026 DROPS Design A/S. We reserve all rights. This document, including all its sub-sections, has copyrights. Read more about what you can do with our patterns at the bottom of each pattern on our site. |


With over 40 years in knitting and crochet design, DROPS Design offers one of the most extensive collections of free patterns on the internet - translated to 17 languages. As of today we count 324 catalogs and 12290 patterns - 12280 of which are translated into English (US/in).
We work hard to bring you the best knitting and crochet have to offer, inspiration and advice as well as great quality yarns at incredible prices! Would you like to use our patterns for other than personal use? You can read what you are allowed to do in the Copyright text at the bottom of all our patterns. Happy crafting!
Post a comment to pattern DROPS 89-2
We would love to hear what you have to say about this pattern!
If you want to leave a question, please make sure you select the correct category in the form below, to speed up the answering process. Required fields are marked *.