DROPS Safran
DROPS Safran
100% Cotton
from 1.45 $ /50g
Get the yarn to make this pattern from 8.70$.

The yarn cost is calculated from the pattern’s smallest size and the yarn’s cheapest product type. Looking for an even better price? You might find it on the DROPS Deals!

DROPS Super Sale

Sweet berry dress

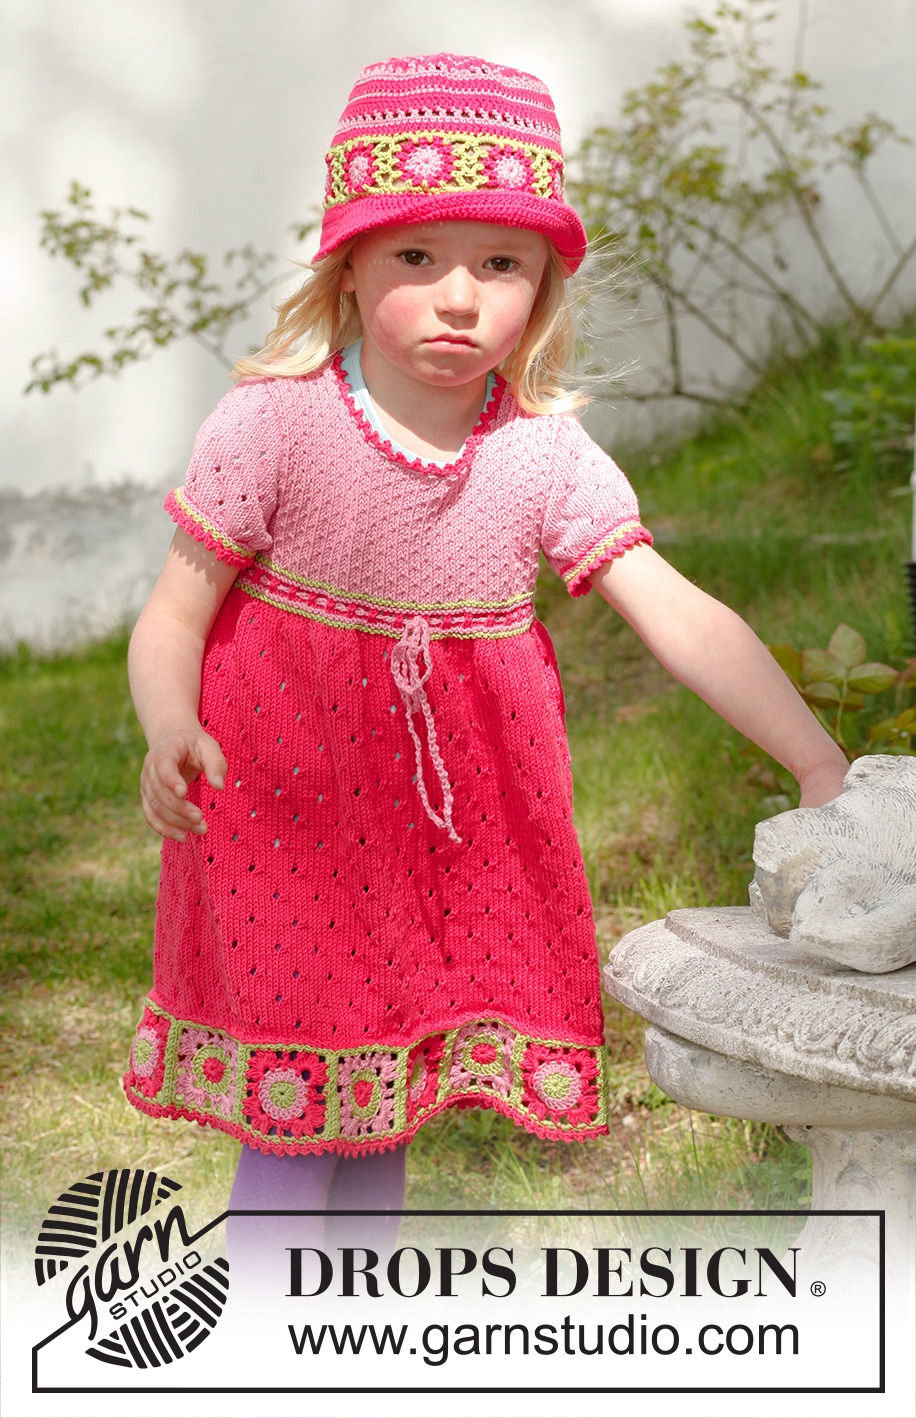
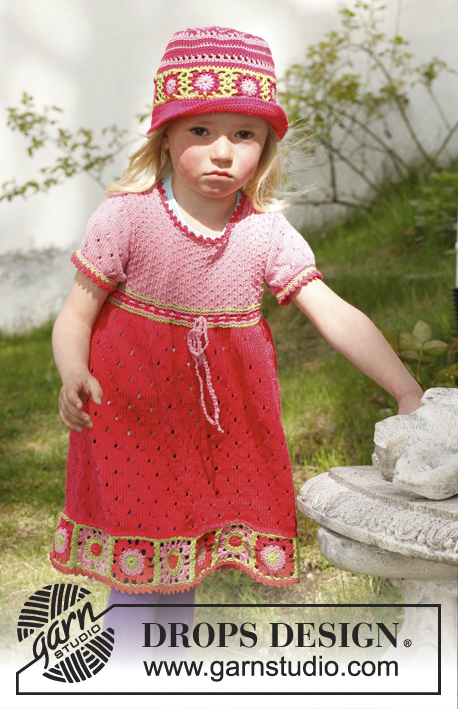
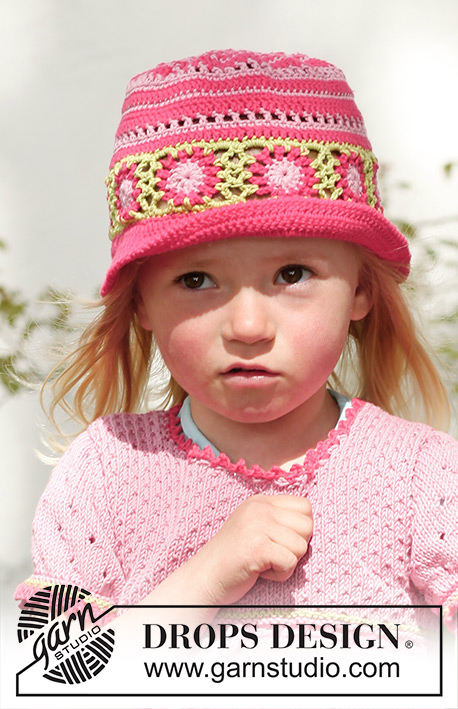
Knitted dress with short sleeves and granny squares in DROPS Safran. Size children 3 to 12 years.

DROPS Children 23-49
DROPS design: Pattern no E-008-bn
Yarn group A
---------------------------------------------------------
Size: 3/4 - 5/6 - 7/8 - 9/10 - 11/12 years
Finished measurements:
Bust: 60-64-68-72-76 cm / 23½"-25 1/4"-26 3/4"-28½"-30"
Full length: 55-60-65-70-75 cm / 21½"-23½"-25½"-27½"-29½"

Materials:
DROPS SAFRAN from Garnstudio
150-200-200-250-250 g color no 13, raspberry
100-100-100-150-150 color no 02, medium pink
50 g for all sizes in color no 31, lime

DROPS DOUBLE POINTED NEEDLES AND CIRCULAR NEEDLE (60 and 80 cm / 24'' and 32'') SIZE 3 mm/US 2.5 - or size needed to get 24 sts x 32 rows in stockinette st = 10 x 10 cm / 4'' x 4''.
DROPS DOUBLE POINTED NEEDLES and CIRCULAR NEEDLE (60 cm / 24'') SIZE 2.5 mm/US 1.5 - for garter st.
DROPS CROCHET HOOK size 3 mm / C.

-------------------------------------------------------

Alternative Yarn – See how to change yarns here
Yarn Groups A to F – Use the same pattern and change the yarn here
Yarn usage using an alternative yarn – Use our yarn converter here

-------------------------------------------------------

DROPS Safran
DROPS Safran
100% Cotton
from 1.45 $ /50g
Get the yarn to make this pattern from 8.70$.

The yarn cost is calculated from the pattern’s smallest size and the yarn’s cheapest product type. Looking for an even better price? You might find it on the DROPS Deals!

DROPS Super Sale

SAVE 30% on 6 cotton favorites!
Valid until 04.12.2024

Pattern instructions

NOTE: This pattern is written in American English. All measurements in charts are in cm. For conversion from inches to cm - click here. There are different terms for crocheting in American and British English. If this pattern includes crochet, click for "crochet terms" here. For this pattern in British English, please click here.
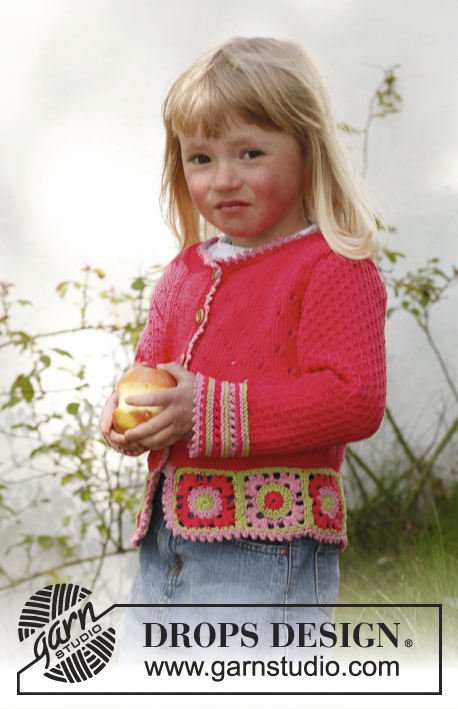
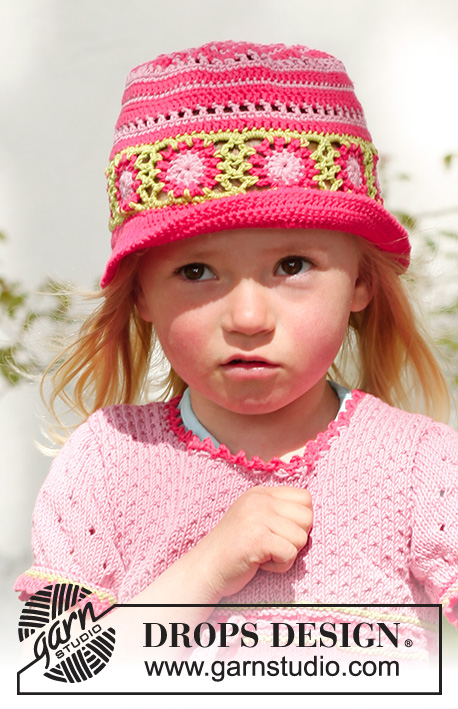
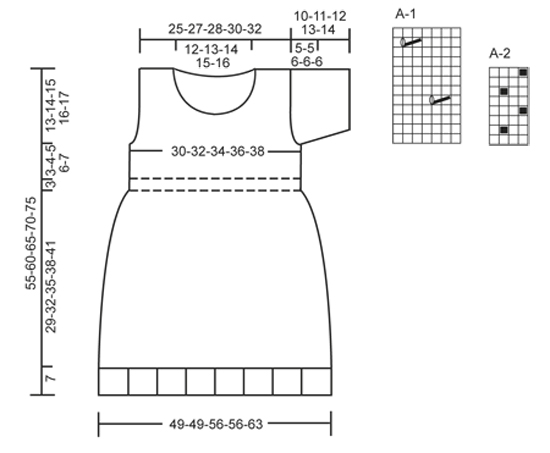
PATTERN:
See diagrams A-1 and A-2, diagrams show all rows in pattern from RS.

GARTER ST (in the round on circular needle):
* K 1 round and P 1 round *, repeat from *-*.
---------------------------------------------------------

BODY:
Worked in the round on circular needle.
Cast on 238-238-266-266-301 sts on circular needle size 3 mm / US 2.5 with raspberry. P 1 round, then work diagram A-1. REMEMBER THE GAUGE! Work A-1 until piece measures approx. 29-32-35-38-41 cm / 11½"-12½"-13 3/4"-15"-16" – finish after at least 2 rounds in stockinette st after 1 round with holes. Work next round as follows: * K 2, K 2 tog, K 1, K 2 tog *, repeat from *-* the entire round = 170-170-190-190-215 sts. Then K 1 round while at the same time dec 26-18-26-18-31 sts evenly = 144-152-164-172-184 sts. Switch to circular needle size 2.5 mm / US 1.5. Work 2 rounds in GARTER ST - see explanation above - with lime and 2 rounds in garter st with medium pink, switch to raspberry. K 2 rounds, work next round as follows: * K 2 tog, 1 YO *, repeat from *-* the entire round, then K 1 round. Then work 2 rounds in garter st medium pink and 2 rounds in garter st with lime. Switch back to circular needle size 3 mm / US 2.5 – NOW MEASURE PIECE FROM HERE! Continue with medium pink and A-2 until finished measurements. When piece measures 3-4-5-6-7 cm / 1"-1½"-2"-2½"-2 3/4" with A-2, work next round as follows: bind off the first 6 sts for armhole, work 66-70-76-80-86 sts A-2, bind off 6 sts for armhole and work A-2 the rest of row.
Finish front and back piece separately.

FRONT PIECE:
= 66-70-76-80-86 sts. Continue with A-2 back and forth on needle – AT THE SAME TIME bind off for armholes at the beg of every row, each side: 2 sts 1 time and 1 st 1-1-2-2-3 times in each side = 60-64-68-72-76 sts. When the medium pink section measures 10-12-13-15-16 cm / 4"-4 3/4"-5"-6"-6 1/4", bind off the middle 14-16-18-20-22 sts for neck and finish each shoulder separately. Then bind off on every row from neck: 3 sts 1 time, 2 sts 1 time and 1 st 2-2-3-3-3 times = 16-17-17-18-19 sts remain on shoulder. Bind off when the medium pink section measures 16-18-20-22-24 cm / 6 1/4"-7"-8"-8 3/4"-9½". Dress now measures approx. 48-53-58-63-68 cm / 19"-21"-22 3/4"-24 3/4"-26 3/4" in total.

BACK PIECE:
= 66-70-76-80-86 sts. Then bind off for armholes each side as on front piece = 60-64-68-72-76 sts. When the medium pink section measures 14-16-18-20-22 cm / 5½"-6 1/4"-7''-8''-8¾'', bind off the middle 26-28-32-34-36 sts for neck and finish each shoulder separately. Then bind off 1 st on next row towards the neck = 16-17-17-18-19 sts remain on the shoulder. Bind off when piece measures the same as front piece.

SLEEVE:
Worked in the round on double pointed needles.
Cast on 51-51-54-54-57 sts on double pointed needles size 2.5 mm / US 1.5 with lime. P 1 round, then 2 rounds in garter st in medium pink and 2 rounds in garter st in raspberry. Switch to medium pink and K 1 round while at the same time inc 12-12-16-16-20 sts evenly (inc by making YOs) = 63-63-70-70-77 sts. On next round K YOs twisted (i.e into back loop) to avoid holes. Continue with A-1 until finished measurements. At the same time when piece measures 5-6-6-7-8 cm / 2"-2½"-2½"-2 3/4"-3", bind off 6 sts mid under sleeve and work back and forth on needle until finished measurements. Then bind off 2 sts for sleeve cap at the beg of every row in each side until piece measures 9-10-11-12-13 cm / 3½"-4"-4½"-4 3/4"-5", then bind off 3 sts 1 time in each side. Bind off the remaining sts, piece measures approx. 10-11-12-13-14 cm / 4"-4½"-4 3/4"-5"-5½".

ASSEMBLY:
Sew shoulder seams and sew in sleeves.

NECK EDGE: Pick up approx. 75 to 100 sts around the neck on double pointed needles size 2.5 mm / US 1.5 with medium pink. P 1 round, bind off with K sts.

COLORS ON CROCHET SQUARES:
Squares are worked in 2 different color combinations:
SQUARE A: Cast on + 1st round = raspberry, 2nd round = lime, 3rd and 4th round = medium pink, 5th round = lime.
SQUARE B: Cast on + 1st round = lime, 2nd round = medium pink, 3rd and 4th round = raspberry, 5th round = lime.

CROCHET TIP: Replace first dc at beg of every round with 3 ch and finish every round with 1 sl st in third ch from beg of round.

BOBBLE: 3 dc that are worked tog, i.e. wait with last pull through on every dc until all 3 dc have been worked, make a YO on hook and pull through all 4 loops.

WORK THE SQUARES AS FOLLOWS:
Work 4 ch on hook size 3 mm / C and form a ring with 1 sl st in first ch.
ROUND 1: Work 12 dc in ch-ring – read CROCHET TIP.
ROUND 2: 2 dc in every dc = 24 dc.
ROUND 3: * 1 sc in dc, ch 3, skip 1 dc *, repeat from *-*, finish with 1 sl st in first sc from beg of round (= 12 sc with ch spaces in between).
ROUND 4: In first ch space work [-]: * [1 BOBBLE – see explanation above, ch 2, 1 bobble, 4 ch (= corner), 1 bobble, ch 2, 1 bobble], ch 3, 1 hdc in sc between the next 2 ch spaces, ch 3, skip 1 ch space *, repeat from *-* a total of 4 times but the last time finish after 3 ch with 1 sl st at the top of first bobble.
ROUND 5: * 2 sc in first 2-ch space, 6 sc in next 4-ch space (= corner), 2 sc in next 2-ch space, 3 sc in next 3-ch space, 3 sc in next 3-ch space *, repeat from *-* the entire round. Square measures approx. 7 x 7 cm / 2¾'' x 2¾''.

Work 7-7-8-8-9 squares in each color combination = 14-14-16-16-18 squares in total. Sew squares to into a long strip, place the colors alternately – sew edge to edge with lime to avoid a chunky seam. Sew the strip tog to form a ring. Sew the square strip to the bottom of dress, edge to edge with small stitches.

PICOT BORDER:
Work a picot border with raspberry on hook size 3 mm / C at the bottom of dress as follows: * 1 sc, ch 3, 1 sc in first ch (= 1 picot), skip 1 sc *, repeat from *-*, finish with 1 sl st in first sc.
Work a picot border the same way with raspberry around the neck and at the bottom of sleeves.

TIES:
Work with medium pink as follows: * ch 2, 1 sc in first ch *, repeat from *-* until tie measures approx. 100-110-120-130-140 cm / 40"-44"-47"-51"-55", cut and fasten the thread.
Pull the tie through the eyelet holes in the waist on dress.

----------------------------------------------------------
Hat - see pattern SmåDrops 23-48
---------------------------------------------------------
Cardigan - see pattern SmåDrops 23-50
---------------------------------------------------------

Diagram

All measurements in charts are in cm.

symbols = K from RS, P from WS
symbols = P from RS, K from WS
symbols = K 2 tog, 1 YO
diagram
Do you have a question? See a list of frequently asked questions (FAQ)

Knitting tension is what determines the final measurements of your work, and is usually measured per 10 x 10 cm. It is provided like so: number of stitches in width x number of rows in height - eg: 19 stitches x 26 rows = 10 x 10 cm.

The knitting tension is very individual; some people knit/crochet loosely while others work tightly. You adjust the knitting tension with the needle size, which is why the suggested needle size only serve as a guide! You need to adjust this (up or down) to ensure that YOUR knitting tension matches the knitting tension provided in the pattern. If you work with a different knitting tension than provided you will have a different yarn consumption, and your work will have different measurements than what the pattern suggests.

The knitting tension also determines which yarns can replace each other. As long as you achieve the same knitting tension you can replace one yarn with another.

See DROPS lesson: How to measure your tension/gauge

See DROPS video: How to make a gauge tension swatch

The required amount of yarn is provided in grams, eg: 450 g. To calculate how many balls you’ll need you first need to know how many grams are in 1 ball (25g, 50g or 100g). This information is available if you click on the individual yarn quality on our pages. Divide the amount required with the amount of each ball. For example, if each ball is 50g (the most common amount), the calculation will be as follows: 450 / 50 = 9 balls.

The important thing when changing from one yarn to another is that the knitting/crochet tension remains the same. This is so that the measurements of the finished piece will be the same as on the sketch provided. It is easier to achieve the same knitting tension using yarns from the same yarn group. It is also possible to work with multiple strands of a thinner yarn to achieve the knitting tension of a thicker one. Please try our yarn converter. We recommend you to always work a test swatch.

Please NOTE: when changing yarn the garment might have a different look and feel to the garment in the photo, due to individual properties and qualities of each yarn.

See DROPS lesson: Can I use a different yarn than the one mentioned in the pattern?

All our yarns are categorised into yarn groups (from A to F) according to thickness and knitting tension – group A contains the thinnest yarns and group F the thickest. This makes it easier for you to find alternative yarns to our patterns, should you wish to switch yarn. All yarns within the same group have a similar knitting tension and can easily replace each other. However, different yarn qualities have different structures and properties which will give the finished work a unique look and feel.

Click here for an overview of the yarns in each yarn group

At the top of all our patterns you’ll find a link to our yarn converter, which is a helpful tool should you wish to use a different yarn than suggested. By filling in the yarn quality you wish to replace, the amount (in your size) and number of strands, the converter will present good alternative yarns with the same knitting tension. Additionally it will tell you how much you’ll require in the new qualities and whether you’ll need to work with multiple strands. Most skeins are 50g (some are 25g or 100g).

If the pattern is worked with multiple colours, every colour will have to be converted separately. Similarly, if the pattern is worked with several strands of different yarns (for example 1 strand Alpaca and 1 strand Kid-Silk) you will have to find alternatives for each, individually.

Click here to see our yarn converter

Since different yarns have different qualities and textures we have chosen to keep the original yarn in our patterns. However, you can easily find options among our available qualities by using our yarn converter, or simply pick a yarn from the same yarn group.

It is possible that some retailers still have discontinued yarns in stock, or that someone has a few skeins at home that they would like to find patterns for.

The yarn converter will provide both alternative yarn as well as required amount in the new quality.

If you think it's hard to decide what size to make, it can be a good idea to measure a garment you own already and like the size of. Then you can pick the size by comparing those measures with the ones available in the pattern's size chart.

You'll find the size chart at the bottom of the pattern.

See DROPS lesson: How to read size chart

The needle size provided in the pattern serves only as a guide, the important thing is to follow the knitting tension. And since knitting tension is very individual, you will have to adjust the needle size to ensure that YOUR tension is the same as in the pattern – maybe you’ll have to adjust 1, or even 2 needle sizes, up or down to achieve the correct tension. For this, we recommend that you work test swatches.

Should you work with a different knitting tension than the one provided, the measurements of the finished garment might deviate from the measurement sketch.

See DROPS lesson: How to measure your tension/gauge

See DROPS video: How to make a gauge tension swatch

Working a garment top-down provides more flexibility and room for personal adjustment. For example it is easier to try the garment on while working, as well as making adjustments to length of yoke and shoulder caps.

The instructions are carefully explaining every step, in the correct order. Diagrams are adjusted to the knitting direction and are worked as usual.

The diagram depicts all rows/rounds, and every stitch seen from the right side. It is read from bottom to top, from right to left. 1 square = 1 stitch.

When working back and forth, every other row is worked from the right side and every other row is worked from the wrong side. When working from the wrong side, the diagram will have to be worked reversed: from left to right, knit stitches are purled, purl stitches are knit etc.

When working in the round every round is worked from the right side and the diagram are worked from right to left on all rounds.

See DROPS lesson: How to read knitting diagrams

The diagram depicts all rows/rounds, and every stitch seen from the right side. It is worked from bottom to top, from right to left.

When working back and forth every other row is worked from the right side: from right to left and every other row is worked from the wrong side: from left to right.

When working in the round, every row in the diagram are worked from the right side, from right to left.

When working a circular diagram you start in the middle and work your way outwards, counter clockwise, row by row.

The rows usually start with a given number of chain stitches (equivalent to the height of the following stitch), this will either be depicted in the diagram or explained in the pattern.

See DROPS lesson: How to read crochet diagrams

Instructions for working several diagrams after each other on the same row/round, will often be written like so: “work A.1, A.2, A.3 a total of 0-0-2-3-4 times". This means you work A.1 once, then A.2 is worked once, and A.3 is repeated (in width) the number of times provided for your size – in this case like so: S = 0 times, M = 0 times, L=2 times, XL= 3 times and XXL = 4 times.

The diagrams are worked as usual: begin with the first row in A.1, then work the first row in A.2 etc.

See DROPS lesson: How to read knitting diagrams

See DROPS lesson: How to read crochet diagrams

The total width of the garment (from wrist-to-wrist) will be larger in the larger sizes, despite the actual sleeves being shorter. The larger sizes have longer sleeve caps and wider shoulders, so there will be a good fit in all sizes.

The measurement sketch/schematic drawing provides information regarding the full length of the garment. If it’s a jumper or a jacket the length is measured from the highest point on the shoulder (usually closest to the neckline), and straight down to the bottom of the garment. It is NOT measured from the tip of shoulder. Similarly, the length of yoke is measured from the highest point on the shoulder and down to where yoke is split into body and sleeves.

See DROPS lesson: How to read a schematic drawing

Diagrams are often repeated on the round or in height. 1 repeat is the diagram the way it appears in the pattern. If it says to work 5 repeats of A.1 in the round, then you work A.1 a total of 5 times after/next to each other in the round. If it says to work 2 repeats of A.1 vertically/in height you work the entire diagram once, then begin again at the start and work the entire diagram one more time.

Chain stitches are slightly narrower than other stitches and to avoid working the cast-on edge too tight, we simply chain more stitches to begin with. The stitch count will be adjusted on the following row to fit the pattern and measurement sketch.

The rib edge is more elastic and will contract slightly compared to, for example, stocking stitch. By increasing before the rib edge, you avoid a visible difference in width between the rib edge and the rest of the body.

It’s very easy to cast off too tightly, and by making yarn overs while casting off (and simultaneously casting these off) you avoid a too tight cast off edge.

See DROPS video: How to bind off with yarn overs (yo)

To achieve an even increase (or decrease) you can increase on, for example: every 3rd and 4th row alternately, like so: work 2 rows and increase on the 3rd row, work 3 rows and increase on the 4th. Repeat this until the increase is complete.

See DROPS lesson: Increase or decrease 1 st on every 3rd and 4th row alternately

Should you prefer to work in the round instead of back and forth, you may of course adjust the pattern. You’ll need to add steeks mid-front (usually 5 stitches), and follow the instructions. When you would normally turn and work from the wrong side, simply work across the steek and continue in the round. At the end you’ll cut the piece open, pick up stitches to work bands, and cover the cut edges.

See DROPS video: How to knit steeks and cut open

Should you prefer to work back and forth instead of in the round, you may of course adjust the pattern so you work the pieces separately and then assemble them at the end. Divide the stitches for the body in 2, add 1 edge stitch in each side (for sewing) and work the front and back pieces separately.

See DROPS lesson: Can I adapt a pattern for circular needles into straight needles?

Pattern repeats can vary slightly in the different sizes, in order to get the correct proportions. If you’re not working the exact same size as the garment in the photo, yours might deviate slightly. This has been carefully developed and adjusted so that the complete impression of the garment is the same in all sizes.

Make sure to follow instructions and diagrams for your size!

If you have found a pattern you like which is available in women’s size it’s not very difficult to convert it to men’s size. The biggest difference will be the length of sleeves and body. Start working on the women size that you think would fit across the chest. The additional length will be worked right before you cast off for the armhole/sleeve cap. If the pattern is worked top-down you can add the length right after the armhole or before the first decrease on sleeve.

Regarding additional yarn amount, this will depend on how much length you add, but it is better with a skein too many than too few.

All yarns will have excess fibres (from production) that might come off as lint or shedding. Brushed yarns (ie hairier yarns) have more of these loose, excess fibres, causing more shedding.

Shedding also depends on what is worn under or over the garment, and whether this pulls at the yarn fibres. It’s therefore not possible to guarantee that there will be no shedding

Below are some tips on how to get the best result when working with hairier yarns:

1. When the garment is finished (before you wash it) shake it vigorously so the looser hairs come off. NOTE: do NOT use a lint roller, brush or any method that pulls at the yarn.

2. Place the garment in a plastic bag and put it in your freezer - the temperature will cause the fibres to become less attached to each other, and excess fibres will come off easier.

3. Leave in the freezer for a few hours before taking it out and shaking it again.

4. Wash the garment according to the instructions on the yarn label.

Pilling is a natural process that happens to even the most exclusive of fibers. It's a natural sign of wear and tear that is hard to avoid, and that is most visible in high friction areas of your garment like a sweater's arms and cuffs.

You can make your garment look as new by removing the pilling, using a fabric comb or a pill/lint remover.

Still can't find the answer you need? Then scroll down and leave your question so one of our experts can try to help you. This will be done normally within 5 to 10 working days.
In the meantime, you can read the questions and answers that others have left to this pattern or join the DROPS Workshop on Facebook to get help from fellow knitters/crocheters!

You might also like...

Post a comment to pattern DROPS Children 23-49

We would love to hear what you have to say about this pattern!

If you want to leave a question, please make sure you select the correct category in the form below, to speed up the answering process. Required fields are marked *.

Comments / Questions (4)

country flag Maria wrote:

Mam problem z czwartym okrążeniem kwadratu, może ktoś pomoże?

02.08.2019 - 20:51

DROPS Design answered:

Witaj Mario! Udało się czy pomóc? Jeśli będziesz w przyszłości miała pytania, proszę zaznacz w formularzu PYTANIE, a nie KOMENTARZ, wtedy odpowiemy w przeciągu 2-3 dni. A propos, czy już zagłosowałaś na nową kolekcję DROPS Jesień/Zima, zapraszamy serdecznie!

07.06.2020 - 22:19

country flag Everdina Van Zijderveld-Tenkink wrote:

Ich habe das süße Kleidchen 2 mal gestrickt, beide Male passten der Kopf nicht durch die Halsöffnung

26.11.2018 - 09:29

DROPS Design answered:

Liebe Frau Van Zijderveld-Tenkink, stimmt Ihre Maschenprobe? Haben Sie bei der Abketten für Hals die Maschen nicht zu eng gestrickt? Am besten zeigen Sie Ihre Arbeit Ihrem Laden (auch per E-Mail), so können Sie Ihnen vielleicht weiterhelfen. Viel Spaß beim stricken!

26.11.2018 - 10:44

country flag Astrid Seidl wrote:

Kann man auch eine Anleitung für diese Tolle Kleid für 1-2 Jährige bekommen . Habe dieses Kleid schon mehrfach gestrickt und umgewndelt zum Dirndl aber jetzt brauche ich eine Anleitung für kleinere.Freue mich auf Antwort Danke

22.02.2016 - 16:11

DROPS Design answered:

Leider können wir Ihnen nur die genannten Größen bieten, in einer kleineren Größe gibt es die Anleitung nicht.

24.02.2016 - 20:15

country flag Natasja wrote:

Bij de mouw wordt opgezet met nld 2.5. Na het meerderen staat niets over wisselen naar naald 3.0. Ga ik echter door met 2.5 dan wordt de mouw te klein voor de jurk. Wissel ik hier naar 3.0 dan klopt het wel.

04.01.2015 - 22:23