
Popular categories
Looking for a yarn?


Comments / Questions (35)
![]() Diana D wrote:
Diana D wrote:
Är det garnåtgång för 1 st frukt eller för flertalet som på bilden? Ex 50 gram rött garn för 1 äpple eller för flera?
12.09.2025 - 15:47DROPS Design answered:
Hei Diana. Garnmengden skal være nok til kurven, frukten og grønnsakerne du ser på bildet. Om du bare ønsker å hekle bananene kan du se på oppskrift DROPS Children 23-63, pærene (DROPS Children 23-61), eplene (DROPS Children 23-60) eller klemetiner (DROPS Children 23-62). mvh DROPS Design
22.09.2025 - 13:11
![]() Ruchika wrote:
Ruchika wrote:
I am a beginner and I am making a basket. On round 6 a sentence is written (on every even numbered round) work 1 dc on every dc. Does this mean I have to repeat the pattern same again or make 1 dc in each dc's = 40 dc? How dc will be on round 6 please?
30.12.2024 - 01:42DROPS Design answered:
Dear Ruchika, it means that on every even round (you see that even rounds aren't explained anymore from this row onwards) you will work 1dc on each dc of the previous round, so you don't increase stitches on these rounds, only on odd rounds. In round 6 you work 40 dc (the same number as in round 5), in round 8 you work 48 dc (the same number as in round 7), e.t.c. As you spread the increases with a straight round in between them, you will continue widening the piece but also it will start folding upwards, to start getting a basket shape. Happy crochetting!
31.12.2024 - 00:33
![]() Ina Bell wrote:
Ina Bell wrote:
I wont to make these for my 2 year old twin great grand daughters.
20.06.2024 - 03:45
![]() Lauren wrote:
Lauren wrote:
Hi there, love the style of these fruits and vegetables! I was looking through te pattern which popped up a question: in the carrot pattern, it goes from round 5 to 7 to 9 to 11. Am I supposed to do every round twice (5-6, 7-8, 9-10)? Or is it basically only round 5, 6, 7, 8? Thanks in advance!
25.05.2024 - 08:09DROPS Design answered:
Dear Lauren, if you read the pattern trough carefully, you will find the sentence: "ROUND 4 (and then on every even numbered round): Work 1 dc in every dc." Which means, even numbered rows are 1 rp in each stitch. I hope this helps. Happy Crafting!
25.05.2024 - 21:27
![]() Pina wrote:
Pina wrote:
Salve, ho confezionato il fungo, che mi piaceva molto, buona spiegazione, più difficile fare gli aumenti e diminuzioni, che dovevo gestire io nei giri. Grazie per i tutorial gratis. È venuto un bel lavoro! Pina
10.10.2023 - 08:43
![]() Birgit Kofoed wrote:
Birgit Kofoed wrote:
Jeg forstår slet ikke hele opskriften på bananskrællen. Skal den hækles på bananen, eller skal man slå luftmasker op! Det er meget forvirrende.
14.10.2022 - 16:31DROPS Design answered:
Hei Birgit. Du hekler bananen som forklart og når den er ferdig skal bananskallene hekles hver for seg selv, men de festes med fastmasker på bananen første rad de hekles. Hekle 1 fastmaske i rundt hver av de første 6 fastmasker (på bananen, omgang 20), snu. Hekle 12 fastmaske-rader (hver rad begynner med 1 luftmaske, 1 fastmaske i hver fastmaske). På neste rad (rad 13) felles 1 fastmaske på begynnelsen og på slutten av raden, deretter hekles resterende fastmaske 2 og 2 sammen på neste rad, klipp tråden. Hekle neste bananskal på omgang 20 på selve bananen og da over 8 fastmasker. 3. bananskal hekles over 6 fastmasker. mvh DROPS Design
24.10.2022 - 11:11
![]() Maria wrote:
Maria wrote:
Me gusta mucho pero si le pusieran para marcar en la vuelta que ya insiste el resto genial
27.09.2022 - 19:45
![]() Szpulka wrote:
Szpulka wrote:
Właśnie czegoś takiego szukałam! Wszystko wyjaśnione, krok po kroku zapisane. Fantastyczne! Bardzo dziękuję.
20.03.2022 - 10:32
![]() Sandra Larsson wrote:
Sandra Larsson wrote:
Hej! Söker ersättare till DROPS Paris nr 45 till moroten. Funderar på dubbel tråd DROPS Safran nr 08 eller 11. Vilket är mest likt? Eller har ni något annat förslag? Mvh. Sandra
18.11.2020 - 17:30DROPS Design answered:
Hej Sandra. Du kan antingen välja Paris nr 13 orange även till moroten eller dubbel tråd av Safran nr 28 apelsin. Mvh DROPS Design
19.11.2020 - 08:55
![]() Theresa Contreras wrote:
Theresa Contreras wrote:
I just wanted to say that I love your patterns. Your tips and explanations are very clearly written. Thank you! I had fun making the banana. I will be back to make more.
04.05.2020 - 18:35
|
|
Tutti frutti#dropstuttifrutti |
|
 |
 |
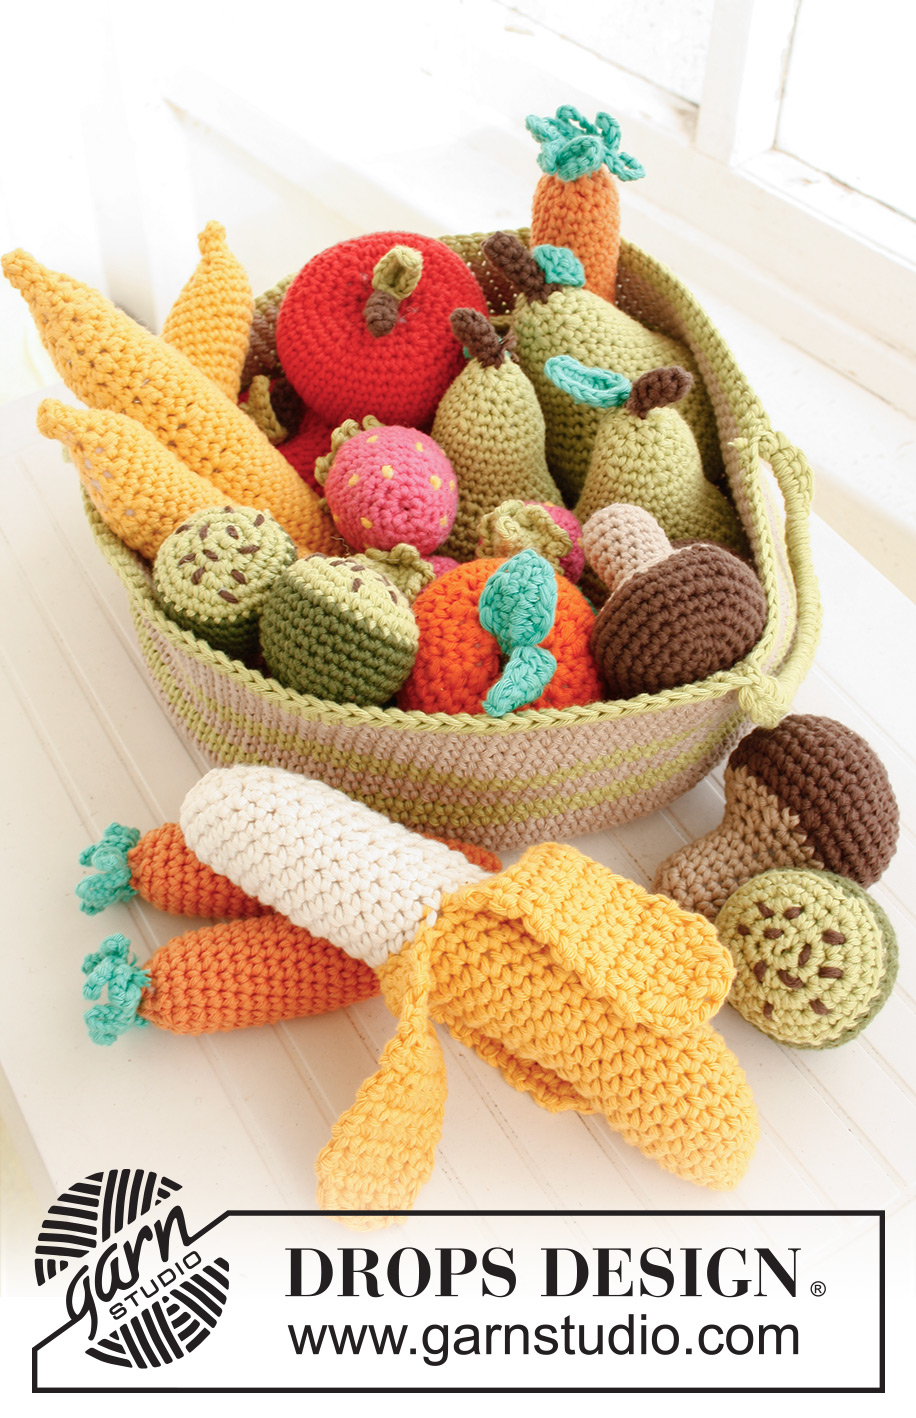
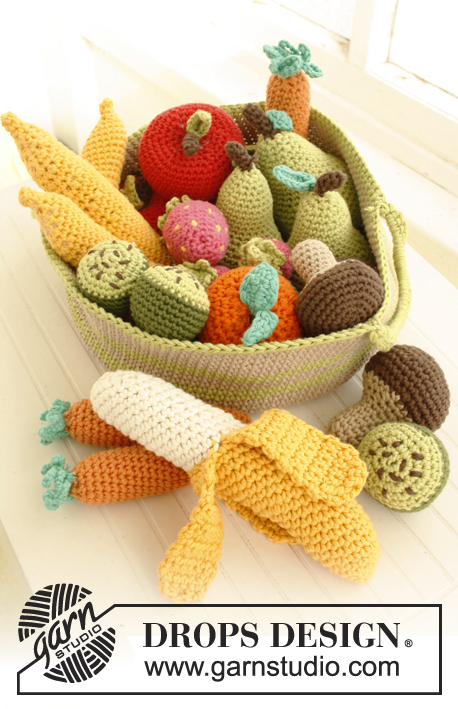
Crochet toy basket of fruits and vegetables in DROPS Paris.
DROPS Children 23-56 |
|
|
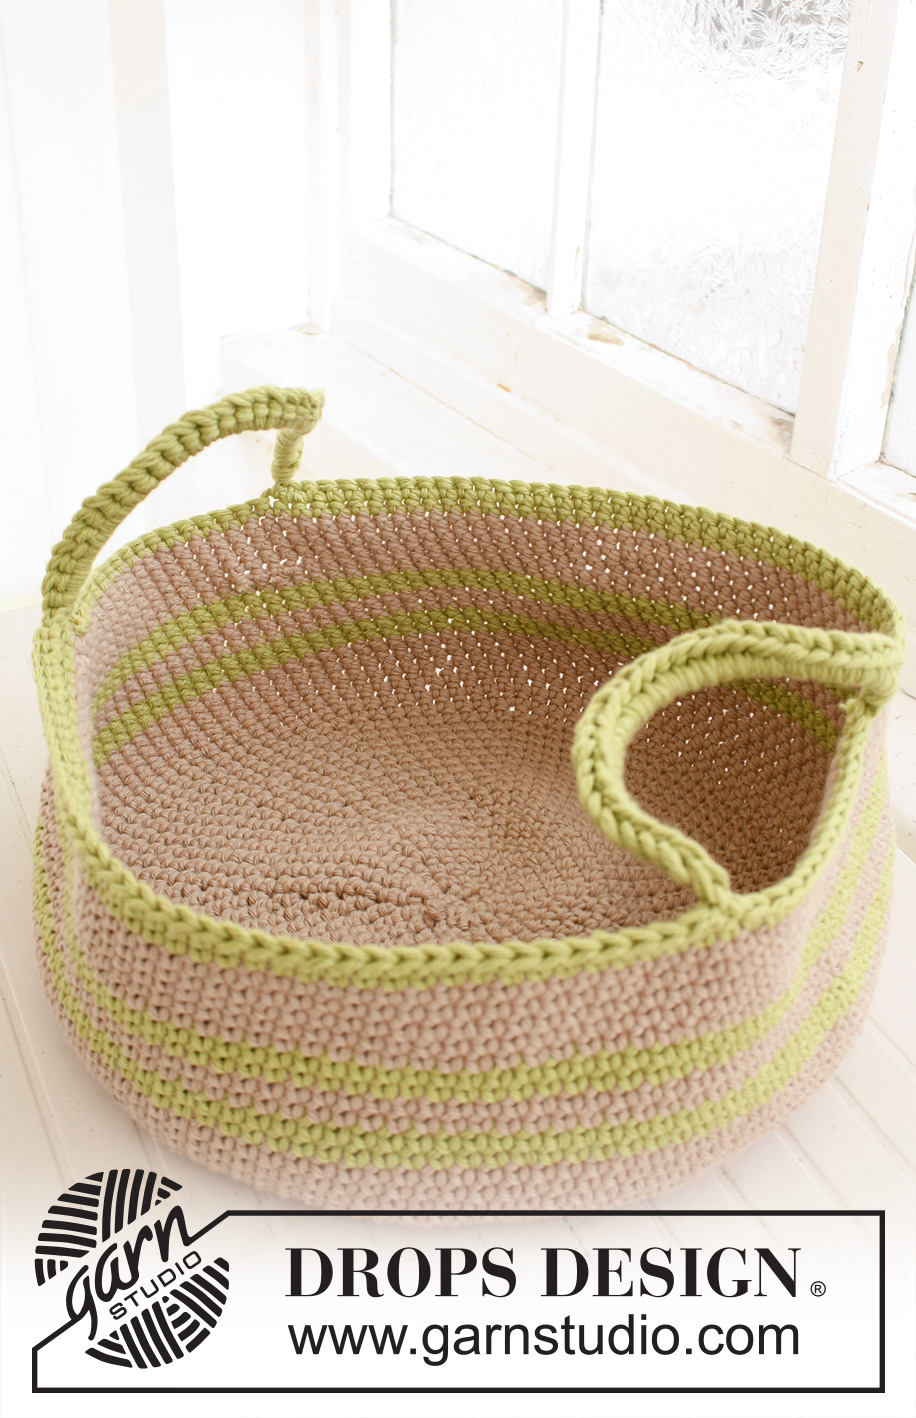
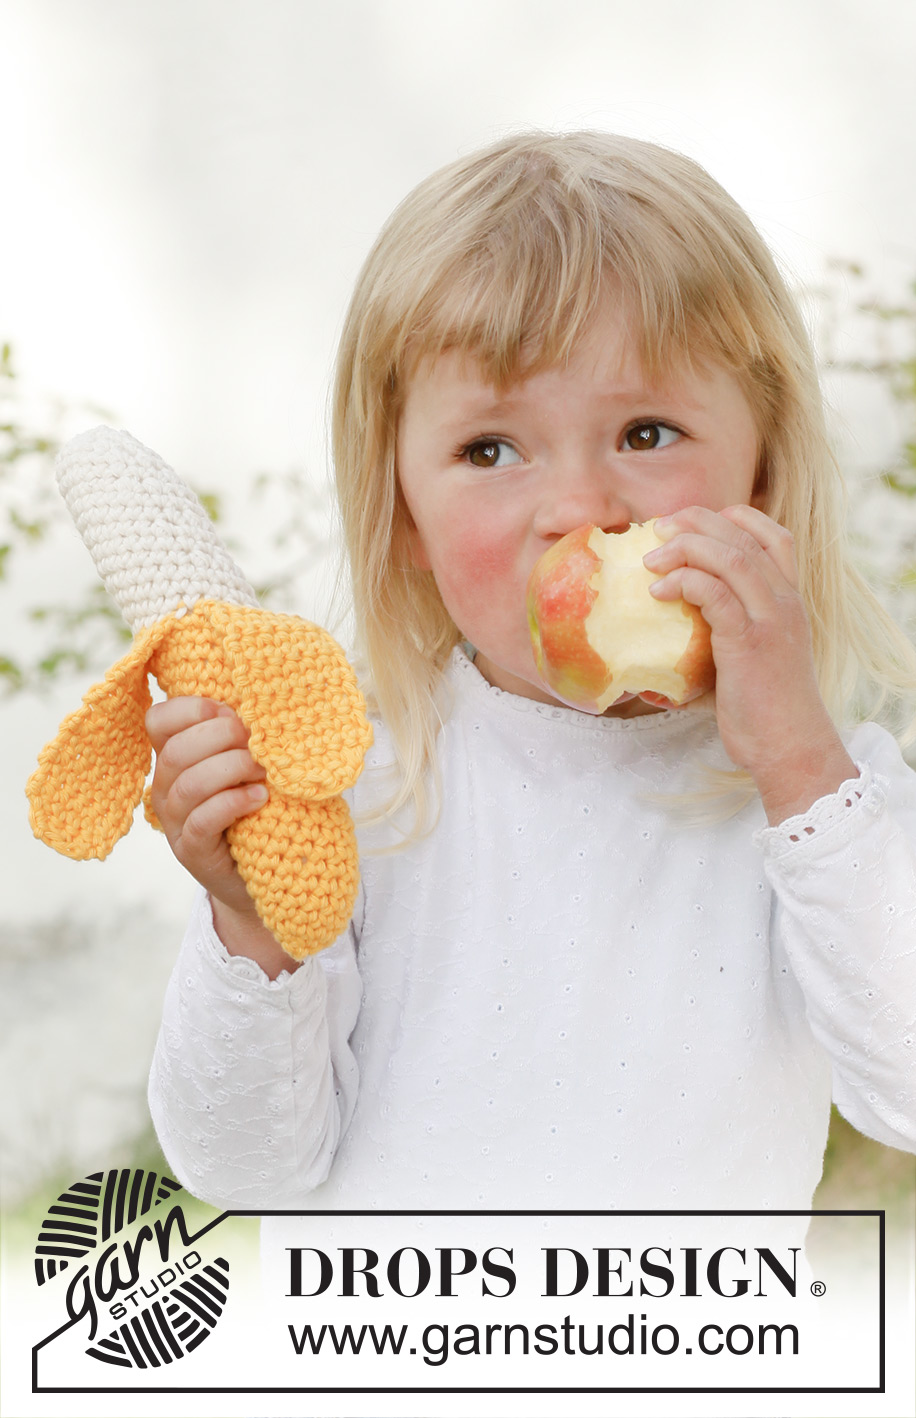
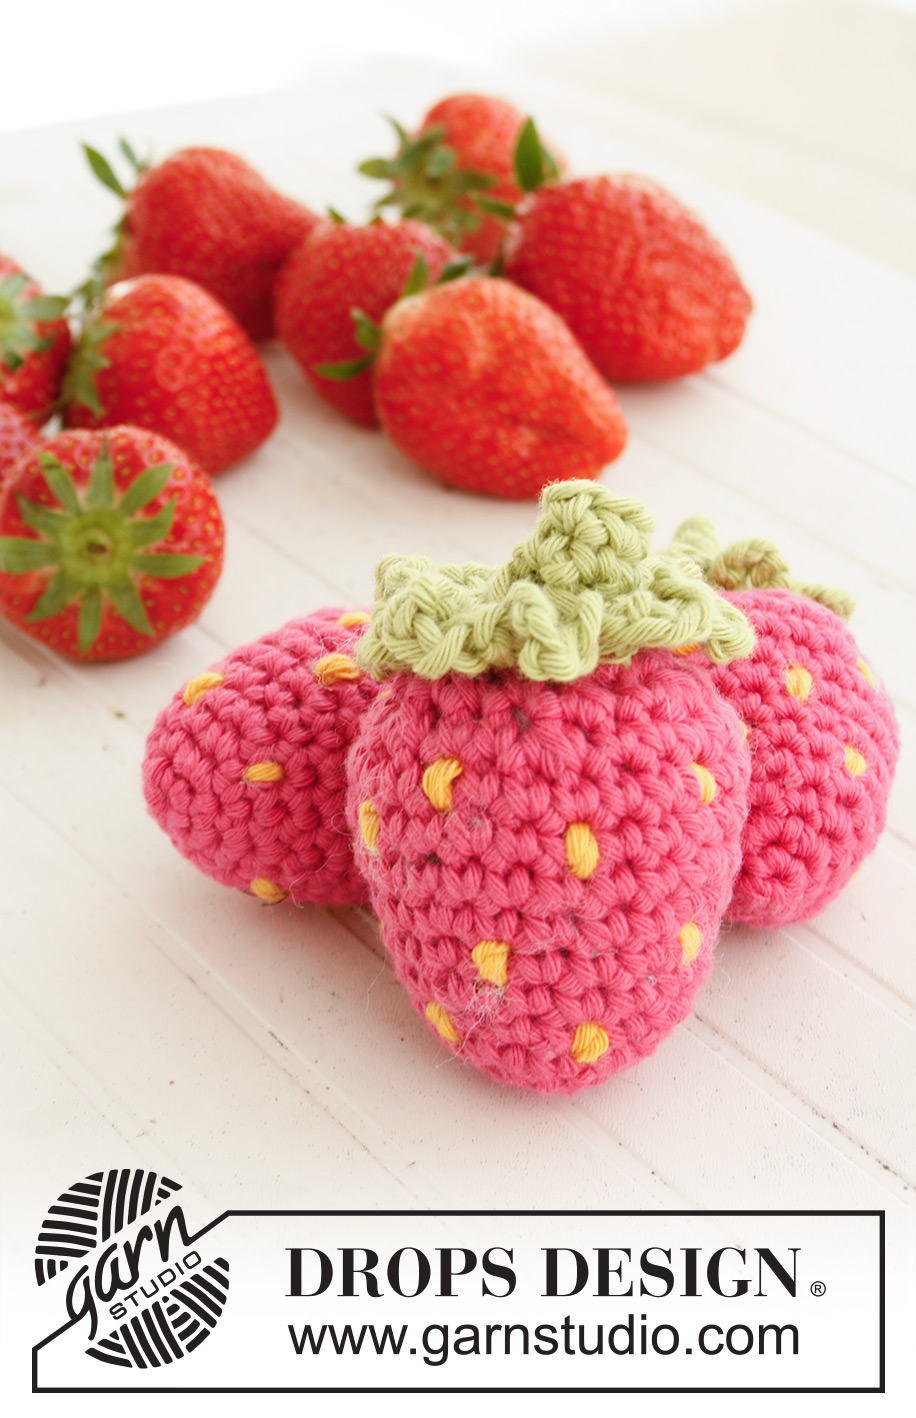
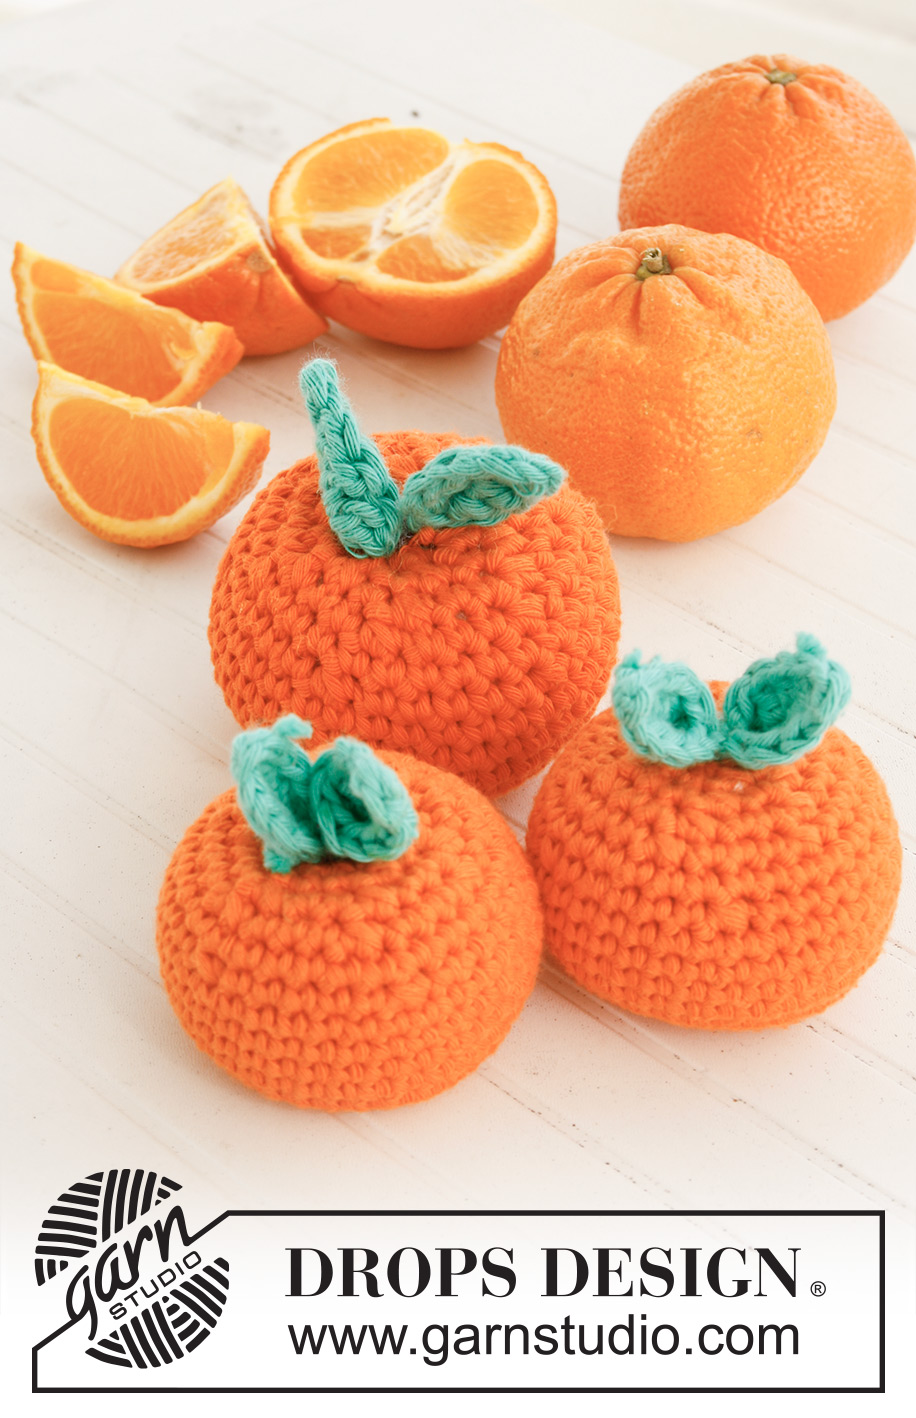
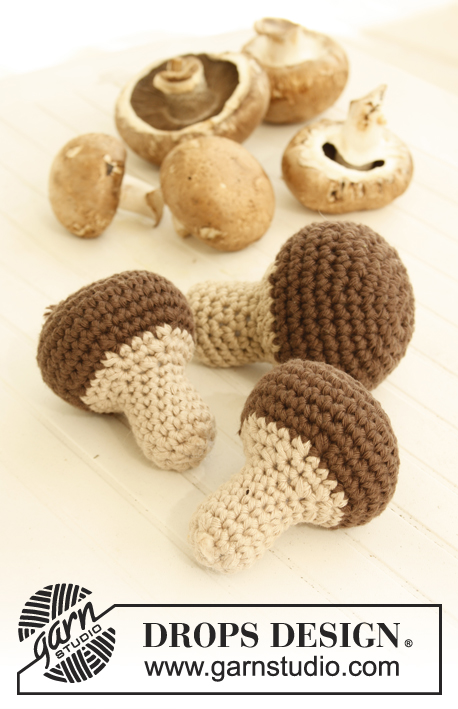
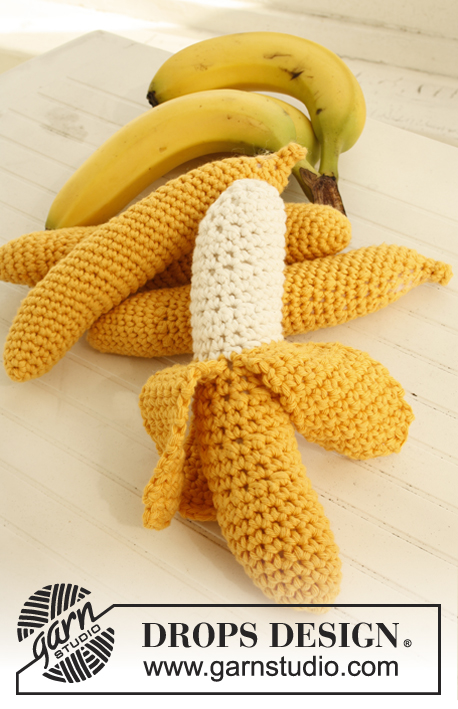
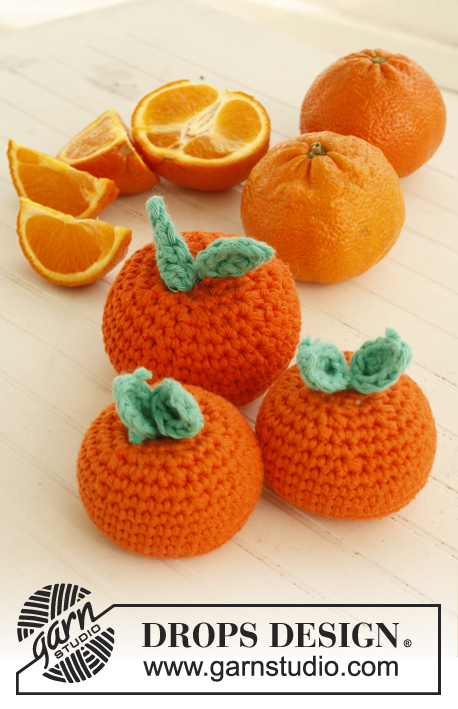
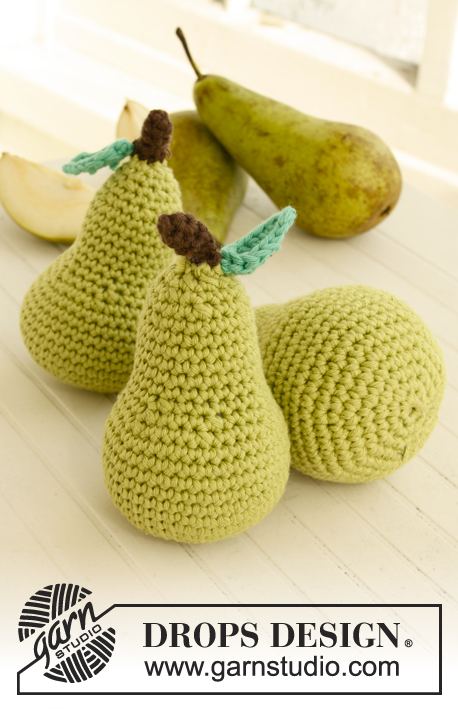
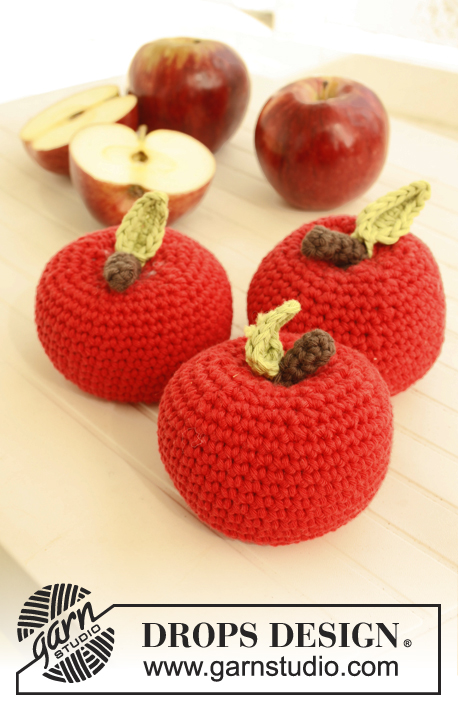
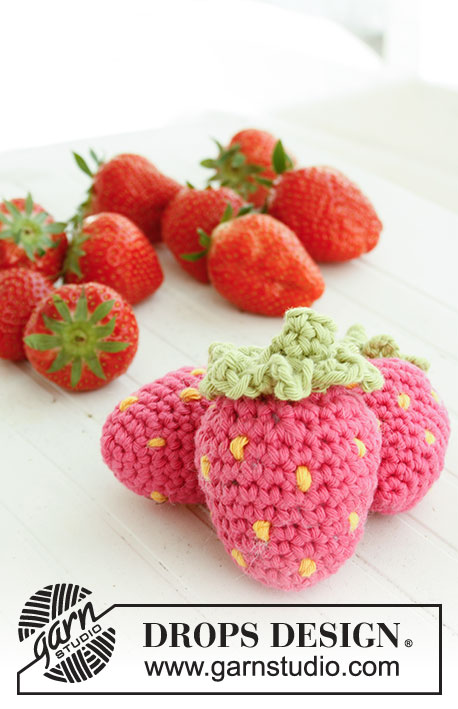
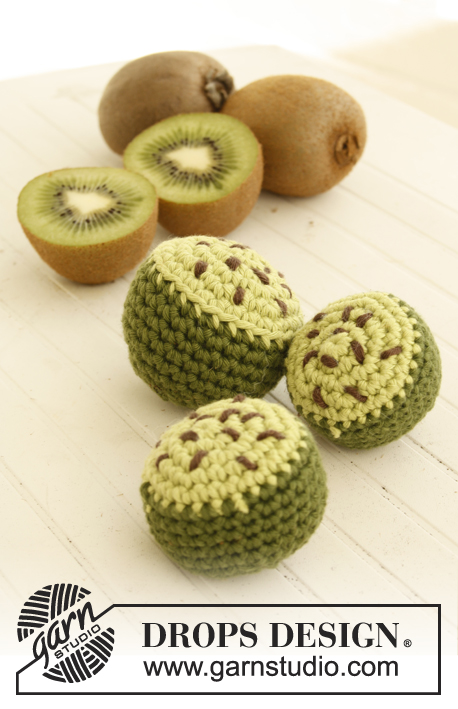
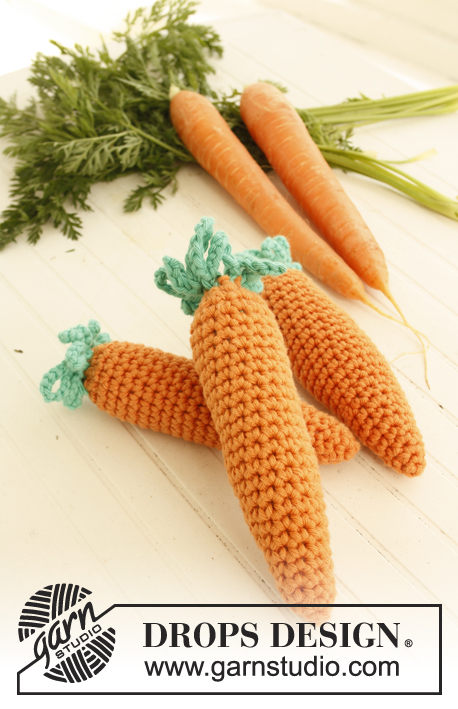
MAGIC CIRCLE: When piece is worked in the round, start with this technique to avoid holes in the middle (instead of ch-ring): Hold the yarn end and wind the yarn one time around the index finger to make a loop. Hold the loop with left thumb and middle finger, place the thread over left index finger. Insert hook through the loop, make a YO and pull thread through loop, ch 1, then work sc around the loop. When the desired no of sc have been reached, pull the yarn end to tighten the loop. Fasten the yarn end at the back. Continue to work in the round in a circle. WORK IN THE ROUND IN A CIRCLE: After last sc on the round, continue to next round with 1 sc in next sc (= first sc from previous round). NOTE: Insert a marker at the beg of round between last sc and first sc on the round, move the marker upwards when working. INCREASE TIP: Inc 1 sc by working 2 sc in next sc. DECREASE TIP: Dec 1 sc by working 2 sc tog as follows: * Insert hook in next sc, get thread *, repeat from *-* one more time, make a YO and pull thread through all 3 sts on hook. COLOR CHANGE: To get a nice color change work last sc on round as follows: Insert hook in last sc, get thread, make a YO with the new color and pull it through all sts on hook. Continue on to next round with the new color. -------------------------------------------------------- CARROT: Work in the round in a circle. Ch 2 with dusty orange on hook size 4.5 mm/ US 7. ROUND 1: Work 3 sc in 1st ch - READ WORK IN THE ROUND IN A CIRCLE. ROUND 2: Inc 1 sc in every sc - READ INCREASE TIP = 6 sc. ROUND 3: * 1 sc in each of the next 2 sc, inc 1 sc in next sc *, repeat from *-* one more time = 8 sc. ROUND 4 (and then on every even numbered round): Work 1 sc in every sc. ROUND 5: * 1 sc in each of the next 3 sc, inc 1 sc in next sc *, repeat from *-* one more time = 10 sc. ROUND 7: * 1 sc in each of the next 4 sc, inc 1 sc in next sc *, repeat from *-* one more time = 12 sc. ROUND 9: * 1 sc in each of the next 5 sc, inc 1 sc in next sc *, repeat from *-* one more time = 14 sc. ROUND 11: * 1 sc in each of the next 6 sc, inc 1 sc in next sc *, repeat from *-* one more time = 16 sc. Then work 1 sc in every sc in the round in a circle for 12 more rounds. Then dec as follows: ROUND 1: * 1 sc in each of the next 2 sc, dec 1 sc - READ DECREASE TIP *, repeat from *-* the entire round = 12 sc. ROUND 2: * 1 sc in next sc, dec 1 sc *, repeat from *-* the rest of the round = 8 sc. ROUND 3: Work all sc tog 2 by 2 = 4 sc, cut the thread. Fill the carrot with some poly stuffing, sew the last 4 sc tog with thread end. LEAF: Ch 3 with opal green and form a ring with 1 sl st in 1st ch. Work as follows in the ring: * 1 sc, ch 9, 1 sc, ch 11 *, repeat from *-* a total of 4 times, finish with 1 sl st in 1st sc = 8 ch-loops, cut and fasten the thread. Sew leaves at the top of carrot. -------------------------------------------------------- APPLE: Work in the round in a circle. Start by making a MAGIC CIRCLE - read explanation above - at the bottom of apple with red on hook size 4.5 mm/ US 7. ROUND 1: Work 7 sc in the magic circle - READ WORK IN THE ROUND IN A CIRCLE. ROUND 2: Inc 1 sc in every sc = 14 sc. ROUND 3: * 1 sc in next sc, inc 1 sc in next sc *, repeat from *-* the entire round = 21 sc. ROUND 4: * 1 sc in each of the next 2 sc, inc 1 sc in next sc *, repeat from *-* the entire round = 28 sc. ROUND 5: * 1 sc in each of the next 3 sc, inc 1 sc in next sc *, repeat from *-* the entire round = 35 sc. ROUND 6: Work 1 sc in every sc. ROUND 7: * 1 sc in each of the next 4 sc, inc 1 sc in next sc *, repeat from *-* the entire round = 42 sc. ROUND 8-16: Work 1 sc in every sc. ROUND 17: * 1 sc in each of the next 5 sc, dec 1 sc *, repeat from *-* the entire round = 36 sc. ROUND 18: * 1 sc in each of the next 4 sc, dec 1 sc *, repeat from *-* the entire round = 30 sc. ROUND 19: * 1 sc in each of the next 3 sc, dec 1 sc *, repeat from *-* the entire round = 24 sc. ROUND 20: * 1 sc in each of the next 2 sc, dec 1 sc *, repeat from *-* the entire round = 18 sc. ROUND 21: * 1 sc in next sc, dec 1 sc *, repeat from *-* the rest of the round = 12 sc. ROUND 22: Work all sc tog 2 by 2 = 6 sc, cut the thread. Fill the apple with some poly stuffing, sew the last 6 sc tog with thread end. NOTE: Pull the thread end through the top and bottom of apple to make a dent in each side. STEM: Worked in the round in a circle. Ch 3 with brown on hook size 4.5 mm/ US 7, then 2 sc in 1st and 2nd ch = 4 sc. Continue in the round and work a total of 16 sc with 1 sc in every sc, cut and fasten the thread. LEAF: Worked back and forth. Crochet a row with 8 ch and pistachio on hook size 4.5 mm/ US 7, then crochet along the ch-row as follows: 1 sl st in 2nd ch from hook, 1 sc in each of the next 2 ch, 1 hdc in next ch, 1 dc in each of the next 2 ch, 2 sc in the last ch. Then work on the other side of ch-row as follows: 1 dc in each of the next 2 ch, 1 hdc in next ch, 1 sc in each of the next 2 ch, 1 sl st in the last ch, cut and fasten the thread. ASSEMBLY: Sew stem and leaf at the top of apple. -------------------------------------------------------- PEAR: Worked in the round in a circle. Start by making a MAGIC CIRCLE - read explanation above - at the bottom of pear with pistachio on hook size 4.5 mm/ US 7. ROUND 1: Work 7 sc in the magic circle - READ WORK IN THE ROUND IN A CIRCLE. ROUND 2: Inc 1 sc in every sc = 14 sc. ROUND 3: * 1 sc in next sc, inc 1 sc in next sc *, repeat from *-* the entire round = 21 sc. ROUND 4: * 1 sc in each of the next 2 sc, inc 1 sc in next sc *, repeat from *-* the entire round = 28 sc. ROUND 5: * 1 sc in each of the next 3 sc, inc 1 sc in next sc *, repeat from *-* the entire round = 35 sc. ROUND 6: Work 1 sc in every sc. ROUND 7: * 1 sc in each of the next 4 sc, inc 1 sc in next sc *, repeat from *-* the entire round = 42 sc. ROUND 8-13: Work 1 sc in every sc. ROUND 14: * 1 sc in each of the next 4 sc, dec 1 sc *, repeat from *-* the entire round = 35 sc. ROUND 15: * 1 sc in each of the next 3 sc, dec 1 sc *, repeat from *-* the entire round = 28 sc. ROUND 16: * 1 sc in each of the next 5 sc, dec 1 sc *, repeat from *-* the entire round = 24 sc. ROUND 17-22: Work 1 sc in every sc. ROUND 23: * 1 sc in each of the next 2 sc, dec 1 sc *, repeat from *-* the entire round = 18 sc. ROUND 24: Work 1 sc in every sc. ROUND 25: * 1 sc in next sc, dec 1 sc *, repeat from *-* the entire round = 12 sc. ROUND 26: Work 1 sc in every sc. ROUND 27: Work all sc tog 2 by 2 = 6 sc, cut the thread. Fill the pear with some poly stuffing, sew the last 6 sc tog with thread end. STEM: Worked in the round in a circle. Ch 3 with brown on hook size 4.5 mm/ US 7, then 2 sc in 1st and 2nd ch = 4 sc. Continue in the round and work a total of 16 sc with 1 sc in every sc, cut and fasten the thread. LEAF: Worked back and forth. Crochet a row with 8 ch and opal green on hook size 4.5 mm/ US 7, then crochet along the ch-row as follows: 1 sl st in 2nd ch from hook, 1 sc in each of the next 2 ch, 1 hdc in next ch, 1 dc in each of the next 2 ch, 2 sc in the last ch. Then work on the other side of ch-row as follows: 1 dc in each of the next 2 ch, 1 hdc in next ch, 1 sc in each of the next 2 ch, 1 sl st in the last ch, cut and fasten the thread. ASSEMBLY: Sew stem and leaf at the top of pear. -------------------------------------------------------- CLEMENTINE: Worked in the round in a circle. Start by making a MAGIC CIRCLE - read explanation above - at the bottom of clementine with orange on hook size 4.5 mm/ US 7. ROUND 1: Work 7 sc in the magic circle - READ WORK IN THE ROUND IN A CIRCLE. ROUND 2: Inc 1 sc in every sc = 14 sc. ROUND 3: * 1 sc in next sc, inc 1 sc in next sc *, repeat from *-* the entire round = 21 sc. ROUND 4: * 1 sc in each of the next 2 sc, inc 1 sc in next sc *, repeat from *-* the entire round = 28 sc. ROUND 5: * 1 sc in each of the next 3 sc, inc 1 sc in next sc *, repeat from *-* the entire round = 35 sc. ROUND 6-10: Work 1 sc in every sc. ROUND 11: * 1 sc in each of the next 5 sc, dec 1 sc *, repeat from *-* the entire round = 30 sc. ROUND 12: Work 1 sc in every sc. ROUND 13: * 1 sc in each of the next 3 sc, dec 1 sc *, repeat from *-* the entire round = 24 sc. ROUND 14: * 1 sc in each of the next 2 sc, dec 1 sc *, repeat from *-* the entire round = 18 sc. ROUND 15: * 1 sc in next sc, dec 1 sc *, repeat from *-* the entire round = 12 sc. ROUND 16: Work all sc tog 2 by 2 = 6 sc, cut the thread. Fill the clementine with some poly stuffing, sew the last 6 sc tog with thread end. NOTE: Pull the thread end through the top and bottom of clementine to make a dent in each side. LEAF: Worked back and forth. Crochet a row with 6 ch and opal green on hook size 4.5 mm/ US 7, then crochet along the ch-row as follows: 1 sl st in 2nd ch from hook, 1 sc in next ch, 1 hdc in next ch, 1 dc in next ch, 3 dcin the last ch. Then work on the other side of ch-row as follows: 1 dc in next ch, 1 hdc in next ch, 1 sc in next ch, 1 sl st in last ch, cut and fasten the thread. ASSEMBLY: Work another leaf the same way and fasten them at the top of the clementine. Sew a couple of stitches with brown between the 2 leaves. -------------------------------------------------------- STRAWBERRY: Worked in the round in a circle. Start by making a MAGIC CIRCLE - read explanation above - at the bottom of strawberry with shocking pink on hook size 4.5 mm/ US 7. ROUND 1: Work 4 sc in the magic circle - READ WORK IN THE ROUND IN A CIRCLE. ROUND 2: Inc 1 sc in every sc = 8 sc. ROUND 3: * 1 sc in next sc, inc 1 sc in next sc *, repeat from *-* the entire round = 12 sc. ROUND 4: * 1 sc in each of the next 2 sc, inc 1 sc in next sc *, repeat from *-* the entire round = 16 sc. ROUND 5: Work 1 sc in every sc. ROUND 6: * 1 sc in each of the next 3 sc, inc 1 sc in next sc *, repeat from *-* the entire round = 20 sc. ROUND 7: Work 1 sc in every sc. ROUND 8: * 1 sc in each of the next 4 sc, inc 1 sc in next sc *, repeat from *-* the entire round = 24 sc. ROUND 9 and 10: Work 1 sc in every sc. ROUND 11: * 1 sc in each of the next 2 sc, dec 1 sc *, repeat from *-* the entire round = 18 sc. ROUND 12: * 1 sc in next sc, dec 1 sc *, repeat from *-* the entire round = 12 sc. ROUND 13: Work all sc tog 2 by 2 = 6 sc, cut the thread. Fill the strawberry with some poly stuffing, sew the last 6 sc tog with thread end. LEAF: Worked in the round. Ch 48 with pistachio on hook size 4.5 mm/ US 7 and form a ring with 1 sl st in 1st ch. ROUND 1: Work 1 sc in first ch, * skip 5 ch, 1 sc in next ch *, repeat from *-* the entire round and finish by skipping the last 5 ch and 1 sl st in 1st sc = 8 sc and 8 ch-loops. ROUND 2: Ch 1 , 1 sc in every sc, finish with 1 sl st in first sc. ROUND 3: Ch 1 , work all sc tog 2 by 2 = 4 sc. Then work 1 sc in every sc, cut and fasten the thread. Sew leaves at the top of strawberry. Sew some stitches with strong yellow on the strawberry. -------------------------------------------------------- KIWI: Worked in the round in a circle. Start by making a MAGIC CIRCLE - read explanation above - with pistachio on hook size 4.5 mm/ US 7 at the top of a cut kiwi. ROUND 1: Work 7 sc in the magic circle - READ WORK IN THE ROUND IN A CIRCLE. ROUND 2: Inc 1 sc in every sc = 14 sc. ROUND 3: * 1 sc in next sc, inc 1 sc in next sc *, repeat from *-* the entire round = 21 sc. ROUND 4: * 1 sc in each of the next 2 sc, inc 1 sc in next sc *, repeat from *-* the entire round = 28 sc. ROUND 5: Work 1 sc in every sc - switch to green in the last sc on round - READ COLOR CHANGE. ROUND 6-10: With green work 1 sc in every sc. ROUND 11: * 1 sc in each of the next 5 sc, dec 1 sc *, repeat from *-* the entire round = 24 sc. ROUND 12: 1 sc in each of the next 2 sc, dec 1 sc *, repeat from *-* the entire round = 18 sc. ROUND 13: * 1 sc in next sc, dec 1 sc *, repeat from *-* the entire round = 12 sc. ROUND 14: Work all sc tog 2 by 2 = 6 sc, cut the thread. Fill the piece with some poly stuffing, sew the last 6 sc tog with thread end. Sew some stitches with brown at the bottom of piece in pistachio. -------------------------------------------------------- MUSHROOM: Worked in the round in a circle. Start by making a MAGIC CIRCLE - Read explanation above - at the top of the mushroom with brown on hook size 4.5 mm/ US 7. ROUND 1: Work 7 sc in the magic circle - READ WORK IN THE ROUND IN A CIRCLE. ROUND 2: Inc 1 sc in every sc = 14 sc. ROUND 3: * 1 sc in next sc, inc 1 sc in next sc *, repeat from *-* the entire round = 21 sc. ROUND 4: * 1 sc in each of the next 2 sc, inc 1 sc in next sc *, repeat from *-* the entire round = 28 sc. ROUND 5: Work 1 sc in every sc. ROUND 6: * 1 sc in each of the next 3 sc, inc 1 sc in next sc *, repeat from *-* the entire round = 35 sc. ROUND 7: Inc 1 sc in 1st sc, then 1 sc in every sc = 36 sc. ROUND 8 and 9: Work 1 sc in every sc. ROUND 10: * 1 sc in each of the next 4 sc, dec 1 sc *, repeat from *-* the entire round = 30 sc, switch to dark beige in the last sc on round - READ COLOR CHANGE. ROUND 11: With dark beige work * 1 sc in each of the next 3 sc, dec 1 sc *, repeat from *-* the entire round = 24 sc. ROUND 12: * 1 sc in each of the next 2 sc, dec 1 sc *, repeat from *-* the entire round = 18 sc. ROUND 13: * 1 sc in next sc, dec 1 sc *, repeat from *-* the entire round = 12 sc. ROUND 14 and 15: Work 1 sc in every sc. ROUND 16: * 1 sc in each of the next 5 sc, inc 1 sc in next sc *, repeat from *-* the entire round = 14 sc. ROUND 17: Work 1 sc in every sc. ROUND 18: * 1 sc in each of the next 6 sc, inc 1 sc in next sc *, repeat from *-* the entire round = 16 sc. ROUND 19: Work 1 sc in every sc. ROUND 20: * 1 sc in each of the next 2 sc, dec 1 sc *, repeat from *-* the entire round = 12 sc. ROUND 21: Work all sc tog 2 by 2 = 6 sc, cut the thread. Fill the mushroom with some poly stuffing, sew the last 6 sc tog with thread end. -------------------------------------------------------- BANANA: Worked in the round in a circle. Ch 2 with strong yellow on hook size 4.5 mm/ US 7. ROUND 1: Work 3 sc in 1st ch - READ WORK IN THE ROUND IN A CIRCLE. ROUND 2: Inc 1 sc in every sc = 6 sc. ROUND 3: Inc 1 sc in every sc = 12 sc. ROUND 4: Work 1 sc in every sc. ROUND 5: Work 1 sc in every sc but inc 1 sc in 1st and last sc on round = 14 sc. Repeat 4th and 5th round (i.e. inc 1 sc in 1st and last sc on every other round) so that there are 20 sc on round. ROUND 12: Inc 1 sc in each of the first 2 sc, 1 sc in each of the next 4 sc, dec 4 sc over the next 8 sc - READ DECREASE TIP, 1 sc in each of the next 4 sc, inc 1 sc in each of the last 2 sc = 20 sc. ROUND 13 and 14: Work 1 sc in every sc. ROUND 15: Inc 1 sc in each of the first 3 sc, 1 sc in each of the next 4 sc, dec 4 sc over the next 8 sc, 1 sc in each of the next 4 sc, inc 1 sc in last sc. ROUND 16 and 17: Work 1 sc in every sc. ROUND 18: Inc 1 sc in each of the first 4 sc, 1 sc in each of the next 4 sc, dec 4 sc, 1 sc in each of the last 4 sc. ROUND 19 and 20: Work 1 sc in every sc. ROUND 21: Work 1 sc in each of the first 2 sc, inc 1 sc in each of the next 4 sc, 1 sc in each of the next 4 sc, dec 4 sc over the next 8 sc, 1 sc in each of the last 2 sc. ROUND 22 and 23: Work 1 sc in every sc. ROUND 24: Work 1 sc in each of the first 4 sc, inc 1 sc in each of the next 4 sc, 1 sc in each of the next 4 sc, dec 4 sc over the last 8 sc. ROUND 25 and 26: Work 1 sc in every sc. ROUND 27: Dec 1 sc over the first 2 sc, work 1 sc in each of the next 4 sc, inc 1 sc in each of the next 4 sc, 1 sc in each of the next 4 sc, dec 3 sc over the next 6 sc. ROUND 28 and 29: Work 1 sc in every sc. ROUND 30: Dec 2 sc over the first 4 sc, work 1 sc in each of the next 4 sc, inc 1 sc in each of the next 4 sc, 1 sc in each of the next 4 sc, dec 2 sc over the next 4 sc. ROUND 31: Work 1 sc in every sc. ROUND 32: Dec 2 sc over the first 4 sc, work 1 sc in every sc until 4 sc remain, dec 2 sc over the next 4 sc = 16 sc. Repeat 32nd round 2 more times = 8 sc. Fill the banana with some poly stuffing. On next round dec 2 sc = 6 sc remain, then work 12 sc with 1 sc in every sc, cut and fasten the thread. -------------------------------------------------------- BANANA WITH SKIN: Worked in the round in a circle. Ch 2 with strong yellow on hook size 4.5 mm/ US 7. ROUND 1: Work 3 sc in 1st ch - READ WORK IN THE ROUND IN A CIRCLE. ROUND 2: Inc 1 sc in every sc = 6 sc. ROUND 3: Inc 1 sc in every sc = 12 sc. ROUND 4: Work 1 sc in every sc. ROUND 5: Work 1 sc in every sc but inc 1 sc in 1st and last sc on round = 14 sc. Repeat 4th and 5th round (i.e. inc 1 sc in 1st and last sc on every other round) so that there are 20 sc on round. ROUND 12: Inc 1 sc in each of the first 2 sc, 1 sc in each of the next 4 sc, dec 4 sc over the next 8 sc - READ DECREASE TIP, 1 sc in each of the next 4 sc, inc 1 sc in each of the last 2 sc = 20 sc. ROUND 13 and 14: Work 1 sc in every sc. ROUND 15: Inc 1 sc in each of the first 3 sc, 1 sc in each of the next 4 sc, dec 4 sc over the next 8 sc, 1 sc in each of the next 4 sc, inc 1 sc in last sc. ROUND 16 and 17: Work 1 sc in every sc. ROUND 18: Inc 1 sc in each of the first 4 sc, 1 sc in each of the next 4 sc, dec 4 sc over the next 8 sc, 1 sc in each of the last 4 sc. ROUND 19 and 20: Work 1 sc in every sc, switch to off white in the last sc on last round - READ COLOR CHANGE. ROUND 21: With off white work 1 sc in each of the first 2 sc, inc 1 sc in each of the next 4 sc, 1 sc in each of the next 4 sc, dec 4 sc over the next 8 sc, 1 sc in each of the last 2 sc. ROUND 22 and 23: Work 1 sc in every sc. ROUND 24: Work 1 sc in each of the first 4 sc, inc 1 sc in each of the next 4 sc, 1 sc in each of the next 4 sc, dec 4 sc over the last 8 sc. ROUND 25 and 26: Work 1 sc in every sc. ROUND 27: Dec 1 sc over the first 2 sc, work 1 sc in each of the next 4 sc, inc 1 sc in each of the next 4 sc, 1 sc in each of the next 4 sc, dec 3 sc over the next 6 sc. ROUND 28 and 29: Work 1 sc in every sc. ROUND 30: Dec 2 sc over the first 4 sc, work 1 sc in each of the next 4 sc, inc 1 sc in each of the next 4 sc, 1 sc in each of the next 4 sc, dec 2 sc over the next 4 sc. ROUND 31: Work 1 sc in every sc. ROUND 32: Dec 2 sc over the first 4 sc, work 1 sc in every sc until 4 sc remain, dec 2 sc over the next 4 sc = 16 sc. Repeat 32nd round 2 more times = 8 sc. Fill the banana with some poly stuffing. On next round dec 2 sc = 6 sc remain, cut the thread, sew the last 6 sc tog with thread end. BANANA SKIN: Worked back and forth. With strong yellow and hook size 4.5 mm/ US 7, work as follows on last round with strong yellow: Work 1 sc in each of the first 6 sc, turn. Work 12 sc rows (every row beg 1 ch, 1 sc in every sc). On next row dec 1 sc at beg and end of row, then work the remaining sc tog 2 by 2 on next row, cut the thread. Repeat on the next 8 sc on round, then on the last 6 sc on round = 3 banana skins. -------------------------------------------------------- BASKET: Measurements: Approx. height 12 cm / 4 3/4" Worked in the round in a circle. Start by making a MAGIC CIRCLE - read explanation above - at the bottom of basket with dark beige on hook size 4.5 mm/ US 7. ROUND 1: Work 8 sc in the magic circle - READ WORK IN THE ROUND IN A CIRCLE. ROUND 2: Inc 1 sc in every sc = 16 sc. ROUND 3: * 1 sc in next sc, inc 1 sc in next sc *, repeat from *-* the entire round = 24 sc. ROUND 4: * 1 sc in each of the next 2 sc, inc 1 sc in next sc *, repeat from *-* the entire round = 32 sc. ROUND 5: * 1 sc in each of the next 3 sc, inc 1 sc in next sc *, repeat from *-* the entire round = 40 sc. ROUND 6 (and then on every even numbered round): Work 1 sc in every sc. ROUND 7: * 1 sc in each of the next 4 sc, inc 1 sc in next sc *, repeat from *-* the entire round = 48 sc. ROUND 9: * 1 sc in each of the next 5 sc, inc 1 sc in next sc *, repeat from *-* the entire round = 56 sc. ROUND 11: * 1 sc in each of the next 6 sc, inc 1 sc in next sc *, repeat from *-* the entire round = 64 sc. ROUND 13: * 1 sc in each of the next 7 sc, inc 1 sc in next sc *, repeat from *-* the entire round = 72 sc. ROUND 15: * 1 sc in each of the next 5 sc, inc 1 sc in next sc *, repeat from *-* the entire round = 84 sc. ROUND 17: * 1 sc in each of the next 6 sc, inc 1 sc in next sc *, repeat from *-* the entire round = 96 sc. ROUND 19: * 1 sc in each of the next 7 sc, inc 1 sc in next sc *, repeat from *-* the entire round = 108 sc. ROUND 21: * 1 sc in each of the next 8 sc, inc 1 sc in next sc *, repeat from *-* the entire round = 120 sc. ROUND 22-26: Work 1 sc in every sc, switch to pistachio in the last sc on last round - READ COLOR CHANGE. Then work stripes as follows: Work 2 rounds pistachio, 2 rounds dark beige, 2 rounds pistachio. Then work 1 sc in every sc with dark beige until basket measures approx. 10 cm/ 4" vertically (measured from upper edge when basket lies flat). Switch to pistachio in the last sc on the last round and work 1 round with pistachio. Next (= last) round is worked with pistachio as follows: * Work 1 sc, work ch for approx. 14 cm/ 5½" (for handle), skip the next 16 sts, 1 sc in each of the next 43 sc *, repeat from *-* 1 more time, finish with 1 sl st in 1st sc on round = 2 ch-loops for handles in each side of basket. Crochet with 2 threads pistachio on hook size 5 mm/ US H/8 around each handle as follows: Work 32 sc, cut and fasten the thread. |
|
Have you finished this pattern?Tag your pictures with #dropspattern #dropstuttifrutti or submit them to the #dropsfan gallery. Do you need help with this pattern?You'll find 11 tutorial videos, a Comments/Questions area and more by visiting the pattern on garnstudio.com. © 1982-2026 DROPS Design A/S. We reserve all rights. This document, including all its sub-sections, has copyrights. Read more about what you can do with our patterns at the bottom of each pattern on our site. |
|


With over 40 years in knitting and crochet design, DROPS Design offers one of the most extensive collections of free patterns on the internet - translated to 17 languages. As of today we count 324 catalogs and 12290 patterns - 12280 of which are translated into English (US/in).
We work hard to bring you the best knitting and crochet have to offer, inspiration and advice as well as great quality yarns at incredible prices! Would you like to use our patterns for other than personal use? You can read what you are allowed to do in the Copyright text at the bottom of all our patterns. Happy crafting!
Post a comment to pattern DROPS Children 23-56
We would love to hear what you have to say about this pattern!
If you want to leave a question, please make sure you select the correct category in the form below, to speed up the answering process. Required fields are marked *.