
Popular categories
Looking for a yarn?


Comments / Questions (22)
![]() Amber wrote:
Amber wrote:
In the hat pattern rows 11 and 12 of A2 have no stitch pattern in the middle 11 stitches. I am not sure what I need to do here. Please explain.
03.10.2025 - 17:22DROPS Design answered:
Dear Amber, A.2 has 2 stitch patterns: the lace section and the cables sections. The lace section is composed only of 10 rows and the cable section of 12 rows. So you start repeating the middle section 2 rows earlier. That is, on row 11 of A.2 you work the cable sections as indicated and in the empty section you work as in row 1 of A.2. Then, in the next row, you work the middle section as in row 2 of A.2. In the next row you work as in row 3 of A.2, while you work the cables as in row 1 of A.2. Continue like this until the piece measures 21cm, and adjust to stop in a repeat of the middle section in Row 10 of A.2. Happy knitting!
05.10.2025 - 20:13
![]() Hélène Monette wrote:
Hélène Monette wrote:
Bonjour, y'a-t-il une erreur, mitaine droite: 5 m. end., 2 ens endroit (répéter), moi je finis avec 35 mailles et si je continu avec les diminutions suivantes il ne me restera pas 34 mailles sur mon aiguille. merci
29.04.2025 - 13:52DROPS Design answered:
Bonjour Mme Monette, en tricotant: *5 m end, tricoter ens à l'end les 2 m suiv*, répéter de *-* encore 2 fois, 1 m end, 2 m env, *2 m ens à l'end, 2 m end*, répéter de *-* encore 1 fois, 2 m ens à l'end, 2 m env et terminer par 4 m end = vous aurez *5+1* x 3 (= 18 m) + 1+2+ *1+2*x2 (= 6 m) +1+2+4=18+1+2+6+1+2+4=34 m. Bon tricot!
29.04.2025 - 13:54
![]() Laura wrote:
Laura wrote:
For knitting the left mitten, for the first row of the palm, do I knit 4 stitches, the pattern, then knit 19 stitches? Is that what knitting in reverse means?
14.11.2021 - 03:41DROPS Design answered:
Dear Laura, you are right. It is exactly what it means. Happy Stitching!
14.11.2021 - 09:56
![]() Laura Swain wrote:
Laura Swain wrote:
Hopefully the last question. When increasing for the thumb, how would the second increase row proceed? Exactly where are the increases in relation to the yarn overs? Do I always add a yarn over either side of that first stitch (which has become the second stitch), or do I add a yarn over before the new first and after the third stitch?
07.11.2021 - 22:51DROPS Design answered:
Hi Laura, for the second increase for the thumb you should add a yarn over before the new first and after the third stitch. Happy knitting!
07.11.2021 - 22:59
![]() Laura Swain wrote:
Laura Swain wrote:
In chart A.7 there are YOs that seem to be creating a lacy hole. Is this right or should I be knitting into the back loops of these yarn overs?
07.11.2021 - 00:41DROPS Design answered:
Hi Laura, in A.7, on the next round knit the yarn overs to make holes (not through the back loop). Happy knitting!
07.11.2021 - 11:01
![]() Laura wrote:
Laura wrote:
Could I lengthen the cowl/neck warmer to a scarf? How much yarn do you think I would need?
17.10.2021 - 18:52DROPS Design answered:
Dear Laura, if you want a scarf of 30x 180, you'd need 400gr in total of DROPS Nepal. Happy knitting!
17.10.2021 - 19:05
![]() Diana wrote:
Diana wrote:
Hi there, I am working on the Solveig Mittens Pattern. I believe it is supposed to be available in S/M and also M/L - but there only appears to be the smaller size instructions on the website. I have one mitten half completed and it looks a bit too narrow to me. Would you be able to add on the directions for the M/L size please? Thank you very much. Love your patterns - especially all of the lace shawls!
25.11.2020 - 06:50DROPS Design answered:
Dear Diana, the width are the same in both sizes, only length is longer in larger size - you can try with larger needles - try with needle size 3, 5 for example, it might help to get larger piece. Your DROPS store might have other tips for you - happy knitting!
25.11.2020 - 08:13
![]() Jardé wrote:
Jardé wrote:
Bonjour, Je rencontre un problème pour la moufle gauche. Lorsque je dois faire des diminutions du début de rang je dois procéder comment ? Car il faut les commencer 3 mailles avant le marqueur et le marqueur se trouve après la première maille seulement. Je dois commencer sur le rang précédent ou je dois faire la dim en deux étapes et diminuer les deux mailles ensemble en fin de rang ? Merci drops !
16.02.2018 - 20:06DROPS Design answered:
Bonjour Mme Jardé, commencez la diminution à la fin du tour pour que les 2 diminutions de chaque côté soient faites au même rythme. Bon tricot!
19.02.2018 - 08:48
![]() Jardé wrote:
Jardé wrote:
Bonjour, Pour les moufles Je dois réaliser les augmentations de chaque côté de la première maille du tour ou du côté extérieur des mailles augmentées ? C'est écrit 'augmenter de chaque côté des mailles augmentées' du coup si on suit ça on obtient 4 augmentations tous les deux rangs. Merci d'avance pour votre réponse.
11.02.2018 - 21:41DROPS Design answered:
Bonjour Mme Jardé, on va augmenter de part et d'autre des mailles augmentées = avant l'augmentation précédente, la m du pouce et après l'augmentation précédente pour qu'il n'y ait que 2 augmentations et non 4. Bon tricot!
12.02.2018 - 09:19Polina wrote:
Hello, enjoy your website for many years and it gets better and more convenient every year. The general advice about all the descriptions of garments on the site: it would be great if, when writing the name of yarn used for the item, you make it as a link to the specified yarn. Thanks!
27.01.2017 - 14:19DROPS Design answered:
Dear Polina, you will find link to the shadecard of the requested yarn at the very bottom of "Materials" tab, just above "Print pattern, Photo, Comments). Happy knitting!
27.01.2017 - 15:24
|
|||||||||||||||||||||||||||||||
Solveig#solveigset |
|||||||||||||||||||||||||||||||
|
|
|||||||||||||||||||||||||||||||
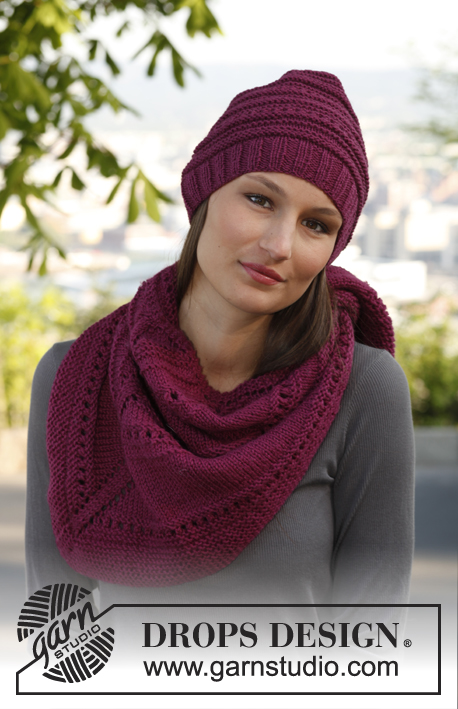
Knitted DROPS hat, neck warmer and mittens with lace pattern in ”Nepal”.
DROPS 142-17 |
|||||||||||||||||||||||||||||||
|
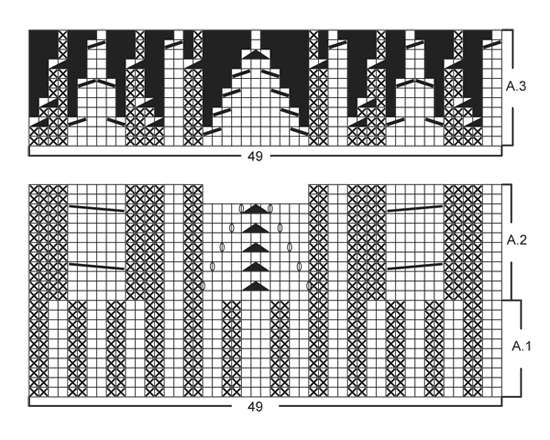
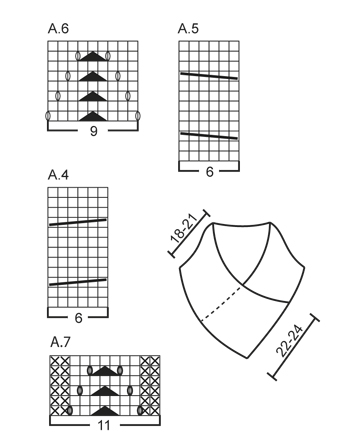
HAT AND NECKWARMER: PATTERN: See diagrams A.1 to A.6. Diagrams show all rows in pattern seen from RS. GARTER ST (back and forth on needle): K sts on all rows. -------------------------------------------------------- HAT: Worked in the round. Cast on 98 sts on circular needle size 3 mm / US 2.5 with Nepal and K 1 round. Then work rib according to diagram A.1 (= 2 repetitions on round). When A.1 has been worked 1 time vertically, switch to circular needle size 4 mm / US 6. Then work PATTERN according to diagram A.2. When piece measures approx. 21 cm / 8¼" – stop after one full repetition vertically of lace pattern, work and dec according to diagram A.3 (= 2 repetitions on round) – switch to double pointed needles when needed. When A.3 has been worked 1 time vertically, 24 sts remain on round. K2 twisted tog around. Cut the thread and pull it through the remaining sts, tighten tog and fasten. The hat measures approx. 26 cm / 10¼" vertically. ---------------------------------------------------------- NECK WARMER: Worked back and forth on needle. Cast on 40-44 sts on needle size 4.5 mm / US 7 with Nepal. K 4 rows (1st row = RS) – AT THE SAME TIME on 3rd row inc 5-5 sts evenly (do not inc over the outermost 2 sts in each side) = 45-49 sts. Work next row as follows from RS: 2 edge sts in GARTER ST – see explanation above, work A.4 (= 6 sts), P 2-3, A.5 (= 6 sts), P 2-3, A.6 (= 9 sts), P 2-3, A.4, P 2-3, A.5 and 2 edge sts in GARTER ST. Continue pattern like this (from WS K the 2-3 sts between every diagram). When piece measures approx. 71-75 cm / 28"-29½" – stop after one full repetition vertically of lace pattern in the middle, K 4 rows – AT THE SAME TIME dec 5-5 sts evenly on 1st row = 40-44 sts. Then bind off with K from WS. ASSEMBLY: Place the 2 ends on top of each other so that the tip at the front is double. Sew bind off edge edge to edge with the outer side of one long side, and cast on edge edge to edge with outer side in the other side. -------------------------------------------------------- MITTENS: PATTERN: See diagram A.7. Diagram shows all rows in pattern. INCREASE TIP: Inc 1 st by making 1 YO, on next round K YO twisted to avoid holes. DECREASE TIP: Dec as follows (beg 3 sts before marker): K 2 tog, K 2 (marker is between these 2 sts), slip 1 st as if to K, K 1, psso. -------------------------------------------------------- RIGHT MITTEN: Cast on 40-40 sts on double pointed needles size 3 mm / US 2.5 with Nepal and K 1 round. Then work rib (= K 2/P 2). When rib measures 6-7 cm / 2½"-2¾", work next round as follows: * K 5, K the next 2 tog *, repeat from *-* 2 more times, K 1, P 2, * K 2 tog, K 2 *, repeat from *-* 1 more time, K 2 tog, P 2 and finish with K 4 = 34-34 sts. Switch to double pointed needles size 4 mm / US 6, work next round as follows: 19 sts in stockinette st (= inside hand), A.7 (= 11 sts) and 4 sts in stockinette st. Continue the pattern like this. When piece measures 8-9 cm / 3"-3½", inc 1 st on each side of first st on round for thumb - READ INCREASE TIP. Repeat inc on each side of the inc sts every other round 4-5 more times = 44-46 sts. Now slip the 11-13 thumb sts on a stitch holder. Continue in the round as before while AT THE SAME TIME casting on 1 new st behind thumb on next round = 34-34 sts. When mitten measures approx. 21-23 cm / 8¼"-9" (try the mitten on, approx. 4 cm / 1½" remain until finished measurements), insert 1 marker after the first 16 sts on round and 1 marker after the next 17 sts (1 st remains on round after last marker). Now dec 1 st on each side of both markers - READ DECREASE TIP. Repeat dec every other round 2 more times and then every round a total of 3 times = 10 sts remain on needle – NOTE: When there is not room for more repetitions of A.7 vertically, finish the pattern after one whole repetition vertically, then work in stockinette st over the remaining sts in pattern until dec are done. Cut the thread and pull it through the remaining sts, tighten tog and fasten. THUMB: Slip the 11-13 thumb sts from stitch holder back on double pointed needles size 4 mm / US 6. In addition pick up 4-3 sts behind thumb = 15-16 sts. Work in stockinette st in the round until the thumb itself measures approx. 4½-5 cm / 1¾"-2" (try on the mitten, approx. ½ cm / ¼" remain until finished measurements). K 2 rounds while AT THE SAME TIME K2 tog around on both rounds = 4-4 sts remain on needle. Cut the thread and pull it through the remaining sts, tighten tog and fasten. LEFT MITTEN: Cast on and work as right mitten but reversed. I.e. beg rib with P 2 (instead of K 2). Work 1st round after rib as follows: K 4, P 2, * K 2 tog, K 2 *, repeat from *-* 1 more time, K 2 tog, P 2, K 1, * K 2 tog, K 5 *, repeat from *-* 2 more times. Inc for thumb on each side of last st on round. And before dec at the top of mitten, insert 1st marker after 1st st on round and 2nd marker after the next 17 sts (= 16 sts remain on round after last marker). |
|||||||||||||||||||||||||||||||
Diagram explanations |
|||||||||||||||||||||||||||||||
|
|||||||||||||||||||||||||||||||
 |
|||||||||||||||||||||||||||||||
 |
|||||||||||||||||||||||||||||||
Have you finished this pattern?Tag your pictures with #dropspattern #solveigset or submit them to the #dropsfan gallery. Do you need help with this pattern?You'll find 12 tutorial videos, a Comments/Questions area and more by visiting the pattern on garnstudio.com. © 1982-2026 DROPS Design A/S. We reserve all rights. This document, including all its sub-sections, has copyrights. Read more about what you can do with our patterns at the bottom of each pattern on our site. |
|||||||||||||||||||||||||||||||


With over 40 years in knitting and crochet design, DROPS Design offers one of the most extensive collections of free patterns on the internet - translated to 17 languages. As of today we count 325 catalogs and 12298 patterns - 12288 of which are translated into English (US/in).
We work hard to bring you the best knitting and crochet have to offer, inspiration and advice as well as great quality yarns at incredible prices! Would you like to use our patterns for other than personal use? You can read what you are allowed to do in the Copyright text at the bottom of all our patterns. Happy crafting!
Post a comment to pattern DROPS 142-17
We would love to hear what you have to say about this pattern!
If you want to leave a question, please make sure you select the correct category in the form below, to speed up the answering process. Required fields are marked *.