
Popular categories
Looking for a yarn?


Comments / Questions (91)
![]() Vicki wrote:
Vicki wrote:
The hat and neck warmer photo both show buttons, but the pattern does not have button hole instructions? How to create the button holes or where to place the button holes? Can you review pattern and advice? Vicki
07.01.2024 - 03:53DROPS Design answered:
Hi Vicki, the buttons on the hat and neck warmer are for decoration only, they do not fasten. They are sewn on tightly, through all layers of garment (See - HAT: ... Sew 2 buttons on to flap at the bottom of hat, sew through both layers. NECK WARMER: ... Place bands on top of each other and sew on 4 buttons through both layers.) So there is no worry about button holes at all. Happy knitting!
07.01.2024 - 12:55
![]() Jeanette Grunditz wrote:
Jeanette Grunditz wrote:
Hei, jag kan ikke førstå mønstret! Har prøvd mange ganger men det blir bare feil 😰 kan dere være snille og skrive hvordan det strikkes etter kant og man bytt till pinne 5? Rett og avig kan jag men førstå ikke om det ska være Rett. Rett Avig. Mm ?? Mvh og takk for hjelpen
08.07.2022 - 17:56
![]() Stacey wrote:
Stacey wrote:
The only thing I am confused about in this pattern is when it says “K 1 row from ws”. What exactly does that mean? Is the first row knit and that is the ws?
14.11.2019 - 23:55DROPS Design answered:
Dear Stacey, ws means the wrong side (and rs means right side) so the sentence means you have to knting onerow from the wrong side. Happy Knitting!
15.11.2019 - 02:33
![]() Monica wrote:
Monica wrote:
Buonasera, lavorando a m legaccio in tondo è corretto fare le diminuzioni a volte sul dritto e a volte sul rovescio?(per una taglia s/m del cappello). Grazie, saluti.
20.12.2018 - 16:01DROPS Design answered:
Buongiorno Monica. Quando lavora in tondo, lavora sempre sul diritto del lavoro. In caso di lavorazione in piano, diminuire ogni 3 ferri comporterebbe diminuire una volta sul diritto del lavoro, una volta sul rovescio. Buon lavoro!
20.12.2018 - 16:50
![]() Annick wrote:
Annick wrote:
Bonjour, j‘ai tricoté le bonnet qui est magnifique, et les explications très claires. Pour le tour de cou, j‘ai tricoté les 2 parties identiques, mais je ne comprends pas vraiment la suite. comment rassembler les 2 parties. Est-ce que vous pourriez y ajouter un shéma ou une illustration? pour aider un peu. Merci d‘avance
17.11.2018 - 21:28DROPS Design answered:
Bonjour Annick, à la fin de la 2ème partie, coupez le fil, comme à la fin de la 1ère partie. Montez maintenant 6 mailles avec l'aiguille 5, tricotez les mailles des deux parties l'une après l'autre, et montez 6 m = 112 m sur l'aiguille. Continuez maintenant en allers et retours avec 6 m au point mousse (= les 6 nouvelles mailles) de chaque côté. Bon tricot!
19.11.2018 - 08:23
![]() Hermoso wrote:
Hermoso wrote:
Bonsoir je comprends pas le diagramme les rgs à l'envers on tricote comme les mailles se présente?merci
17.10.2018 - 20:06DROPS Design answered:
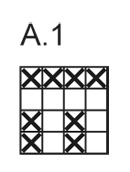
Bonjour Mme Hermoso, lisez le diagramme en commençant en bas à droite et de droite à gauche sur l'endroit (= et tous les tours quand vous tricotez en rond) et de gauche à droite sur l'envers ( quand vous tricotez en rangs). Ainsi, A.1 se tricote ainsi en allers et retours: rang1 (sur l'endroit): 1 m end, 1 m env, 1 m end, 1 m env, au rang2 (sur l'envers): 1 m end, 1 m env, 1 m end, 1 m env. Rang 3: tout à l'end. Rang 4: tout à l'end. En rond: rangs 1 et 2: 1 m end, 1 m env, 1 m end, 1 m env. Rang3: tout à l'end. Rang4: tout à l'env. Bon tricot!
18.10.2018 - 09:25
![]() Hesnard Chantal wrote:
Hesnard Chantal wrote:
Bonjour, pourriez-vous svp m'envoyer la croquis du modèle car je n'arrive pas à voir comment on le monte. Merci d'avance
05.04.2018 - 16:48DROPS Design answered:
Bonjour Mme Hesnard, il n'y a pas de croquis pour ce modèle, à quel niveau bloquez-vous? Tricotez-vous le bonnet ou le tour de cou?
06.04.2018 - 08:28
![]() Sandra wrote:
Sandra wrote:
Hallo zusammen, Es fehlt die Angabe zu "kraus rechts - siehe oben" in dieser Anleitung... Es gibt keine Erklärung über der Anleitung wie sonst immer...
27.12.2017 - 22:41
![]() Marianna wrote:
Marianna wrote:
Ma quando posso unire in tondo???? Dopo che ho calato le prime 6maglie??
26.01.2017 - 23:25DROPS Design answered:
Buongiorno Marianna. Sì esatto, lavora in tondo dopo aver intrecciato le 6 maglie, quindi quando ha completato la parte a legaccio dove poi verranno attaccati i bottoni. Buon lavoro!
27.01.2017 - 06:55
![]() Belinda Lance wrote:
Belinda Lance wrote:
The Drops Yarn weight symbol used here is (Nepal Yarn Group C). In Canada we use number weight symbol: Lace is 0, Super Fine is 1, Fine is 2, Light is 3, Medium is 4, Bulky is 5, Super Bulky is 6 and Jumbo 7. So what number would be used for this particular garment? Is it 4 Medium?
12.01.2017 - 16:25DROPS Design answered:
Dear Mrs Lance, you'll find all relevant informations about the yarn under their own shadecard. Remember your DROPS Store will provide you any further assistance. Happy knitting!
12.01.2017 - 17:09
|
|||||||
Bliss#blissset |
|||||||
|
|
|||||||
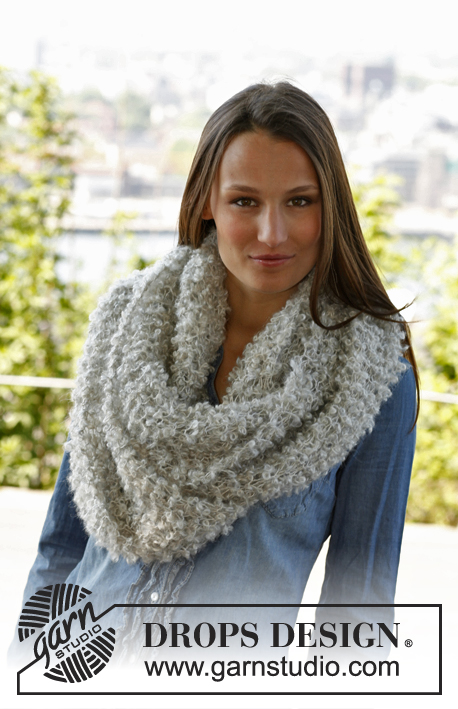
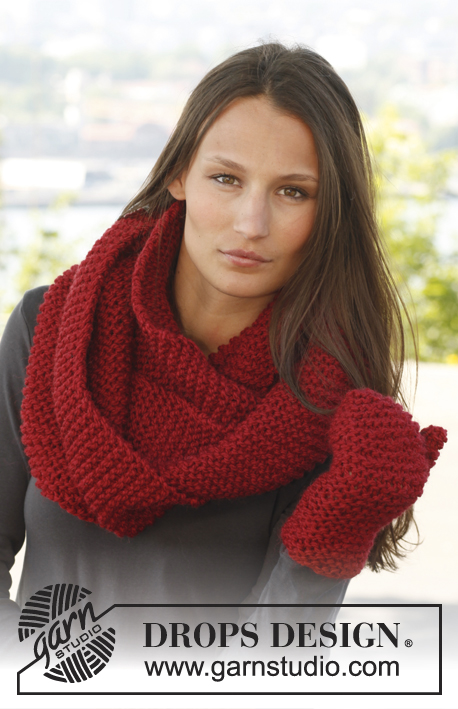
Knitted DROPS neck warmer and hat with pattern in ”Nepal”.
DROPS 140-40 |
|||||||
|
GARTER ST (back and forth on needle): K sts on all rows. GARTER ST (in the round on circular needle): * K 1 round and P 1 round *, repeat from *-*. PATTERN: See diagram A.1. Diagram shows all rows in pattern from RS. ---------------------------------------------------------- HAT: Piece is first worked back and forth on circular needle and then in the round. Cast on 86-94 sts with Nepal on circular needle size 4 mm / US 6. K 1 row from WS, then work as follows: 6 sts in GARTER ST - see explanation above, * K 2, P 2 *, repeat from *-*, finish with K 2 and 6 sts in garter st. Continue rib and in garter st in each side until piece measures 4 cm / 1½". Switch to circular needle size 5 mm / US 8. Now work as follows: 6 sts in garter st, A.1 over the next 74-82 sts and finish with 6 sts in garter st. When piece measures 8 cm / 3⅛", bind off the first 6 sts on needle, then work in the round with A.1 over all sts = 80-88 sts. When piece measures 20-21 cm / 8"-8¼", work in GARTER ST - see explanation above - until finished measurements. Work in garter st, AT THE SAME TIME dec 12 sts evenly every 3rd round a total of 5 times = 20-28 sts remain on round. Now K2 tog around, cut the thread and pull it through the remaining sts. Tighten tog and fasten. The hat measures approx. 25-26 cm / 9¾"-10¼" vertically. Sew 2 buttons on to flap at the bottom of hat, sew through both layers. ---------------------------------------------------------- NECK WARMER: Worked back and forth on needle. Cast on 62 sts on circular needle size 4 mm / US 6 with Nepal. K 1 row from WS, then work as follows - from RS: 6 sts in garter st, K 2, * P 2, K 2 *, repeat from *-* and finish with 6 sts in garter st. Continue like this. When piece measures 4 cm / 1½", switch to circular needle size 5 mm / US 8 and continue as follows: 6 sts in garter st, diagram A.1 over the next 50 sts and finish with 6 sts in garter st. When piece measures 20 cm / 8", bind off 6 sts in each side = 50 sts. Cut the thread. Put piece aside. Knit another piece the same way. Cast on 6 sts on circular needle size 5 mm / US 8, work sts from one piece back on needle, work sts from the other piece back on needle and cast on 6 sts at end of row = 112 sts. Worked back and forth on needle as follows: 6 sts in garter st (band), diagram A.1 over the next 100 sts, 6 sts in garter st (band). Continue like this until piece measures 34 cm / 13½". Switch to circular needle size 4 mm / US 6, then work as follows – AT THE SAME TIME on first row inc 2 sts evenly: 6 sts in garter st, K 2, * P 2, K 2 *, repeat from *-* and finish with 6 sts in garter st = 114 sts. Work rib for 4 cm /1½", then bind off with K over K and P over P. Place bands on top of each other and sew on 4 buttons through both layers. |
|||||||
Diagram explanations |
|||||||
|
|||||||
 |
|||||||
Have you finished this pattern?Tag your pictures with #dropspattern #blissset or submit them to the #dropsfan gallery. Do you need help with this pattern?You'll find 7 tutorial videos, a Comments/Questions area and more by visiting the pattern on garnstudio.com. © 1982-2026 DROPS Design A/S. We reserve all rights. This document, including all its sub-sections, has copyrights. Read more about what you can do with our patterns at the bottom of each pattern on our site. |
|||||||


With over 40 years in knitting and crochet design, DROPS Design offers one of the most extensive collections of free patterns on the internet - translated to 17 languages. As of today we count 324 catalogs and 12252 patterns - 12242 of which are translated into English (US/in).
We work hard to bring you the best knitting and crochet have to offer, inspiration and advice as well as great quality yarns at incredible prices! Would you like to use our patterns for other than personal use? You can read what you are allowed to do in the Copyright text at the bottom of all our patterns. Happy crafting!
Post a comment to pattern DROPS 140-40
We would love to hear what you have to say about this pattern!
If you want to leave a question, please make sure you select the correct category in the form below, to speed up the answering process. Required fields are marked *.