
Popular categories
Looking for a yarn?


Comments / Questions (45)
![]() Brenda Chan wrote:
Brenda Chan wrote:
Yoke question: on sleeves decrease every other row 16 times and then every row: 16 times for all sizes???? I don't understand at all. need help please
17.04.2020 - 23:28DROPS Design answered:
Dear Brenda, on the yoke, you should decrease first every other row 15-16-17-18-19-20 times (number depending on teh size you are knitting), then in every row 16 times for each sizes. Happy Knitting!
19.04.2020 - 21:29
![]() Anny Jansen wrote:
Anny Jansen wrote:
Goedemiddag even een vraag over dit vest. moet de kabel ook aan het achterpand gebreid worden? en je begint onder de armen met de kabel he? als ik het goed hebt. dat is vraag 1 vraag 2 is de raglan minderingen moeten aan de goede kant maar dan ook aan de verkeerde kant? is dat niet te veel van het goede? graag hoor ik van u met vriendelijke groet a jansen
18.01.2015 - 14:11DROPS Design answered:
Hoi Anny. Je breit A.2 (de kabel) in alle overgangen op de pas = dus ook op het achterpand. Je mindert eerst alleen op de goede kant (= om de naald) en vervolgens in elke nld = dus ook op de verkeerde kant (maar dit geldt alleen op de mouwen of ook op de panden in de drie grootste maten).
19.01.2015 - 13:48
![]() Sandrine PASCAL wrote:
Sandrine PASCAL wrote:
Bonsoir, J'en suis aux diminutions des manches et du dos et devant. Et j'ai du mal a comprendre vos explications: dois-je diminuer en premier pour le dos et devant et ensuite les manches ou bien le tout en même temps. Merci pour votre réponse
03.06.2014 - 21:03DROPS Design answered:
Bonjour Mme Pascal, les diminutions se font différemment pour le dos/les devants et pour les manches, ex en taille S vous diminuez 22 fois tous les 2 rangs pour dos/devant mais pour les manches 15 fois tous les 2 rangs puis 16 fois tous les rangs, c'est-à-dire que pendant les 15 x tous les 2 rangs vous diminuerez partout tous les 2 rangs puis uniquement tous les 2 rangs sur dos/devants mais tous les rangs sur les manches. Bon tricot!
04.06.2014 - 08:53
![]() Pascal wrote:
Pascal wrote:
Bonjour, j'ai un souci avec ce modèle notamment avec l'échantillon. Pour obtenir un échantillon de 17 m x 22 rangs en jersey avec 1 fil Alpaca + 1 fil Kid-Silk tricotés ensemble = 10 x 10 cm je me suis retrouver avec des aiguilles à tricoter n°3. Est-ce moi qui tricote trop lâche ou il y a une erreur dans le numéros d'aiguille?
30.12.2013 - 14:26DROPS Design answered:
Bonjour Pascal, la tension habituelle de ces 2 fils tricotés ensemble est bien de 17 m x 22 rangs sur aiguilles 5 (ou la taille nécessaire). N'hésitez pas à consulter notre vidéothèque, elle peut vous aider à apprendre une autre technique qui "régulera" votre tension. Bon tricot!
30.12.2013 - 15:59
![]() Chrystelle wrote:
Chrystelle wrote:
Bonjour, je crois qu'il y a une erreur dans ce modèle au niveau des manches. monter 96 mailles (ma taille) pour les manches avec un échantillon de 17 mailles pour 10 cm cela fait une manche de plus de 50 cm de circonférence, cela fait très grand, non ???
14.10.2013 - 20:19DROPS Design answered:
Bonjour Chrystelle, le nombre de mailles à monter est correct, les manches sont volontairement un peu large. Bon tricot!
15.10.2013 - 08:39
![]() It V D Eijk wrote:
It V D Eijk wrote:
Je moet 244 st opzetten en na het boord 57 st minderen dat snap ik niet dan klopt de stekenverhouding niet meer ???
07.10.2013 - 11:35DROPS Design answered:
Hoi. Het klopt wel. Je begint met boordsteek en dat trekt altijd meer samen dan tricotsteek. Door te minderen blijft het werk hetzelfde breedte houden als je doorgaat in tricotsteek.
07.10.2013 - 21:04
![]() Kitty wrote:
Kitty wrote:
In de omschrijving van de pas staat in de 4e regel: MEERDER meer st op de mouw dan op het lijf. Ik neem aan dat dit MINDER moet zijn?
14.12.2012 - 14:40DROPS Design answered:
U heeft gelijk. Het is aangepast. Bedankt voor de reactie.
15.12.2012 - 17:18Martina wrote:
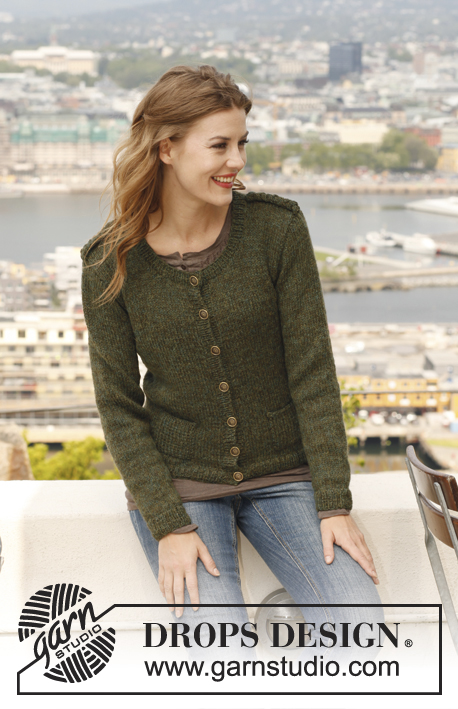
Ich habe das Jäckchen in grün gestrick und bin seit einer Woche stolze Besitzerin! Wirklich ein tolles Modell.
03.11.2012 - 16:23MaFrançoise wrote:
Voici un beau modèle que pensez-vous de l'alpaca bouclé pour le réaliser ???
26.08.2012 - 12:17DROPS Design answered:
Bonjour Mafrançoise, 2 fils du groupe A = 1 fil du groupe C. Pensez à tricoter votre échantillon pour vérifier les mesures et la visibilité des torsades. Bon tricot !
27.08.2012 - 09:06
![]() Corry wrote:
Corry wrote:
Kun je de patroon ook gewoon op rechte naalden breien? Hoe is dan de verhouding voor en achterpand? de helft
25.07.2012 - 14:13DROPS Design answered:
Dit model wordt heen en weer gebreid, maar wilt u de panden delen, dan is dat wel mogelijk. U kunt in het patroon ook zien hoeveel st er zijn per pand (de zijkanten zijn waar de markeerders worden geplaatst). Ik zou wel aanraden om het pas te breien zoals er wordt beschreven - niet opsplitsen vanwege de kabel. Vergeet niet om 1 kantst op te zetten voor de naad aan de zijkanten.
26.07.2012 - 11:36
|
|||||||||||||
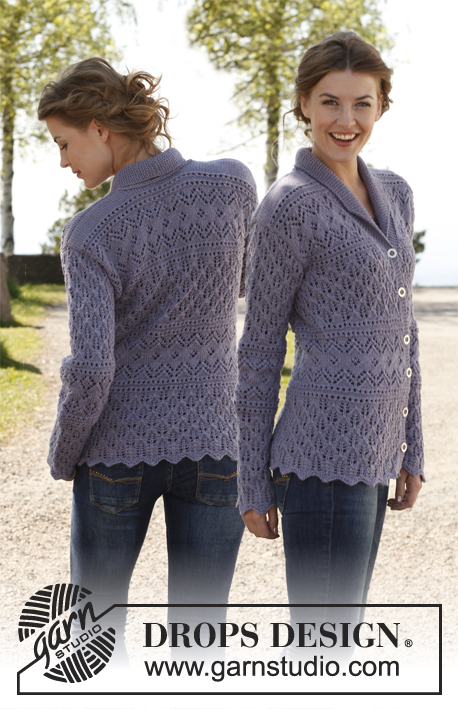
Lavender Glory#lavenderglorycardigan |
|||||||||||||
|
|
|||||||||||||
Knitted DROPS jacket with short, wide sleeves, raglan and cable rib in ”Alpaca” and ”Kid-Silk”. Size: S - XXXL.
DROPS 141-15 |
|||||||||||||
|
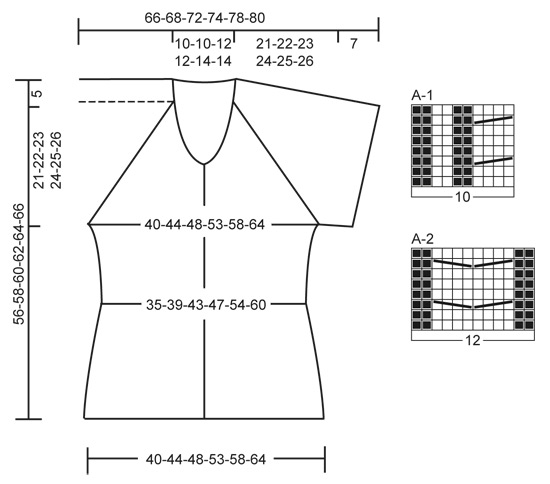
GARTER ST (back and forth on needle): K all rows. GARTER ST (in the round on circular needle): * P 1 round and K 1 round *, repeat from *-*. 1 ridge = 2 rounds. PATTERN: See diagrams A-1 and A-2. Diagrams show all rows in pattern seen from RS. BUTTONHOLES: Bind off for buttonholes on right band. 1 buttonhole = K tog third and fourth st from mid front and make 1 YO. Bind off for buttonholes when piece measures: SIZE S: 5, 12, 20, 27, 35 and approx. 42 cm / 2", 4¾", 8", 10⅝", 13¾" and approx. 16½". SIZE M: 5, 13, 21, 29, 37 and approx. 44 cm / 2", 5⅛", 8¼", 11⅜", 14½" and approx. 17¼". SIZE L: 5, 13, 21, 29, 37 and approx. 45 cm / 2", 5⅛", 8¼", 11⅜", 14½" and approx. 17¾". SIZE XL: 7, 15, 23, 31, 39 and approx. 47 cm / 2¾", 6", 9", 12¼", 15¼" and approx. 18½". SIZE XXL: 7, 15, 23, 31, 39 and approx. 48 cm / 2¾", 6", 9", 12¼", 15¼" and approx. 19". SIZE XXXL: 7, 16, 24, 33, 41 and approx. 50 cm / 2¾", 6¼", 9½", 13", 16⅛" and approx. 19¾". NOTE: Work last buttonhole when 2 rows remain before neck bind off. RAGLAN: Dec on each side of diagram A-2. Dec as follows FROM RS: Before A-2: K 2 tog. After A-2: Slip 1 st as if to K, K 1, psso. Dec as follows FROM WS: Before A-2: P 2 twisted tog. After A-2: P 2 tog. ---------------------------------------------------------- BODY: Worked back and forth on circular needle from mid front. Cast on 204-224-244-264-294-324 sts (includes 5 band sts in each side) on circular needle size 4 mm / US 6 with 1 strand Alpaca and 1 strand Kid-Silk. Work as follows (1st row = RS): 5 band sts in GARTER ST – see explanation above, diagram A-1 until 9 sts remain, work the first 4 sts in A-1 one more time and finish with 5 band sts in garter st. Continue like this - AT THE SAME TIME when piece measures 5-5-5-7-7-7 cm / 2"-2"-2"-2¾"-2¾"-2¾", beg bind off for BUTTONHOLES - see explanation above. When piece measures approx. 8 cm / 3⅛" work next row as follows from RS: 5 sts in garter st, * K 2 tog, K 2 tog, K 2, K 2 tog, K 2 * (i.e. 10 sts become 7 sts), repeat from *-* until 9 sts remain, K 2 tog, K 2 tog and 5 sts in garter st = 145-159-173-187-208-229 sts. Insert 2 markers in the piece; 38-42-46-49-54-60 sts in from each side (= 69-75-81-89-100-109 sts between markers on back piece). Switch to circular needle size 5 mm / US 8 and continue in stockinette st with bands in garter st as before. REMEMBER THE GAUGE! When piece measures 10-10-11-11-12-12 cm / 4"-4"-4⅜"-4⅜"-4¾"-4¾", dec 1 st on each side of every marker, repeat dec every 2 cm / ¾" 3 more times = 129-143-157-171-192-213 sts. When piece measures 20-20-21-21-22-22 cm / 8"-8"-8¼"-8¼"-8¾"-8¾", inc 1 st on each side of every marker, repeat inc every 2 cm / ¾" 3 more times = 145-159-173-187-208-229 sts. When piece measures 30-31-32-33-34-35 cm / 11¾"-12¼"-12½"-13"-13⅜"-13¾", bind off 6-6-8-8-10-10 sts in each side for armholes (i.e. 3-3-4-4-5-5 sts on each side of every marker) = 133-147-157-171-188-209 sts remain on needle, put piece aside and knit the sleeves. SLEEVE: Worked in the round on a short circular needle. Cast on 90-92-96-98-102-104 sts on circular needle size 4 mm / US 6 with 1 strand Alpaca and 1 strand Kid-Silk. Insert 1 marker at the beg of round. Work 2 ridges in GARTER ST in the round - see explanation above! Switch to circular needle size 5 mm / US 8 and continue in stockinette st. When piece measures 7 cm / 2¾", bind off 6-6-8-8-10-10 sts mid under sleeve (= 3-3-4-4-5-5 sts on each side of marker) = 84-86-88-90-92-94 sts remain on needle. Put piece aside and knit another sleeve. YOKE: Slip sleeves on to same circular needle as body = 301-319-333-351-372-397 sts. Insert 1 marker in every transition between body and sleeves, in all these transitions work diagram A-2 (i.e. with 6 sts on each side of every marker), work the other sts as before but continue to work bands in garter st. At the same time (on 1st row from RS) dec for RAGLAN on each side of A-2 – see explanation above! More sts must be dec on sleeves than on body, this is done as follows: On BODY dec every other row: 22-24-25-23-22-21 times and then every row: 0-0-0-6-10-15 times. On SLEEVES dec every other row: 15-16-17-18-19-20 times and then every row: 16 times for all sizes. AT THE SAME TIME when piece measures 43-45-46-48-49-51 cm / 17"-17¾"-18"-19"-19¼"-20", slip the outermost 6 sts in each side towards mid front on a stitch holder for neck. Continue to bind off at beg of every row in each side for neck: 1 st every other row 4-4-5-5-6-6 times in each side and then 1 st every 4th row until raglan dec are done (it is ok if the neck bind off overlaps with raglan dec on front piece). After all dec and bind off, approx. 70 to 80 sts remain on needle. Cut the thread. NECK EDGE: Switch to circular needle size 4 mm / US 6. Pick up (from RS) approx. 15-20 sts at the front along right side of neck (incl sts on stitch holder), then work the remaining 60-70 sts from body on to needle and finally pick up approx. 15-20 sts at the front along left side of neck (including sts on stitch holder) = approx. 90-110 sts. K 3 rows back and forth – AT THE SAME TIME on 1st row (= WS) K sts over all the cables tog 2 by 2, i.e. dec 4 sts over every raglan = approx. 74-94 sts remain on needle. When 3 rows have been worked, loosely bind off with K from RS. ASSEMBLY: Sew tog the openings under the sleeves and sew on buttons. |
|||||||||||||
Diagram explanations |
|||||||||||||
|
|||||||||||||
 |
|||||||||||||
Have you finished this pattern?Tag your pictures with #dropspattern #lavenderglorycardigan or submit them to the #dropsfan gallery. Do you need help with this pattern?You'll find 15 tutorial videos, a Comments/Questions area and more by visiting the pattern on garnstudio.com. © 1982-2026 DROPS Design A/S. We reserve all rights. This document, including all its sub-sections, has copyrights. Read more about what you can do with our patterns at the bottom of each pattern on our site. |
|||||||||||||


With over 40 years in knitting and crochet design, DROPS Design offers one of the most extensive collections of free patterns on the internet - translated to 17 languages. As of today we count 324 catalogs and 12290 patterns - 12280 of which are translated into English (US/in).
We work hard to bring you the best knitting and crochet have to offer, inspiration and advice as well as great quality yarns at incredible prices! Would you like to use our patterns for other than personal use? You can read what you are allowed to do in the Copyright text at the bottom of all our patterns. Happy crafting!
Post a comment to pattern DROPS 141-15
We would love to hear what you have to say about this pattern!
If you want to leave a question, please make sure you select the correct category in the form below, to speed up the answering process. Required fields are marked *.