
Popular categories
Looking for a yarn?


Comments / Questions (33)
![]() Rebekka wrote:
Rebekka wrote:
Guten Tag. In welcher Farbe werden die Umschläge für die Daumenzunahme gestrickt? Immer in der Farbe der Vorgängermasche? Oder ist es prinzipiell egal? Und die Abnahmen? Ich glaube da ergibt sich die gleiche Frage. 🤔 Über eine Antwort würde ich mich freuen.
30.07.2025 - 10:21DROPS Design answered:
Liebe Rebekka, die Zunahmen können Sie mit Farben Schwarz stricken (die Farbe für die neue Masche bei der nächsten Runde); die Abnahmen werden mit Schwarz gestrickt (siehe schriftliche Anleitung). Viel Spaß beim Stricken!
30.07.2025 - 16:11
![]() Ulla-maria wrote:
Ulla-maria wrote:
Findes karneval nr 820 ikke mere?
02.06.2025 - 20:37DROPS Design answered:
Hej Ulla-Maria, nej desværre, vi kan ikke få fat i den mere. Men vi har rigtig mange fine meleringer og så har vi fået DROPS Fiesta som også har helt fantastiske meleringer :)
03.06.2025 - 07:10
![]() Sabine Schewe wrote:
Sabine Schewe wrote:
Hallo, kann es sein, dass die Farbe 820 Karneval nicht mehr lieferbar ist? Können Sie vielleicht eine Alternative vorschlagen? Vielen Dank für die Mühe!
22.11.2024 - 10:56DROPS Design answered:
Lieve Frau Schewe, ja genau, diese Farbe ist jetzt ausgelaufen; bei der Farbkarte Fabel finden Sie alle aktuellen Farben, sicher finden Sie eine davon, die Ihnen inspieren wird. Viel Spaß beim Stricken!
22.11.2024 - 14:08
![]() Jeanette wrote:
Jeanette wrote:
Omslagen i tumkilen, vilken färg ska dessa stickas med?
08.09.2021 - 12:19DROPS Design answered:
Hei Jeanette. De kan økes med bunnfargen (sort). mvh DROPS design
15.09.2021 - 13:55
![]() Dea wrote:
Dea wrote:
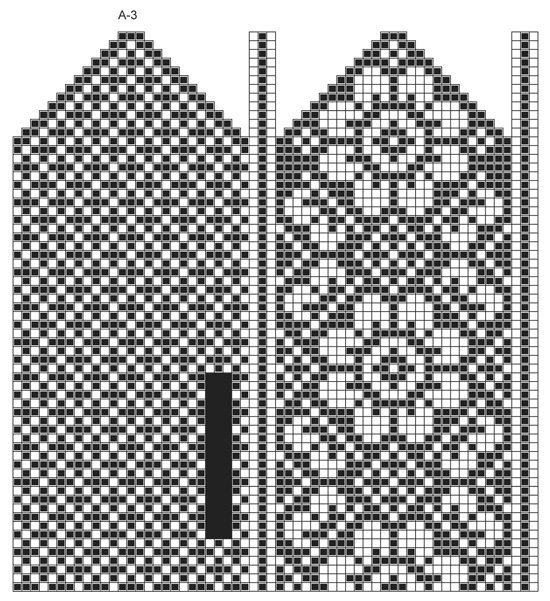
Buonasera, nella spiegazione c'è scritto " Quando si inizia a diminuire sul sopra della mano, diminuire da ogni lato delle 3 m. a lato (1 carnevale, 1 nero, e 1 carnevale). Diminuire prima di queste 3 m. lavorando 2 m. insieme a dir. con il nero e diminuire dopo queste 3 m. lavorando 2 m. insieme a dir. ritorto con il nero." credo che queste diminuzioni valgano anche per il sotto della mano o no? Grazie.
28.01.2019 - 21:32DROPS Design answered:
Buonasera Dea. Sì, le diminuzioni vanno fatte prima/dopo le 3 maglie (carnevale, nero, carnevale) ai due lati della muffola. Quindi sia sul sopra della mano che sul sotto. Buon lavoro!
28.01.2019 - 22:47
![]() Lilja wrote:
Lilja wrote:
Hi, why there is a decrease in round 1 of A.2 and an increase in the last row again? Why I can't just keep 60 stitches and knit A.2 5 times in full pattern size? My knitting becomes too narrow at this point, so I wondered whether I switch the yarn (because it should become narrow) or if I do something wrong at the A.2 chart. Thanks for the beauiful pattern anyway! Lilja
21.09.2017 - 17:54DROPS Design answered:
Dear Lilja, you decrease for A.2 to make it more narrow for the wrist. Remember to check and keep your tension even when working colour pattern. Happy knitting!
22.09.2017 - 09:44
![]() Anne Marit Mosebakken wrote:
Anne Marit Mosebakken wrote:
Hei Hvordan garn kan jeg bruke til den som dere ikke har lenger?
14.10.2016 - 19:27DROPS Design answered:
Hei Anne Marit. Saa vaelger du één af de andre farver i Fabel. Se garnkortet her
17.10.2016 - 16:32Alexandra wrote:
Welche Grösse haben die fertigen Handschuhe, bzw. für welchen Handumfang passen die? Würde die gerne für mich selbst stricken, habe recht grosse Hände. Danke!
04.10.2016 - 14:11DROPS Design answered:
Liebe Alexandra, mit 24 M = 10 cm werden Sie mit 60 M (Hand = A.3) ca 25 cm bekommen. Ich habe 41 Reihe gezählt nach dem Daumen - dh mit 32 R = 10 cm sind diese Reihe ca 12 cm. Wenn Sie weitere persönnilche Hilfe dafür brauchen, können Sie sich gerne an Ihren DROPS Laden wenden.
04.10.2016 - 15:36Philippa wrote:
I realise the Fabel carnival 820 has been discontinued. Could you please advise, was it a "long print"? I will choose another colour. Thanks.
09.02.2016 - 06:52DROPS Design answered:
Dear Philippa, Fabel 820 was a "print". Happy knitting!
09.02.2016 - 14:58
![]() Sinna wrote:
Sinna wrote:
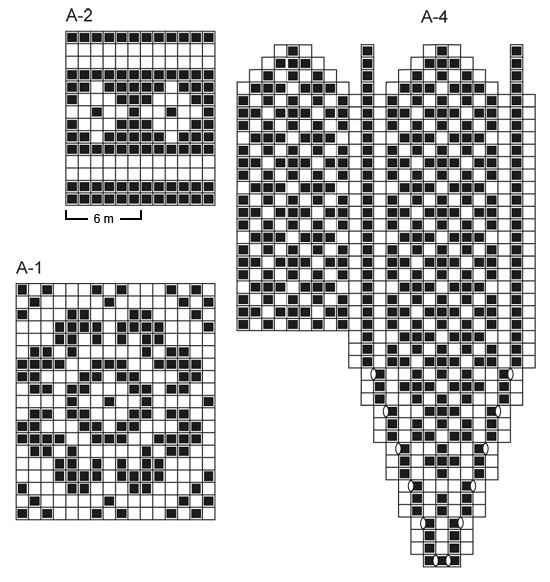
I don’t understand what happens when moving on to A2 (the same problem as Magdalena 16.11.2012 kl. 12:29). If I have 54 sts and there are 12 sts in A2 it doesn’t match.
09.01.2016 - 19:39DROPS Design answered:
Dear Sinna, A.2 is worked over 6 sts (see rapport in diag), so that you will repeat A.2 (= 12 sts a total of 4 times + th first stss in A.2) = 54 sts. Happy knitting!
11.01.2016 - 09:54
|
||||||||||
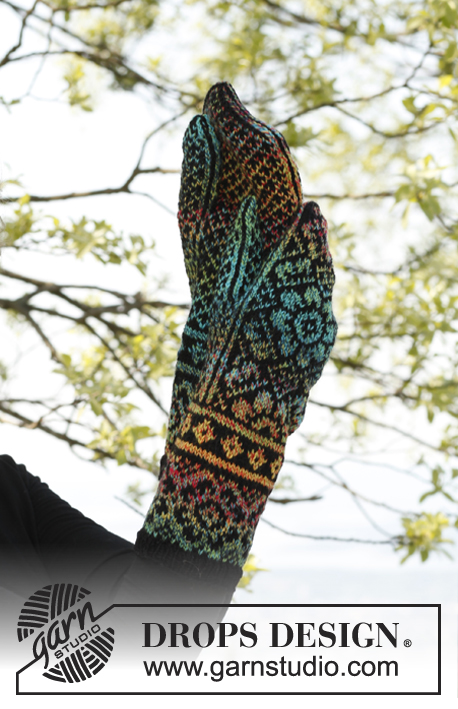
Rainbow Mitts#rainbowmitts |
||||||||||
 |
 |
|||||||||
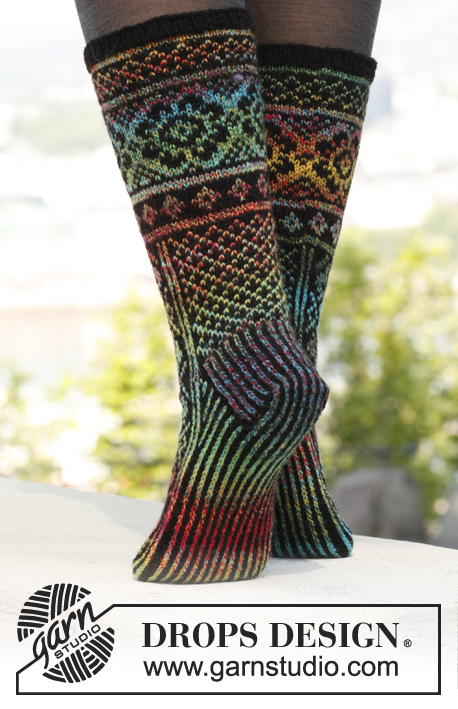
Knitted DROPS mittens with pattern in "Fabel".
DROPS 143-32 |
||||||||||
|
PATTERN: Diagrams A-1 to A-4. All diagrams are worked in stockinette. -------------------------------------------------------- RIGHT MITTEN: Worked in the round on double pointed needles. Cast on 64 sts on double pointed needles size 2.5 mm/US 1.5 with black. K 1 round, work 6 rounds rib = K 1/P 1. Switch to double pointed needles size 3 mm/US 2.5, K 1 round with black, then work diagram A-1 (= 4 repetitions on the round). REMEMBER THE GAUGE! When A-1 has been worked 1 time vertically, work A-2 - AT THE SAME TIME on first round dec 10 sts evenly = 54 sts, and on last round of A-2 inc 6 sts evenly = 60 sts. Continue with A-3. When it has been worked up to the 3 black squares in A-3, work A-4 over these 3 squares (continue the other sts in A-3). Inc in A-4 as shown in diagram - on next round K YOs twisted to avoid holes. When 6 inc have been worked (there are now 15 sts in thumb gusset), work 3 rounds without inc as shown in A-4, then slip the 15 thumb sts on a stitch holder. Cast on 3 new sts over sts on stitch holder = 60 sts. Continue working according to A-3. When beg to dec on top of hand, dec on each side of 3 sts in the side (1 carnival, 1 black, and 1 carnival). Dec before these 3 sts by K 2 tog with black and dec after these 3 sts by K 2 twisted tog with black. After all dec are done, 12 sts remain on needle. Cut the thread and pull it through the remaining sts, tighten tog and fasten. The entire mitten measures approx. 30 cm/ 11¾". THUMB: Slip the 15 thumb sts back on double pointed needles size 3 mm/US 2.5. Pick up 9 sts in the edge behind the thumb = 24 sts. Continue in the round according to A-4. When dec beg, dec on each side of 1 st black in each side. Dec before this st by K 2 tog with carnival and dec after this st by K 2 twisted tog with carnival. After all dec are done, 8 sts remain on needle. Cut the thread and pull it through the remaining sts, tighten tog and fasten. LEFT MITTEN: Cast on and work as right mitten but work the 3 black sts for thumb in the 3rd, 4th and 5th st from the left in diagram A-3. |
||||||||||
Diagram explanations |
||||||||||
|
||||||||||
 |
||||||||||
 |
||||||||||
Have you finished this pattern?Tag your pictures with #dropspattern #rainbowmitts or submit them to the #dropsfan gallery. Do you need help with this pattern?You'll find 13 tutorial videos, a Comments/Questions area and more by visiting the pattern on garnstudio.com. © 1982-2026 DROPS Design A/S. We reserve all rights. This document, including all its sub-sections, has copyrights. Read more about what you can do with our patterns at the bottom of each pattern on our site. |
||||||||||


With over 40 years in knitting and crochet design, DROPS Design offers one of the most extensive collections of free patterns on the internet - translated to 17 languages. As of today we count 325 catalogs and 12298 patterns - 12288 of which are translated into English (US/in).
We work hard to bring you the best knitting and crochet have to offer, inspiration and advice as well as great quality yarns at incredible prices! Would you like to use our patterns for other than personal use? You can read what you are allowed to do in the Copyright text at the bottom of all our patterns. Happy crafting!
Post a comment to pattern DROPS 143-32
We would love to hear what you have to say about this pattern!
If you want to leave a question, please make sure you select the correct category in the form below, to speed up the answering process. Required fields are marked *.