
Popular categories
Looking for a yarn?


Comments / Questions (95)
![]() Manhes wrote:
Manhes wrote:
Bonjour .juste une question pour le gilet No 137-6 Miss Sissi au sujet des rangs raccourci faut-il les continuer quand on commence les augmentation côté emmanchures. Merci
13.04.2024 - 17:23DROPS Design answered:
Bonjour Mme Manhes, tricotez les rangs raccourcis jusqu'à ce que vous ayez tricoté 6-6-6-8-8-10 rangs (en haut, côté emmanchure) après la dernière maille rabattue pour l'emmanchure. Puis augmentez en fin de rang côté emmanchure, tout en continuant les rangs raccourcis comme avant. Bon tricot!
15.04.2024 - 07:26
![]() Birgit wrote:
Birgit wrote:
Hallo, in der Anleitung steht "Maschenprobe im Muster gestrickt". Auf welches Muster bezieht sich das? Und wenn ich das Rückenmuster (M1) nehme; beginne ich dann wie in der Anleitung Rückenteil? Also aus der Mitte heraus? Vielen Dank und viele Grüße Birgit
24.06.2019 - 07:58DROPS Design answered:
Liebe Birgit, Maschenprobe ist mit Lochmuster, dh mit M.1 bzw M.2. Rückenteil wird zuerst in der Runde mit M.1 gestrickt, dann stricken Sie den unterern Teil (die anderen Maschen werden entweder abgekettet (= Armaussschnitte) oder stillgegelgt, dann stricken Sie den oberen Teil (mit Halsausschnitt), dann stricken Sie die rechte und die linke Seite (separat). Viel Spaß beim stricken!
24.06.2019 - 08:20
![]() Picard wrote:
Picard wrote:
Il y a une erreur dans le diagramme M1 il est noté tricoter à l'endroit sur endroit et envers sur l'envers mais comme on tricote en circulaire en fait il faut tout tricoter à l'endroit sinon on obtient du point mousse et pas du jersey. Par contre M2 est juste puisqu'on tricote en aller retour.
02.06.2017 - 14:22DROPS Design answered:
Bonjour Mme Picard, les diagrammes sont justes, 1 case blanche dans les diagrammes se tricote en jersey endroit (soit tout à l'endroit quand on tricote en rond, soit à l'end sur l'endroit et à l'envers sur l'envers quand on tricote en allers et retours). Bon tricot!
02.06.2017 - 16:08
![]() Audooren Myriam wrote:
Audooren Myriam wrote:
Oke ik was bang dat ik er tekort zou hebben door die opmerking die voor mij staat Grt Myriam
25.01.2017 - 18:26
![]() Audooren Myriam wrote:
Audooren Myriam wrote:
Hoe veel wol zou ik nodig hebben voor model 137-6 maat XL
25.01.2017 - 13:26DROPS Design answered:
Hoi Myriam. Kijk aan het hoofd van het patroon: Maat: S - M - L - XL - XXL - XXXL Materiaal: DROPS MUSKAT van Garnstudio 450-500-550-600-650-700 gr. kleur nr. 10, perzik
25.01.2017 - 13:59
![]() Elizabeth Fasol wrote:
Elizabeth Fasol wrote:
Ja mijn stekenverhouding was prima ik mask altijd eerst een proef vandaar dat het mij ook zo verbaasde.
07.08.2015 - 21:16
![]() Elizabeth Fasol wrote:
Elizabeth Fasol wrote:
Ik kocht voor dit vestje 700 gram muskat. Dat is voor de grootste maat. Ik heb de een na grootste maat. Ik had 14 bolletjes. Toen ik nog een voorpand en een mouw moest had ik volgens mijn berekening nig 6,5 bolletjes nodig. Ik heb nooit wol tekort. Echt nooit. Ik heb met de juiste naald gebreid. Als ik dit geweten had 21 bolletjes, dan had ik een ander patroon gekozen. Nu wordt het wel heel erg duur. Graag uw commentaar. Met vriendelijke groet Elizabet fasil 0652064911
02.08.2015 - 15:01DROPS Design answered:
Beste Elizabeth. Meer dan 1 kilo garen voor deze type vest maat XXXL is wel erg veel - ook in vergelijking met andere soortgelijke Muskatvesten op onze site. Ik vraag me af of u misschien iets verkeerds hebt gedaan en of uw stekenverhouding (zoals aangegeven in het patroon) klopt. Maar ik zal een bericht doorgeven aan ons Design team, zij beheren de patronen en maken aanpassingen als nodig.
03.08.2015 - 14:50
![]() Damaris wrote:
Damaris wrote:
Por favor podria decirme si los aumentos para e cuello los hago tambien por el lado revez ?
20.11.2014 - 03:18DROPS Design answered:
Hola Damaris. Los aumentos para el cuello se trabajan en las filas del LD (es decir cada 2ª fila). En la fila de vta los aumentos hechos en la fila anterior se trabajan como pt retorcido para evitar que se formen agujeros.
24.11.2014 - 12:15
![]() Benedetta wrote:
Benedetta wrote:
Buonasera, ho finito il davanti dx, ho cominciato il davanti sx al contrario del davanti dx ma non capisco come lavorare il diagramma M.2 , sempre da dx verso sx o come? Grazie per il vs aiuto
30.03.2014 - 22:17DROPS Design answered:
Buongiorno Benedetta. Anche per il davanti sinistro, il diagramma M.2 viene lavorato da destra verso sinistra. Ci riscriva se è ancora in difficoltà. Buon lavoro!
31.03.2014 - 13:58
![]() Benedetta wrote:
Benedetta wrote:
Scusate ho dimenticato di dirvi che in totale io ho eseguito 2 ripetizioni(8ferri in alto e 16 ferri in basso).grazie
22.03.2014 - 23:37DROPS Design answered:
Buongiorno Benedetta, dopo aver inserito i segnapunti, deve iniziare a lavorare a ferri accorciati e contemporaneamente iniziare le diminuzioni per gli scalfi. Dopo l'ultimo intreccio per lo scalfo deve lavorare a ferri accorciati fino a quando sono stati lavorati 6 f in alto vicino allo scalfo. Ci riscriva se non è chiaro. Buon lavoro!!
23.03.2014 - 13:08
|
|||||||||||||||||||
Miss Sophie#misssophiecardigan |
|||||||||||||||||||
 |
 |
||||||||||||||||||
Knitted DROPS jacket in ”Muskat” with square on the back, lace pattern and ¾ sleeves. Size: S - XXXL
DROPS 137-6 |
|||||||||||||||||||
|
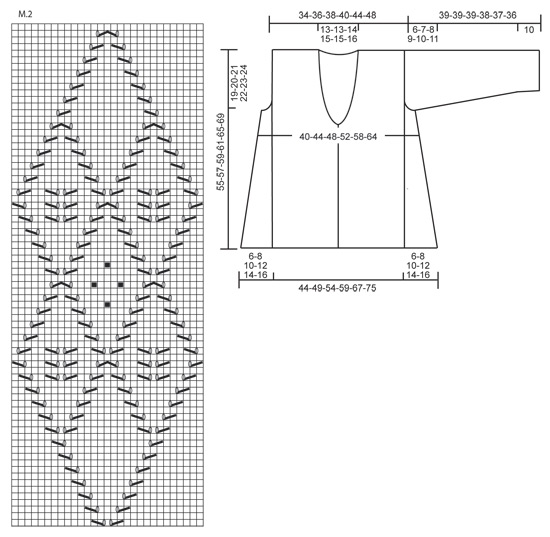
PATTERN: See diagrams M.1 and M.2. Diagrams show pattern from RS. GARTER ST (back and forth on needle): K all rows. SHORT ROWS (applies to side piece): Beg from bottom edge and work as follows: * Work until 1st marker, turn and work back, work 2 rows over all sts, work until 2nd marker, turn and work back, work 2 rows over all sts *, repeat from *-*. I.e. 1 repetition = 4 rows at the top and 8 rows at the bottom. BUTTON HOLES: Bind off for 3 button holes from RS on right band. 1 button hole = bind off fourth st from mid front and cast on 1 new st on next row over this st. Bind off for button holes when piece measures: SIZE S: 15, 22 and 29 cm / 6", 8¾" and 11⅜" SIZE M: 16, 23 and 30 cm / 6¼", 9" and 11¾" SIZE L: 17, 24 and 31 cm / 6¾", 9½" and 12¼" SIZE XL: 18, 25 and 32 cm / 7", 9¾" and 12½" SIZE XXL: 18, 26 and 34 cm / 7", 10¼" and 13⅜". SIZE XXXL: 20, 28 and 36 cm / 8", 11" and 14¼" DECREASE TIP (applies to neck dec at the front): All dec are done from RS inside all sts in garter st (= band + the inc sts for collar). RIGHT FRONT PIECE: Dec as follows after all sts in garter st: Slip 1 st as if to K, K 1, psso. LEFT FRONT PIECE: Dec as follows when 2 sts in stockinette st remain before all sts in garter st: K 2 tog. -------------------------------------------------------- JACKET: First worked in a square in the round, then worked down the back piece and outwards in the sides. Then work front piece and the sleeves. BACK PIECE: Cast on 8 sts with Muskat and divide them on 4 double pointed needles size 4 mm / US 6 (= 2 sts on every needle). Insert a marker at the beg of the round. Then work diagram M.1 = 4 repetitions in the round. Switch to circular needle when needed. REMEMBER THE GAUGE! When diagram M.1 has been worked, there are 264 sts on needle. Continue in the round in stockinette st and with inc in every corner as before until there are 272-288-304-320-352-384 sts on needle, work 1 round after last inc. Work next round as follows (all sizes): K 41-45-49-53-61-69 and then slip them on stitch holder 1 (= towards right side), bind off the next 28 sts (= armhole), K 67-71-75-79-87-95 and then slip them on stitch holder 2 (= up towards neck), bind off the next 28 sts (= armhole), K 41-45-49-53-61-69 and slip them on stitch holder 3 (= towards left side). 67-71-75-79-87-95 sts remain on needle, cast on 1 new st in each side (= edge st). NOW MEASURE PIECE FROM HERE! Work in stockinette st back and forth with 1 edge st in each side in GARTER ST – see explanation above – for 18 cm / 7" (= down the back piece). Switch to circular needle size 3.5 mm / US 4 and work 6 rows in garter st. Then LOOSELY bind off. Piece measures approx. 53-55-57-59-63-67 cm / 21"-21⅝"-22½"-23¼"-24¾"-26⅜". BACK PIECE – upwards: Slip the 67-71-75-79-87-95 sts from stitch holder 2 (= up towards neck) on circular needle size 4 mm / US 6 and work as follows (1st row = RS): 22-24-25-27-30-34 sts in stockinette st, bind off the next 23-23-25-25-27-27 sts for neck and work in stockinette st the rest of row (= 22-24-25-27-30-34 sts). Finish each shoulder separately in stockinette st. Continue to bind off 1 st on next row towards the neck = 21-23-24-26-29-33 sts remain on the shoulder. When a total of 5 rows have been worked after sts were slipped back on needle, bind off with P from WS. The entire back piece measures approx. 55-57-59-61-65-69 cm / 21⅝"-22½"-23¼"-24"-25½"-27⅛". RIGHT SIDE PIECE: Pick up 40 sts on circular needle size 3.5 mm / US 4 inside edge st along the right side of the section in stockinette st at the bottom of back piece, then work the 41-45-49-53-61-69 sts from stitch holder 1 back on needle = 81-85-89-93-101-109 sts. Turn and K 1 row from WS – AT THE SAME TIME bind off the first 2 sts (= towards armhole). Insert 2 markers in the piece as follows from RS: 1st marker after 25-25-26-27-27-28 sts and 2nd marker after a total of 50-50-52-54-54-56 sts (insert markers without working the row). READ ALL OF THE FOLLOWING SECTION BEFORE CONTINUING! Continue in garter st back and forth – while AT THE SAME TIME working SHORT ROWS – see explanation above! ARMHOLES: At the same time bind off at beg of all rows beg from armhole: 2 sts 2-2-2-2-3-3 more times and then 1 st 2-4-6-8-8-10 times. 73-75-77-79-85-91 sts remain on needle. Continue with short rows until 6-6-6-8-8-10 rows have been worked at the top by armhole after last bind off. On next row worked from bottom edge, cast on 1 new st at the end of row towards armhole, repeat inc at the end of every row towards armhole 1-3-5-7-7-9 more times, then cast on 2 sts 3-3-3-3-4-4 times. 81-85-89-93-101-109 sts now remain on needle and side piece measures approx. 6-8-10-12-14-16 cm / 2⅜"-3⅛"-4"-4¾"-5½"-6¼" at the top (and approx. 12-16-20-24-28-32 cm / 4¾"-6¼"-8"-9½"-11"-12½" at the bottom). LOOSELY bind off all sts. LEFT SIDE PIECE: Work the 41-45-49-53-61-69 sts from stitch holder 3 on to circular needle size 3.5 mm / US 4, then pick up 40 sts down along left side of back piece inside 1 edge st = 81-85-89-93-101-109 sts. K 2 rows over all sts - at the same time on 2nd row beg bind off for armhole as on right side piece. On next row (i.e. from bottom edge) beg short rows (first insert markers as on right side). Continue as on right side piece. RIGHT FRONT PIECE: Cast on 41-43-45-47-51-55 sts (includes 6 band sts towards mid front and 1 edge st in the side) on needle size 3.5 mm / US 4 with Muskat. Work 6 rows in garter st. Switch to needle size 4 mm / US 6 and continue in stockinette st but with 6 band sts and 1 edge st in the side worked in garter st until finished measurements. When piece measures 11-12-12-13-13-14 cm / 4⅜"-4¾"-4¾"-5⅛"-5⅛"-5½", work as follows (beg from RS): 6 band sts in garter st, 2-3-4-5-7-9 sts in stockinette st, diagram M.2 (= 29 sts), 3-4-5-6-8-10 sts in stockinette st and 1 edge st in garter st. READ ALL OF THE FOLLOWING SECTION BEFORE CONTINUING! BUTTON HOLES: When piece measures 15-16-17-18-18-20 cm / 6"-6¼"-6¾"-7"-7"-8", bind off for BUTTON HOLES - see explanation above. COLLAR: At the same time when piece measures 28-29-30-31-33-35 cm / 11"-11⅜"-11¾"-12¼"-13"-13¾", beg to inc for collar. Inc inside outermost band st by making 1 YO. On next row K YO twisted to avoid holes. Repeat inc on every other row a total of 14 times and then on every 4th row 5 times (inc 19 sts in total, i.e. 25 sts in garter st incl 6 band sts after last inc). NECK DEC: At the same time when piece measures 31-32-33-34-36-38 cm / 12¼"-12½"-13"-13⅜"-14¼"-15", dec 1 st for neckline - SEE DECREASE TIP! Repeat dec every row from RS a total of 13-13-14-14-15-15 times. ARMHOLES: When piece measures 41-43-45-47-51-55 cm / 16⅛"-17"-17¾"-18½"-20"-21⅝", bind off 1 st in the side for armhole. After all inc and dec there are 46-48-49-51-54-58 sts on needle. When diagram M.2 has been worked, continue in stockinette st over these sts. Work until piece measures 55-57-59-61-65-69 cm / 21⅝"-22½"-23¼"-24"-25½"-27⅛" in total (adjust according to back piece). Now bind off the outermost 21-23-24-26-29-33 sts on the shoulder (bind off from WS to avoid cutting the yarn when continuing with collar), work the rest of row (= 25 sts remain). Continue in garter st over these sts as follows: * 2 rows in garter st over all sts, 2 rows in garter st over only the outermost 18 sts (i.e. towards mid front) *, repeat from *-* until collar measures approx. 7-7-7½-7½-8-8 cm / 2¾"-2¾"-2⅞"-2⅞"-3⅛"-3⅛" at the inside on the most narrow part (it will then measure the double at the edge). Putting the sts on a stitch holder now and sewing collar tog mid back with kitchener sts will look nicer, but you can also bind off and sew the collar tog with neat stitches. LEFT FRONT PIECE: Work as right front piece but reversed and without button holes. Bind off shoulder sts from RS. SLEEVE: Worked back and forth on circular needle. Cast on 52-54-56-60-62-66 sts (includes 1 edge st each side) on needle size 3.5 mm / US 4. Work 4 cm / 1½" in garter st. Switch to circular needle size 4 mm / US 6 and continue in stockinette st with 1 edge st in garter st in each side. When piece measures 10 cm / 4", inc 1 st in each side. Repeat inc every 2-2-1½-1½-1-1 cm / ¾"-¾"-½"-½"-⅜"-⅜" a total of 10-11-12-12-14-14 times = 72-76-80-84-90-94 sts. When piece measures 33-32-31-29-27-25 cm / 13"-12½"-12¼"-11⅜"-10⅝"-9¾" (shorter measurements in the larger sizes because of longer sleeve cap and broader shoulder width), bind off for sleeve cap at beg of every row in each side: 3 sts 1 time, then bind off 2 sts in each side until piece measures 38-38-38-37-36-35 cm / 15"-15"-15"-14½"-14¼"-13¾", finally bind off 3 sts 1 time in each side, then bind off the remaining sts. Sleeve measures approx. 39-39-39-38-37-36 cm / 15¼"-15¼"-15¼"-14½"-14¼". ASSEMBLY: Sew the shoulder seams. Sew the 2 collar parts tog mid back by using either kitchener sts or neat stitches and sew on to back piece. Sew front piece to the edge pieces in garter st - sew inside 1 edge st on front piece and inside bind off edge on edge piece. Sew sleeve seams inside 1 edge st and sew in the sleeves. Sew on buttons. |
|||||||||||||||||||
Diagram explanations |
|||||||||||||||||||
|
|||||||||||||||||||
 |
|||||||||||||||||||
 |
|||||||||||||||||||
Have you finished this pattern?Tag your pictures with #dropspattern #misssophiecardigan or submit them to the #dropsfan gallery. Do you need help with this pattern?You'll find 25 tutorial videos, a Comments/Questions area and more by visiting the pattern on garnstudio.com. © 1982-2026 DROPS Design A/S. We reserve all rights. This document, including all its sub-sections, has copyrights. Read more about what you can do with our patterns at the bottom of each pattern on our site. |
|||||||||||||||||||


With over 40 years in knitting and crochet design, DROPS Design offers one of the most extensive collections of free patterns on the internet - translated to 17 languages. As of today we count 324 catalogs and 12210 patterns - 12200 of which are translated into English (US/in).
We work hard to bring you the best knitting and crochet have to offer, inspiration and advice as well as great quality yarns at incredible prices! Would you like to use our patterns for other than personal use? You can read what you are allowed to do in the Copyright text at the bottom of all our patterns. Happy crafting!
Post a comment to pattern DROPS 137-6
We would love to hear what you have to say about this pattern!
If you want to leave a question, please make sure you select the correct category in the form below, to speed up the answering process. Required fields are marked *.