
Popular categories
Looking for a yarn?


Comments / Questions (84)
![]() Angela wrote:
Angela wrote:
Buongiorno. Sulla spiegazione c'è scritto che gli aumenti vanno fatti ogni due ferri e in contemporanea lavorare i ferri accorciati. Come faccio a contare i due ferri lavorati per fare gli aumenti? Grazie
08.07.2025 - 10:03DROPS Design answered:
Buonasera Angela, può aiutarsi con uno schema cartaceo in cui tenere traccia del aumenti e dei ferri accorciati. Buon lavoro!
20.07.2025 - 17:21
![]() Martha wrote:
Martha wrote:
Hallo zusammen. Bin etwas irritiert. Bei der 2ten verkürzten Reihe steht am Ende „ unten 12 Reihen und oben 2 Reihen per Rapport „ Mit der vierten Markierung komme ich immer auf 4 Reihen per Rapport. Hänge jetzt fest. Denke ich vielleicht verkehrt ? Für Hilfe wäre ich sooo dankbar. Das ist eine so wunderschöne, Zeitlose Weste. LG
14.03.2023 - 09:31DROPS Design answered:
Liebe Martha, nach 4. Markierung bis zur Ende der Reihe sind es nur 2 Reihen: 2 R bis 1. Mark. + 2 R bis 2. Mark + 2 R bis 3. Mark + 2 R bis 1. Mark + 2 R bis 4. Mark + 2 R über alle M = 12 R und nur 2 nach 4. Mark. kann das Ihnen helfen?
14.03.2023 - 10:20
![]() Ada wrote:
Ada wrote:
Klopt het dat in de 2e naald de laatste 8 steken niet gebreid moeten worden? En in de 4e, 6e, enz. ook niet?
22.07.2021 - 14:50
![]() Brigitte Gradl wrote:
Brigitte Gradl wrote:
Hallo, wie kann ich das Muster für Socken stricken, da es ja keine Rückreihe gibt
15.06.2021 - 09:15DROPS Design answered:
Liebe Grau Gradl, wenn Sie das Muster M.1 in der Runde stricken möchten, dann stricken Sie die Maschen, wie Sie bei den Hinreihen aussehen sollen, dh alle Kästchen werden rechts gestrickt, die mit dem schwarzen Quadrat werden links gestrickt. Viel Spaß beim stricken!
15.06.2021 - 13:23
![]() Miriam Van Hoorn wrote:
Miriam Van Hoorn wrote:
Ik ben net begonnen aan dit patroon. Ik vind het heel mooi. Ik denk dat t ook mooi staat. Mijn vraag is de volgende. Hoe vaak moet ik de verkorte naalden breien? Moet ik dat steeds elke keer dat ik onderaan het patroon ben herhalen of alleen 1 x als het genoemd wordt dus 1x verkorte naalden 1 en 1x verkorte naalden 2?
03.06.2015 - 23:06DROPS Design answered:
Hoi Miriam. Je breit steeds de verkorte toeren over het hele patroon. Enige wissel is van verkorte toeren 1 naar 2 en terug naar 1.
04.06.2015 - 13:27
![]() Barcelo wrote:
Barcelo wrote:
Bordure fantaisie rang 5 compte 18 mailles,je n'en compte que 17 pouvez-vous m'éclairer Bien merci
01.08.2013 - 10:32DROPS Design answered:
Bonjour Mme Barcelo, le rang 5 a bien 18 m : 3 m end, 1 jeté, 2 m ens à l'env, 1 jeté, 2 m ens à l'env, 1 jeté, 1 m torse à l'end, 1 jeté, 2 m ens à l'end, 1 m env, 2 m ens torse à l'end, 1 jeté, 4 m end (= 18 m). Bon tricot !
01.08.2013 - 10:56Elsa Ruiz wrote:
Hermoso modelo, será uno de mis p´róximos proyectos
29.12.2012 - 21:45
![]() Clary wrote:
Clary wrote:
Combien de série de rangs raccourcis?ce n'est pas clair
13.11.2012 - 14:10DROPS Design answered:
Bonjour Clary, les rangs raccourcis 1 se tricotent jusqu'à ce que vous ayez fait 8 augmentations. Les rangs raccourcis 2 se répètent ensuite jusqu'à la fin du devant gauche où on reprend les rangs raccourcis 1. Bon tricot !
13.11.2012 - 14:22
![]() Lena Mörk wrote:
Lena Mörk wrote:
Ska vändningarna göras hela koftan? Eller bara två gånger? Lena
15.08.2012 - 14:57DROPS Design answered:
Hej, du gör vändingarna runt hela koftan! Lycka till!
16.08.2012 - 15:43
![]() Lena Mörk wrote:
Lena Mörk wrote:
Ska vändningarna göras hela koftan? Eller bara två gånger? Lena
14.08.2012 - 18:57
|
|||||||||||||||||||||||||
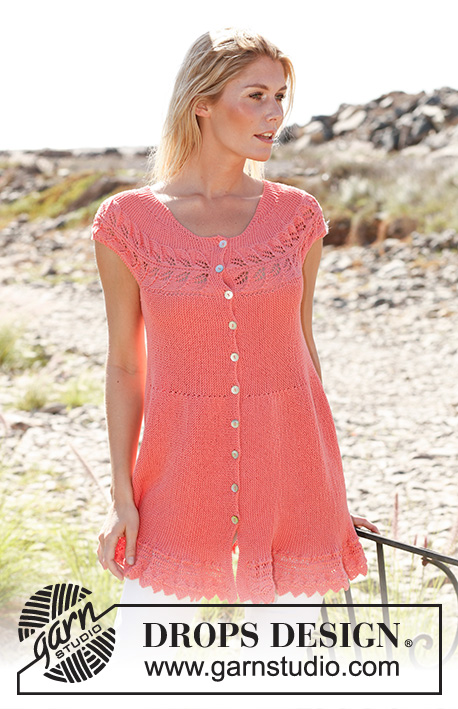
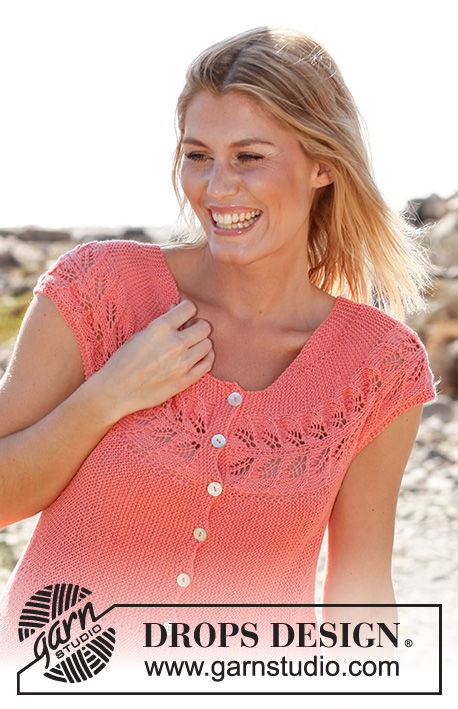
Peach Melba#peachmelbatunic |
|||||||||||||||||||||||||
 |
 |
||||||||||||||||||||||||
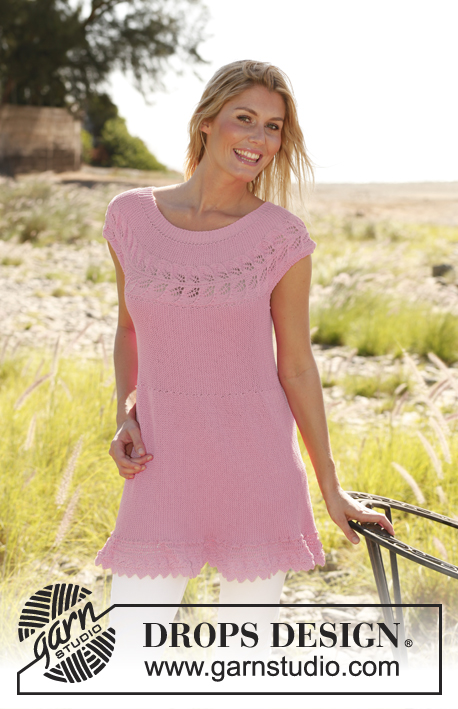
Knitted DROPS tunic worked sideways in garter st with lace pattern and buttons at the front in ”Safran”. Size: S - XXXL
DROPS 139-3 |
|||||||||||||||||||||||||
|
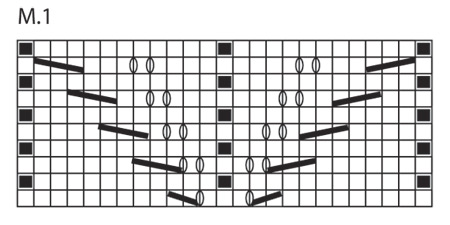
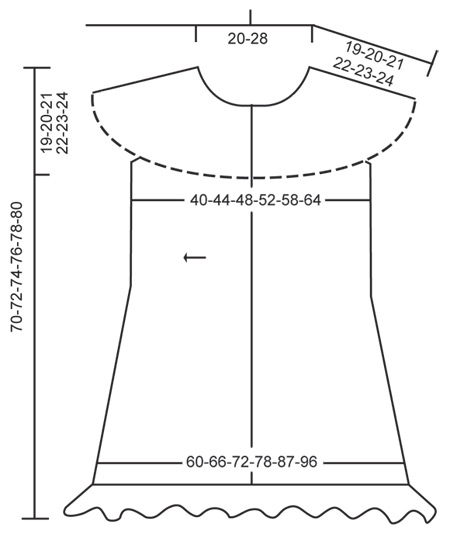
EDGE PATTERN: ROW 1 (= RS): K 3, 1 YO, P 2 tog, 1 YO, P 2 tog, 1 YO, K 1 twisted (i.e. work in back loop of st instead of front), K 2 tog, P 1, K 2 twisted tog, K 1 twisted, 1 YO, K 3 (= 17 sts). ROW 2 (= WS): K 3, P 3, K 1, P 3, K 2, 1 YO, P 2 tog, 1 YO, P 2 tog, K 1 (= 17 sts). ROW 3-4: Work as 1st and 2nd row. ROW 5: K 3, 1 YO, P 2 tog, 1 YO, P 2 tog, 1 YO, K 1 twisted, 1 YO, K 2 tog, P 1, K 2 twisted tog, 1 YO, K 4 (= 18 sts). ROW 6: K 4, P 2, K 1, P 4, K 2, 1 YO, P 2 tog, 1 YO, P 2 tog, K 1 (= 18 sts). ROW 7: K 3, 1 YO, P 2 tog, 1 YO, P 2 tog, 1 YO, K 1 twisted, K 1, K 1 twisted, 1 YO, slip 1 st as if to K, K 2 tog, psso, 1 YO, K 5 (= 19 sts). ROW 8: K 5, P 7, K 2, 1 YO, P 2 tog, 1 YO, P 2 tog, K 1 (= 19 sts). ROW 9: K 3, 1 YO, P 2 tog, 1 YO, P 2 tog, 1 YO, K 1 twisted, K 3, K 1 twisted, 1 YO, K 7 (= 21 sts). ROW 10: bind off 4 sts (1 st is now on right needle), K 2, P 7, K 2, 1 YO, P 2 tog, 1 YO, P 2 tog, K 1 (= 17 sts). REPEAT THESE 10 ROWS. LACE PATTERN: See diagram M.1, diagram shows pattern from RS. GARTER ST (back and forth on needle): K all rows. 1 ridge = 2 K rows. SHORT ROWS 1: Work 1st row from bottom edge (= from WS): * Work until 1st marker, turn, work back, work until 2nd marker, turn, work back, work until 3rd marker, turn, work back, work until 1st marker, turn, work back, work 2 rows over all sts. * Repeat from *-*, i.e. 10 rows at the bottom and 2 rows at the top in 1 repetition. SHORT ROWS 2: Work 1st row from bottom edge (= from WS): * Work until 1st marker, turn, work back, work until 2nd marker, turn, work back, work until 3rd marker, turn, work back, work until 1st marker, turn, work back, work until 4th marker, turn and work back, work 2 rows over all sts. * Repeat from *-*, i.e. 12 rows at the bottom and 2 rows at the top in 1 repetition. -------------------------------------------------------- TUNIC: Worked sideways from mid front – work from right front band and around. Worked back and forth on a circular needle to make room for all the sts. NOTE: THE PICTURE HAS BEEN MIRRORED IN THE CATALOG! LOOSELY cast on 149-154-158-163-168-173 sts on circular needle size 3 mm / US 2or3. K 3 rows over all sts (1st row = WS). Work next row as follows from the top (= RS): K 3, * K 2 tog, make 1 YO, K 11-11-11-12-12-12 *, repeat from *-* a total of 9 times, K 2 tog, make 1 YO and K the remaining 27-32-36-32-37-42 sts (= 10 button holes). Then K 5 rows back and forth over all sts. Work next row as follows from the top (= RS): 4-6-7-9-11-13 sts in GARTER ST – see explanation above, diagram M.1 (= 25 sts), 103-106-109-112-115-118 sts in garter st and then EDGE PATTERN over the last 17 sts - see explanation above. Work next row as follows from bottom edge (= WS) at the same time insert 3 markers in the piece as follows: Edge pattern over the first 17 sts, insert 1st marker, work 65-65-67-67-69-69 sts in garter st, insert 2nd marker, work 38-41-42-45-46-49 sts in garter st, insert 3rd marker, work diagram M.1 and work the last 4-6-7-9-11-13 sts in garter st. Turn and work back in garter st and pattern as on previous row. Continue the pattern like this – AT THE SAME TIME work SHORT ROWS 1, beg from WS – see explanation above! When piece measures 3 cm / 1⅛" at the top by neck (measured from cast on edge when piece is flat), inc 1 st on next row towards neck by making 1 YO inside the 2 upper sts. On next row K YO twisted to avoid holes. Repeat inc every other row a total of 9 times and then on every 4th row 3 times. AT THE SAME TIME after 8 inc, insert a new marker after 4 sts from the top (= 4th marker). Then work SHORT ROWS 2. After all inc, there are 8 sts after last marker at the top and 161-166-170-175-180-185 sts in total (after 1 whole repetition of Edge pattern). When piece measures approx. 21-22-24-25-28-30 cm / 8¼"-8¾"-9½"-9¾"-11"-11¾" measured between 2nd and 3rd marker – measured from cast on edge and out to needle (adjust after 1 whole repetition with short rows), work next row as follows from WS: Work until 3-3-4-4-5-5 sts remain before 3rd marker (44-46-48-50-53-55 sts should remain), slip the sts just worked on a stitch holder. Work the row as before, turn and work back as before over the 44-46-48-50-53-55 sts. Then work back and forth over only the sts on the needle (= right sleeve). RIGHT SLEEVE: Work pattern and in garter st as before with short rows as follows: * Work until 3rd marker (= 3-3-4-4-5-5 sts), turn and work back, work until 4th marker, turn and work back, work 2 rows over all sts *, repeat from *-* until sleeve measures approx. 26-28-30-32-34-36 cm / 10¼"-11"-11¾"-12½"-13⅜"-14¼" in bottom edge - finish after 1 row from RS. Slip the sts on a stitch holder. RIGHT SIDE PIECE: Slip sts from the first stitch holder back on needle and work 1 row from RS as before. Then work pattern as before and short rows as follows: * Work until 1st marker, turn and work back, work until 2nd marker, turn and work back, work 2 rows over all sts *, repeat from *-* until piece measures 2-4-4-6-6-8 cm / ¾"-1½"-1½"-2⅜"-2⅜"-3⅛" at the top under the sleeve - stop after 1 row from RS over all sts. BACK: Work all sts on needle + sts from stitch holder back on circular needle (this row is worked from WS without short rows). NOW MEASURE PIECE FROM HERE! Work 1 row back from RS with pattern as before. Then continue with pattern, in garter st and short rows 2 as before until piece measures 38-40-44-46-52-56 cm / 15"-15¾"-17¼"-18"-20½"-22" measured between 2nd and 3rd marker (adjust after 1 whole repetition with short rows). Now work next row from WS as follows: Work until 3-3-4-4-5-5 sts remain before 3rd marker, 44-46-48-50-53-55 sts should remain, slip the sts just worked on a stitch holder. Work the row as before, turn and work back as before over the 44-46-48-50-53-55 sts. Then work back and forth over only the sts on the needle (= left sleeve). LEFT SLEEVE: Work as right sleeve. LEFT SIDE PIECE: Work as right side piece. LEFT FRONT PIECE: Work all sts on needle + sts from stitch holder back on needle. NOW MEASURE PIECE FROM HERE! Then continue with pattern, in garter and short rows 2 as before. When piece measures 6 cm / 2⅜" measured between 2nd and 3rd marker, beg dec at the top of neck. Dec on next row from RS by K tog 2nd and 3rd st from the top. Repeat dec every 4th row 2 times and then on every other row 9 times. AT THE SAME TIME after 4 dec, end the SHORT ROWS 1 (remove 4th marker). When all dec are done, 149-154-158-163-168-173 sts remain on needle (after 1 whole repetition of Edge pattern). Work until piece measures approx. 19-20-22-23-26-28 cm / 7½"-8"-8¾"-9"-10¼"-11" measured between 2nd and 3rd marker (stop after 1 full repetition of Edge pattern and preferably also a full diagram M.1 if that fits). Then K 9 rows over all sts for front band. Then LOOSELY bind off from WS - it is very important to avoid a tight bind off edge - if it is tight, the garment will not hang nicely. ASSEMBLY: Sew on buttons. |
|||||||||||||||||||||||||
Diagram explanations |
|||||||||||||||||||||||||
|
|||||||||||||||||||||||||
 |
|||||||||||||||||||||||||
 |
|||||||||||||||||||||||||
Have you finished this pattern?Tag your pictures with #dropspattern #peachmelbatunic or submit them to the #dropsfan gallery. Do you need help with this pattern?You'll find 16 tutorial videos, a Comments/Questions area and more by visiting the pattern on garnstudio.com. © 1982-2026 DROPS Design A/S. We reserve all rights. This document, including all its sub-sections, has copyrights. Read more about what you can do with our patterns at the bottom of each pattern on our site. |
|||||||||||||||||||||||||


With over 40 years in knitting and crochet design, DROPS Design offers one of the most extensive collections of free patterns on the internet - translated to 17 languages. As of today we count 324 catalogs and 12290 patterns - 12280 of which are translated into English (US/in).
We work hard to bring you the best knitting and crochet have to offer, inspiration and advice as well as great quality yarns at incredible prices! Would you like to use our patterns for other than personal use? You can read what you are allowed to do in the Copyright text at the bottom of all our patterns. Happy crafting!
Post a comment to pattern DROPS 139-3
We would love to hear what you have to say about this pattern!
If you want to leave a question, please make sure you select the correct category in the form below, to speed up the answering process. Required fields are marked *.