
Popular categories
Looking for a yarn?


Comments / Questions (50)
![]() Aline Poppe wrote:
Aline Poppe wrote:
Het telpatroon m1 is me onduidelijk. Is er een videootje van? Met vriendelijke groeten. Aline
24.03.2026 - 15:10DROPS Design answered:
Dag Aline,
Er is helaas geen video van specifiek dit telpatroon. Je breit heen en weer waarbij je de eerste naald en alle oneven naalden van het telpatroon aan de goede kant breit. De even naalden brei je aan de verkeerde kant, deze naalden brei je dus recht aan de verkeerde kant. Je hebt dichte en open rondjes in het telpatroon. Dit zijn omslagen die je tussen 2 steken maakt. Het dichte/zwarte rondje zijn 2 omslagen, het open rondje staat voor 1 omslag. Op de volgende naald (dus op de verkeerde kant) laat je de omslagen van de naald af glijden.
25.03.2026 - 16:14
![]() Charlotte Frost wrote:
Charlotte Frost wrote:
Ved ikke om det er mig der er dum, men hvordan bliver mønsteret forskudt
07.07.2024 - 14:38
![]() Bugnon Elisabeth wrote:
Bugnon Elisabeth wrote:
Merci pour votre réponse. Je comprends bien cette impossibilité. Je vais chercher parmi vos modèles, une forme similaire que je pourrais adapter. Bonne journée et meilleures salutations.
09.12.2020 - 12:38
![]() Bugnon Elisabeth wrote:
Bugnon Elisabeth wrote:
Bonsoir, j'ai encore une question au sujet du pull Drops 137-28. Je le fais pour ma fille en taille M. Elle m'a demandé de le rallonger de 10cm , ce qui ne me pose pas de problème normalement, mais elle aimerait aussi des manches plus longues. A la place d'une longueur totale de 105cm (taille M) elle aimerait 140cm. Comment puis-je faire pour avoir des manches correctes? Merci et bonne soirée!
08.12.2020 - 20:00DROPS Design answered:
Bonjour Mme Bugnon, nous ne sommes malheureusement pas en mesure de pouvoir adapter chacun de nos modèles à chaque demande, merci pour votre compréhension. N'hésitez pas à vous adresser à votre magasin et/ou à un forum spécialisé. Bon tricot!
09.12.2020 - 06:55
![]() Bugnon Elisabeth wrote:
Bugnon Elisabeth wrote:
Merci pour votre réponse!
04.12.2020 - 11:22
![]() Bugnon Elisabeth wrote:
Bugnon Elisabeth wrote:
Bonjour, je vais commencer le pull DROPS 137-28 et je lis sur le diagramme: ...1 jeté entre 2 mailles et 2 jetés entre 2 mailles. Par contre, dans le tutoriel, vous faites 2 jetés entre 2 mailles et 3 jetés entre 2 mailles. Je veux juste être sûre de faire juste! merci de me préciser ceci.
03.12.2020 - 18:30DROPS Design answered:
Bonjour Mme Bugnon, la vidéo montre la technique de ce type de point, autrement dit, il s'agit ici une autre façon de tricoter ce genre de point avec des jetés que l'on lâche au rang suivant, suivez bien les indications du diagramme: *3 m end, 1 jeté, 1 m end, 2 jetés, 1 m end, 2 jetés, 1 m end, 1 jeté, 2 m end* et répétez de *-* au 3ème rang. Bon tricot!
04.12.2020 - 07:33
![]() Irena wrote:
Irena wrote:
Nie rozumiem końcówki opisu wykonania ramienia (rozmiar L). „ Kiedy schemat M1 zostanie wykonany 18 razy na wysokość, przer. ściegiem francuskim przez wszystkie o. do końca”. Skoro do końca przerabiamy robótkę ściegiem francuskim, to dlaczego na końcu w opisie jest informacja: „ W sumie zostało wykonanych 19 powtórzeń na wysokość”?
04.05.2018 - 16:02DROPS Design answered:
Witaj Ireno, faktycznie to jest nielogiczne. Moim zdaniem w rozmiarze L będzie 18 powtórzeń wg schematu M1 na wysokość, a dalej tylko ścieg francuski. Jeszcze to sprawdzę, jeśli się to potwierdzi naniesiemy korektę do wzoru. Dziękuję za zwrócenie uwagi. Pozdrawiam
05.05.2018 - 10:40
![]() Cindy wrote:
Cindy wrote:
Ich hab zwar erst das gute stück angefangen mit stricken aber mir kommt es irgendwie klein vor. Ich habe eigentlich XS und stricke daher die S, weil ich es doch etwas weiter mag. Fällt es klein aus????
27.07.2017 - 20:45DROPS Design answered:
Liebe Cindy, alle Maßen für jede Größe finden Sie in der Schnittübersicht dargestellt, wenn Ihre Maschenprobe stimmt (dh hier 16 M. x 26 R. in M1 gestrickt (20 M. x 26 R. glatt) ) dann haben Sie die richtigen Größe. Viel Spaß beim stricken!
28.07.2017 - 08:22
![]() Jennie Nybro wrote:
Jennie Nybro wrote:
När man maskar av för halsen så maskar man ju hela tiden av från rätsidan. Så när man stickat M1 16 gånger och ska börja maska av i början av varje varv från avigsidan, är det alltså längst ut på ärmen man maskar av då, inte mot halsringningen?
10.05.2017 - 19:38DROPS Design answered:
Hej Jennie, Ja det stämmer, du börjar maska av längst ut på ärmen, så den blir smalare ytterst mot handen.
11.05.2017 - 11:51
![]() Marije wrote:
Marije wrote:
Dit is het eerste project (op een paar sjaals na) wat ik heb afgerond. Kun je de trui gelijk dragen? Of moet deze eerst gewassen of behandeld worden met een of ander spulletje? Ik heb iemand wel eens horen zeggen dat je breiwerk eerst moet wassen om de vorm te behouden. Klopt dat?
16.06.2014 - 09:50DROPS Design answered:
Hoi Marije. Je kan de trui wassen volgens de wasvoorschrift van jouw gekozen garen.
16.06.2014 - 16:46
|
|||||||||||||
White Bird#whitebirdsweater |
|||||||||||||
 |
 |
||||||||||||
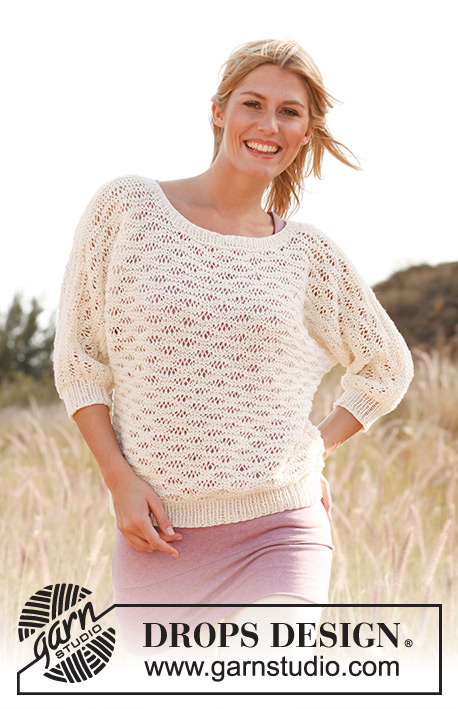
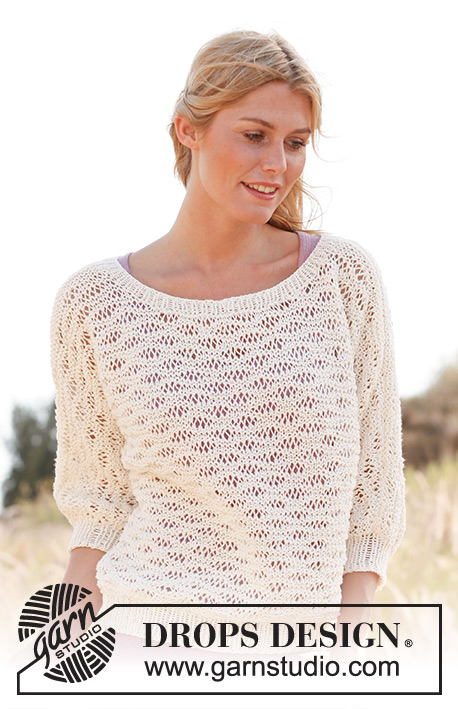
Knitted DROPS jumper with lace pattern in ”Bomull-Lin”. Size S-XXXL
DROPS 137-28 |
|||||||||||||
|
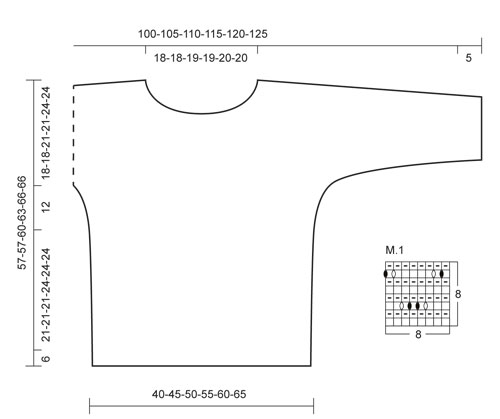
GARTER ST (back and forth on needle): K all rows. PATTERN: See diagram M.1. The diagram shows the pattern from RS. NOTE: The YOs are not worked on return row but slipped off the needle to make holes. ---------------------------------------------------------- BACK PIECE: Worked back and forth on circular needle. Cast on 80-88-96-106-114-122 sts with Bomull-Lin on circular needle size 4 mm / US 6. Work 1st row from RS as follows: 1 edge st in garter st - See explanation above, * K 1, P 1 *, repeat from *-*, 1 edge st in garter st. Work rib like this for 6 cm / 2⅜". On next row from RS, switch to circular needle size 4.5 mm / US 7 and work diagram M.1 with 1 edge st in garter st in each side - AT THE SAME TIME on 1st row dec 14-14-14-16-16-16 sts evenly = 66-74-82-90-98-106 sts (= 8-9-10-11-12-13 repetitions of diagram M.1 + 1 edge st in garter st in each side). REMEMBER THE GAUGE! When diagram M.1 has been worked 7-7-7-8-8-8 times vertically (piece measures approx. 27-27-27-30-30-30 cm / 10½"-10½"-10½"-11¾"-11¾"-11¾") cast on new sts for sleeves in each side as follows (beg from RS) – NOTE: Work the new sts in the pattern: Cast on 1 new st in each side on every 4th row (i.e. on every other row from RS) a total of 4 times, then cast on 2 new sts at the end of every row a total of 6 times in each side, then cast on 8 new sts at the end of the next 2 rows and finally 16 new sts at the end of the next 2 rows = 146-154-162-170-178-186 sts (= 40 new sts in each side, diagram M.1 has now been worked 11-11-11-12-12-12 times vertically and piece measures approx. 39-39-39-42-42-42 cm / 15¼"-15¼"-15¼"-16½"-16½"-16½"). Continue until M.1 has been worked 15-15-16-17-18-18 times vertically (piece measures approx. 51-51-54-57-60-60 cm / 20"-20"-21¼"-22½"-23½"-23½"). On next row from RS bind off the middle 22-22-24-24-26-26 sts for neck = 62-66-69-73-76-80 sts remain on each shoulder. Now finish each shoulder separately. RIGHT SHOULDER: bind off for neck at the beg of every row from RS as follows: bind off 3 sts 1 times, 2 sts 1 time, and 1 st 2 times = 55-59-62-66-69-73 sts. When diagram M.1 has been worked 16-16-17-18-19-19 times vertically (piece measures approx. 54-54-57-60-63-63 cm / 21¼"-21¼"-22½"-23½"-24¾"-24¾"), work in garter st over all sts until finished measurements – while AT THE SAME TIME binding off for diagonal shoulder at the beg of every row from WS as follows: 8-8-8-12-12-12 sts 2 times and then 8 sts 2 times = 23-27-30-26-29-33 sts remain on needle. Loosely bind off all sts on next row from RS (piece measures approx. 57-57-60-63-66-66 cm / 22½"-22½"-23½"-24¾"-26"-26"). LEFT SHOULDER: Work as right shoulder but reversed. FRONT PIECE: Work front piece the same way as back piece. ASSEMBLY: Graft/sew shoulder/sleeve seams from RS. SLEEVE EDGE: Worked back and forth on circular needle. Pick up from RS 50-50-60-60-70-70 sts along bottom edge on sleeve with circular needle size 4 mm / US 6. Work rib as follows: 1 edge st in garter st, * K 1, P 1 *, repeat from *-*, 1 edge st in garter st. Work rib for 5 cm / 2", loosely bind off all sts with K over K and P over P. ASSEMBLY: Sew side and under arm seams in one inside 1 edge st. NECK EDGE: The neck edge is worked in the round on circular needle size 4 mm / US 6 as follows: Beg mid back, pick up from RS approx. 100 - 110 sts inside 1 edge st around the neck. K next round while at the same time adjusting no of sts to 98-98-102-102-106-106. Then work rib (K 1/P 1) for approx. 2 cm / ¾", loosely bind off all sts with K over K and P over P. |
|||||||||||||
Diagram explanations |
|||||||||||||
|
|||||||||||||
 |
|||||||||||||
Have you finished this pattern?Tag your pictures with #dropspattern #whitebirdsweater or submit them to the #dropsfan gallery. Do you need help with this pattern?You'll find 15 tutorial videos, a Comments/Questions area and more by visiting the pattern on garnstudio.com. © 1982-2026 DROPS Design A/S. We reserve all rights. This document, including all its sub-sections, has copyrights. Read more about what you can do with our patterns at the bottom of each pattern on our site. |
|||||||||||||


With over 40 years in knitting and crochet design, DROPS Design offers one of the most extensive collections of free patterns on the internet - translated to 17 languages. As of today we count 324 catalogs and 12290 patterns - 12280 of which are translated into English (US/in).
We work hard to bring you the best knitting and crochet have to offer, inspiration and advice as well as great quality yarns at incredible prices! Would you like to use our patterns for other than personal use? You can read what you are allowed to do in the Copyright text at the bottom of all our patterns. Happy crafting!
Post a comment to pattern DROPS 137-28
We would love to hear what you have to say about this pattern!
If you want to leave a question, please make sure you select the correct category in the form below, to speed up the answering process. Required fields are marked *.